
Crochet car mirror charms have become an exceptionally popular branch of yarn crafting, turning vehicle interiors into customized personal spaces through handmade accessories. This practical tutorial details ten original crochet car mirror charm ideas that combine automotive safety standards with charming textile aesthetics. Handcrafted mirror ornaments allow makers to explore small-scale structural crocheting, miniature amigurumi shaping, plant imitation, and dynamic suspension cord engineering. Readers will learn essential stitch structures, compact stuffing practices, lightweight yarn selection, and adjustable lanyard installations that prevent driving obstructions while maintaining visual appeal. Creating personalized mirror accessories solves the common challenge of finding tasteful, non-distracting vehicle ornaments by keeping overall hanging dimensions, weight, and movement strictly controlled. Designing your own handmade mirror charms also presents cost-effective gift possibilities for new drivers, seasonal updates, and everyday creative practice without significant financial investments. Crafting these small automotive accents builds foundational proficiency in circular increasing, continuous spiral stitches, integrated cord loops, and neat finishing joins. The following sections break down necessary workshop tools, planning considerations, ten fully detailed project concepts, troubleshooting methods, and cabin styling techniques, guiding makers smoothly from raw skein to road-ready ornament.
Why This Idea Is Trending or Useful
Miniature automotive crochet charms hold a significant presence among trending ideas across visual inspiration platforms because they satisfy the desire for warm, personalized vehicle styling. Modern drivers frequently seek alternatives to generic plastic air fresheners and oversized novelty dice, preferring soft, artisanal pieces that bring tactile comfort to commuter spaces. Polymer fibers and natural cotton yarns absorb ambient vibrations, preventing irritating clicking noises against windshield glass during vehicle motion. This creative project offers strong DIY appeal because it requires minimal material yardage and works up quickly, letting crafters finish an entire project in a single evening. The straightforward structural nature of these designs makes them accessible for beginners seeking easy project wins that do not require complex apparel sizing or intensive multi-piece joins. Beyond purely decorative value, these miniature hangings can double as passive car scent diffusers when crafted with absorbent unfinished wood beads or natural fiber cores. By creating compact textile charms, makers introduce playful personality to modern vehicle interiors while mastering fundamental tension, assembly, and cord termination proficiencies.
Materials and Preparation
Proper workspace organization and accurate material selection are critical when fabricating miniature crochet charms designed for the dynamic environment of a moving car. Essential materials include size three light-worsted mercerized cotton yarn or sport-weight acrylic yarn, lightweight polyester fiberfill, unfinished natural wooden beads, and sturdy clasp findings. Ergonomic steel or aluminum crochet hooks ranging between 2.25 and 3.5 millimeters maintain the firm stitch tension needed to keep structural contours intact without interior stuffing escaping. Your tool collection should also include sharp detail embroidery scissors, blunt tapestry needles, locking stitch markers, and natural cotton twine or waxed cord. Thoughtful project planning requires assessing finished pendant dimensions to ensure the entire charm does not hang lower than ten centimeters or block the driver’s forward road vision. Thoroughly prepare your yarn by winding clean center-pull cakes, measuring out adequate lanyard cordage in advance, and checking your stitch tension on a miniature swatch prior to beginning your chosen pattern. Tight, consistent stitches remain the primary mechanical factor that preserves charm shape under continuous vehicle vibration and intense sun exposure.
1. Miniature Trailing Pothos Hanging Basket
Step-by-Step Guide
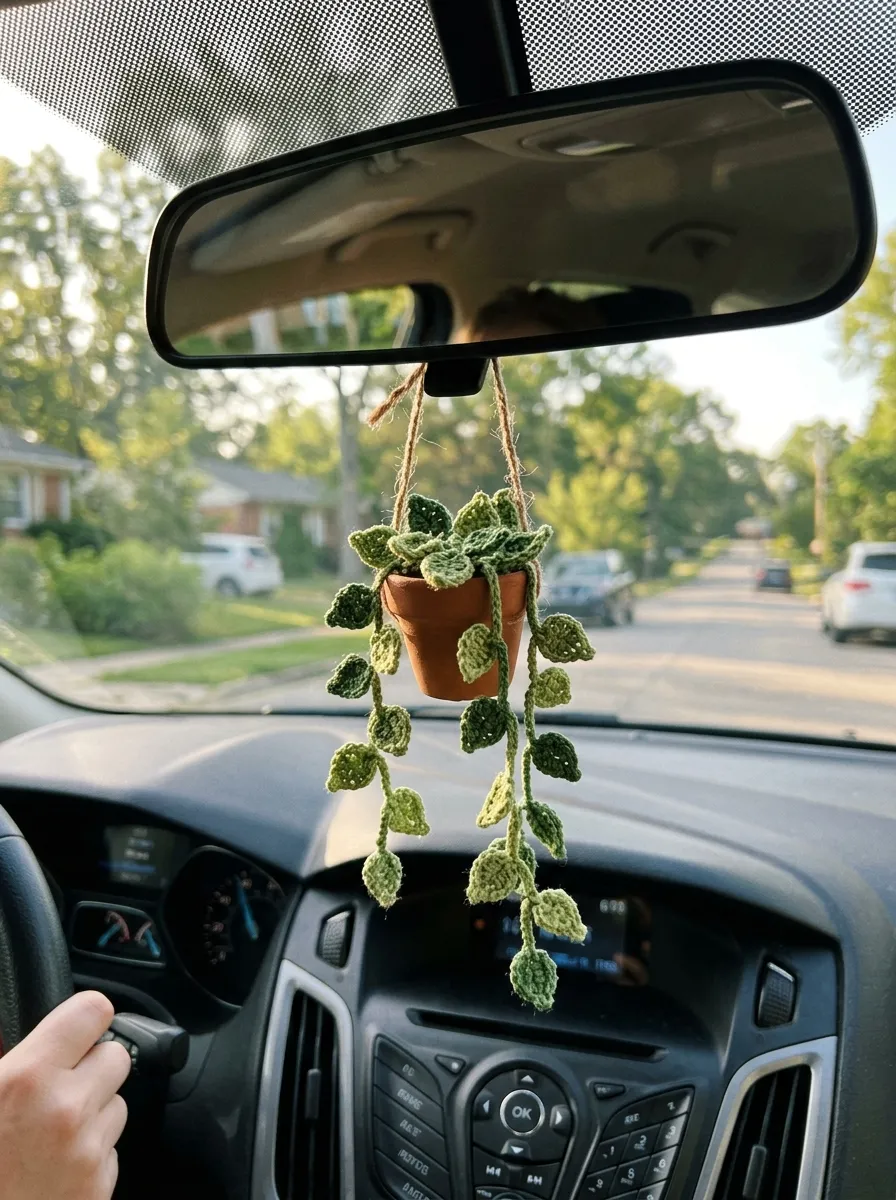
The miniature trailing pothos hanging basket brings soothing botanical aesthetics into the car interior, replicating a traditional hanging houseplant in a compact, lightweight format. This design features a small, conical terracotta-colored pot base filled with rich soil-colored yarn, from which multiple green leaf vines spill downward naturally. Mercarized cotton yarn in olive, moss, and warm clay gives the miniature plant crisp stitch clarity and authentic organic coloration. The key design balance lies in keeping the trailing vine tendrils short enough to prevent distracting swings during sudden turns or stops. The solid clay pot profile provides a stable base, while the varied lengths of the cascading leaves introduce lively visual depth. This build functions as an approachable beginner friendly project, introducing essential basket shaping, chain-stitch vine construction, and multi-tier lanyard knotting.
Begin by working six single crochet stitches into a magic adjustable ring using terracotta cotton yarn and a 2.5-millimeter hook, placing a locking stitch marker in the first stitch. Expand the circular base evenly over three rounds until reaching eighteen stitches, then work five straight rounds in back loops only to build the firm vertical walls of the miniature flower pot. Transition to dark brown yarn across the top opening, working two inward decrease rounds over a light pinch of polyester fiberfill to establish the clean soil base. Join forest green yarn to the top surface, chaining varying lengths between twelve and twenty stitches to form five distinct vine stems. Work back along each chain by combining slip stitches, single crochets, and picot stitches to shape miniature pointed leaf pairs along each stem. Finish the project by attaching three ten-centimeter cord segments symmetrically around the pot rim, braiding the strands together at the top to form a durable hanging loop for the mirror.
2. Minimalist Bohemian Sunburst Talisman

Read This:

Execution Process
The minimalist bohemian sunburst talisman utilizes balanced radial geometry, flat planar construction, and gentle fringe elements to produce a modern design suitable for neutral car interiors. This design relies on a solid circular core encircled by pointed, radiant sunbeam stitches, creating a clean celestial silhouette that sits flat against the rearview mirror post. A warm palette of unbleached linen, soft butterscotch, and mustard yellow complements the aesthetic preferences of modern drivers who favor understated interior decoration. Because this talisman is flat and unpadded, it avoids unnecessary bulk, remaining exceptionally stable without twisting erratically during acceleration or braking. The natural cotton fringe along the bottom adds gentle tactile texture without blocking outward visibility through the windshield glass. This project teaches fundamental circular flat-circle mechanics, decorative picot edging, and clean strand brushing methods.
Start by working eight single crochet stitches into a magic ring using unbleached ecru cotton yarn and a three-millimeter hook, joining the final stitch with a slip stitch. Increase by eight stitches evenly across the next three rounds to create a completely flat, dense circular medallion measuring five centimeters in diameter. Switch to mustard yellow yarn to work the radiant perimeter, repeating a sequence of one single crochet, one half double crochet, a chain-two picot, and a slip stitch around the entire border to build sixteen sharp sunbeams. Cut six five-centimeter strands of matching ecru yarn, looping them through the lower four stitches of the sunburst medallion using simple lark’s head knots to form a tidy fringe. Comb the fringe strands thoroughly using a fine wire pet brush or stiff comb, then trim the bottom edges into an even, clean chevron point. Chain forty stitches from the top ray of the sunburst to create a slender suspension cord, finishing the loop with a smooth unfinished natural wood bead.
3. Tiny Amigurumi Strawberry Swag
How to Create
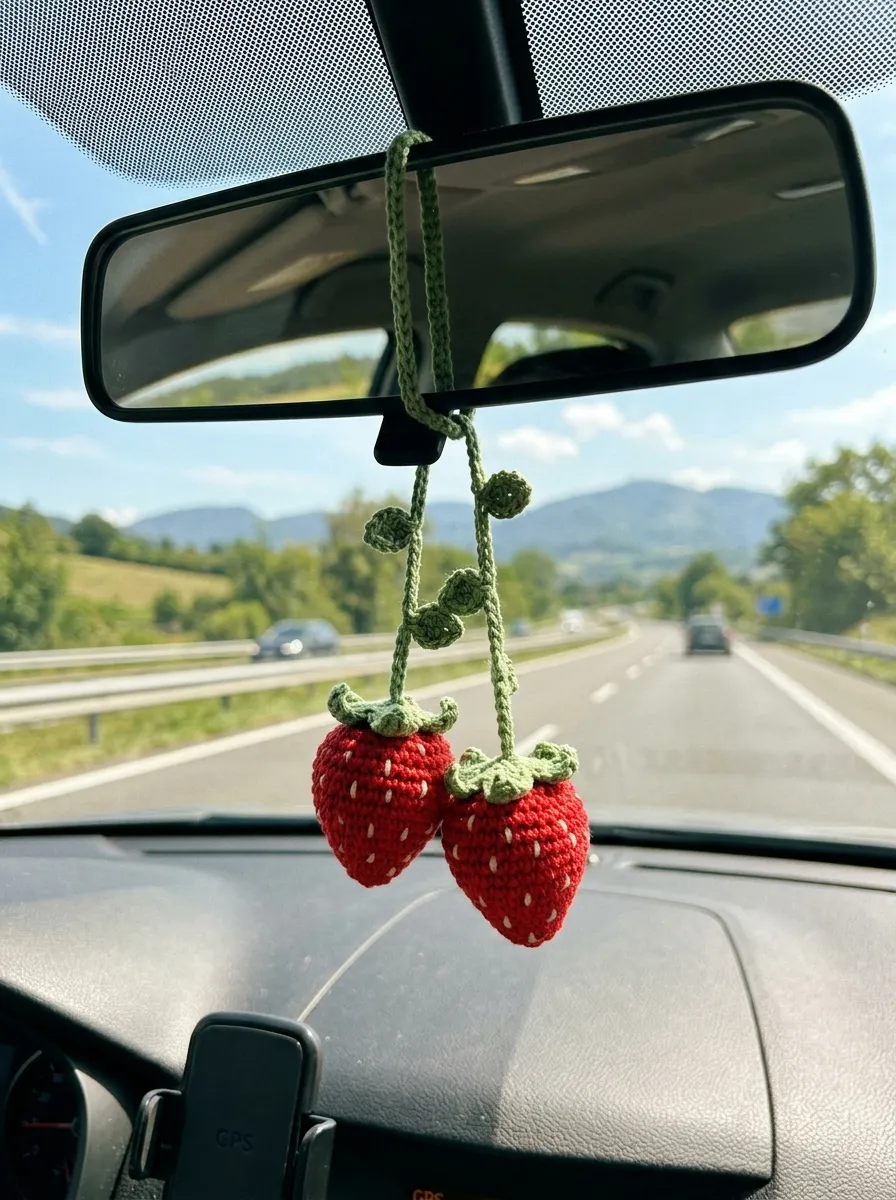
The tiny amigurumi strawberry swag combines vibrant botanical shapes with cheerful character design, creating an energetic focal point for bright vehicle aesthetics. This design features two plump miniature strawberries connected by a continuous leafy green suspension vine that drapes symmetrically over the rearview mirror support arm. Rich crimson or bright coral yarn forms the fruit bodies, accented by tiny embroidered cream seed stitches and vibrant lime green calyx caps. The dual-drop format balances weight across both sides of the mirror base, preventing the charm from sliding or shifting during travel. Because each fruit component measures only three centimeters in length, the overall piece remains small, light, and safe for daily commutes. This project provides excellent practice in working continuous miniature amigurumi spirals, directional decreasing, and simple surface embroidery.
Begin at the bottom point of the first strawberry using crimson cotton yarn and a 2.5-millimeter hook, placing four single crochet stitches into a magic adjustable loop. Increase gradually over five rounds until reaching sixteen stitches, then work three straight rounds to establish the plump fruit body before tapering the top with four evenly spaced decreases. Lightly stuff the strawberry body with a small pinch of resilient polyester fiberfill, then close the remaining hole tightly using a blunt needle threaded through the front loops. Embroider tiny vertical seed dashes across the crimson surface using fine cream embroidery floss, spacing them evenly around the perimeter. Crochet a five-point star calyx using lime green yarn, sew it flat over the top closure of the fruit, and repeat the entire sequence to construct an identical second strawberry. Connect the two berries using a sixty-stitch surface chain worked in matching green yarn, adding two miniature leaf appliques near the midpoint to secure the swag over the mirror arm.
4. Scandinavian Daisy Flower Cluster

Read This:
Setup Method
The Scandinavian daisy flower cluster uses clean floral geometry, crisp white and golden-yellow contrasts, and flat petal arrangements to introduce fresh garden inspiration into the vehicle cabin. This piece consists of three overlapping, flat daisy blossoms suspended at staggered heights from a single, neat suspension cord. Pure white petals radiate from a domed yellow center, giving the cluster a neat, structured silhouette that coordinates easily with both dark and light vehicle interiors. The layered arrangement provides dimension while remaining thin, preventing the flowers from hitting the windshield glass during quick vehicle stops. Each daisy measures roughly four centimeters across, ensuring the trio forms a modest, tasteful accent. This creative project develops skills in rapid petal shaping, slip-stitch joins, and staggered cord arrangement.
To make the primary daisy, crochet six single crochet stitches into a magic ring using bright golden-yellow mercerized yarn, fastening off to leave a neat round center disk. Join crisp white yarn to the front loop of any disk stitch, chaining three, working two double crochets into the same stitch, and chaining three down to slip stitch into the base. Repeat this petal sequence around the entire perimeter to create twelve uniform white petals, using your fingertips to press them flat and smooth. Construct two additional daisies using the exact same method, making the third flower slightly smaller by substituting half double crochets for the main petal stitches. Weave all loose yarn tails into the backside of each flower, coating the knots with a drop of fabric sealant to keep them secure under vehicle vibration. Join the three daisies with staggered lengths of green cord measuring eight, ten, and twelve centimeters, uniting the top ends inside an unfinished wooden suspension ring.
5. Modern Textured Desert Cactus in Clay Pot

How to Make
The modern textured desert cactus in a clay pot features dimensional vertical ribs, earthy desert tones, and a bright blossom accent, creating a charming Southwestern-style ornament. This design pairs an upright, textured ribbed saguaro cactus body with a flared, sturdy terracotta pot, providing a playful miniature soft sculpture. Using soft sage or dusty jade yarn for the cactus body introduces calm, modern tones that complement modern car interiors. The distinct vertical ridges are created using back-loop-only stitching, producing natural shadow lines that mimic real desert succulents. A bright coral or sunny yellow flower blossom on the cactus top adds a lively pop of color that catches the eye without causing driver distraction. This design emphasizes structural stability, tight stuffing distribution, and precise multi-part assembly.
Begin by crocheting the terracotta pot base with six single crochet stitches in a magic ring, increasing outward to fifteen stitches and working upward for six straight rounds to form the pot. Stuff the lower half of the pot with a dense ball of scrap yarn or firm fiberfill, topping it with a dark brown circular insert to represent dry desert soil. To build the ribbed cactus, chain fourteen stitches in sage green yarn, working back and forth in back-loop-only single crochet for sixteen rows to form an accordion-style ribbed rectangle. Fold the ribbed panel in half lengthwise, slip-stitch the side edges together, gather the top edge tightly with a tapestry needle, and pack the interior cylinder with fiberfill. Secure the base of the cactus firmly into the center of the brown soil patch using strong whipstitches. Crochet a miniature four-petal blossom in coral yarn, attach it to the top tip of the cactus, and anchor a forty-centimeter braided hanging cord through the top crown.
6. Whimsical Pastel Sleeping Cloud Drops


Step-by-Step Guide
The whimsical pastel sleeping cloud drops charm brings calm, dreamy aesthetics into commuter spaces, utilizing curved cloud contours, embroidered sleeping eyes, and delicate dangling raindrops. This design uses an undulating, puffy cloud body worked in soft ecru or pale heather gray, suspended horizontally above three small pastel raindrops. The soft, rounded lobes give the cloud a playful, welcoming look, while the minimalist embroidered face keeps the expression understated and modern. Suspending the raindrops on fine, varied threads introduces gentle, independent motion that moves with the vehicle without swinging excessively. The lightweight construction ensures the ornament hangs effortlessly, reducing stress on the rearview mirror mount. This build teaches horizontal curve shaping, delicate facial embroidery, and balanced multi-strand drop assembly.
Construct the front cloud panel using an eight-stitch foundation chain in soft white yarn and a 2.75-millimeter hook, shaping three rounded top lobes using progressive half-double and double crochet clusters. Work across the foundation to maintain a flat lower edge, then crochet an identical matching back panel to give the cloud structural body and clean perimeter seams. Embroider two subtle, curved sleeping eye arcs onto the front panel using charcoal gray embroidery floss, adding tiny pink yarn knots to suggest blushing cheeks. Align the front and back panels with wrong sides facing, joining them around the perimeter with a clean single crochet border while inserting a light layer of polyester stuffing. To create the three drops, crochet miniature teardrops in pastel mint, sky blue, and soft lilac yarn, leaving a long starting tail on each drop. Thread the raindrop tails through the bottom edge of the cloud at spaced intervals, then anchor a sturdy braided hanging loop into the center lobe.
7. Chunky Retro Daisy Checkerboard Charm

How to Create
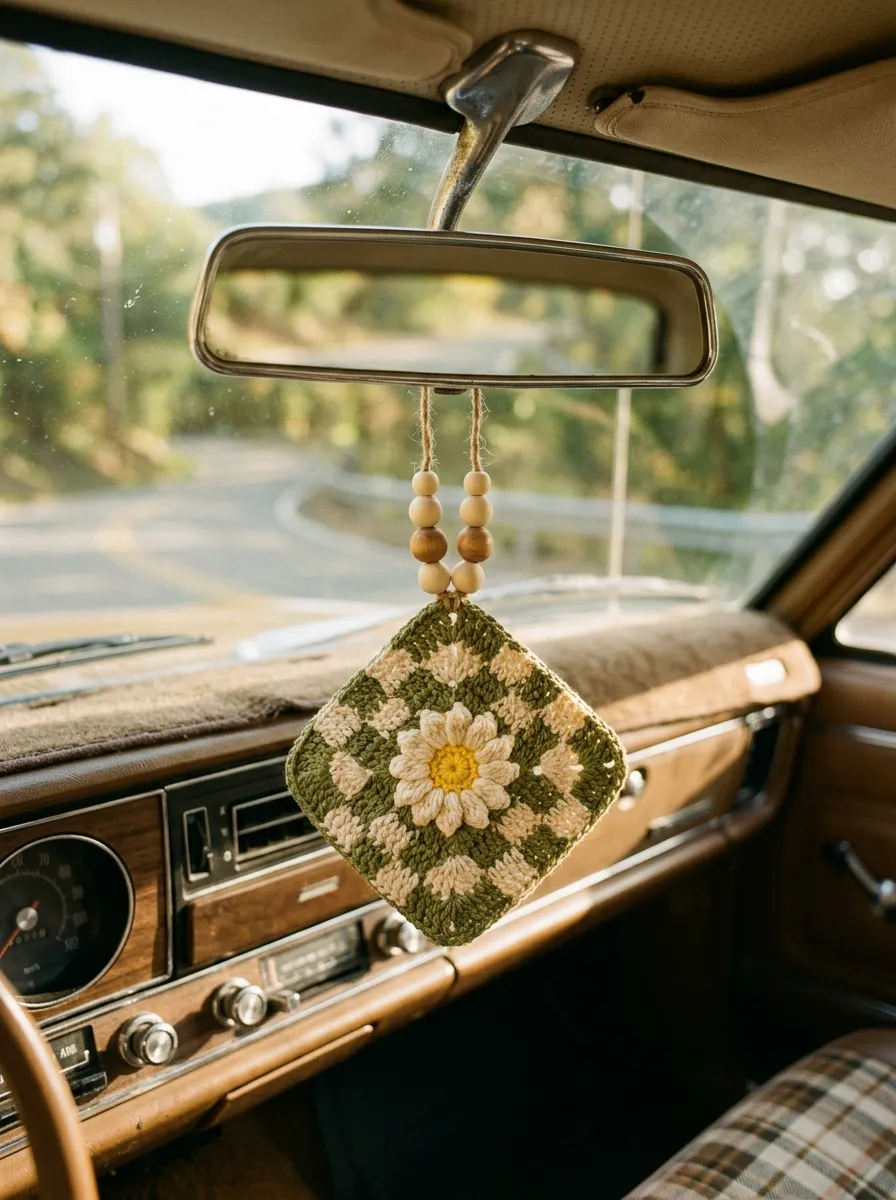
The chunky retro daisy checkerboard charm pairs vintage graphic patterns with delicate floral accents, delivering a stylish accessory for modern vehicle styling. This design features a flat, double-sided square tile worked in two-tone checkerboard tapestry crochet, accented by a raised three-dimensional daisy flower at its center. Contrasting palettes like chocolate brown and cream, or forest green and warm ecru, provide rich graphic contrast that stands out cleanly against car windshields. The dense tapestry crochet technique creates a firm, non-curling square that retains its crisp geometric shape over time without needing internal cardboard stiffeners. Adding the central daisy introduces tactile depth, blending graphic retro patterns with soft floral elements. This project develops skills in two-color yarn management, flat tapestry tension, and clean border finishing.
Begin by chaining thirteen stitches in warm cream cotton yarn using a 2.5-millimeter hook, alternating three stitches of cream and three stitches of olive green across each row. Carry the secondary yarn color smoothly inside your working stitches, keeping the yarn tension even to prevent the carried thread from showing through the front face. Work twelve rows in this checkerboard rhythm to create a balanced four-patch square, finishing the perimeter with a crisp single crochet frame in dark green yarn. Crochet a miniature daisy by working six bullion stitches or puff stitches in bright white yarn around a tiny mustard-yellow center loop. Sew the finished miniature daisy securely to the center of the checkered square, hiding the attachment threads inside the thick double-face fabric. Secure a matching twenty-centimeter hanging cord to one corner of the square, threading two natural wooden beads along the cord to complete the retro design.
8. Woodland Acorn and Oak Leaf Cluster
Read This:
Setup Method
The woodland acorn and oak leaf cluster uses organic textures, rich forest colors, and varied natural silhouettes to bring an earthy, rustic presence to vehicle cabins. The design incorporates a textured acorn with a detailed scale cap, paired alongside a sculpted lobed oak leaf and a raw wooden accent bead. Deep chocolate brown, warm taupe, and rich moss green yarns deliver natural woodland tones that age gracefully under sun exposure. Using post stitches or textured front-loop work gives the acorn cap realistic tactile depth that contrasts nicely with the smooth acorn base. The flat oak leaf provides visual balance against the rounded acorn body, creating an asymmetrical cluster that hangs comfortably without blocking the driver’s forward view. This project expands knowledge of specialized texture stitches, lobed leaf shaping, and organic cluster arrangement.
Start the acorn base with rich caramel-brown yarn, working six single crochet stitches into a magic circle and expanding to twelve stitches over two gradual increase rounds. Work four straight rounds to build the smooth acorn body, insert a firm pinch of fiberfill, and taper the upper stitches inward to form a rounded oval nut. Transition to deep espresso-brown yarn to form the textured cap, working alternating slip stitches and half-double crochets around the surface to imitate overlapping woodland scales. To construct the oak leaf, chain twelve stitches in moss green yarn, working along both sides of the chain with single crochets, trebles, and picot dips to sculpt six rounded leaf lobes. Steam the oak leaf gently using a household iron on its lowest setting to flatten the lobes and keep the foliage from curling at the edges. Tie the leaf and acorn together with natural hemp cord, add a raw cedar bead above the junction, and form a secure loop for mirror mounting.
9. Modern Minimalist Crescent Moon and Star
How to Make
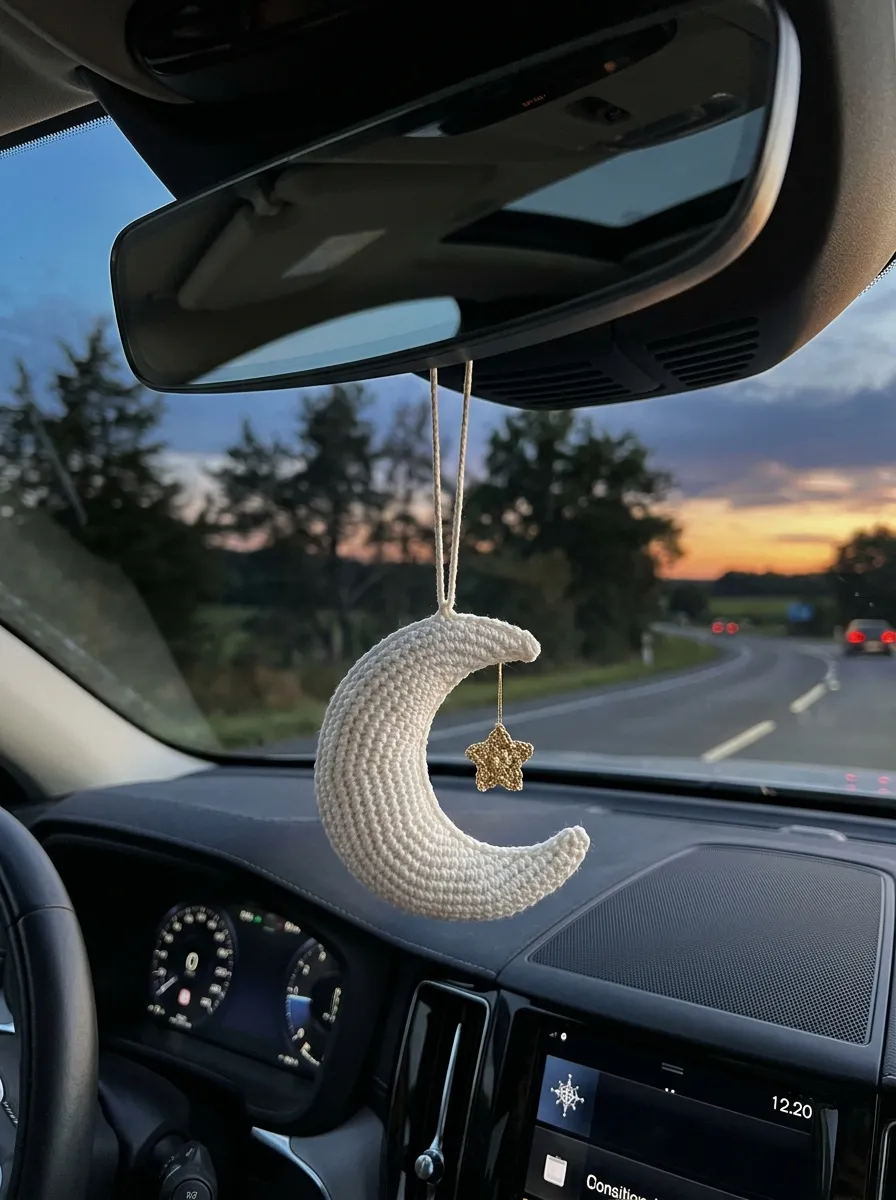
The modern minimalist crescent moon and star charm brings celestial elegance to vehicle interiors through clean lines, graceful arches, and open negative space. This piece showcases a tapered crescent moon silhouette paired with a tiny, sharp five-point star suspended neatly within the inner curve. Neutral palettes such as soft bone white, silvery gray, or pale spun gold maintain an understated, chic look that blends easily with leather and fabric car interiors. The curved crescent shape requires smooth increases and decreases, producing a clean, sculptural form that resists twisting or folding. The tiny floating star introduces light, subtle motion within the moon’s curve without adding distracting swinging weight. This project helps makers master progressive stitch scaling, sharp point finishing, and delicate interior suspension techniques.
Begin the crescent moon by chaining twenty-five stitches in bone-white mercerized cotton yarn using a 2.5-millimeter hook, turning with a single turning chain. Work along the foundation chain using graduated stitches, moving smoothly from slip stitches to single crochets, half doubles, and double crochets at the center before tapering back down to slip stitches. Repeat this gradual shaping across two additional rows, concentrating increases along the outer curve while maintaining decreases along the inner margin to establish the arch. For the star, work five single crochet stitches into a magic circle using bright gold thread, forming each star point with a slip stitch, a chain two, and a slip stitch down the chain. Suspend the small star inside the crescent’s inner curve using an eight-centimeter length of transparent monofilament or fine matching cotton thread. Connect the upper horn of the moon to a forty-centimeter hanging loop, securing the assembly with a minimalist wooden slider bead.
10. Floating Terrarium Moss Ball Bauble


Execution Process
The floating terrarium moss ball bauble reimagines Japanese kokedama garden art as a hanging vehicle accessory, pairing rich moss textures with simple twine wrappings. This design features a spherical moss-green textured ball bound with crisscrossing neutral threads, topped with a miniature succulent sprig and a smooth hanging bead. Deep forest green, variegated olive, and earthy taupe yarns produce an authentic botanical appearance that brings tranquil nature indoors. Using textured bouclé or dense single-crochet loop stitches gives the sphere an organic moss-like surface that absorbs ambient cabin light without harsh glare. The crisscrossing neutral twine wraps add structural reinforcement and authentic artisan character, holding the sphere together securely. This build teaches spherical volume control, exterior surface binding, and secure structural hardware installation.
Begin by working six single crochet stitches into an adjustable loop using deep olive-green cotton yarn and a 2.5-millimeter hook, placing a marker to track your continuous rounds. Increase outward until reaching thirty stitches, work six straight rounds to establish the sphere’s height, and pack the interior firmly with dense fiberfill. Taper the sphere closed using gradual decreases, pulling the yarn tail tightly through the remaining six front loops to seal the moss core securely. Take a two-meter length of natural unbleached linen thread and wrap it crisscross around the green sphere, securing the intersecting strands with small hidden backstitches. Crochet a miniature three-petal succulent rosette in pale seafoam yarn, sewing it flat over the top junction of the wrapped moss ball. Pass a long needle carrying a braided green cord up through the center of the ball and rosette, topping the cord with a raw sandalwood bead to create a balanced hanging charm.
10 Simple Image Generation Prompts
-
Idea 1: Miniature Trailing Pothos Hanging Basket
A tiny crochet trailing pothos plant in a terracotta pot hanging from a car rearview mirror, green leaves cascading down, soft natural daylight through the windshield, cozy car aesthetic, realistic textile details, shallow depth of field.
-
Idea 2: Minimalist Bohemian Sunburst Talisman
A minimalist bohemian crochet sunburst charm with short fringe hanging from a car mirror, warm mustard and ecru tones, sunny morning road trip atmosphere, modern aesthetic interior, soft bokeh background.
-
Idea 3: Tiny Amigurumi Strawberry Swag
Two small amigurumi crochet strawberries connected by a leafy green vine, draped over a car rearview mirror, bright red cotton yarn with cream seed details, cheerful aesthetic, crisp focus, soft dashboard lighting.
-
Idea 4: Scandinavian Daisy Flower Cluster
A trio of small Scandinavian crochet daisies with white petals and yellow centers hanging from a rearview mirror, clean minimalist car interior, airy soft daylight, modern handmade aesthetic.
-
Idea 5: Modern Textured Desert Cactus in Clay Pot
A miniature crochet saguaro cactus in a tiny terracotta pot hanging as a car mirror charm, sage green ribbed texture with a tiny coral flower on top, clean road background, warm sunny day aesthetic.
-
Idea 6: Whimsical Pastel Sleeping Cloud Drops
A small white crochet cloud with embroidered sleeping eyes and pastel blue raindrop charms hanging from a car mirror, dreamy aesthetic, soft morning light filtering through the windshield, cozy commute vibe.
-
Idea 7: Chunky Retro Daisy Checkerboard Charm
A small retro checkerboard crochet square in olive green and cream with a 3D daisy flower center, hanging from a rearview mirror, vintage aesthetic, detailed cotton yarn texture, soft interior car lighting.
-
Idea 8: Woodland Acorn and Oak Leaf Cluster
An earthy crochet acorn and green oak leaf cluster hanging from a car mirror, textured brown acorn cap, rustic natural aesthetic, autumn road trip atmosphere, warm sunlight.
-
Idea 9: Modern Minimalist Crescent Moon and Star
A minimalist crochet crescent moon in pale cream yarn with a tiny gold star hanging inside the curve, suspended from a rearview mirror, serene evening aesthetic, modern clean car interior.
-
Idea 10: Floating Terrarium Moss Ball Bauble
A miniature crochet moss ball wrapped in natural twine with a tiny succulent on top, hanging as a car rearview mirror charm, peaceful botanical aesthetic, soft diffused daylight, realistic yarn fibers.
Common Beginner Mistakes and How to Avoid Them
Crafters new to car mirror charms frequently run into issues with excessive length, driver obstruction, loose tension, and rapid sun bleaching. Making hanging charms too long is a frequent error; long cords cause ornaments to swing widely during vehicle turns, creating a visual distraction and potentially tapping against the glass. Avoid this by keeping the entire suspension drop under ten centimeters, using adjustable slider beads so you can shorten the cord after mounting it. Loose stitch tension also causes problems, as car vibrations and summer heat will cause loosely worked stitches to stretch, exposing internal polyester fiberfill over time. To prevent this, use a hook that is one full millimeter smaller than your yarn label recommends, ensuring dense, firm fabric that holds its shape. Acrylic yarns can also soften or fade when exposed to intense summer sun through vehicle windshields. Choose mercerized cotton yarn instead, as its tightly spun fibers resist UV fading, heat stretching, and surface pilling under daily driving conditions. Lastly, avoid hanging ornaments using weak single-strand thread; always choose braided cotton cord, waxed twine, or multi-strand chain loops to ensure long-term durability.
Practical Tips for Better Results
Refining your crochet car charms into clean, boutique-quality accessories depends on disciplined finishing methods, balanced weighting, and neat hardware integration. Incorporating natural, unvarnished wooden beads along your hanging cord provides multiple practical benefits, serving as an adjustable tension slider while providing an organic visual anchor. These unsealed wooden beads can also absorb a few drops of natural essential oils, functioning as a gentle, renewable car diffuser without requiring artificial chemical air fresheners. When building three-dimensional shapes like miniature pots, fruits, or globes, use cluster-fill or dense scrap yarn rather than loose, wispy stuffing to ensure firm, uniform volume that resists collapsing over time. You can also coat structural knots, cord ends, and seam closures with a tiny dab of clear, washable fabric adhesive to prevent joins from unraveling under daily vehicle vibration. Lightly steaming finished flat elements, such as leaves, sunbursts, and flower petals, with a garment steamer relaxes the yarn fibers, helping pieces hang flat without curling inward. Taking time for these thoughtful assembly steps ensures your handmade vehicle charms look balanced, professional, and built for the road.
Styling, Presentation, or Organization Ideas
Thoughtful presentation and cohesive styling turn simple crochet car charms into eye-catching accessories that elevate vehicle interiors or make memorable handmade gifts. When styling a vehicle cabin, coordinate your charm’s color palette with your seat upholstery, steering wheel wrap, or dashboard trim, choosing muted earth tones, warm neutrals, or soft pastels for an understated look. Combining varied textures, like pairing smooth mercerized cotton charms with raw wooden beads and soft linen cords, adds visual interest without cluttering the windshield space. If you are gifting or selling your creations, mount each charm on a sturdy kraft paper display card stamped with your maker’s logo, wrapping the extra suspension cord neatly through back notches. For social media portfolios or craft displays, photograph your charms suspended inside a clean vehicle against a soft, out-of-focus road backdrop during the soft golden hour of early morning or late afternoon. To keep your craft collection organized at home, store finished charms on a multi-hook wall rack or in clear, compartmentalized bins, keeping cords untangled and ready for quick gifting or road trip accessorizing.
Budget or Time Planning
Crocheting car mirror charms is an economical, time-efficient hobby that yields charming, useful accessories from modest yarn leftovers. Because these miniature designs require only ten to twenty yards of yarn, a single standard skein of cotton yarn can yield four to six complete charms, keeping production costs low. You can maximize your budget by purchasing a few versatile neutral yarn shades, alongside a multi-pack of assorted unfinished wooden beads and durable clasp hardware. Managing your crafting time efficiently involves batching steps: crochet all bases first, complete all leaves and accents in a second session, and finish with a focused assembly and cord-knotting session. A single mirror charm typically requires thirty to forty-five minutes of active crochet time and ten minutes of assembly, making it an easy, satisfying project to complete during a quiet evening. Batch-producing popular designs like mini potted plants or retro daisies helps you build a supply of thoughtful gifts for holidays, driving milestones, and seasonal exchanges. Setting aside dedicated crafting blocks keeps your workflow organized, helping you turn yarn scraps into stylish automotive accessories without project fatigue.
Creative Expansion and Advanced Inspiration
Once you feel confident with fundamental charm designs, you can expand your creative repertoire by exploring advanced mixed-media accents, seasonal variations, and versatile accessory adaptations. Experiment with incorporating small metal charms, like miniature brass bells, enameled stars, or personalized stamped tags, along your suspension cords to introduce delicate metallic accents. You can also explore seasonal styling, designing removable, interchangeable charms for holidays, autumnal harvests, and spring blooms that refresh your car interior throughout the year. These compact designs also adapt easily beyond vehicle mirrors; by swapping the hanging loop for a split-ring key fob, lobster swivel clasp, or ribbon loop, you can turn any charm into a bag clip, backpack accent, or holiday tree ornament. Consider creating coordinated car interior sets, pairing your mirror charm with matching crochet cup-holder coasters, seatbelt comfort covers, or steering wheel accents centered around the same color palette. Keeping a dedicated craft journal with stitch counts, cord length measurements, and color palettes will guide your ongoing creative journey, turning simple automotive charm ideas into cherished handmade designs for every journey.