Crochet miniature charms have established an enduring presence across contemporary craft channels, offering makers a delightful format for mastering three-dimensional yarn construction. This comprehensive guide explores miniature pastry crafts, specifically detailing ten functional crochet donut charms designed for everyday bag pendants, planner tags, and decorative accents. Throughout this detailed tutorial, readers will acquire practical knowledge concerning toroidal shaping mechanics, seamless curved decreases, color blocking methods, and dynamic surface embroidery. Learning to crochet these miniature bakery treats provides an efficient pathway to mastering fundamental amigurumi principles, including uniform loop tension, invisible joining techniques, and hardware assembly. Beyond building technical proficiency, this creative project delivers immediate everyday utility by converting leftover scrap fibers into polished, tactile accessories. The compact scale of each charm makes it an accessible, rewarding project that yields professional results without demanding extensive time commitments or large workspaces. Whether you plan to curate an expressive accessory collection or assemble thoughtful handmade gifts for loved ones, this guide equips you with reliable methods to create durable, high-density yarn pendants with lasting visual appeal.
Why This Idea Is Trending or Useful
The current popularity of small-scale baked good motifs across modern design platforms reflects an ongoing appreciation for tactile nostalgia, playful self-expression, and functional portability. In modern fashion and home decor accents, miniature yarn motifs bring a soft, inviting texture to rigid utilitarian objects such as backpacks, key organizers, and zippered pouches, aligning with popular minimalist style sensibilities that value charming micro-details. From a DIY perspective, these projects solve the widespread challenge of yarn scrap management, presenting an easy project framework that consumes minimal yardage while teaching core geometric fabrication. Beginners benefit immensely from this design model because the predictable circular geometry allows for rapid troubleshooting without the stress of unraveling dozens of rounds. Furthermore, the universal recognition of dessert forms makes them inherently engaging, allowing creators to explore creative ideas through color pairing, textured stitches, and mixed-media additions. The balance of low financial commitment, rapid execution times, and highly visible finished results ensures that these trending ideas maintain continuous relevance among modern lifestyle crafters seeking rewarding handmade outcomes.
Materials and Preparation
Executing clean, structurally sound miniature charms requires selecting specific materials engineered to hold distinct structural shapes without exposing inner fiberfill. Mercerized cotton yarn in sport or DK weight is the standard recommendation for this endeavor, as its tight structural twist prevents fiber splitting and provides crisp, distinct stitch definition that withstands daily pocket friction. Pair this yarn with an ergonomic aluminum crochet hook sized between 2.0 mm and 2.5 mm, selecting a diameter smaller than typical ball-band recommendations to guarantee a firm, non-gapping fabric surface. Essential crafting notions include locking plastic stitch markers to monitor continuous spiral counts, dense polyester fiberfill for smooth internal volume, a blunt tapestry needle for seamless edge grafting, fine embroidery snips, and sturdy split key rings with jump rings. Preparation begins with systematic workspace organization, ensuring clear task lighting to maintain accurate stitch counts across continuous rounds. Wind your yarn into neat center-pull cakes to ensure smooth, tangle-free feeding tension throughout your crafting session. Establishing steady, uniform hand tension before beginning ensures that paired segments align smoothly during final perimeter assembly.
1. Classic Glazed Strawberry Ring Charm
Step-by-Step Guide
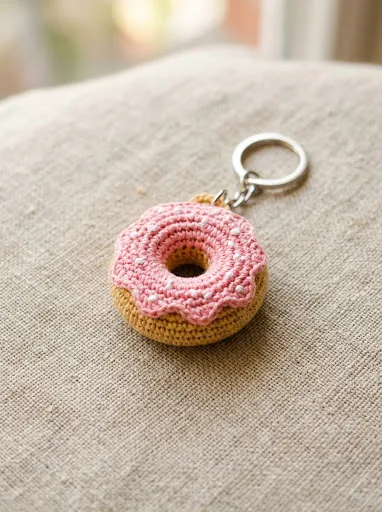
The traditional glazed strawberry donut charm relies on a balanced contrast between a warm golden-tan dough base and a glossy, berry-pink icing cap. The visual success of this design stems from its clean, uninterrupted toroidal ring shape, which requires precise increase and decrease sequences around an open central foundation chain. The dough body is constructed as a curved circular tube worked in continuous spiral rounds, beginning with an open inner circumference that mirrors authentic deep-fried bakery proportions. The strawberry glaze layer is fabricated separately as a flat scalloped circle that drapes gracefully across the upper curved hemisphere, creating realistic drips that catch directional light. This classic pairing of warm pastry shades and vibrant pastel frosting delivers timeless dessert charm, making it an exceptional introductory piece for crafters exploring three-dimensional miniature construction for the first time.
Begin by chaining twenty-four stitches in golden-tan cotton using a 2.25 mm hook, joining the ends with a slip stitch to form an untwisted circular ring. Work continuous single crochet rounds around this central hole, increasing evenly across the first three rounds until the diameter expands to forty-eight stitches, establishing the outward curve of the donut underbelly. Work three level rounds without adjustments, switch to bright strawberry-pink yarn, and immediately begin reciprocal decrease sequences across three consecutive rounds to pull the fabric back toward the inner hub. Before closing the final round, systematically insert small, dense pinches of polyester fiberfill into the circular channel using the dull end of a hook to achieve a firm, smooth ring. Use a blunt tapestry needle to graft the final decrease round directly to the original foundation chain loops, pull the tail taut, and affix a silver split key ring through the outer pastry edge.
2. Rich Dark Chocolate Fudge Pendant
Read This:

How to Make
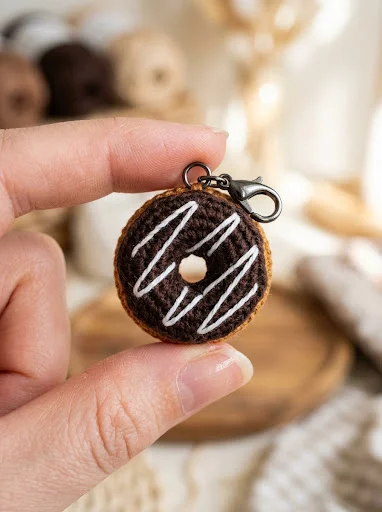
The rich dark chocolate fudge donut charm explores dramatic tonal contrast, using deep cocoa shades paired with pristine white piping accents to simulate gourmet patisserie confections. The design concept focuses on a sophisticated, luxurious presentation, utilizing a deep chocolate-brown glaze set against an espresso-tinted or golden dough foundation. What elevates this concept beyond standard play food is the application of delicate surface embroidery, which replicates artisan drizzle lines looping smoothly across the curved surface. The darker color palette coordinates effortlessly with upscale leather bags, dark backpacks, and minimalist personal items, appealing to crafters who favor understated, mature aesthetics over whimsical pastels. Working with deep brown cotton requires careful attention to stitch visibility, offering crafters an excellent exercise in tactile stitch recognition and controlled surface embroidery over curved three-dimensional surfaces.
Commence construction by forming a continuous circular tube with golden-tan yarn, establishing an initial foundation chain of twenty stitches joined into an open circle. Work two rounds of single crochet, increasing uniformly to thirty-two stitches, then work two straight rounds before joining a saturated espresso-brown yarn to form the top fudge glaze. Continue in the dark brown shade for four rounds, working corresponding decrease sequences that return the tube circumference back to the initial twenty-stitch gauge. Pack the internal void firmly with synthetic stuffing, ensuring the ring feels dense and resilient when squeezed between thumb and forefinger. Graft the inner edge together using overcast stitches with a tapestry needle, burying the yarn tail inside the core. Thread an embroidery needle with two strands of optic-white cotton embroidery floss, executing sweeping surface chain stitches diagonally across the upper chocolate face to replicate delicate confectioner piping before attaching a polished gunmetal lobster clasp.
3. Pastel Birthday Cake Confetti Ring
Execution Process
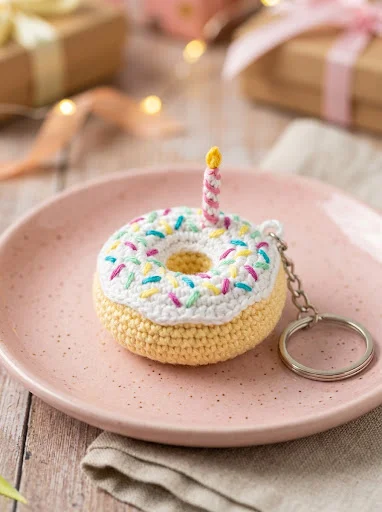
The pastel birthday cake charm captures celebratory visual energy by combining a pale vanilla dough base, a creamy white glaze, and vibrant multicolored confetti sprinkle embroidery. The design concept centers around festive, joyful styling, utilizing miniature straight stitches in primary and pastel hues to recreate the classic appearance of baked party treats. Proportional harmony is achieved by keeping the embroidered sprinkles uniform in length, ensuring they distribute evenly across the upper dome without overcrowding the clean ivory background. This design offers immense creative flexibility, as makers can customize the sprinkle palette to reflect specific seasonal events, pride motifs, or personalized celebratory colors. Crafting this charm provides practical experience in balancing complex multi-colored surface embellishments on miniature objects, teaching makers how to maintain secure internal thread knots so details remain permanently locked in place during daily functional handling.
Fabricate the main pastry ring using soft buttercream-yellow cotton yarn, starting with twenty-four foundation chain stitches joined into an open ring. Work progressive single crochet increases over four rounds until reaching forty-eight stitches, maintain level height for two rounds, and transition seamlessly to a crisp milk-white yarn on the final yarn-over. Work two rounds in white before introducing decreases, mirroring the base increases to pull the upper fabric back inward toward the center opening. Before adding stuffing or grafting the inner opening closed, thread an embroidery needle with turquoise, magenta, and lemon embroidery floss. Embroider dozens of tiny, two-millimeter straight stitches randomly across the white surface area, securing each thread firmly to the interior wall with double knots. Once the sprinkles are complete, pack the core channel with dense fiberfill, graft the inner seams together using matching white thread, and install a sturdy silver charm ring.
4. Cinnamon Sugar Powdered Ring Pendant
Read This:
Setup Method
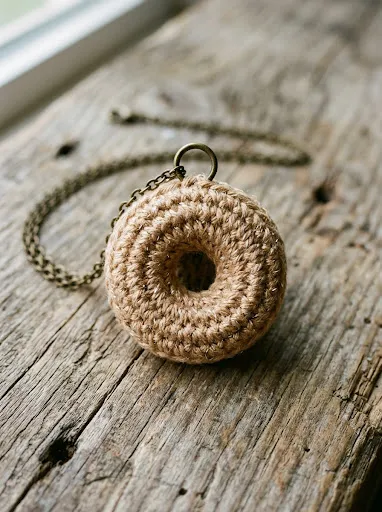
The cinnamon sugar powdered ring pendant focuses on tactile texture and visual subtlety, capturing the rustic appearance of freshly tossed, sugar-dusted breakfast pastries. The design concept avoids thick decorative frosting caps entirely, opting instead for a unified pastry ring fabricated from warm camel or light cinnamon yarn. To mimic the crystalline shimmer of granulated sugar, the entire outer surface is enhanced by holding an ultra-fine translucent iridescent filament together with the primary cotton yarn throughout construction. Alternatively, fine French knot embroidery in ecru cotton can be scattered across the upper surface to simulate crystallized sugar grains. This minimalist, texturally driven charm appeals to lovers of rustic bakery styling and vintage aesthetic movements, delivering an understated accessory that emphasizes fine fiber texture and clean geometric execution over complex surface graphics.
Begin by pairing a strand of light camel sport-weight cotton with a single strand of ultra-fine metallic crystal filament, holding both strands flush across your working tension finger. Chain twenty-two stitches using a 2.5 mm hook, join without twisting into an open loop, and work one round of standard single crochet stitches through the back bumps of the chain. Over the subsequent three rounds, systematically increase the stitch count by six stitches per round until reaching forty stitches, ensuring the metallic filament remains visible on the exterior fabric face. Work four consecutive rounds without increases, maintaining steady gauge so the metallic element weaves evenly throughout the fabric. Execute three rounds of invisible decreases to reduce the count back to twenty-two stitches, lightly stuffing the interior with firm polyester fill as the opening narrows. Weave the final working edge securely to the initial foundation chain, knot the thread ends internally, and attach an antiqued bronze jump ring.
5. Matcha Green Tea Glazed Mini Ring
Step-by-Step Guide
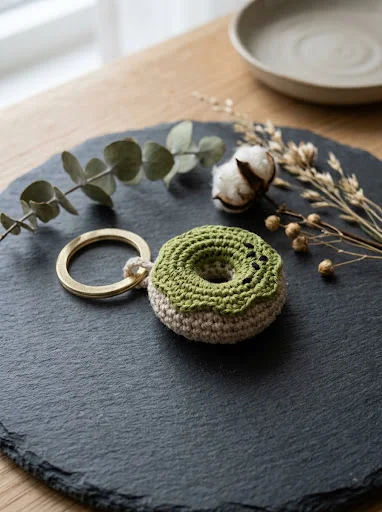
The matcha green tea glazed charm channels modern botanical cafe culture, pairing an earthy, muted olive-green glaze with an un-dyed, natural oatmeal linen-cotton base. The design concept prioritizes organic minimalism and serene color harmony, drawing inspiration from Japanese confectionery and contemporary minimalist style trends. The upper green tea glaze is intentionally designed with subtle, asymmetrical wavy edges rather than a rigid circular boundary, mimicking the natural flow of warm artisan glazes settling over baked pastry. This model avoids busy sprinkles, relying instead on a pair of miniature embroidered black sesame seeds or a delicate white tea drizzle to provide focal contrast. This project introduces crafters to executing organic, non-uniform stitch borders while managing clean color transitions, resulting in an elegant accessory suitable for high-end linen totes, canvas backpacks, and neutral leather goods.
Initiate the pastry base using natural oatmeal-toned cotton yarn, joining a loop of twenty chains with a slip stitch before working three rounds of gradual outward increases to reach thirty-six stitches. On round four, transition cleanly to an earthy sage- or matcha-green yarn, executing the change across the final loop of the previous stitch to ensure a razor-sharp color break. To form the organic, dripping glaze perimeter, work the next round using alternating stitch heights, cycling between slip stitches, single crochets, half double crochets, and occasional treble clusters to produce undulating glaze drips across the dough. Work three standard rounds to build the upper dome, then complete corresponding decrease rounds to taper the top edge back toward the center ring. Insert compact layers of stuffing into the donut interior, whipstitch the inner borders closed with a tapestry needle, and anchor a brushed-brass keychain clasp to the top rim.
6. Frosted Donut with Miniature Safety Eyes
Read This:
How to Make
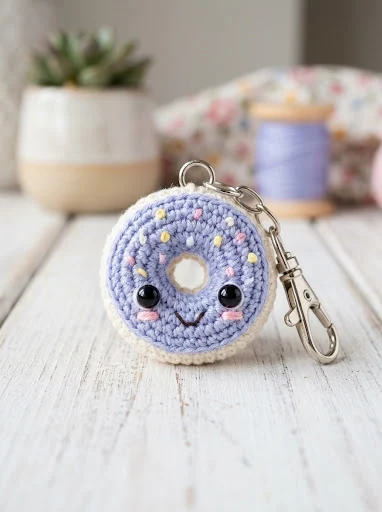
The expressive frosted donut charm brings playful character appeal to the classic dessert silhouette by incorporating expressive miniature safety eyes and delicate facial embroidery. This kawaii-inspired concept features a soft sky-blue or lavender glaze seated atop an ivory dough ring, creating an inviting canvas for character styling. Two glossy black plastic safety eyes are anchored low on the glaze plane, flanked by tiny pink embroidered cheeks and a petite curved smile placed right along the inner ring border. The design requires precise structural preparation, as safety eye washers must be seated firmly inside the narrow tubular fabric before the internal fiberfill is packed and sealed. This project provides practical training in hardware placement within confined three-dimensional forms, teaching makers how to align facial features symmetrically along curved planes to create an endearing, professional-grade amigurumi accessory.
Construct the base by working twenty stitches in ivory cotton into a circular ring, increasing over three rounds to reach thirty-six stitches before transitioning to soft lavender yarn. Work two level rounds in lavender to establish the side profile of the glaze. Before proceeding to decrease rounds, select your feature zone across stitches twelve through eighteen on round five. Insert two 4.0 mm black plastic safety eyes into the fabric spaced four stitches apart, locking the grooved plastic posts firmly inside the inner tube using their corresponding friction washers. Thread a fine needle with black embroidery floss to stitch a shallow, three-millimeter curved smile centered between the eyes, adding two horizontal blush bars in soft pink immediately beneath each eye. Resume crocheting the decrease rounds, pack the internal channel with firm stuffing while maneuvering around the plastic eye posts, whipstitch the inner opening closed, and secure a swivel clasp.
7. Salted Caramel and Drizzle Swirl Pendant
Execution Process
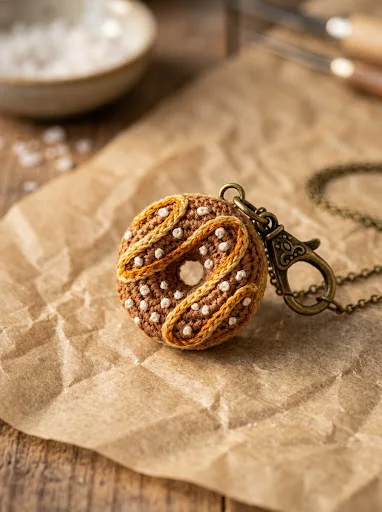
The salted caramel and drizzle swirl charm represents gourmet confectionery design, featuring a warm toffee-colored dough base, a rich amber caramel glaze, and textured white salt crystal accents. The aesthetic focus centers on tonal warmth, layering rich shades of butterscotch, caramel, and tan to produce a visually indulgent accessory. Visual depth is established through a dual-color swirl technique, where two distinct yarn colors are carried simultaneously across the glaze rounds to form dynamic diagonal striping that wraps around the curved doughnut profile. Tiny, three-dimensional French knots stitched in stark ecru yarn mimic flaky sea salt crystals scattered over the sweet glaze, providing delightful tactile texture. This concept offers an engaging challenge for intermediate crafters, offering hands-on practice in multi-strand tapestry crochet within small circular dimensions while demonstrating how diverse embroidery techniques enhance handmade realism.
Begin by establishing an open foundation chain of twenty-four stitches using warm biscuit-toned yarn, expanding the circular tube over three increase rounds to reach forty-two stitches. At round four, introduce both rich caramel brown and golden-buff yarn strands, carrying the non-working yarn securely inside the center of your stitches. Alternate working three stitches in caramel and three stitches in buff across four consecutive rounds, offsetting the color shifts by one stitch each round to force the pattern into a continuous diagonal caramel swirl. Drop the buff yarn and continue in solid caramel to complete the decrease rounds, reducing the circumference back to twenty-four stitches. Before sealing the tube, thread a tapestry needle with off-white cotton and scatter six to eight tight French knots across the caramel stripes to represent coarse sea salt crystals. Pack the tubular ring firmly with fiberfill, graft the inner seams together invisibly, and mount an antique bronze ring.
8. Blueberry Glaze with Micro-Bead Sprinkles
Read This:
Setup Method
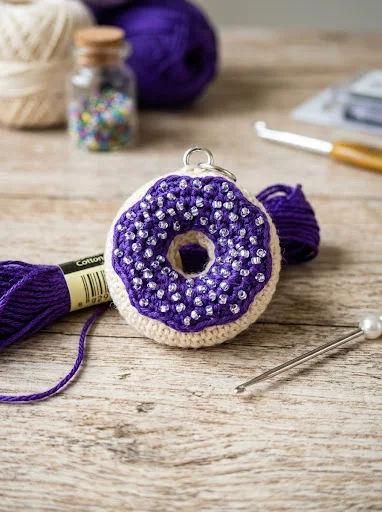
The blueberry glaze charm combines vibrant berry-violet yarn tones with light-catching micro-glass beads to create a sparkling, high-contrast pastry pendant. The design concept pairs an airy pastel dough base with a deeply saturated indigo or royal purple glaze, capturing the intense coloration of wild berry glazes. Instead of traditional thread embroidery, genuine glass seed beads are integrated directly into the upper glaze stitches, producing a resilient, sparkling sprinkle texture that will not fray or loosen with repeated handling. The glass beads catch ambient light with every movement of your keys or bag, transforming a simple fiber project into an eye-catching piece of handmade jewelry. This project introduces crafters to the specialized mechanics of bead crochet, demonstrating how to string, position, and lock rigid glass beads securely into flexible yarn loops without compromising structural fabric tension.
Prior to creating your foundation slipknot, thread thirty size 10/0 iridescent white and silver glass seed beads directly onto a skein of rich violet cotton yarn using a fine wire beading needle. Set the beaded yarn aside and construct the lower donut half using pale cream cotton, working from an initial chain of twenty stitches up to thirty-six stitches over three rounds. Switch to the pre-strung violet yarn, working one level round of single crochet to lock the color line. Across the next three rounds, slide an individual glass bead tightly against the hook before finishing designated single crochet stitches, locking each bead firmly onto the visible exterior face of the glaze. Execute standard decrease rounds to taper the top edge inward, taking care not to trap beads inside the seams. Stuff the interior firmly with dense polyester fill, graft the inner ring closed with a neat whipstitch, and attach a silver lanyard clasp.
9. Scandi-Style Minimalist Waffle-Textured Donut
Step-by-Step Guide
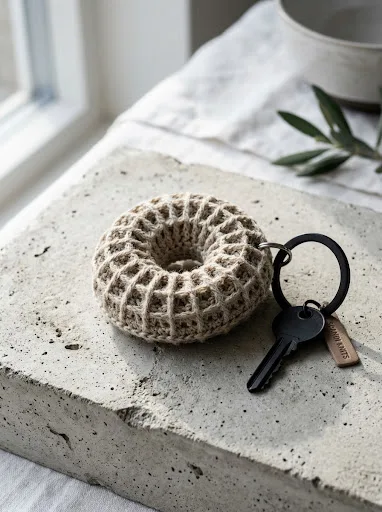
The Scandinavian-style minimalist donut charm strips away bright glazes and ornamental toppings, celebrating architectural simplicity, natural fiber textures, and understated geometric forms. Crafted entirely in muted, neutral tones such as undyed flax, stone gray, or toasted rye, this design highlights pure craftsmanship through textured relief stitching. The entire donut ring is worked in alternating front-post and back-post single crochet stitches, producing a raised waffle or rib grid across the circular surface. This textured topography mimics the crisp, baked exterior of artisan pastries while providing a pleasing tactile hand-feel. The monochromatic palette integrates effortlessly into contemporary minimalist lifestyles, making it an ideal understated accessory for neutral linen totes, commuter backpacks, and modern keyrings. This design teaches crafters advanced post-stitch mechanics within circular geometric planes, showing how surface texture alone can create sophisticated, eye-catching design features.
Begin with un-dyed natural linen-cotton yarn, chaining twenty-four stitches and joining them into an untwisted circle using a 2.0 mm hook to maintain a dense, firm stitch gauge. Work round one in standard single crochet, increasing evenly to thirty-six stitches around the circumference. On round two, initiate the textured pattern by working one front-post single crochet around the stem of the first stitch, followed by one back-post single crochet around the next stitch, repeating this alternating sequence around the ring. Maintain this alternating post-stitch rhythm across eight continuous rounds, adjusting your increases symmetrically within the pattern valleys to expand the tube to forty-two stitches before decreasing back to twenty-four. The post stitches produce a thick, structured fabric wall that naturally holds its shape. Pack a light layer of polyester stuffing into the channel, graft the inner borders together with an invisible needle join, and install a matte-black stainless steel key ring.
10. Split Bitten Donut with Jam Infill

How to Make
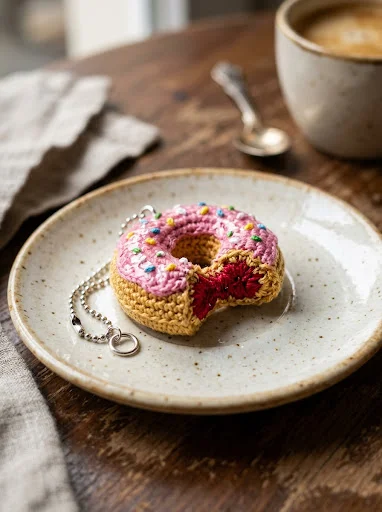
The split bitten donut charm introduces a playful narrative element to miniature dessert crafting by featuring a realistic missing bite mark that reveals an inner jam filling. Rather than maintaining an unbroken circular ring, this design is worked as an open crescent, using layered red embroidery stitches and stepped decreases to simulate uneven tooth marks along the break. The contrast between the golden pastry exterior, the glossy pink glaze, and the exposed crimson berry jam filling creates an authentic, engaging miniature sculpture. This advanced concept challenges crafters to move beyond simple rotational symmetry, requiring calculated edge shaping, targeted interior stuffing, and clean edge closures along flat vertical breaks. The finished piece stands out as a unique conversation starter, showcasing exceptional artisanal crochet skill and creative storytelling through fiber art.
Begin by chaining twenty-four stitches in golden-tan yarn, working the standard tubular donut sequence with increases, an upper strawberry glaze transition, and corresponding decreases across forty stitches. Before packing or grafting the inner opening closed, use sharp fabric snips to cut straight through one side of the donut ring, creating two raw open ends separated by a half-inch gap. Fold the raw edges inward and whipstitch them closed with matching thread, forming a clean crescent shape. To construct the bite mark impression, use ruby-red cotton yarn to embroider dense clusters of satin stitches across the exposed flat ends, fully concealing the underlying tan yarn to simulate rich fruit jam. Indent the center of the cut edge using deep, tightly pulled running stitches to replicate an authentic curved tooth impression. Pack the remaining crescent body firmly with fiberfill, graft the inner curved rim closed, and secure a heavy-duty ball-chain loop through the opposite intact pastry arch.
Common Beginner Mistakes and How to Avoid Them
When crafting miniature amigurumi donut charms, beginners frequently encounter issues with loose stitch tension, which allows white internal stuffing to show through the stitches. To prevent this unsightly problem, always select a hook that is one to two sizes smaller than recommended on the yarn label, creating a dense, impenetrable fabric wall that completely conceals inner padding. Another widespread challenge is losing track of round counts when working continuous spiral rounds around the open center ring. Because miniature patterns expand and contract within only a few stitches, missing a single increase can warp the entire ring and cause the donut to twist unevenly. Always insert a locking metal stitch marker into the first stitch of every round, moving it upward systematically as you work. Additionally, beginners often under-stuff or over-stuff the inner circular channel: under-stuffing leaves the charm dented and limp, while over-stuffing stretches the stitches and distorts the circular opening into a solid lump. Pack the fiberfill in small, compressed pinches using the flat end of a wooden skewer, pressing the fill firmly against the outer curved walls while keeping the inner hole open and defined.
Practical Tips for Better Results
Achieving a clean, professional finish on micro-crochet charms requires careful attention to fiber selection, color joins, and finishing techniques. Always choose mercerized cotton over standard acrylic yarns; the treated cotton fibers resist pilling from everyday pocket friction, maintain vibrant color over time, and provide the crisp stitch definition essential for miniature details. When transitioning from the dough color to the frosting glaze, execute the color change on the final yarn-over of the preceding stitch, and work the first round of the new color in the back loops only to produce a sharp, shelf-like glaze edge. When sewing the inner seam of the donut closed, use the mattress stitch or a needle graft through the corresponding front loops of the starting and ending rounds to ensure a completely invisible seam that looks seamless from all angles. Finally, improve the longevity of your handmade accessories by applying a light mist of water-based fabric stiffener across the finished charms. Allow them to air-dry completely on blocking pins to lock the circular geometry in place before attaching keychains and bag hardware.
Styling, Presentation, or Organization Ideas
These miniature dessert charms offer versatile styling potential across a wide range of personal accessories and home settings. Attach a single glazed donut charm to the zipper pull of a canvas tote bag, laptop sleeve, or casual denim jacket to introduce a playful touch of texture to everyday essentials. You can also cluster three charms of varying pastry styles together using split jump rings and a swivel lobster clasp, creating an attractive multi-tier bag pendant that moves naturally with wear. Beyond personal accessories, these compact creations make wonderful decorative additions to domestic spaces. String eight to ten charms along a length of waxed linen cord to create an adorable seasonal garland for coffee bars, baker’s racks, or kitchen pegboards. For neat, functional organization within a craft studio, arrange completed charms by glaze color on mounted wooden pegboards using small brass cup hooks. This setup keeps the pendants organized and accessible while doubling as an inspiring wall display that highlights your handmade collection.
Budget or Time Planning
Miniature crochet projects are exceptionally cost-effective and time-efficient, making them ideal ventures for makers working within tight budget or schedule limits. Because each donut charm consumes less than fifteen yards of yarn, a modest stash of sport-weight cotton skeins can yield dozens of individual pieces without requiring additional raw material purchases. A single charm typically takes between forty-five and seventy-five minutes to complete, allowing crafters to finish polished, functional items in a single evening. To maximize productivity, implement an assembly-line workflow: crochet all the golden dough bases in one focused session, craft the various colorful glazes during the next, and complete the embroidery, stuffing, and hardware assembly in a final sitting. Sourcing your split key rings, jump rings, and lobster clasps in bulk packs of fifty or one hundred pieces significantly reduces the cost per unit, dropping the production expense of each finished pendant to a fraction of retail prices. This combination of minimal expense and fast turnaround makes these charms fantastic choices for community craft fairs, holiday gift exchanges, and satisfying weekend projects.
Creative Expansion and Advanced Inspiration
Once you master basic donut ring geometry, you can expand this craft into advanced configurations and mixed-media projects. Experiment with scaling these patterns up or down simply by altering your yarn weights and hook sizes. Working with fine size 10 or 20 crochet thread alongside a 1.0 mm steel hook transforms these designs into delicate jewelry pieces, such as drop earrings, dainty charm bracelets, or wearable pendant necklaces. Conversely, working the identical patterns with chunky chenille yarn and an 8.0 mm hook scales the miniature charm into a plush desk pillow or nursery accent. You can also explore richer mixed-media accents by incorporating miniature safety eyes, tiny wooden jewelry beads, hand-sewn seed pearls, or specialized textile inks to airbrush subtle toasted gradients onto the golden pastry dough. By combining varied fiber weights, alternative hardware configurations, and creative surface embellishments, you can easily develop unique variations on this versatile dessert motif that reflect your personal design style.