Handmade crochet charms for teachers represent one of the most practical and thoughtful craft trends across online creative communities. These miniature yarn creations serve as personalized tokens of appreciation, desk accents, bag tags, and classroom markers. Exploring these projects allows makers of all skill levels to discover structured methods for constructing meaningful gifts that celebrate educators. In this detailed guide, you will learn the foundational construction techniques, material requirements, and assembly processes needed to build ten distinctive charm designs. Each concept balances aesthetic appeal with daily utility, ensuring the finished piece functions well in a school environment. Handmade gifts carry emotional significance, making these small projects far more memorable than mass-produced retail items. Creating charms also allows crafters to utilize leftover yarn scraps, turning small supplies into polished, professional accessories. By mastering these designs, you gain practical textile skills, understand dimensional yarn construction, and produce durable keepsakes tailored to classroom settings. Whether crafting for Teacher Appreciation Week, back-to-school celebrations, or holiday recognition, these curated ideas offer a clear, step-by-step pathway to successful crafting.
Why This Idea Is Trending or Useful
Crochet charms tailored for educators continue to dominate trending ideas across visual design platforms because they merge functional everyday utility with charming visual craft. Modern design trends prioritize handmade objects that convey personal thought without cluttering functional work surfaces. Classrooms require efficient organization, and these compact accessories attach seamlessly to teacher lanyards, key rings, canvas totes, and desk organizers. The DIY appeal stems directly from the rapid completion time of small-scale yarn work, providing immediate creative satisfaction without the extensive time investment required by large afghans or garments. Beginners find these compact pieces highly accessible because they rely on fundamental stitches worked in continuous rounds or simple flat rows. The minimalist style of modern fiber arts gives these traditional school motifs a contemporary look that fits professional adult aesthetics. Furthermore, miniature fiber pieces provide an affordable, creative project that keeps material budgets low while delivering lasting sentimental value. By translating familiar academic emblems into textured fabric, makers create durable keepsakes that brighten long instructional workdays.
Materials and Preparation
Proper preparation ensures structural durability and clean visual presentation across all miniature crochet charm projects. The primary materials required include sport-weight or lightweight mercerized cotton yarn, which provides crisp stitch definition and prevents surface pilling under daily handling. A standard 2.5 mm or 3.0 mm ergonomic aluminum crochet hook maintains the firm, dense gauge needed to keep structural shapes intact and hide internal batting. Essential tools include a blunt tapestry needle for weaving yarn tails, sharp embroidery scissors, locking metal stitch markers, polyester cluster fiberfill for stuffing three-dimensional forms, and sturdy metal key rings or swivel lobster clasps. Before beginning any pattern, calculate the intended gauge by working a small test circle to confirm that no gaps appear between standard single crochet stitches. Cut suitable lengths of cotton cord or gather jump rings for the final mechanical attachments. Keep small containers nearby to organize safety eyes, wooden spacer beads, and split rings. Clean hands and an uncluttered, well-lit surface prevent fiber contamination during construction.
1. Classic Red Apple Keyring Accent
Execution Process
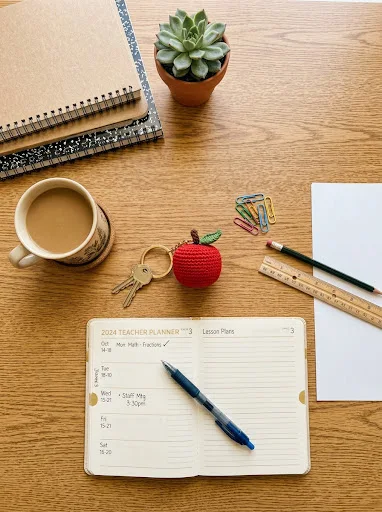
The miniature red apple represents an enduring emblem of educational appreciation, executed here as a balanced three-dimensional sphere. The design features a rounded base that narrows slightly at the crown, topped with an integrated green leaf and a slender brown stem. Worked in continuous spiral rounds, the dense single crochet stitches yield a firm, smooth exterior that withstands repeated daily friction when attached to classroom keys or lanyard clips. Mercerized cotton yarn gives the fruit an authentic sheen while maintaining structural firmness without visible fiber distortion. A subtle indentation worked into the top and bottom poles replicates natural botanical contours, transforming basic spherical amigurumi into an elevated decorative piece. This project serves as an ideal baseline for beginners, introducing uniform stitch increases, controlled decreases, and balanced internal stuffing techniques. Its compact diameter ensures it remains lightweight, preventing unnecessary strain on vehicle ignitions or zipper sliders while delivering an unmistakable visual tribute to classroom mentors.
To construct the apple, form an adjustable magic loop using vibrant red cotton yarn and work six single crochet stitches directly into the center. Expand the circle through systematic increases over subsequent rounds until reaching thirty stitches, maintaining equal tension to prevent surface buckling. Work six level rounds without increases to establish the vertical height of the fruit. Begin tapered decreases evenly across the following three rounds, pausing when a small opening remains to pack polyester fiberfill firmly into the interior. Complete the final decrease round, fasten off, and leave a twelve-inch yarn tail. Thread this tail through the center core from top to bottom, pulling firmly to create realistic dimpled poles before knotting securely. To make the stem, join deep brown yarn at the center indent, chain five, and slip stitch back along the foundation chain. Attach olive green yarn beside the stem, chain four, single crochet into the second chain, double crochet into the next, and slip stitch into the final loop to shape the leaf. Secure all yarn ends inside the core and fasten a twenty-millimeter split ring through the base of the stem.
2. Miniature Graphite Pencil Backpack Tag
Read This:

Setup Method
This elongated hexagonal pencil charm translates a fundamental classroom tool into a whimsical, functional accessory designed for book bags and supply totes. The visual layout follows the familiar anatomy of a traditional wooden pencil, featuring a soft pink eraser terminal, a metallic silver ferrule band, a vibrant yellow barrel, and a tapered natural wood tip capped with a charcoal lead point. Working this piece in continuous rounds creates a sturdy, self-supporting cylinder that maintains crisp geometric boundaries between color transitions. The firm fabric prevents bending, ensuring the finished piece maintains its distinct linear silhouette even during active daily commutes. Mercerized sport-weight yarn keeps the diameter compact, making the charm unobtrusive yet immediately recognizable to colleagues and students. Beyond its aesthetic appeal, this design provides practical practice in managing clean horizontal color changes and working tight decreases at the sharpened conical tip. It serves as a durable marker for teacher planner bags, pencil cases, or personal storage cubbies.
Begin the pencil at the eraser end by working six single crochet stitches into a magic ring using dusty pink yarn. Increase evenly to twelve stitches in the second round, then work three straight rounds in back loops only to establish a sharp, flat boundary edge. Switch seamlessly to metallic gray yarn to construct the metal ferrule, working two complete rounds of twelve single crochet stitches. Transition directly to bright golden yellow yarn to form the main hexagonal body, crocheting twelve level rounds while maintaining uniform vertical tension. Pause to insert a thin dowel segment or densely rolled polyester stuffing to give the central barrel rigid vertical stability. Change to unbleached cream yarn to initiate the sharpened wooden section, working one level round followed by alternating decrease rounds that taper the cylinder into a precise conical apex. Switch to matte charcoal yarn for the final six-stitch decrease round to form the graphite lead point. Draw the remaining loops closed with a tapestry needle, weave the tail through the core, and attach a lobster clasp to the pink eraser end using a securely knotted loop of reinforced cotton cord.
3. Wise Horned Owl Mascot Ornament
Assembly Sequence
The horned owl motif celebrates wisdom and thoughtful mentorship, making it a beloved visual theme for primary and secondary school educators. This design transforms the classic symbol into a charming egg-shaped body adorned with layered felt or crocheted eye patches, a miniature triangular beak, and textured feather tufts at each ear. The compact profile ensures durability, avoiding fragile protruding limbs that might catch on clothing or desk hardware. Rich earth tones such as warm taupe, cream, and mustard yellow provide a modern, grounded palette that aligns with contemporary artisan home decor trends. The front chest panel features subtle textured cluster stitches that simulate natural plumage, introducing makers to varied surface textures within a small project radius. The dense, stable base allows the finished owl to stand unsupported as a small desk companion beside computer monitors or stackable paper trays, in addition to functioning as an eye-catching hanging charm.
Start the owl by casting six single crochet stitches into an adjustable ring using medium taupe yarn. Increase sequentially across five rounds until reaching thirty stitches, establishing a sturdy circular base. Continue upward in continuous rounds for eight levels, introducing three central popcorn stitches along the front chest quadrant on alternating rounds to build layered surface texture. For the eyes, work six single crochet stitches of ivory yarn into two separate magic loops, fasten off, and secure small black safety beads through the centers before stitching both rounds onto the upper half of the face. Embroider a small diamond-shaped beak between the eyes using burnt-orange thread. Begin balanced decrease rounds to narrow the crown of the head, inserting polyester batting progressively to achieve a firm, resilient density. Once closed, pinch the top corners flat and attach four-strand yarn fringes to the left and right edges. Comb and trim these fringes to form pointed feather tufts. Attach a small silver jump ring and swivel hook behind the central crown seam to complete the hanging mechanism.
4. Vintage Composition Notebook Charm


How to Make
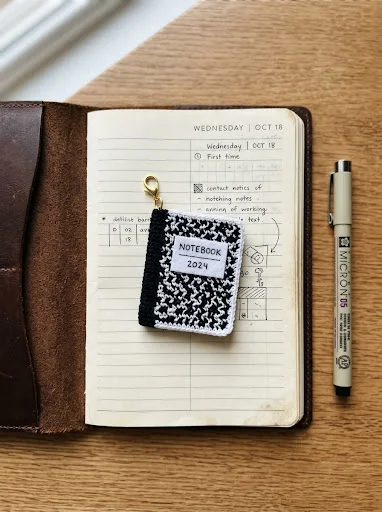
This flat, rectangular charm replicates the nostalgic visual identity of a classic marble-patterned composition notebook. Designed as an ultra-slim hanging tablet, it features a textured black-and-white mottled front cover, a solid black spine binding, and neat ivory page edges along the perimeter. Unlike stuffed amigurumi, this project relies on flat row-by-row tapestry crochet techniques, producing an item with minimal bulk that lies flat against planner covers, lanyards, and book surfaces. The distinct graphic design provides an authentic academic touch, celebrating lesson planning, reflective journaling, and literacy instruction. The front face includes a small stitched rectangular label where crafters can embroider initials, grade levels, or specific subject abbreviations using simple backstitch embroidery. The structural rigidity is achieved through tight single crochet stitches, ensuring the notebook edges remain crisp and perpendicular without curling over time. It represents an exceptional exercise in precise edge neatness and two-color yarn carriage.
To construct the notebook covers, chain fourteen using crisp black yarn and work thirteen rows of single crochet, carrying an off-white secondary yarn within the stitches to produce random, two-stitch monochrome marbling across the surface. Work two identical rectangular panels to serve as the front and back covers. For the interior pages, cut a thin rectangle of stiff white crafting felt slightly smaller than the crochet panels, or work a solid ivory crochet insert spanning twelve rows of twelve stitches. Sandwich the felt or crochet page insert between the decorative covers, aligning the outer perimeter precisely. Join black yarn at the top left corner and crochet through all layers down the left edge to form the notebook binding, executing three single crochet stitches into each corner turn to maintain flat geometry. Switch to ivory yarn along the top, right, and bottom edges, working a dense slip-stitch border through the outer loops to simulate compressed paper sheets. Embroider a small white felt label onto the front cover using black sewing thread, then fasten an antique bronze swivel clasp directly to the top edge of the reinforced spine.
5. Golden Honeybee Appreciation Accent
How to Create
The honeybee motif offers a sweet message of gratitude, celebrating the industrious energy and dedication educators bring to their classrooms every day. This design features an oblong, striped body worked in alternating bands of honey yellow and deep espresso brown, complemented by delicate translucent-style white wings and a miniature embroidered face. The rounded, compact proportions create a smooth, tactile charm that teachers can attach to supply pouches or keep in pockets as a grounding token. The clean striping requires precise yarn handling to prevent jagged color transitions, providing an excellent platform for mastering jogless stripes in round crochet. Lightweight white wings are worked separately as flat teardrop petals and anchored securely to the dorsal line, laying flat against the body to prevent snagging during routine use. This cheerful insect design brightens instructional environments while offering a modern, nature-inspired decorative accent suitable for all grade levels.
Initiate the bee’s body with six single crochet stitches in an adjustable loop using honey-gold cotton yarn. Increase systematically over four rounds to reach twenty-four stitches, then proceed with two level rounds of gold. Introduce dark brown yarn without cutting the gold thread, working two full rounds of brown, followed by two rounds of gold, repeating this sequence to produce five distinct horizontal stripes across the abdomen. Position miniature four-millimeter safety eyes between rounds three and four of the gold face area, securing the plastic washers firmly on the interior. Begin even decrease rounds along the rear segments, packing batting smoothly to maintain an aerodynamic, oblong shape. Close the terminal opening and weave the tail inward to hide the knot. To construct the wings, use fine white cotton yarn to work into a magic loop: chain two, three double crochets, two treble crochets, three double crochets, and chain two, slip stitching into the center ring. Pull the loop tight to form a symmetrical teardrop, make a matching pair, and stitch both securely along the upper brown stripe. Affix a gold key chain to the top center balance point.
6. Potted Green Succulent Desk Charm

Read This:

Step-by-Step Guide
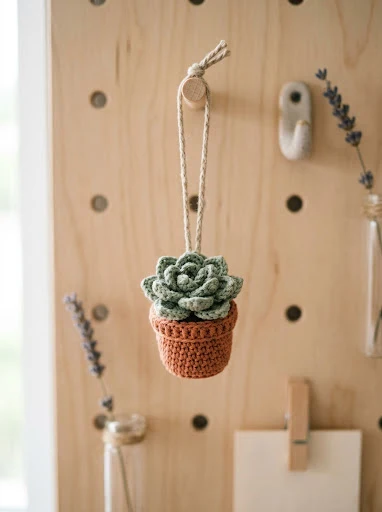
Potted plants bring calming botanical aesthetics into learning spaces, but living greenery often struggles under low classroom lighting and busy teaching schedules. This crochet succulent charm captures natural botanical charm in a permanent, zero-maintenance fiber form. The design features a miniature terracotta-toned pot holding rich dark soil, from which a cluster of pointed sage-green succulent rosettes emerges. Designed with a wide, flat bottom, this piece serves dual roles: it can hang gracefully from an office pegboard or rest steadily upon a teacher’s desk alongside pens and dry-erase markers. The combination of structured geometric pottery shapes with organic leaf clusters provides rich visual contrast. Working the foliage introduces crafters to dimensional petal construction, picot points, and tight cluster joins. The earthy color combination of terracotta, deep brown, and muted sage reflects contemporary minimalist style, producing an elegant gift that complements modern classroom organization.
Begin the flower pot using rich terracotta yarn, working six single crochet stitches into a magic ring. Increase across three rounds to eighteen stitches, then work one round into the back loops only to establish a crisp, flat baseline. Crochet six upright rounds of eighteen stitches, widening slightly by two stitches on round five. For the top lip of the pot, work one round in front loops only using half double crochet stitches, creating an authentic protruding rim before fastening off. Join dark brown yarn to the exposed interior back loops of the rim round, working one level round and one rapid decrease round packed with dense stuffing to form the soil base. For the succulent rosettes, join sage-green yarn directly to the central soil surface. Chain four, work a picot point in the second chain from the hook, single crochet in the remaining chains, and slip stitch back into the soil. Repeat this petal sequence in concentric rings moving outward, varying chain lengths between three and five stitches to create layered, natural foliage. Secure all interior ends and thread a durable braided cord through the bottom base up through the foliage center, finishing with a brass trigger snap.
7. Pastel Chalkboard Eraser Keepsake

Execution Process
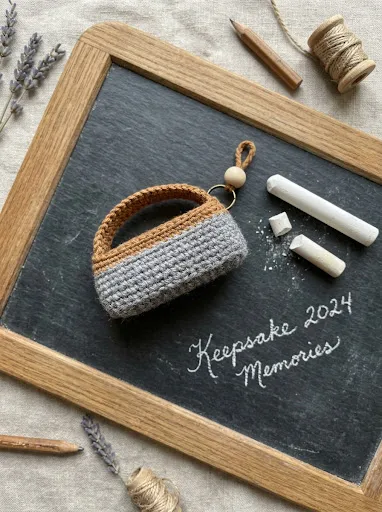
This charm reimagines a traditional classroom tool by rendering the classic wooden chalkboard eraser in soft pastel textiles. The structured rectangular design features two distinct visual strata: a plush, heather-gray lower felt section representing the dense cleaning pad, and an upper wooden-toned block representing the ergonomic handle. The clean lines and angular geometry provide a pleasant departure from typical rounded amigurumi projects. Crafters master rectangular spatial construction by combining flat foundation chains, sharp corner increases, and straight vertical wall rises. Because an eraser is fundamentally angular, maintaining crisp vertical planes is critical to preserving its recognizable character. This charm looks exceptional attached to whiteboard marker caddies, teacher tote zippers, or classroom key sets. Its compact, lightweight footprint prevents it from feeling clunky, while the tactile wool-blend or cotton yarn delivers a warm, comforting feel during demanding workdays.
Begin by chaining nine using soft heather-gray yarn. Work eight single crochet stitches down the chain, place three stitches in the final link to turn the corner, and work seven stitches along the opposite side, placing two stitches in the last space to complete an eighteen-stitch rounded rectangle. Continue working outward for one additional round, placing three single crochets into each of the four corner points to establish sharp, perpendicular angles. Work three vertical rounds of twenty-six stitches without increases to build the height of the felt pad. Switch to warm caramel-brown yarn to represent the wooden block, working one round into the back loops only to define the material boundary. Crochet four subsequent level rounds in standard single crochet. Cut a rectangular insert from thin plastic canvas and place it at the base to maintain a flat rubbing surface, then pack the interior with firm batting. To close the top handle, work matching corner decreases over two rounds, or whipstitch a separate flat rectangular brown panel across the upper opening. Secure a small antiqued bronze eyelet screw or thread loop at one end to anchor a sturdy key ring.
8. Coffee Mug Fuel Accent

Step-by-Step Guide
Educators rely on daily coffee and tea breaks to sustain their energy through early morning lesson preparation and late-afternoon grading sessions. This miniature mug charm captures that routine in a delightfully detailed ceramic-style design. The model features a cylindrical white mug body with a curved side handle, filled with deep espresso-brown or caramel-colored liquid at the brim, complete with a tiny embroidered swirl of white cream. The hollow-wall construction requires consistent tension to ensure the mug remains circular without bulging outward when stuffed. Crafters develop precision when crocheting and attaching the slender hollow handle, which must be anchored firmly to withstand daily tugs. The neutral palette of warm cream, rich coffee, and soft pastel ceramic tones integrates seamlessly with adult accessories. This project provides a relatable, humorous, and heartfelt nod to an educator’s daily fuel source, serving as an exceptional decorative accent for thermal mug bags, lunch totes, or classroom desk caddies.
Form the base of the mug by working six single crochet stitches into a magic circle using bright white yarn. Increase uniformly across four rounds to reach twenty-four stitches. Work one round into the back loops only to create a sharp perpendicular footing. Continue upward in standard single crochet for eight rounds, forming a tidy cylindrical cup. Fasten off white yarn cleanly. Take rich dark-brown yarn and crochet an independent flat circle of twenty-four stitches, working an internal spiral of surface slip stitches with cream embroidery floss to simulate poured foam art. Position the brown liquid circle inside the top rim of the white cup, aligning stitch for stitch. Join the two components by slip stitching through both loops around the top perimeter, pausing three-quarters of the way around to fill the mug firmly with batting before completing the seam. To construct the handle, chain nine with white yarn, turn, and work eight slip stitches down the row to create a structured, slightly curved cord. Pin the handle ends to the side wall spanning rounds three through seven, whipstitch both contact points securely with a yarn needle, and attach a lobster clasp to the upper rim opposite the handle.
9. Academic Graduation Mortarboard Charm

How to Make
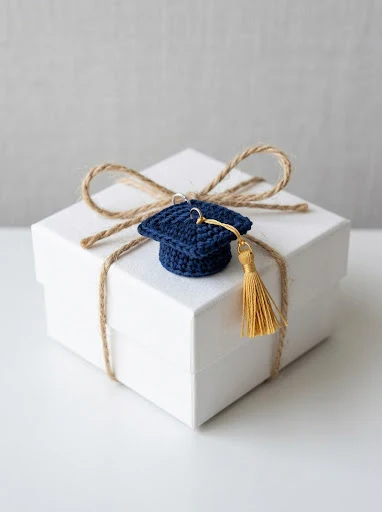
The academic graduation cap, or mortarboard, represents formal academic accomplishment, dedication to scholarship, and the transformative guidance provided by dedicated instructors. This geometric charm features a crisp, diamond-shaped flat mortarboard top balanced over a round skull cap base, finished with a contrasting dangling tassel that sways with movement. Constructing this piece challenges crafters to create perfectly flat, non-curling square planes using balanced corner stitch expansions. The stark geometric contrast between the square crown and circular skull cap offers excellent spatial training in textile assembly. Rendered in classic collegiate navy, deep forest green, or timeless black, the cap projects dignity and scholarly respect. The miniature tassel provides fluid movement, catching the eye when attached to professional portfolio zippers, graduation gift bags, or daily lesson plan binders. It stands as a timeless symbol of gratitude, acknowledging an educator’s profound influence on student success and personal development.
Begin the square mortarboard top by chaining two in deep navy yarn, working four single crochets into the first chain. In round two, work three single crochet stitches into every single stitch to establish four distinct corners. Across subsequent rounds, identify each center corner stitch and place three single crochets into it, working single crochets across the intervening edges until the square measures approximately two and a half inches wide. Fasten off and block the square with gentle steam to ensure edges remain flat. For the lower skull cap, work six single crochets into a magic loop, expand to eighteen stitches over three rounds, and crochet two level rounds to form a shallow dome. Lightly stuff the dome and stitch its open edge centered against the underside of the flat mortarboard square. Thread a tiny gold button or work a French knot using golden-yellow embroidery thread directly through the top center of the square. Wrap gold embroidery thread ten times around a small piece of cardboard, tie the top bundle, snip the lower loops, and bind the neck to create a miniature hanging tassel. Anchor the tassel thread to the central button, allowing it to drape naturally over the edge, and secure a jump ring through the central apex.
10. Colorful Art Palette Painter Charm
Read This:
Setup Method
Art educators, early childhood teachers, and elementary instructors bring creativity and vibrancy into classrooms every single day. This painter’s palette charm celebrates that imaginative spirit with an ergonomic, kidney-bean-shaped artist tray adorned with textured dollops of colorful paint. The design features a smooth wooden-buff base worked in flat rows with progressive asymmetric increases, complete with a tiny thumbhole ring and miniature surface color accents in crimson, azure, lemon, and emerald. Crafting this piece requires careful adherence to shaped perimeter contours, expanding a maker’s proficiency beyond basic circles and squares into organic forms. The thin, dual-layered construction ensures that yarn tails remain hidden within the sandwich while giving the palette sufficient structural body to prevent flopping. This charm looks brilliant clipped to art apron ties, classroom scissors caddies, or canvas supply bags, making it a thoughtful, visually dynamic tribute to an educator’s colorful influence.
To form the curved palette shape, chain ten using natural unbleached linen yarn. Work across the chain using an asymmetric progression of two slip stitches, three single crochets, two half double crochets, and three double crochets, placing four double crochets in the terminal loop to turn the edge. Continue along the underside with corresponding stitches, shaping an organic, kidney-style contour across two expanding rounds. To introduce the thumbhole, work a chain of three midway through round two, skipping two base stitches before resuming single crochets. Create an identical matching back panel. Align both pieces together and single crochet around the combined perimeter to build a clean, double-thick foundation. For the paint dollops, select miniature scraps of vibrant red, yellow, blue, and green cotton thread. Work five single crochet stitches into a tiny magic loop for each color, slip stitch to close, and fasten off with a six-inch tail. Space these miniature color dots evenly along the outer curved perimeter of the palette and sew them down flat against the upper panel. Finish the charm by securing a durable brass split ring directly through the open thumbhole.
Common Beginner Mistakes and How to Avoid Them
Creating miniature crochet charms requires precise tension control and disciplined technique, as small-scale errors become immediately visible on compact items. A frequent mistake among beginners is using loose crochet tension, which causes the fabric to stretch and allows white polyester fiberfill to poke through the stitches. To resolve this, choose a hook size that is half a millimeter to a full millimeter smaller than the yarn label recommends, producing dense, closed stitches. Another common issue is uneven internal stuffing; packing fiberfill loosely results in lumpy, deformed shapes that flatten under regular handling. Roll your stuffing into firm, small pellets and push them into the corners using the back of a crochet hook to build uniform firmness. Novices also tend to neglect stitch markers during continuous rounds, leading to misaligned increase points and asymmetrical shapes. Always place a locking marker into the active working loop of the final stitch in every round. Finally, securing hardware poorly often causes charms to detach from keychains. Avoid attaching metal split rings to single yarn strands; instead, anchor loops through multiple structural stitches and tie triple knots on the hidden interior before fastening off.
Practical Tips for Better Results
Achieving clean, professional finishes on small handmade gifts relies on specific finishing habits and material choices. Always choose mercerized cotton yarns over fuzzy acrylic alternatives; the tightly spun plant fibers deliver sharp stitch definition, resist splitting during delicate maneuvers, and prevent surface pilling caused by friction against keys or bag fabrics. When executing transitions between colors, finish the final yarn-over of the preceding stitch with the incoming new color to produce sharp horizontal boundaries free from intermediate color bleeding. Master the invisible decrease technique for all amigurumi curves: insert the hook into the front loops only of two consecutive stitches, yarn over, pull through both loops, and finish the single crochet. This creates seamless, gap-free decreases that mirror standard stitches. Take time to steam-block flat charm components, such as mortarboard caps and notebook panels, under a damp pressing cloth before final assembly to flatten curling corners. When attaching metal hardware, incorporate small jewelry jump rings with pliers rather than forcing thick yarn through metal openings, ensuring the charm hangs straight and swivels freely during daily use.
Styling, Presentation, or Organization Ideas
The visual presentation of a handmade charm significantly enhances its impact as a thoughtful gift. Presenting these miniature textile pieces on custom kraft-paper backing cards transforms casual crafting into a sophisticated, professional gift experience. Cut heavyweight cardstock into clean rectangular tags, punch two small holes near the center, and secure the charm’s clasp through the paper, leaving space below for a handwritten note or student signature. These charms also function beautifully as reusable gift accents tied directly into the ribbon wrapping of a larger present, such as a favorite book, insulated drink tumbler, or supply organizer. In classroom settings, educators can clip these charms to lanyard loops, zipper pulls on grading bags, electronic tablet covers, or pencil pouches. You can also hang several charms together from a wooden pegboard near a classroom entryway to organize different room keys, passes, or storage cabinets. The cohesive aesthetic of cotton yarn brings warmth to institutional metal desks and filing cabinets, serving as a bright, decorative focal point throughout the school day.
Budget or Time Planning
Efficient planning makes crafting multiple teacher appreciation charms both affordable and manageable. Because each miniature design requires only ten to twenty grams of yarn, a crafter can produce an entire classroom set from two or three standard skeins of cotton yarn, keeping material costs minimal. To maximize productivity, employ batch-processing techniques: complete all spherical bases in one session, craft small components such as leaves, stems, and handles in a second session, and finish assemblies and hardware attachments in a final block. An individual charm typically takes between forty-five and seventy-five minutes to complete, allowing makers to produce several finished pieces over a single weekend. Organizing materials before starting prevents wasted time; gather your safety eyes, polyfill containers, tapestry needles, and hardware clasps into compartmentalized sorting trays. Establishing an organized production basket keeps active projects portable, letting you complete quick rounds during commutes, appointments, or quiet evening hours. This methodical approach ensures high-quality results without late-night rushing before school gift-giving occasions.
Creative Expansion and Advanced Inspiration
Once you master these baseline charm patterns, explore advanced variations to personalize designs for specific instructional disciplines and grade levels. Music teachers appreciate variations that incorporate miniature crocheted treble clefs or striped piano keys worked with fine crochet thread. Mathematics instructors enjoy charms shaped like miniature geometric solids, abacus frames with sliding wooden spacer beads, or woven measuring tape ribbons. You can also integrate mixed-media elements into fiber pieces, such as unstained natural hardwood rings for tactile appeal, tiny metal charms stamped with graduation years, or custom leather labels engraved with personal names. Advanced crafters can experiment with finer gauge crochet threads, using 1.0 mm hooks to scale these designs down into delicate earrings, lapel pins, or subtle bookmark markers. Changing the seasonal color palette transforms traditional items into festive holiday keepsakes, such as turning the apple motif into a winter holiday ornament using metallic gold accent threads. Exploring diverse surface textures and materials expands your skills while ensuring every handmade gift honors its recipient’s unique dedication.