Handmade yarn accessories have become a dominant trend across modern accessories and creative boards, specifically through the craft of tiny crochet charms designed for backpacks. This comprehensive guide introduces makers to the construction, assembly, and attachment of miniature amigurumi accents that instantly personalize canvas rucksacks, school bookbags, and travel gear. Readers will discover ten unique project concepts, spanning botanical motifs, miniature fruits, celestial charms, and playful geometric figures. Each featured project details exact stitch workflows, fiber selections, and attachment methods suitable for beginners as well as intermediate fiber artists. Creating personal backpack accessories provides a functional entry point into three-dimensional crochet without demanding massive yardage investments or extensive project timelines. Handcrafted bag charms offer an easy project to utilize small yarn scraps while developing core techniques like the magic ring, continuous spiral increases, invisible decreases, and structural assembly. Beyond visual aesthetics, these small accessories bring practical utility by improving zipper grip and assisting in identifying bags in crowded classrooms, airports, or commuter trains. By following this structured tutorial, crafters will acquire the skills needed to produce durable, charming adornments that endure daily urban wear and tear.
Why This Idea Is Trending or Useful
The rising popularity of crochet backpack charms across online craft communities reflects the growing appreciation for tactile, personalized accessories and modern DIY fashion statements. Miniature yarn projects satisfy the demand for creative ideas that deliver instant creative satisfaction without requiring weeks of dedicated labor. These accessories merge practical utility with aesthetic appeal, giving plain backpacks an instant custom makeover while serving as functional zipper pulls for quick opening. The minimalist style of modern commuter bags pairs exceptionally well with vibrant, textured fiber art, creating balanced contrast through soft yarn textures. For beginners, small crochet charms represent a non-intimidating way to practice foundational amigurumi techniques while maintaining minimal material waste. The low barrier to entry ensures anyone with a single hook and remnant yarn can participate in these trending ideas affordably. Furthermore, these miniature creations function as thoughtful handmade gifts, sustainable seasonal accessories, and collectible accents that can be swapped depending on personal mood or seasonal transitions. As urban commuters and students continue seeking distinctive identifiers for mass-produced gear, small handmade bag pendants provide a stylish, accessible, and functional DIY solution.
Materials and Preparation
Proper material selection is essential for crafting durable backpack charms that withstand friction, rain exposure, and frequent daily handling. Mercersized sport-weight or worsted-weight cotton yarn represents the optimal choice, offering superior stitch definition, minimal fuzzing, and exceptional resilience against continuous wear. Gather an ergonomic crochet hook sized slightly smaller than recommended on the yarn label, typically between two millimeters and three millimeters, to produce tight, rigid stitches that keep polyester fiberfill securely contained. Essential preparation tools include a blunt tapestry needle for seamless assembly, sharp embroidery scissors, locking stitch markers for tracking continuous rounds, and safety eyes with locking washers. For attaching the completed piece to bag hardware, secure sturdy metal swivel lobster clasps, heavy-gauge jump rings, split rings, and fine needle-nose jewelry pliers. Initial planning involves sketching charm dimensions to verify that the finished silhouette measures between five to ten centimeters, preventing excessive dangling or zipper obstruction. Conditioning your workspace with small organizational trays keeps jump rings and tiny components organized during assembly. Preparing your hardware beforehand guarantees a clean transition from fiber construction to functional backpack installation.
1. Idea 1: Mini Potted Monstera Leaf Cluster
Step-by-Step Guide
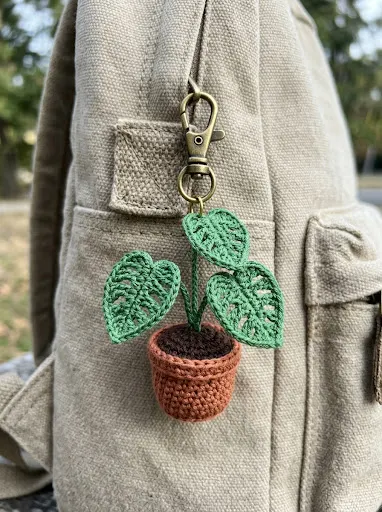
The mini potted monstera leaf cluster brings modern botanical style directly to backpack utility webbing through compact, sculpted foliage. This design features a miniature terracotta-toned cylinder pot topped with dense dark brown soil and three distinctive notched green leaves that hold their upright structure. Its fresh green aesthetic introduces an earthy, organic visual accent against dark nylon, canvas, or leather backpack textures. The botanical concept draws directly from contemporary indoor plant collections, translating large tropical foliage into miniature fiber art. Using firm cotton ensures that each individual leaf maintains its characteristic fenestrations and silhouettes without drooping over time. The solid cylindrical base provides grounding weight, keeping the charm stable when walking or moving through tight transit spaces. This piece appeals to houseplant enthusiasts seeking subtle handmade nature motifs on their everyday carry accessories.
To construct this piece, begin by working into a magic ring using terracotta-colored cotton yarn, completing six single crochets before increasing evenly in continuous spirals to eighteen stitches. Work single crochets through the back loops only to establish a crisp ninety-degree bottom edge, then continue even rounds upward for seven rows to form the pot walls. Switch to dark brown yarn and work inside front loops to create a textured soil cap, leaving a small opening to insert firm polyester fiberfill before closing. For the leaves, chain nine using rich forest green yarn, working slip stitches, half double crochets, and treble crochets along the chain length while executing chain-space cutouts to mimic monstera slits. Insert thin craft wire along the center leaf vein during final border edging to allow natural outward shaping. Stitch the leaf stems firmly into the brown soil center using a tapestry needle, anchoring threads at the base. Secure a sturdy brass jump ring through the central stem junction and fasten it to a metal swivel clasp.
2. Idea 2: Sun-Dappled Citrus Lemon Slice

Read This:

How to Make
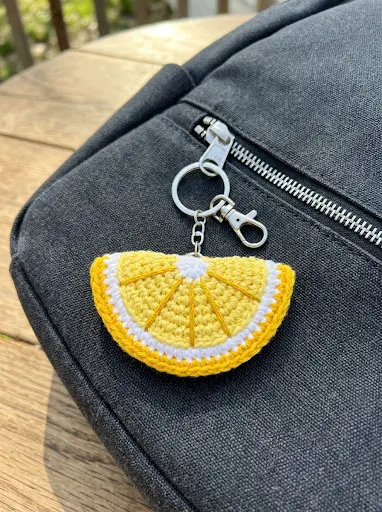
The sun-dappled citrus lemon slice charm delivers bright energy and high-contrast color blocks that make backpack zippers easy to locate instantly. Shaped as a flat semicircle with distinct segmented wedges, this design combines optic white pith lines against bright butter yellow and deep lemon rinds. Its geometric profile lays comfortably flat against backpack side pockets, avoiding unnecessary bulk while maintaining a crisp, graphic silhouette. The refreshing citrus motif fits warm-weather styling, study sessions, and casual travel bags, infusing simple gear with cheerful, handmade charm. Working in flat rows that are later folded and joined creates natural thickness without requiring heavy internal stuffing that might absorb moisture during rainy commutes. The clean line work of embroidered pulp segments teaches precision surface embellishment, elevating basic stitches into detailed illustrative fiber art. This bright accessory provides an easy project for beginner crocheters seeking fast, vibrant results.
Begin by forming a magic ring with white cotton yarn, crocheting six single crochet stitches into the loop without joining rounds. Increase evenly across every round in half-circles, alternating rounds between white and bright pastel yellow until the semicircular disc measures seven centimeters across. Fasten off the colored fiber, switch to an unbleached cream yarn, and crochet one complete round of single crochet along the curved arc to form the inner pith layer. Finish the final curved row using deep golden yellow, working through back loops to produce a raised outer rind perimeter. Thread bright yellow embroidery floss through a blunt needle and stitch six straight radiating lines outward from the magic ring center across the white field to define individual fruit pulp segments. Fold the flat circle in half with wrong sides facing inward, crocheting the straight diameter edges together with slip stitches for reinforced firmness. Attach a split key ring through the top corner stitch, securing a small silver lobster claw for bag attachment.
3. Idea 3: Kawaii Strawberry with Blossom Accent
Execution Process
The kawaii strawberry charm combines classic cottagecore aesthetic appeal with miniature character details, finished with an offset white floral blossom. This piece presents a tapered conical fruit body stitched in deep scarlet yarn, accented with tiny embroidered seed stitches and a ruffled green leafy calyx. Its compact, rounded form makes it an ideal companion for small front accessory pockets or zipper pulls on canvas daypacks. The addition of a tiny five-petal white blossom creates depth, contrasting soft floral shapes against the sturdy strawberry base. Using tight gauge single crochet creates an impenetrable fabric surface that conceals white stuffing completely, even under firm handling. The sweet botanical silhouette pairs seamlessly with pastel backpacks, neutral canvas totes, and denim jackets, making it a versatile accessory for everyday carry.
Start by working six single crochet stitches into an adjustable magic ring using crimson sport-weight cotton yarn. Increase systematically across alternate rounds by two stitches until reaching a maximum circumference of twenty-four stitches, maintaining firm tension to keep the cone shape rigid. Work three straight rounds without increases to shape the berry body, then insert eight-millimeter safety eyes between rounds six and seven, spacing them four stitches apart. Stuff the berry firmly with polyester fiberfill, then execute systematic invisible decreases across remaining rounds, pulling the yarn tail tightly through final front loops to close. To make the leafy top, crochet a five-point star calyx using sage green yarn by chaining four and slip-stitching down each point. Crochet a separate tiny five-petal flower with white yarn and a yellow French knot center, sewing it beside the leafy green cap. Pin and stitch the calyx and flower securely to the top of the strawberry, running the hanging jump ring through the reinforced stem loop.
4. Idea 4: Celestial Pastel Crescent Moon and Star

Read This:
Setup Method
The celestial pastel crescent moon and star set pairs gentle astronomical silhouettes with a soft, dreamy color palette tailored for modern bags. This modular charm features an arched crescent moon worked in muted lavender or buttery cream, paired with a tiny dangling golden star. Its slender, curved silhouette drapes gracefully alongside backpack straps, offering visual movement without obstructing pocket access. The celestial theme provides an understated aesthetic that appeals to older students and commuters who prefer minimalist style over novelty shapes. Crocheting uniform crescent curves requires disciplined tension control across short-row transitions, teaching makers how to manipulate stitch heights effectively. The dangling star element adds secondary motion, clinking softly against bag fabric and creating a polished, multi-layered visual presentation.
Begin the crescent moon by chaining twenty-five stitches with pale lavender cotton yarn, leaving a long starting tail for future assembly. Work along the foundation chain using progressive stitch gradation, transitioning smoothly from slip stitches to single crochets, half double crochets, and centered double crochets before tapering downward inversely. Chain one, turn the work, and repeat the varied stitch heights along the opposite edge of the foundation chain to create a thick curved crescent shape. Fold the curved piece lengthwise and join the edges using neat slip stitches, pausing halfway through to insert a thin sliver of dense fiberfill for soft dimensional volume. For the accompanying mini star, form a magic loop using soft butter yellow thread, working five sets of single crochet, chain two, and slip stitch into the central ring. Weave all loose ends neatly into the star body using a tapestry needle. Connect the tiny star to the lower horn of the crescent moon using a short three-centimeter length of fine metal curb chain, finishing the top curve with an oxidized silver bag clasp.
5. Idea 5: Geometric Color-Blocked Cube Pendant
Step-by-Step Guide
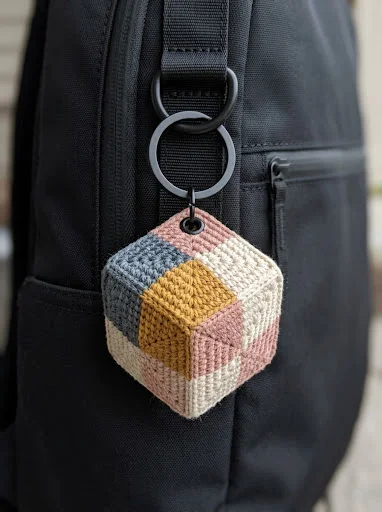
The geometric color-blocked cube pendant offers a crisp, architectural alternative to traditional rounded amigurumi charms, emphasizing clean planes and bold corners. This modern design features six distinct faces rendered in a coordinated palette of slate grey, ochre, soft blush, and ecru. The hard-edged silhouette creates striking contrast against the soft, fluid folds of backpacks and travel duffels, leaning into contemporary graphic trends. Color blocking allows crafters to explore complex color theory on a miniature scale while utilizing minimal quantities of scrap yarn. Inserting a lightweight internal foam block preserves the sharp cubic silhouette through heavy handling, preventing the piece from crushing into an amorphous sphere. This minimalist accent suits unisex backpacks, tech bags, and photography kits where streamlined modern design is preferred over traditional cuteness.
Begin by drafting six identical flat square panels using sport-weight cotton yarn in six contrasting neutral and pastel tones. For each square, chain nine stitches, turning to work eight rows of single crochet while checking that width and height measure exactly three and a half centimeters. Fasten off each square, leaving a fifteen-centimeter yarn tail on four panels to facilitate final edge assembly. Cut a firm high-density foam cube measuring three and a half centimeters on each side to serve as an internal structural skeleton. Pin the crochet squares around the foam core using dressmaker pins, ensuring contrasting colors alternate across adjacent sides. Join adjacent perimeter edges with whip stitches or mattress stitches using a tapestry needle, catching only the inner loops to maintain clean edge seams. Before closing the final seam, thread a heavy-duty eyelet pin through the top center square, bending the internal wire into an anchor loop within the foam. Secure a flat metal split ring to the outer exposed loop to finish this modern geometric accessory.
6. Idea 6: Whimsical Spotted Toadstool Mushroom

How to Make
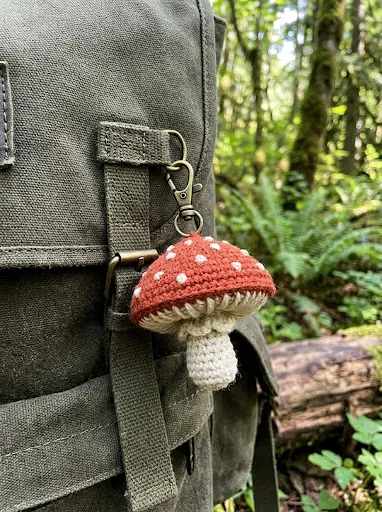
The whimsical spotted toadstool mushroom charm brings woodland nostalgia to daily carry accessories through classic forest storytelling elements. Featuring a broad domed cap in warm terracotta or rich crimson accented by flat ivory spots, the mushroom perches atop a chunky off-white stalk. This structured bell silhouette hangs evenly against backpack water bottle sleeves or front webbing, offering recognizable visual charm from every angle. The contrast between the smooth dome cap and the textured underside gills demonstrates foundational amigurumi shaping principles. Using a weighted base within the mushroom stem ensures that the charm naturally stays oriented upright during movement. This project provides a fun, beginner friendly platform for mastering three-dimensional spherical construction, color transitions, and delicate surface embroidery.
To create the mushroom cap, begin with terracotta yarn in a magic ring, working six single crochets and expanding outward over six continuous rounds to thirty stitches. Work three rounds even to build the downward dome curve, then switch to cream yarn and work through back loops with systematic decreases to form flat gills. Pause before closing the cap to embroider tiny irregular dots across the terracotta surface using ivory yarn and French knots or small bullion stitches. Stuff the cap firmly with fiberfill, shaping it into a smooth dome with your thumbs. For the stem, crochet an unbleached cotton cylinder starting at six stitches and increasing to twelve, working twelve straight rows to create an upright column. Insert a small washed pebble or glass craft bead wrapped in fiberfill into the stem base to supply anchoring weight. Stitch the open top of the stem securely against the cream gills using strong whip stitches, then fix an antique brass lobster clasp directly through the center crown.
7. Idea 7: Textured Spiral Cinnamon Roll Swirl
Execution Process
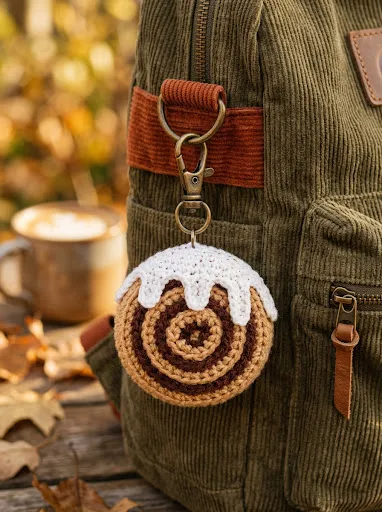
The textured spiral cinnamon roll swirl charm translates comforting bakery motifs into a warm, tactile backpack accessory. This design features a coiled band of rich cinnamon-brown and warm dough-colored yarn, topped with an irregular white frosting drip. Its circular disc shape lies comfortably against backpack panels without rolling, offering a cozy aesthetic that pairs naturally with corduroy, canvas, and autumn-weight outerwear. The coiled construction technique avoids complex sphere shaping, making it exceptionally accessible for crafters learning basic flat tape crochet. Layering dimensional fabric paint or embroidered chain stitches across the pastry top produces a realistic glazed look. This sweet accessory brings warm, comforting vibes to school bags, library book carriers, and casual campus totes.
Crochet a continuous two-color flat ribbon by chaining fifty stitches using warm biscuit-toned cotton yarn, working one row of half double crochet along the entire chain length. Fasten off the base color and join rich cinnamon-brown yarn, crocheting a second parallel row of single crochet through back loops to create a raised inner border. Roll the finished two-tone strip tightly into a spiral disc measuring five centimeters in diameter, checking that the dark brown edge remains visible between dough layers. Secure the coiled layers firmly from the underside by weaving a tapestry needle threaded with strong matching yarn through all thicknesses in a starburst pattern. For the frosting, crochet a freeform white splash by working alternating double crochets, chains, and slip stitches around a small six-stitch ring. Sew the wavy frosting layer off-center onto the pastry top, anchoring stitches discreetly beneath the frosting dips. Attach an antique bronze jump ring through the outer pastry coil, connecting it to a heavy-duty swivel snap hook for secure backpack installation.
8. Idea 8: Coastal-Inspired Ribbed Seashell Pendant
Read This:
Setup Method
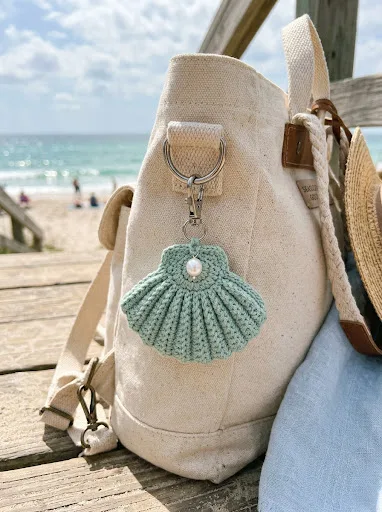
The coastal-inspired ribbed seashell pendant channels calming shoreline elements through rhythmic textures and soft ocean-washed color palettes. This fan-shaped scallop design utilizes back-loop-only stitches to produce sharp alternating ridges that radiate outward from a narrow hinge base. Rendered in gentle seafoam, sandy beige, or soft coral, this charm brings beachy simplicity to summer backpacks, gym bags, and luggage tags. The absence of internal fiberfill stuffing produces a flat, lightweight accessory that endures compression inside lockers or transit bins without losing its silhouette. Handcrafting these linear ridges develops disciplined hook placement, training crocheters to read structural stitch anatomy accurately. The organic shell form pairs gracefully with natural canvas bags, rope handles, and woven textiles.
Begin at the bottom hinge by chaining six stitches in pale seafoam cotton yarn, turning to work five single crochets across the foundation. For the subsequent rows, work single crochet stitches exclusively through the back loops, executing an increase at both outer margins on every third row. This back-loop method naturally generates raised accordion pleats while the strategic increases cause the fabric to flare into a classic fan silhouette. Continue the sequence until you have completed fourteen textured ribs, terminating the upper edge with a decorative scalloped shell margin made of half-double crochet shells. Fold the narrow starting edge in slightly and take three firm passes with a yarn needle to cinch the hinge tight, accentuating the fan spread. Thread an authentic freshwater pearl or round wooden bead onto the hanging loop for an organic accent. Attach a durable stainless steel jump ring through the gathered hinge, securing it directly to a silver spring-gate ring.
9. Idea 9: Vibrant Striped Mini Hot Air Balloon
Step-by-Step Guide
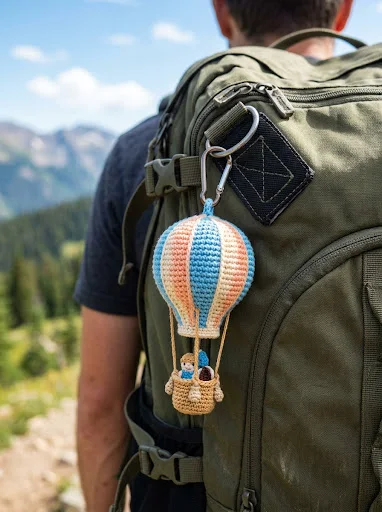
The vibrant striped mini hot air balloon charm represents an imaginative accessory that adds three-dimensional volume and storybook whimsy to any pack. This design features an elongated teardrop balloon stitched in clean alternating vertical stripes of sky blue, peach, and cream, suspended above a tiny square brown basket. Its teardrop profile creates dynamic visual height, swaying gently alongside backpack gear loops during active movement. The complex visual structure makes the piece look like an advanced craft, yet it is assembled from straightforward spherical crochet components and simple thread linkages. The tiny suspended basket serves as an eye-catching detail that showcases precision miniature handiwork. This playful charm suits hiking packs, day planners, and travel gear, serving as a bright reminder of adventure and creative exploration.
To build the balloon envelope, work six single crochets into a magic circle with cream yarn, introducing sky blue and soft peach yarns on alternating stitches. Increase outward while carrying unused yarn floats loosely inside the cavity until reaching thirty stitches across six color segments. Work eight straight rounds to establish vertical height, then execute gradual decreases over five rounds to form the characteristic tapered balloon neck. Pack the balloon cavity firmly with polyester fiberfill, tapering the filling density toward the narrow bottom aperture before stitching closed around a plastic disc insert. For the passenger basket, crochet a small open-top cube of six single crochet stitches per side using tan thread. Connect the basket to the balloon neck by cutting four equal lengths of waxed thread, knotting them securely to the four basket corners and anchoring them upward into the base. Thread an extra-long split ring through the reinforced crown of the balloon to attach a sturdy carabiner clip.
10. Idea 10: Lucky Four-Leaf Clover Medallion
Read This:

How to Make
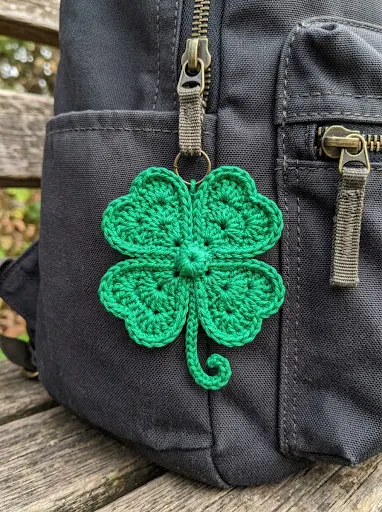
The lucky four-leaf clover medallion provides a compact, graphic talisman that lies completely flat against backpack fabric, delivering charm without bulk. Featuring four symmetrical heart-shaped leaflets meeting at a central knot with a short curling stem, this design utilizes vibrant emerald and forest greens. Its low profile prevents snagging on clothing, bus seats, or locker doors, making it an exceptionally practical daily carry accent. The recognizable four-leaf clover represents good fortune, making this charm a thoughtful handmade gift for students starting new academic terms or friends embarking on travels. The stitch architecture relies on working tall treble and double treble crochets into a central ring, demonstrating how dramatic shape variations can be achieved within a single round of crochet. This project serves as an ideal, fifteen-minute scrap-buster for quick crafting sessions.
To construct the clover, start by forming an adjustable magic ring using bright emerald green mercerized sport-weight cotton yarn. To create the first leaflet, chain three, then work three treble crochets, two double crochets, and one single crochet directly into the ring to form one half of a heart. Complete the heart lobe by working one single crochet, two double crochets, three treble crochets, and a chain three, slip-stitching down into the center ring. Repeat this precise sequence three additional times within the same central ring to generate four distinct, touching heart leaflets. Pull the magic ring tail firmly to cinch the central opening shut, forcing the leaflets into a symmetrical cross formation. To create the stem, chain eight directly from the final slip stitch, turn, and slip-stitch back along the chain length before fastening off cleanly. Weave the tails through the dense backside stitches to reinforce the core. Attach a small jump ring through the valley between two upper petals, securing a miniature swivel hook for fast backpack mounting.
Common Beginner Mistakes and How to Avoid Them
Beginner crocheters tackling miniature charms frequently encounter challenges regarding tension consistency, structural durability, and hardware attachment. A widespread error involves using a hook that is too large for the chosen yarn weight, producing loose stitches where polyester fiberfill peeks through. Prevent this issue by downsizing your hook by one whole millimeter below the manufacturer’s recommendation, ensuring an impenetrable stitch fabric. Another common mistake is over-stuffing or under-stuffing amigurumi components; insufficient stuffing results in lumpy, deflated shapes, while over-stuffing stretches stitches and distorts clean outlines. Pack stuffing gradually in marble-sized clusters, using the blunt end of a pencil to distribute fiber evenly into every corner. Beginners also frequently overlook secure knotting when attaching metal jump rings, leading to lost charms when bags are dropped or jostled. Always utilize heavy-gauge split rings or soldered jump rings, closing gaps using two pairs of jewelry pliers to avoid accidental pull-apart. Furthermore, skipping stitch markers during continuous rounds often causes misplaced increases, ruining intended proportions. Fasten a locking marker into the first stitch of every round to maintain accurate stitch counts. Finally, avoid using delicate non-washable materials like unspun roving or pure silk, which pill and degrade quickly when exposed to weather and friction.
Practical Tips for Better Results
Achieving professional, long-lasting results with handmade backpack charms requires meticulous attention to finishing techniques, thread management, and fiber choices. Always select mercerized cotton instead of acrylic yarn for backpack charms; the tight spinning process removes fuzz and provides exceptional abrasion resistance against coarse backpack canvas. When joining separate pieces, leave yarn tails at least twenty centimeters long, using a curved tapestry needle to weave ends in multiple directions through dense stitches. Consider lightly misting finished cotton pieces with water and blocking them flat using stainless steel pins on blocking mats before final hardware installation. For amigurumi projects requiring facial details, stitch features using contrasting embroidery floss split into two strands to maintain delicate, proportionate expressions. If your charm includes moving parts or chains, apply a tiny drop of clear jewelry cement or clear nail polish to jump-ring joints to prevent them from slipping open. To keep three-dimensional charms clean during dusty commutes, spray the finished fiber surface lightly with a fabric stain repellant designed for outdoor gear. These refined construction habits elevate simple yarn scraps into durable, retail-quality accessories that withstand seasons of continuous daily use.
Styling, Presentation, or Organization Ideas
Curating and presenting crochet backpack charms involves balancing color harmonies, scale, and functional placement across your carry gear. Grouping two complementary charms of varying sizes—such as a dimensional strawberry paired with a flat clover—creates a curated, layered aesthetic on main zipper pulls. When styling neutral backpacks in black, grey, or khaki, deploy bright citrus or emerald charms to create an intentional focal point that enlivens the bag. For brightly colored or patterned bookbags, select monochromatic or neutral geometric charms that blend harmoniously without visual clutter. Fastening charms to upper haul loops or side compression straps protects them from scuffs when setting your backpack down on classroom floors or bus platforms. If you maintain a seasonal collection of charms, store them organized on a wall-mounted brass ring display or pegboard craft system within your closet. This organized setup allows you to switch accessories quickly based on seasonal shifts, holidays, or daily outfit selections. For crafters packaging these items as gifts, mount charms onto heavy cardstock backing cards stamped with care instructions and fiber details. This professional presentation highlights handmade artistry while offering recipients functional, stylish gear accessories.
Budget or Time Planning
Crochet backpack charms represent one of the most budget-conscious and time-efficient crafts available to modern fiber artists. A single fifty-gram ball of quality cotton yarn costs very little yet yields five to eight complete miniature charms, making individual material costs minimal. Basic hardware supplies—including lobster clasps, split rings, and jump rings—are available in bulk packs online, reducing per-unit hardware costs to pocket change. From a time-management perspective, most flat charms like the citrus slice or clover can be completed in under forty-five minutes from start to finish. More intricate three-dimensional builds like the potted monstera or hot air balloon require approximately two hours of focused crafting, making them ideal weekend activities. Batch-processing components dramatically boosts production efficiency: crochet several bases or leaves in one sitting, followed by assembly and hardware attachment in a dedicated finishing session. Utilizing small remnant balls left over from larger garment projects eliminates yarn waste entirely while maximizing creative value. This economic balance of low material costs and rapid completion makes crochet backpack charms an accessible, highly rewarding project for students, gift-givers, and creative makers.
Creative Expansion and Advanced Inspiration
Once you master the fundamentals of basic backpack charm construction, you can explore innovative material fusions and advanced design concepts. Consider incorporating non-fiber accents into your pieces, such as natural wooden rings, raw gemstone beads, or hand-stamped metal tags stamped with personal initials. Experiment with micro-crochet using fine lace thread and steel hooks below one millimeter to produce ultra-detailed miniature charms with astonishing delicacy. You can also integrate small technology elements, such as inserting a hidden Bluetooth tracker or contactless payment fob securely inside padded amigurumi bodies. Exploring functional modifications transforms simple charms into versatile tools; add a small elastic loop to hold lip balm, or conceal a miniature microfiber screen-cleaning cloth within a hollow pod. Advanced crafters can also experiment with waterproof waxed cords, macrame accents, and leather fringes to blend diverse crafting disciplines into hybrid accessories. Scaling up design complexity by sculpting multi-character vignettes or kinetic charms with swinging limbs keeps the making process fresh and engaging. These experimental directions prove that small-scale crochet accessories offer endless opportunities for personal expression and functional design innovation.