

Crochet enthusiasts consistently search for cheerful, tactile projects that bring organic character and vivid color into living spaces. Amigurumi, the Japanese art of crocheting small stuffed yarn figures, offers an approachable medium for capturing the fresh produce of garden harvests. This comprehensive tutorial explores ten delightful amigurumi fruit and vegetable concepts designed to expand your handmade portfolio while reinforcing essential structural crafting techniques. Readers will learn the exact mechanical principles behind building spherical fruits, ribbed root vegetables, textured foliage, and segmented citrus slices using continuous spiral rounds. Constructing these small agricultural sculptures teaches fundamental practices regarding stitch density, uniform increases, invisible decreases, and internal tension that prevent misshapen contours. Beyond technical practice, crocheting miniature produce provides an engaging creative outlet that yields charming play kitchen toys, vibrant kitchen tiered-tray displays, and colorful pincushions. Each detailed project breakdown guides you through foundation magic loops, row-by-row expansions, shaping adjustments, and clean embroidered facial details. By mastering these ten distinct botanical designs, you will develop the technical competence to read complex sculptural charts, manipulate diverse fiber weights, and personalize every finished harvest creation.
Why This Idea Is Trending or Useful
Handcrafted botanical yarn sculptures hold remarkable design relevance in modern interior styling, offering tactile warmth that balances clean minimalist style spaces. Modern farmhouse kitchens, open floating shelves, and wooden dining tables gain an earthy, artisanal focal point when adorned with realistic yarn produce. From a practical DIY perspective, crafting miniature fruits and vegetables represents an easy project that consumes modest yarn yardage while offering immediate visual gratification. Beginners discover that amigurumi produce is exceptionally accessible because items like berries, lemons, and pumpkins rely on basic single crochet variations rather than complex garment tailoring. Furthermore, trending ideas across creative lifestyle platforms emphasize eco-conscious living, heirloom wooden toys, and analog hobbies that foster sustained mental focus away from digital screens. Handcrafted produce provides durable, washable educational tools for young children, encouraging early learning about garden nutrition and imaginative play. Compact yarn figures require virtually no storage footprint, making them ideal portable craft projects to work on during travel. The timeless aesthetic of orchard and garden harvests ensures that these finished figures remain relevant across all decorating seasons.
Materials and Preparation
Achieving durable, firm amigurumi produce requires thorough preparation, accurate gauge management, and the right selection of materials before stitching begins. The primary foundation of successful miniature produce begins with mercerized cotton yarn in DK or sport weight, which delivers sharp stitch definition without fuzzing or splitting. Pair your yarn with an ergonomic aluminum hook sized between 2.0 mm and 3.0 mm, choosing a size smaller than recommended on the label to ensure tight stitches that completely conceal inner batting. Gather vital notions, including locking stitch markers to track seamless spiral rounds, sharp embroidery scissors, blunt tapestry needles, and high-density polyester fiberfill stuffing. For expressive faces, keep small black safety eyes and fine stranded cotton embroidery floss on hand, or select natural wooden beads for hanging loops. Prepare your creative space by categorizing your yarn skeins into produce palettes—such as citrus tones, berry shades, and garden greens—and winding them into neat center-pull cakes. Planning your construction sequence and completing a small spherical tension swatch verifies that your chosen hook and fiber produce a firm, non-stretching fabric capable of holding three-dimensional botanical curves.
Idea 1: Plump Strawberry with Seed Embroidery
Step-by-Step Guide
The plump garden strawberry is an enduring favorite among miniature food crafts, showcasing a gently tapered conical silhouette topped by a star-shaped green calyx. This design relies on a smooth transition from a narrow rounded tip to a broader upper shoulder, capturing the natural posture of ripe field fruit. Using a rich, saturated red or deep crimson cotton yarn emphasizes every individual single crochet stitch, giving the berry a refined and polished finish. The crowning feature is a six-pointed leaf cap that splays outward over the crown, accented by a tiny centered hanging stem. Contrasting yellow or soft cream embroidery thread adds delicate running stitches across the red surface, replicating the pattern of external seeds. Because of its petite scale, the finished strawberry serves as a functional pincushion, a decorative bowl filler, or a whimsical charm for summer market bags. The compact build allows beginners to practice gradual single crochet increases while mastering clean surface embellishments.
To make the strawberry, begin at the bottom tip using bright red cotton yarn, creating six single crochet stitches inside an adjustable magic ring. Expand outward gradually through alternating increase rounds and straight rounds until you reach twenty-four stitches, maintaining firm tension to prevent gaps in the fabric. Work four rounds evenly to establish the plump shoulder height before working invisible decreases across the upper margin to taper the top opening. Pack the interior firmly with polyester fiberfill, using the blunt end of a crochet hook to guide batting into the lower tip before closing the final stitches seamlessly. For the foliage calyx, join bright green yarn into a small circle, working outward into six slender picot-pointed leaf petals using slip stitches and half double crochets. Thread a blunt tapestry needle with pale yellow embroidery floss, working tiny vertical straight stitches across the red body in staggered rows to create realistic seeds, then sew the green leafy calyx flat atop the fruit.

Idea 2: Sunlit Lemon with Textured Pique Rind
Execution Process
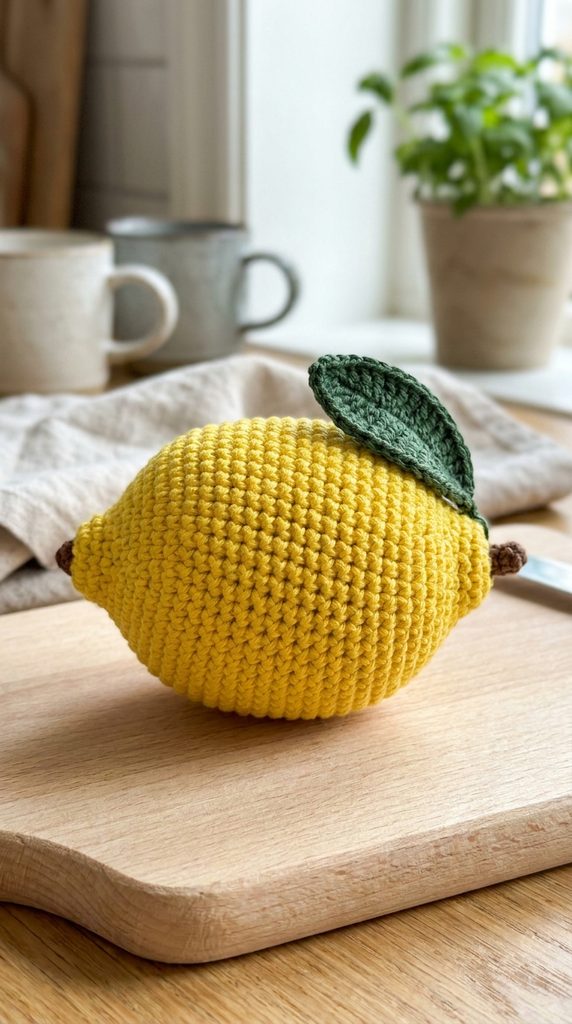
The sunlit lemon brings refreshing Mediterranean warmth and graphic brightness into kitchen spaces, capturing the distinctive tapered ends of fresh citrus fruit. This project introduces subtle surface texture, moving away from perfectly smooth spheres toward an authentic oval form with pronounced blossom and stem nubs. Utilizing bright saffron or zesty canary yellow cotton creates an eye-catching decorative accent that pairs naturally with tiered wooden trays, ceramic fruit bowls, and dining table runners. The structural design features narrow, sharp terminal points on either end, balanced by an expansive central sphere that maintains structural rigidity through dense fiberfill packing. Crafters can leave the lemon completely unembellished for a clean, minimalist style aesthetic, or incorporate a tiny green leaf shoot at the stem end to introduce botanical contrast. Assembling this citrus design provides foundational training in working steep, concentrated increases and matching decreases along opposite poles of a single continuous form.
Initiate the lemon by forming four single crochet stitches into a tight magic loop using vibrant yellow yarn, immediately pulling the tail firm to establish the pointed blossom nub. Expand rapidly over the next four rounds, utilizing concentrated lateral increases until reaching thirty stitches along the widest middle circumference of the fruit. Work eight consecutive rounds of even single crochet to establish the elongated, oblong body of the lemon, maintaining uniform tension to keep the exterior walls straight. Stuff the cavity incrementally with dense polyester batting, pressing the material outward against the sides to emphasize the plump, curved contour of the fruit walls. Taper the opposite end through matching decreases, working down to four stitches before pulling the yarn through the front loops to form the matching stem nub point. To complete the design, crochet a small oval leaf in forest green yarn using graduated chains, single crochets, and double crochets, stitching it securely against the upper nub with a concealed knot.
Idea 3: Earthy Carrot with Textured Greens
How to Create
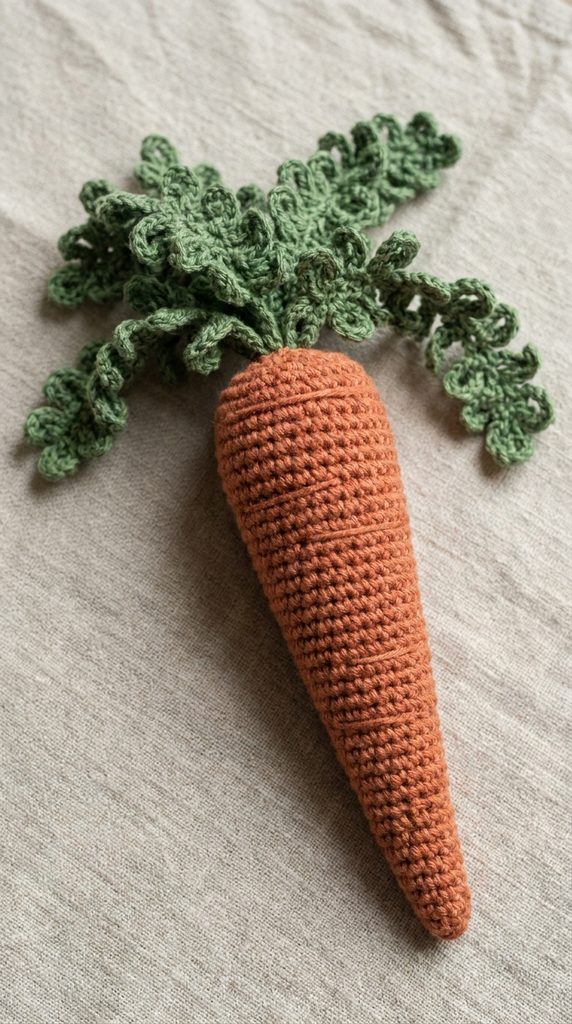
The earthy garden carrot celebrates the rustic appeal of home-grown root crops through an elongated conical shape paired with a lavish spray of feathery green tops. This project captures the dynamic proportions of field produce, tapering smoothly from a wide, blunt root shoulder down to a slender root tip. Saturated orange, terracotta, or heritage purple yarns provide an inspiring palette that complements rustic wooden decor, spring table settings, and children’s market play baskets. The defining visual texture comes from horizontal surface ridges formed by occasional back-loop stitches, mimicking the natural rings found on freshly harvested taproots. The leafy greens provide an engaging textural counterweight, utilizing curly chain loops and slip-stitch tendrils that spill out from the central crown. This design is exceptionally practical for practicing consistent, long-term taper mechanics over dozens of continuous spiral rounds without losing structural symmetry.

Begin the root tip with four single crochet stitches in an adjustable ring using rich orange worsted cotton yarn, placing a locking stitch marker in the opening round. Increase by one stitch every three rounds over thirty continuous rows, creating a long, slender conical profile that widens gradually to twenty-one stitches at the top crown. Incorporate random back-loop single crochet rounds throughout the body to create raised, organic rings that break up the smooth texture of the root. Stuff the long, narrow cavity gradually as you work, using a thin wooden dowel to push fiberfill down to the bottom tip without over-stretching the stitches. Decrease the top opening inward to create a flat, circular upper crown, fastening off with an invisible finish while leaving the center hole accessible. To construct the feathery foliage, join fern-green yarn directly into the top center opening, chaining fifteen stitches and slip-stitching down each strand multiple times to create a cluster of lively, curled leafy frills.
Idea 4: Crisp Red Apple with Slender Stem
How to Make
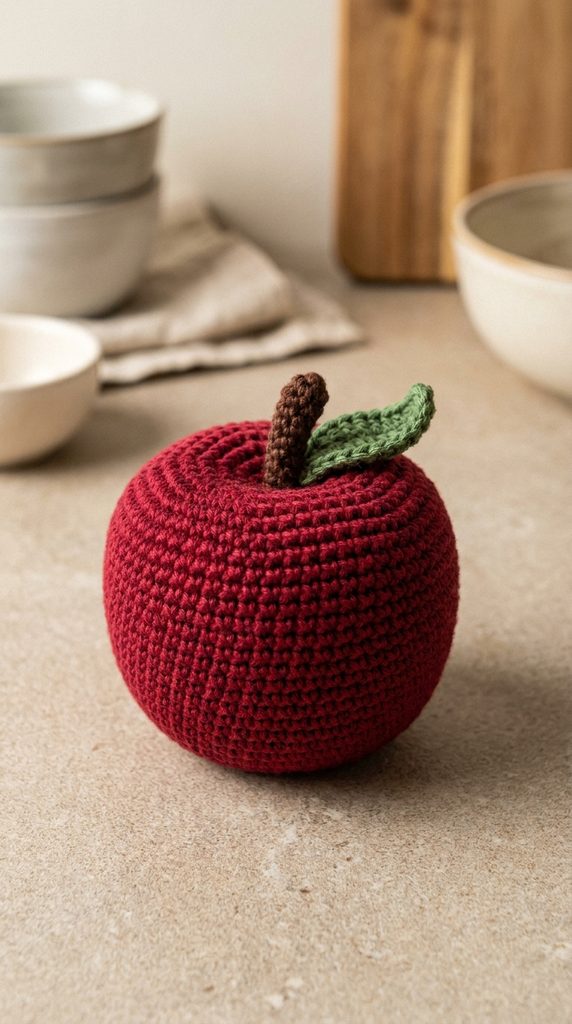
The crisp orchard apple is an iconic kitchen motif that relies on subtle vertical dimpling to replicate the natural indentation of the stem well and lower blossom calyx. This design features a broad, rounded shoulder that tapers slightly toward the base, creating a plump, lifelike silhouette that sits upright on any flat surface. Using lipstick red, warm crimson, or variegated green-and-yellow yarn allows crafters to produce diverse heirloom apple varieties that suit traditional and contemporary home decor themes. The visual centerpiece of the design is the vertical indentation created by pulling an internal sculpting thread tightly between the top stem well and the bottom base. This structural sculpting technique transforms an ordinary spherical crochet ball into an instantly recognizable, realistic apple form. Making this fruit builds valuable experience in interior needle-sculpting techniques that enhance the three-dimensional depth of handmade amigurumi.
Form the base of the apple by working six single crochet stitches into a magic ring with deep red cotton yarn, expanding symmetrically to thirty-six stitches across seven rounds. Crochet twelve straight rounds to build vertical volume before working gradual decreases down to twelve stitches, creating a tall, slightly tapered oval sphere. Stuff the apple core firmly with high-resilience polyester batting, ensuring the packing is dense enough to hold its shape during the subsequent needle-sculpting process. Thread a long tapestry needle with a double strand of strong red yarn, passing the needle vertically from the top opening through the center of the stuffed body and out the bottom base. Pull the sculpting thread firmly to pull the top and bottom poles inward, creating pronounced top and bottom indentations, then knot the thread securely inside the base. Finish by crocheting a narrow two-round stem in deep chocolate brown yarn along with a small oval green leaf, sewing both directly into the recessed top well.
Idea 5: Ripe Avocado Half with Textured Seed
Step-by-Step Guide
The ripe avocado half showcases contemporary visual charm, featuring clean color blocking that highlights the dark pebbled skin, pale lime-green flesh, and smooth brown central pit. This modern design captures popular culinary culture, making it an ideal decorative accent for contemporary dining spaces, novelty keychains, and playful nursery play sets. The construction combines a tear-drop outer silhouette with an interior dimensional dome that forms the raised seed in the center. Choosing a deep forest-green or charcoal-green yarn for the outer shell creates a striking border that frames the soft pastel-green interior meat. The flat face of the avocado requires precise oval shaping, blending single crochets, half double crochets, and double crochets across a foundation chain to build an asymmetrical teardrop curve. This project is ideal for crafters looking to move beyond simple circular patterns and practice asymmetrical, directional crochet shaping.
Begin by crafting the central brown seed, working six single crochet stitches into a magic circle with espresso-brown yarn and expanding to eighteen stitches to form a firm hemisphere. Fasten off the brown yarn and join pale lime-green cotton around the base of the seed hemisphere, expanding outward in continuous rounds using directional increases to form an asymmetrical teardrop face. Once the flat green face reaches the desired dimensions, switch to deep dark-green yarn, working one round through the back loops only to establish a crisp, upright outer rim. Build three straight rounds of dark green to create the outer skin wall, then work gradual decreases across the back shell to cup the back of the avocado inward. Stuff the hollow interior around the raised seed firmly with batting, pressing the stuffing outward so the face remains flat while the outer green rind rounds out smoothly. Close the final opening of the dark back shell seamlessly, weaving all yarn tails into the core.

Idea 6: Sweet Garden Peas in Open Pod
Setup Method
The sweet garden peas in a pod project introduces interactive, multi-piece assembly, featuring three or four individual spherical peas nestled inside an elongated, boat-like husk. This charming botanical design captures the delicate elegance of spring harvests, bringing gentle pastel color and tactile variety to seasonal bowl arrangements. The outer pod features an arched, curved spine with tapered pointed ends, remaining open along the top edge to display the smooth little peas resting inside. Working in complementary shades of soft mint green, bright pea green, and olive allows makers to establish depth between the inner pod lining and the individual spheres. Crafters can leave the round peas loose for interactive sorting play or stitch them permanently into the base of the pod for stationary shelf display. This project provides excellent practice in creating curved, boat-shaped vessels and producing identical miniature spheres with uniform tension.
To make the pod, work a foundation chain of thirty stitches in spring-green yarn, working rows of single crochet and double crochet along both sides of the chain to form an elongated, canoe-shaped boat. Double-stitch the terminal ends to form sharp points, working a final row of tight slip stitches along the rim to give the open edges natural inward curl. For the individual peas, crochet three identical spheres using bright mint-green yarn, working six single crochets into a magic loop and expanding to twelve stitches before decreasing back down to close each ball. Pack each miniature pea firmly with fiberfill, ensuring they are identical in size, smooth, and free of visible stitch gaps. Place the three peas in a neat line within the channel of the pod, verifying that they fit snugly between the curved sidewalls. Secure each pea to the bottom seam of the pod using hidden whipstitches in matching thread, finishing the stem end of the husk with a small looped chain tendril.

Idea 7: Bright Summer Orange with Sliced Wedge
Execution Process
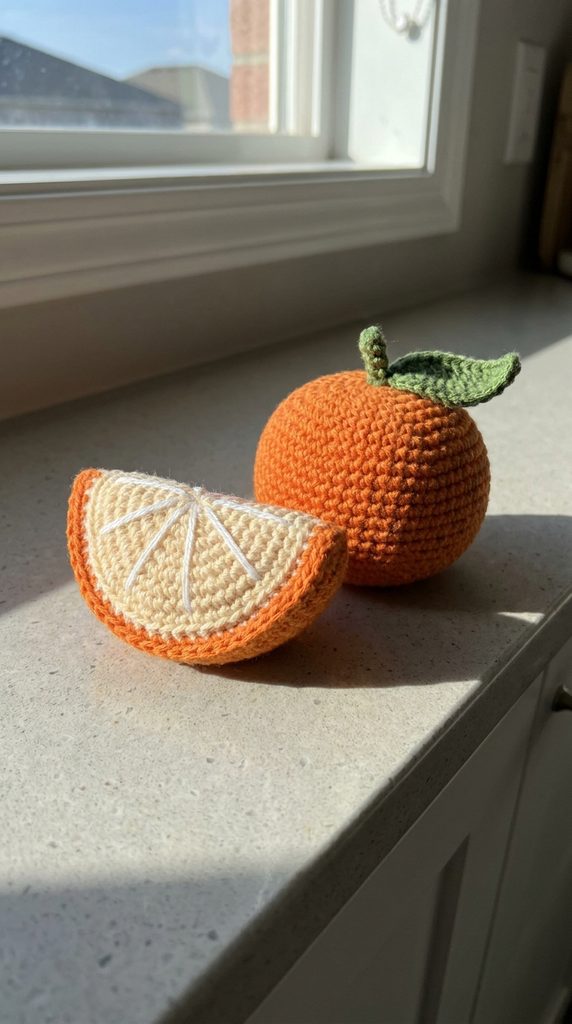
The bright summer orange set pairs a complete spherical fruit with a vibrant triangular slice, creating an engaging display that reveals the colorful internal anatomy of fresh citrus. This design combines rich tangerine yarn on the outer peel with clean white and pale orange segments on the exposed face, mimicking authentic fruit pith and juicy pulp. The pairing makes a lively centerpiece for breakfast nooks, kitchen counter displays, and children’s pretend market stalls. The full round orange provides classic practice in maintaining smooth spherical geometry, while the sliced wedge introduces folded semi-circular construction methods. The visual appeal of the slice relies on delicate white thread embroidery that outlines individual pulp segments across the pale orange face. Completing this dual-piece set strengthens your ability to coordinate multi-part projects while mastering fine surface embroidery over flat crochet panels.
Crochet the whole orange using rich tangerine cotton yarn, working six single crochets into a magic circle and expanding symmetrically to thirty-six stitches across six rounds before closing into a smooth sphere with fiberfill. For the citrus wedge, begin with pure white yarn, crocheting a flat circular disc across five rounds before switching to vivid orange along the outer rim. Using white cotton embroidery floss, stitch six radiating lines outward from the center of the disc to divide the surface into distinct citrus wedges, adding tiny straight stitches to suggest juicy pulp texture. Fold the embroidered circular disc in half to form a thick semicircle wedge, lightly stuffing the interior pocket with batting to give it realistic thickness. Close the straight edge of the folded wedge using single crochet stitches worked in matching orange yarn, then work an additional curved ridge along the outer perimeter to form the rind. Display the finished wedge alongside the whole fruit for a bright, cohesive citrus presentation.
Idea 8: Rustic Autumn Pumpkin with Ribbed Ridges
How to Create
The rustic autumn pumpkin captures seasonal harvest warmth through deep vertical ridges, a flattened spherical profile, and a twisted wooden-style stem. This design moves away from smooth, unbroken curves, utilizing deep structural folds created by wrapping tight surface cords around the body or working in textured back-loop ribbing. Warm ochre, burnt pumpkin, mustard, or creamy white yarns make this project a versatile decorative element for autumn tablescapes, mantle arrangements, and entryway vignettes. The compressed, squat proportions give the pumpkin a grounded, organic feel that mimics authentic heirloom field gourds. The crowning stem provides an earthy accent, worked in heathered brown or charcoal yarn with an irregular, twisting profile. This design is exceptionally beginner friendly because it can be constructed from a simple flat ribbed rectangle sewn into a tube, making it accessible to makers who prefer working in rows rather than continuous rounds.
Begin by chaining twenty-five stitches in warm pumpkin-orange cotton yarn, working thirty rows of single crochet worked exclusively through the back loops to create a stretchy, ribbed rectangular fabric. Fasten off with a long tail, folding the ribbed rectangle in half and seaming the short foundation and ending edges together to form a textured tube. Using a tapestry needle, weave the yarn tail through the stitches along the bottom edge of the tube, pulling the thread tightly to cinch the base closed before tying a secure knot inside. Stuff the interior firmly with polyester fiberfill, making sure not to overstretch the ribbed fabric, then cinch the top opening closed with another running stitch. Pass a long strand of strong orange yarn vertically through the center core of the pumpkin multiple times, aligning the thread with the natural valleys of the ribbing and pulling tight to sculpt deep, rounded side lobes. Sew a short, tapered brown stem into the top center well, finishing with a curled green vine made from a short twisted chain.

Idea 9: Glossy Garden Eggplant with Curved Calyx
How to Make
The glossy garden eggplant brings sculptural elegance and rich jewel tones to the fiber vegetable patch, featuring a distinctive pear-shaped teardrop silhouette. This design expands from a slender upper neck into a broad, weighted base, replicating the smooth contours of fresh nightshade vegetables. Saturated aubergine, royal purple, or deep violet cotton yarn gives the skin a lustrous, sleek look that pairs beautifully with the earthy green tones of the upper leaf cap. The defining design challenge lies in executing gradual, asymmetrical increases that create a natural, organic pear shape rather than a generic sphere. The top of the eggplant features a dramatic five-lobed green calyx that cups the upper shoulder of the vegetable, complete with a thick, curved stem. The finished figure provides a sophisticated, colorful accent for modern kitchen decor, farm stand baskets, or culinary gift displays.
Start at the upper stem end with deep purple yarn, creating six single crochets in an adjustable ring and expanding gradually over eight rounds to build the slender neck of the eggplant. Transition into rapid increases across the next ten rounds, doubling the circumference to create the broad, weighted lower body of the vegetable. Continue working several even rounds before tapering the bottom inward with invisible decreases, packing the interior with batting as you work to build a smooth, firm teardrop shape. Close the final opening at the bottom base seamlessly, burying the remaining yarn tail securely inside the stuffed body cavity. For the green calyx, work six single crochets into a magic loop, branching outward into five long, tapered triangular leaf points that drape naturally over the shoulders of the fruit. Sew a sturdy three-round green stem to the top center of the calyx, then position the leafy cap over the upper neck of the purple body, securing each leaf tip with hidden tacking stitches.

Idea 10: Rosy Radish with Tapered Root Tail
Step-by-Step Guide
The rosy garden radish delivers playful, rustic charm through an eye-catching two-tone gradient, a delicate taproot tail, and a bouquet of tall, upright green leaves. This design features a crisp transition from deep magenta or cerise pink along the upper shoulders down to a clean white tip at the base. This dual-color arrangement mimics the look of crisp French breakfast radishes, providing a lovely, realistic accent for wooden dough bowls, seasonal wreaths, and garden play collections. The base tapers down to a single delicate root string, while the top of the root supports two or three broad green leaves with raised central veins. Practicing clean, jogless color transitions in continuous rounds is the primary technical objective of this pattern, helping crafters build confidence in fiber handling. The completed radish brings a cheerful burst of color to any handmade produce collection, working equally well as an ornamental bag charm or a unique pincushion.
Initiate the root with clean white cotton yarn, working four single crochet stitches into a magic circle to establish a sharp, narrow bottom point. Increase gradually across four rounds before switching to vivid magenta yarn, completing the final pull-through of the transition stitch with the new color to ensure a crisp, level color boundary. Continue expanding the magenta section outward to twenty-four stitches, working four even rounds to build the plump, rounded shoulder of the radish root. Stuff the cavity firmly with polyester batting, then work rapid invisible decreases across the upper crown, cinching the top opening closed with an invisible finish. To make the leafy greens, chain twelve in vibrant leafy-green yarn, working single crochets, half double crochets, and slip stitches around both sides of the chain to create an oblong, flat leaf blade. Craft two or three leaves of varying lengths, stitching the clustered base stems directly into the top of the magenta root, and trim the bottom white yarn tail to create a realistic one-inch taproot string.

Common Beginner Mistakes and How to Avoid Them
Crocheting three-dimensional botanical figures presents unique mechanical variables that differ from flat blanket or scarf projects. A frequent error among beginners is using a crochet hook that is too large for the chosen yarn weight, resulting in loose, visible stitches that allow the white polyester fiberfill to show through. Always select a hook that is one to two sizes smaller than the yarn band specifies, which ensures tight, opaque stitches that fully enclose the interior batting. Another widespread challenge is uneven or light stuffing, which leads to lumpy, misshapen fruits and soft indentations that flatten over time. Solve this by teasing the fiberfill into small, cloud-like tufts and pushing it outward against the interior walls using the back of a wooden spoon to build a firm, resilient core. Additionally, losing track of the first stitch in seamless spiral rounds often produces lopsided tapers, misaligned color changes, and uneven fruit shoulders. Always position a locking plastic stitch marker into the active working loop of every single round, moving it up systematically to maintain accurate stitch counts and balanced symmetry.
Practical Tips for Better Results
Elevating your amigurumi produce from a basic weekend project to a polished artisanal collection relies on mastering subtle finishing techniques and maintaining consistent tension. Always utilize the invisible decrease technique when narrowing the crowns of fruits or tapering vegetable tips, inserting your hook exclusively through the front loops of two adjacent stitches before completing the single crochet. This simple adjustment eliminates the bulky, diagonal ridges created by standard decreases, yielding a smooth, uninterrupted surface across curved forms. When stitching flat leaf caps, stems, or roots onto the main body, secure every piece in place using long dressmaker pins, checking placement from multiple angles before sewing permanent seams. Use an invisible ladder stitch with a blunt tapestry needle, alternating stitches between the leaf base and the fruit body to create a secure, flat join that withstands frequent handling. Finally, lightly steam finished cotton pieces with a garment steamer held several inches away, which relaxes the plant fibers, settles the stitches into place, and gives your handmade harvest a clean, professional finish.
Styling, Presentation, or Organization Ideas
Handmade amigurumi fruits and vegetables possess an organic, artisanal quality that integrates naturally into modern home styling when arranged with care. For a modern farmhouse aesthetic, arrange a curated selection of five to seven produce pieces inside a shallow raw-wood dough bowl or a wire wire basket on your dining table. In a child’s play area or nursery, display the colorful harvest inside low, woven seagrass bins organized by color families, turning everyday toys into attractive room decoration. If you are preparing your produce for seasonal craft markets or handmade gift bundles, arrange the items inside miniature slatted wooden berry baskets lined with natural parchment paper or unbleached linen fabric. Photographing your finished projects for online lifestyle boards requires soft, indirect morning light near a bright window, positioning the yarn produce against neutral stone countertops, light-wood cutting boards, or natural linen textiles. This styling approach highlights clean stitch definition, realistic botanical shaping, and vibrant fiber palettes while avoiding harsh shadows that obscure delicate craft details.
Budget or Time Planning
Creating a complete collection of amigurumi produce is an efficient, budget-friendly hobby that offers high creative returns with minimal financial investment. A single 50-gram skein of durable cotton yarn typically yields four to six miniature fruits, making this one of the most cost-effective fiber arts projects available. To keep initial material costs low, invest in a core palette of primary produce shades—such as cherry red, rich forest green, citrus yellow, and warm pumpkin orange—which can be used across dozens of different fruit and vegetable designs. Organize your crafting time into focused, systematic assembly stages: spend one session crocheting all the main spherical bodies, dedicate the next sitting to producing leaf caps, stems, and seeds, and reserve a final quiet evening for stuffing, needle sculpting, and final assembly. Working in batches prevents creative fatigue, maintains consistent stitch tension across matching sets, and keeps your work surfaces organized. In addition, taking brief hand stretches every thirty minutes prevents wrist fatigue, ensuring your creative hobby remains comfortable and rewarding over time.
Creative Expansion and Advanced Inspiration
Once you feel comfortable constructing the foundational fruit and vegetable shapes detailed in this guide, explore advanced variations that push your creative boundaries. Experiment with scale manipulation, using the exact same patterns with fine embroidery silk and a 0.75 mm hook to make delicate jewelry charms, or switching to thick chenille yarn with an 8.0 mm hook to create oversized, squishy nursery floor cushions. You can also experiment with mixed-media elements, adding dried whole cloves as apple stems, stringing raw cinnamon sticks onto pumpkin crowns, or adding tiny rattle inserts inside citrus slices to turn them into sensory baby toys. Expand your project possibilities by joining finished miniature fruits into long seasonal garlands strung along natural jute twine, creating charming holiday swags for kitchen mantels and window frames. Dedicated makers can also explore realistic botanicals, combining varied root vegetables into a complete tiered garden wreath bound to a natural grapevine base. These versatile creative directions ensure your fiber crafting journey continues to grow, providing endless opportunities for artistic exploration and personalized home decoration.