Amigurumi stacking toys combine traditional Japanese yarn sculpture techniques with purposeful developmental play objects designed for infants and toddlers. Handcrafted stacking rings, nesting towers, and interlocking figures provide a sensory alternative to manufactured plastic alternatives found in commercial toy stores. Readers will discover ten distinct, step by step design concepts structured around graduated ring sizing, central post construction, and balanced weight distribution. Mastering this creative project involves learning how to maintain firm tension, execute seamless decreases, and build stable flat bases using dense single crochet rounds. The utility of crocheted stacking sets extends beyond childhood play; these colorful, textured objects serve as charming nursery home decor accents when placed on open display shelves or bedside stands. Soft cotton and sturdy acrylic fibers offer safe, washable surfaces that resist everyday handling while providing diverse tactile stimulation for developing hands. Crafters will gain actionable insights on how to proportion individual tiers, reinforce internal stabilizer cores, and secure safety elements without introducing choking hazards. Building a handmade stacking set equips makers with foundational three-dimensional fiber engineering skills that translate easily into more complex amigurumi projects.
Why Stacking Toy Projects Are Trending
The ongoing rise of crochet stacking toys across modern Pinterest ideas reflects a widespread cultural shift toward sustainable, heirloom-quality childhood items. Modern design trends heavily favor natural materials, warm neutral palettes, and low-waste living, prompting parents and gift-givers to choose custom textile items over mass-produced plastics. The practical value of these items is significant, as stacking toys promote fine motor skill development, spatial reasoning, and hand-eye coordination in developing children. From a DIY perspective, these projects offer exceptional appeal because they are modular, allowing makers to complete one ring or tier in a single short sitting without feeling overwhelmed. Crafters appreciate the beginner friendly nature of the repeating geometries, which rely primarily on continuous single crochet stitches worked in spirals. The aesthetic versatility allows makers to customize color schemes to match minimalist Scandinavian nurseries, vibrant bohemian playrooms, or soft pastel color palettes. Because individual rings require minimal yardage, these projects serve as an effective stash-busting endeavor that turns leftover materials into durable, treasured family keepsakes.
Essential Materials and Preparation Methods
Beginning an amigurumi stacking toy requires careful material selection and structural planning to guarantee long-term durability and child safety. Crafters should utilize a tightly spun sport or worsted-weight mercerized cotton yarn, as plant-based fibers produce crisp stitch definition without shedding surface fuzz or pill particles during regular handling. Select an ergonomic crochet hook one or two sizes smaller than recommended on the yarn label—typically ranging from 2.5 to 3.5 millimeters—to produce tight, opaque fabric walls that prevent internal polyester fiberfill from escaping. Essential workspace tools include locking plastic stitch markers to monitor continuous spiral rounds, a blunt tapestry needle for seamless assembly seaming, high-density hypoallergenic fiberfill, and a rigid, child-safe interior base material such as closed-cell foam or food-grade silicone rings. Proper planning involves verifying yarn colorfastness by wetting sample swatches to avoid dye bleeding during future cleanings. Crafters must also pre-calculate ring diameters to ensure uniform graduation from the broad base piece up to the apex topper, establishing balanced center-of-gravity proportions before the initial slipknot is cast.
Idea 1: Classic Rainbow Donut Tower
Step-by-Step Guide
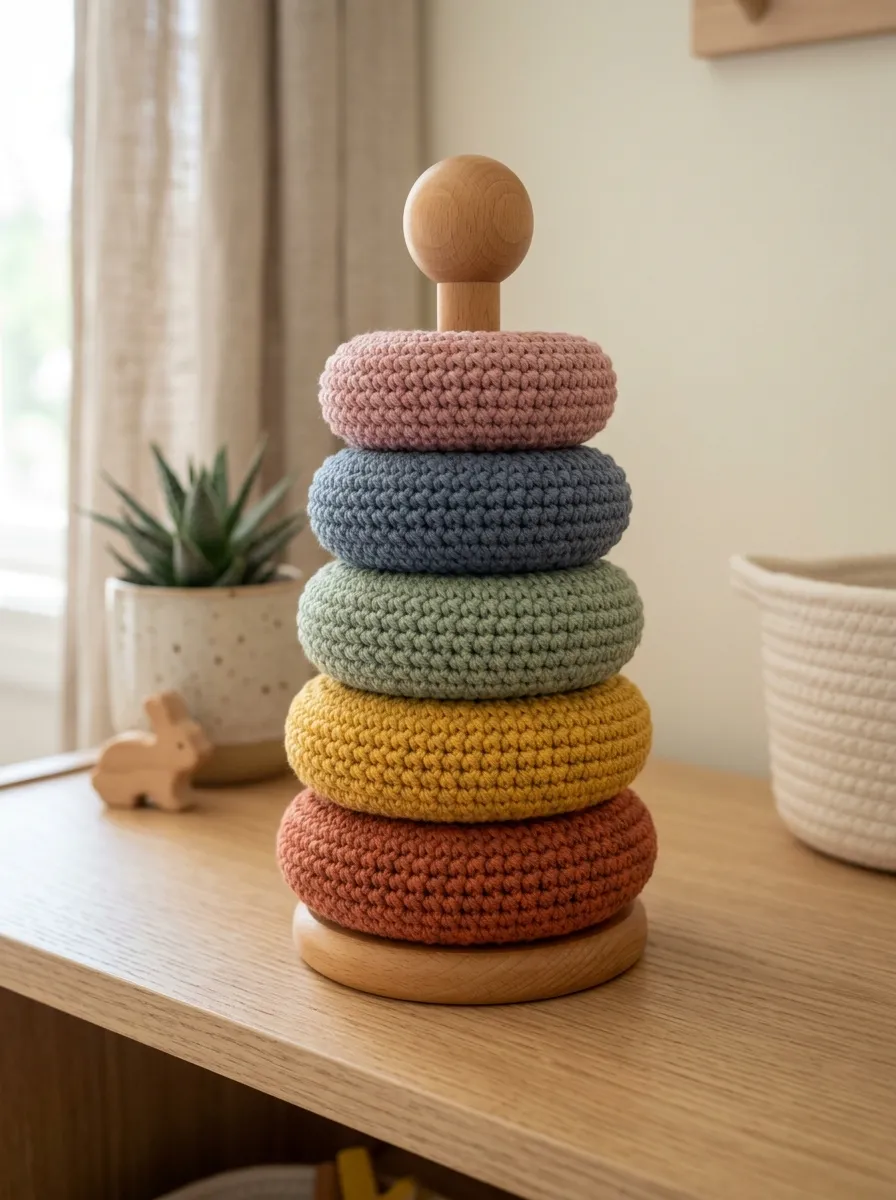
The classic rainbow donut tower serves as a foundational baseline project, featuring five distinct graduated rings that stack over a sturdy conical center column. The color progression transitions through modern muted tones—such as rust, mustard, sage, slate blue, and dusty rose—replacing harsh primary shades with an elevated, contemporary aesthetic. Each toroidal ring maintains a uniform inner aperture diameter to slide freely over the central post, while the outer diameter expands progressively by four stitches per tier. The base platform utilizes a wide, weighted flat disc that keeps the central pole upright during active play sessions, preventing frustrating collapses for young toddlers. A simple, smooth spherical topper crowns the assembly, providing an easy-to-grasp handle that locks the entire stack in place. This beginner friendly project teaches makers how to manage identical inner circumferences while systematically increasing outer surface volume, building essential geometric awareness that underpins all tiered soft sculpture designs.
To build the tower, start by crocheting the weighted base and central spindle as a single continuous unit using a 3.0-millimeter hook and camel-toned cotton yarn. Work a flat circular base in continuous spiral rounds until reaching fifty-four stitches, then work through the back loops only on the subsequent round to create a defined ninety-degree vertical transition. Crochet upward in uniform rounds for twenty-five centimeters to form the vertical post, tapering the width slightly near the apex by inserting four evenly spaced decreases across the final three rounds, then stuff firmly with high-density fiberfill. For the stacking rings, crochet a foundation chain of thirty stitches, join into an unbroken circle, and work in continuous rounds for twelve tiers to establish a hollow tube. Fold the tube edges together, packing polyester stuffing evenly along the interior channel before whip-stitching the starting foundation chain to the active row loops using a tapestry needle. Repeat this process for four additional rings, increasing the row length incrementally by two rows per color to produce graduated outer ring volumes.
Idea 2: Forest Woodland Tree Stacking Set
How to Create
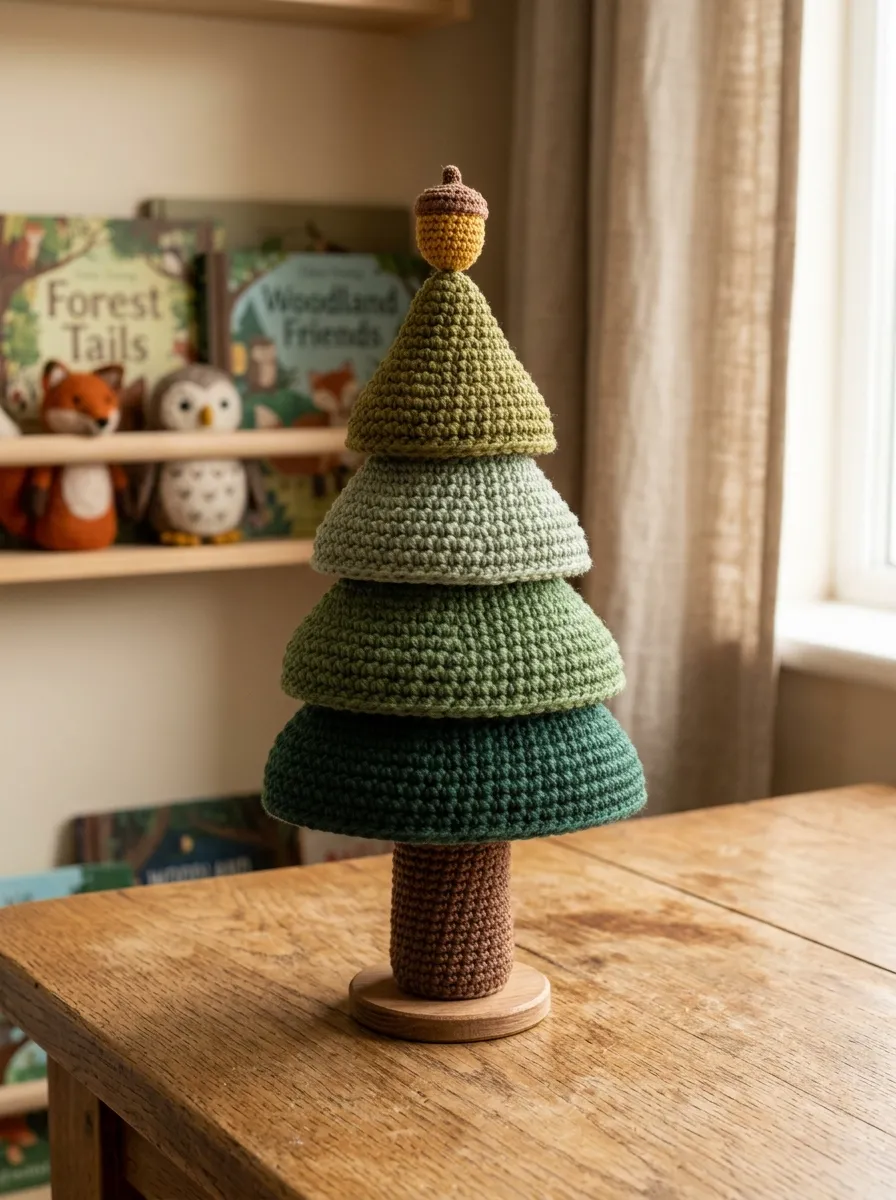
The forest woodland tree stacking set translates organic arboreal shapes into an educational toy through tiered conical foliage rings that nest over a textured trunk. The base post is crocheted in a rich bark-brown tone, detailed with subtle vertical ridges worked in surface slip stitches to mimic authentic woodgrain textures. The foliage rings feature four stepped tiers in varying greens, including deep evergreen, forest moss, pale sage, and olive tones. Each ring is shaped with an angular, flared lower rim worked in front-loop-only stitches, allowing each layer to rest neatly atop the tier below it like natural pine branches. A miniature golden acorn or pale wooden bird acts as the decorative topper, securing the graduated stack into an attractive, freestanding tree sculpture. This creative project functions as both an interactive childhood activity and a sophisticated woodland home decor accent for seasonal displays, bringing natural warmth and tactile interest to modern nursery shelving.
Begin by fabricating the tree trunk base, working eight single crochet stitches into a magic ring using dark brown worsted-weight yarn. Expand the circle over six rounds of uniform increases until reaching forty-eight stitches, then insert a flat plastic disc inside the base to establish lasting structural rigidity. Work thirty rounds upward, decreasing one stitch every five rounds to create a gently tapering vertical trunk, stuffing it densely with polyester fiberfill as you progress. For the foliage layers, crochet hollow ring cylinders that gradually expand in diameter, incorporating a flared skirt along the bottom perimeter by working two half double crochets into every front loop of the final round. Begin with the largest dark green base ring measuring forty-four circumference stitches, reducing each subsequent green tier by six stitches to produce a tapered canopy profile. Crochet a miniature three-dimensional acorn topper using tan yarn and a textured brown cap, stitching it securely to the top of the central post or designing it with an inner hollow sleeve to slip over the terminal peak.
Idea 3: Pastel Ocean Animal Nesting Rings
Execution Process
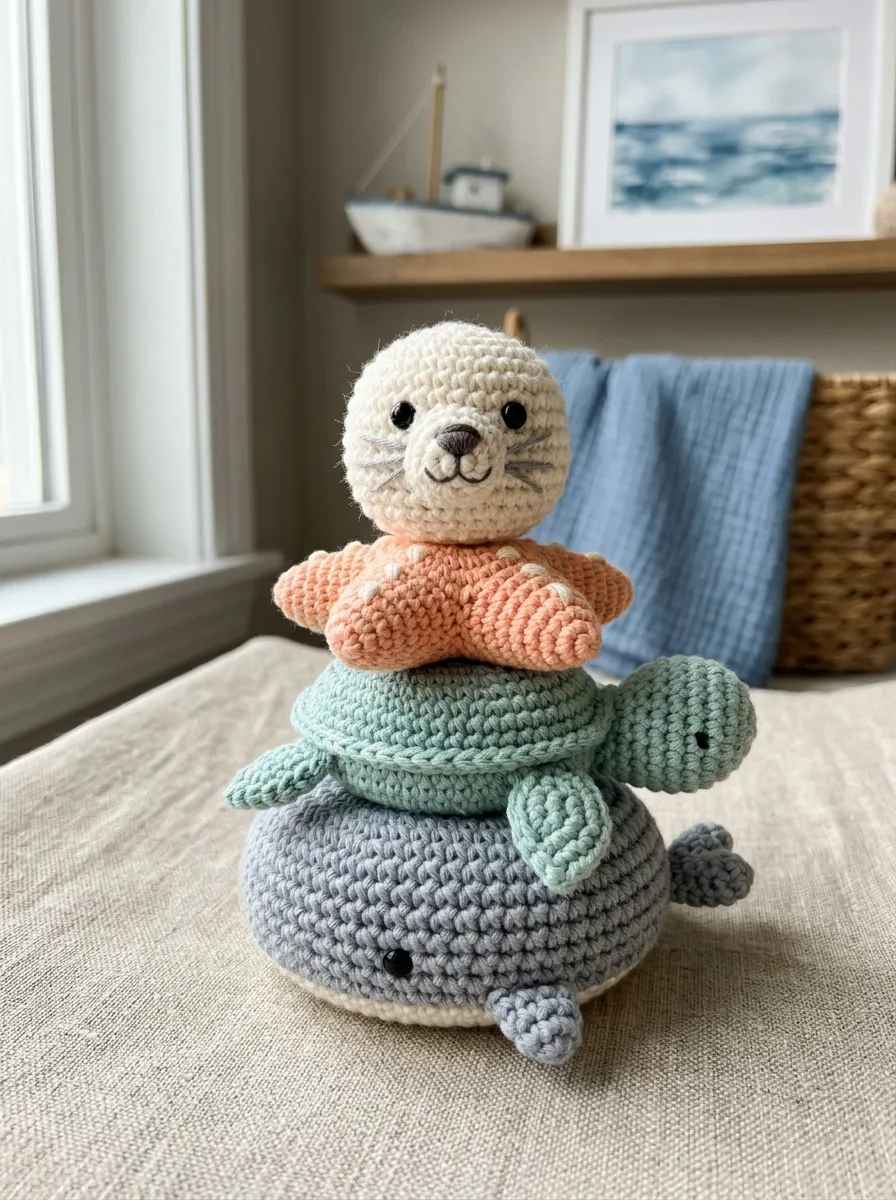
The pastel ocean animal nesting rings transform ordinary circular stacking donuts into distinctive marine creatures, blending educational sorting with imaginative storytelling play. The lowest, widest ring represents an ivory and gray whale complete with tiny side flippers, while the middle tiers depict a seafoam green sea turtle and a soft coral starfish. The topmost component forms an adorable, rounded baby seal head, complete with embroidered whiskers and a smooth, safe spherical contour. Each animal tier incorporates subtle anatomical appendages that do not interfere with the vertical stacking plane, ensuring the rings slide smoothly along the central sand-colored spindle. The pastel color palette—featuring mist blue, seafoam, blush, and unbleached cream—aligns with modern coastal nursery styling, offering a gentle aesthetic that appeals to design-conscious parents. This project teaches crafters how to attach secure miniature appliques onto curved toroidal surfaces without distorting internal ring apertures or disrupting smooth vertical alignment.
To assemble this ocean set, construct the central sand-hued post by crocheting a wide circular base of forty-eight stitches, extending upward for twenty centimeters in tight single crochet rounds to produce a durable vertical cylinder. For the bottom whale ring, construct a standard thirty-six stitch hollow ring in misty gray yarn, sewing a flat white oval patch onto the lower surface before joining the seams to represent the underbelly. Attach two flat, triangular gray flippers flat against the outer sides, ensuring they lie parallel with the stacking plane. Construct the second tier in pale green for the turtle, adding four tiny rounded flipper tabs around the outer circumference. For the third starfish ring, crochet five short conical points separately and seam them evenly around the perimeter of a soft peach ring. Craft the seal topper as a hollow dome that slips over the top pole, embroidering delicate facial features with charcoal cotton embroidery floss and securing all internal tails deeply within the fiberfill core.
Idea 4: Farmyard Animal Tiered Stacker
Read This:

How to Make
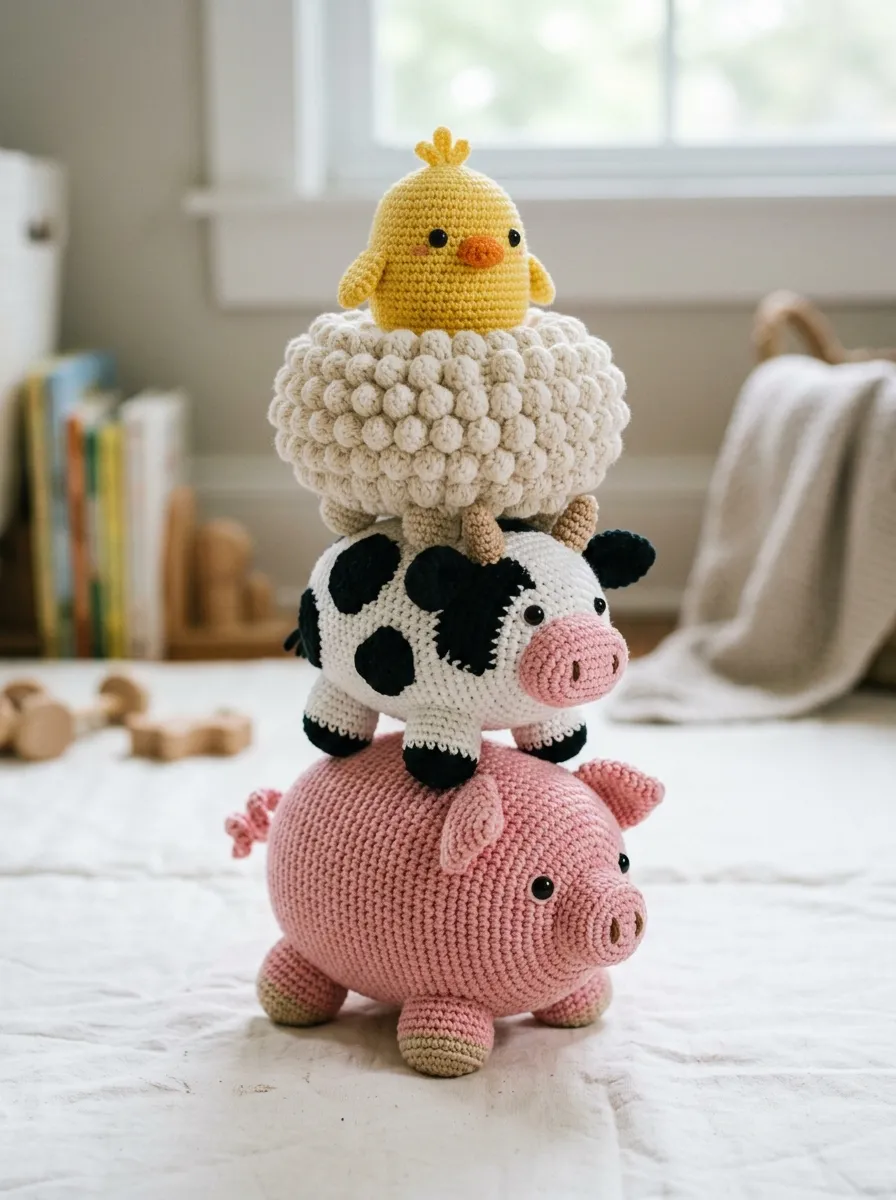
The farmyard animal tiered stacker introduces playful rural characters through stacked body segments that encourage tactile discovery and animal recognition. The bottom foundation ring represents a plump pink pig, followed by a spotted dairy cow mid-tier, a soft white sheep with bobble-stitch fleece, and a vibrant yellow chick capping the apex. The sheep ring utilizes alternating single crochet and four-double-crochet bobble clusters, providing a bumpy sensory texture that contrasts with the smooth, flat surfaces of the adjacent rings. Each tier is sized to represent realistic visual balance, with the wider, heavier animals supporting the smaller creatures above. This design eliminates the traditional central spindle by utilizing nested convex and concave indents, where the curved head of the lower animal fits into an underside recess of the tier above it. This unique execution process challenges crafters to develop dimensional shaping techniques while creating an engaging, wobble-free stacking puzzle that delights toddlers through organic, tactile discovery.
Construct the bottom pig ring using soft pink cotton yarn, working a thirty-two stitch hollow toroidal tube packed with firm fiberfill, adding two flat triangular ears and an oval snout applique along the forward edge. For the second cow tier, work twenty-eight stitches in white yarn, switching randomly to black yarn for three-stitch intervals to generate organic dairy cow spots across the surface. For the sheep tier, chain twenty-four stitches and work four rounds of textured bobble stitches, alternating one single crochet with one four-loop bobble to establish an authentic woolly exterior before seaming the interior channel closed. The chick topper is constructed as a solid sphere of twenty-four stitches using buttercup yellow yarn, detailed with an embroidered orange triangle beak and tiny flat wings sewn flush along the lateral sides. Ensure all animal facial features are rendered exclusively through tightly anchored surface embroidery rather than plastic buttons, preserving total safety for young children during active, unmonitored play sessions.
Idea 5: Minimalist Monochrome Geometric Tower
Setup Method
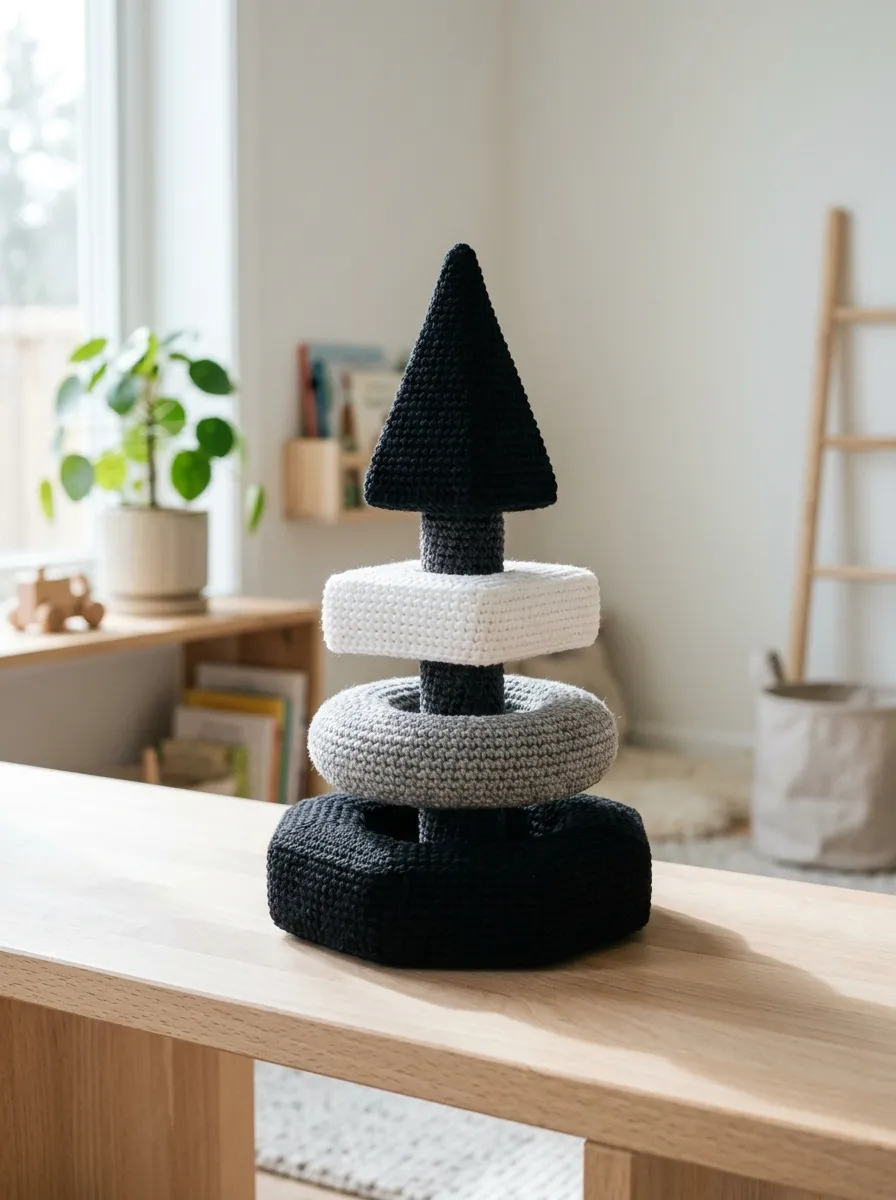
The minimalist monochrome geometric tower emphasizes architectural simplicity, high-contrast visual cues, and clean Scandinavian home decor sensibilities. Using an understated palette of crisp white, heather gray, charcoal, and jet black, this design focuses on varying geometric profiles rather than decorative animal motifs. The lowest ring features a clean octagonal perimeter formed by deliberate corner increases, the middle ring showcases a smooth circular torus, and the third tier incorporates a square outer silhouette with crisp corners. The apex topper is shaped as an elongated pyramid, adding sharp geometric contrast against the rounded shapes below. High-contrast patterns are scientifically proven to captivate infant visual attention, making this set exceptionally functional for early sensory stimulation. The clean, modern design ensures that when the toy is assembled and stored on open nursery shelves, it functions as a sculptural piece of modern textile art that complements minimalist interior spaces.
Begin by constructing the central square-profile spindle, using deep charcoal yarn and working four corner increases across every round of the flat base until twenty-four perimeter stitches are established. Work straight upward for twenty-two centimeters, maintaining four distinct corner lines by working single crochets through the back loops only along corner stitches, then pack the interior firmly with dense stuffing. For the bottom octagonal ring, chain thirty-two stitches, join in a ring, and space eight double-increase points along the outer perimeter every second round to produce eight clean outer edges before sealing the tube. Construct the second tier as a classic circular ring in light heather gray, maintaining uniform round counts without corner accents. For the square white tier, incorporate four distinct corner increases spaced evenly along the outer edge, mirroring the base geometry. Finish the set by crocheting a four-sided black pyramid topper, beginning with four stitches in a magic ring and expanding systematically over twelve rounds before inserting a square cardboard stiffener into the base.
Idea 6: Sweet Treats Bakery Stacking Toy
Read This:

Step-by-Step Guide
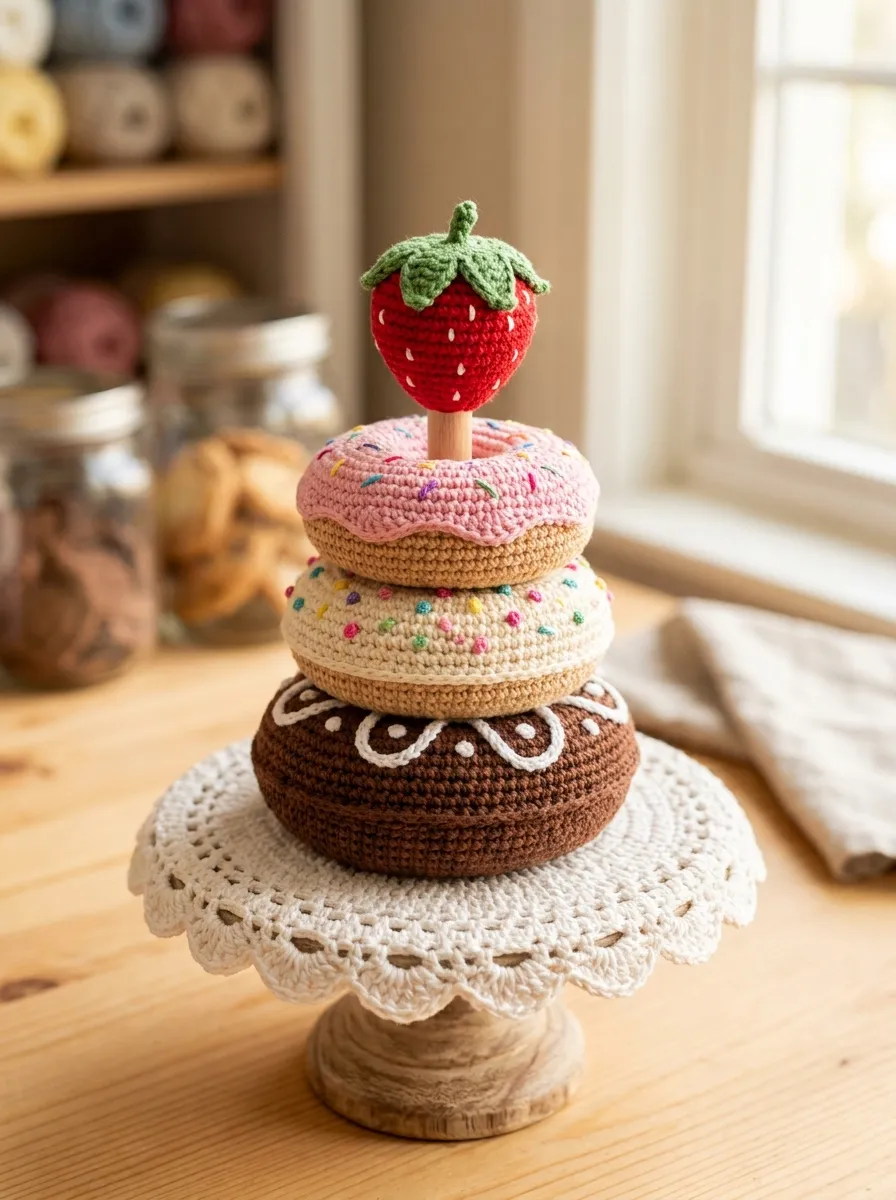
The sweet treats bakery stacking toy reimagines pastry shop confections into a delightful, interactive play set that appeals to young bakers and craft enthusiasts. The base platform resembles a fluted ceramic cake stand worked in crisp white yarn with delicate picot edging along the lower rim. The stacking rings represent different confectionary tiers, starting with a large chocolate cake ring topped with dark fudge slip-stitch swirls, followed by a vanilla frosted layer with pastel sprinkle embroidery. The third tier depicts a glazed berry donut with wavy pink icing, capped by a bright red three-dimensional strawberry with tiny seed indentations serving as the top handle. The combination of textured surface embroidery, undulating frosting borders, and diverse color blocking provides rich sensory variety. This project offers an exceptional platform for practicing surface crochet embellishments, precise color transitions, and applique attachment, resulting in a charming, display-worthy handmade toy.
Commence by crafting the cake stand base, working sixty single crochet stitches into a magic ring using white yarn to create a wide, stable circular foundation. Work upward for six rounds before executing a picot edge—chain three, slip stitch into the base chain—along the perimeter, inserting a wide circular plastic template inside the base to guarantee a flat, wobble-free surface. For the chocolate cake tier, crochet a wide thirty-six stitch ring in rich cocoa brown yarn, surface-crocheting decorative slip-stitch spirals across the upper face using glossy dark brown thread. For the second vanilla tier, work a thirty-stitch ring in unbleached cream yarn, embroidering straight-stitch sprinkles in mint, lavender, and yellow across the upper hemisphere using a blunt needle. Construct the donut tier using golden-tan yarn, overlaying a wavy pink felt or crochet glaze cut with irregular scalloped edges. Finish the project by shaping a tapered strawberry topper in bright crimson yarn, embroidering white seed dashes, and attaching a five-pointed green leaf calyx securely to the crown.
Idea 7: Celestial Moon and Stars Stacking Set
How to Create
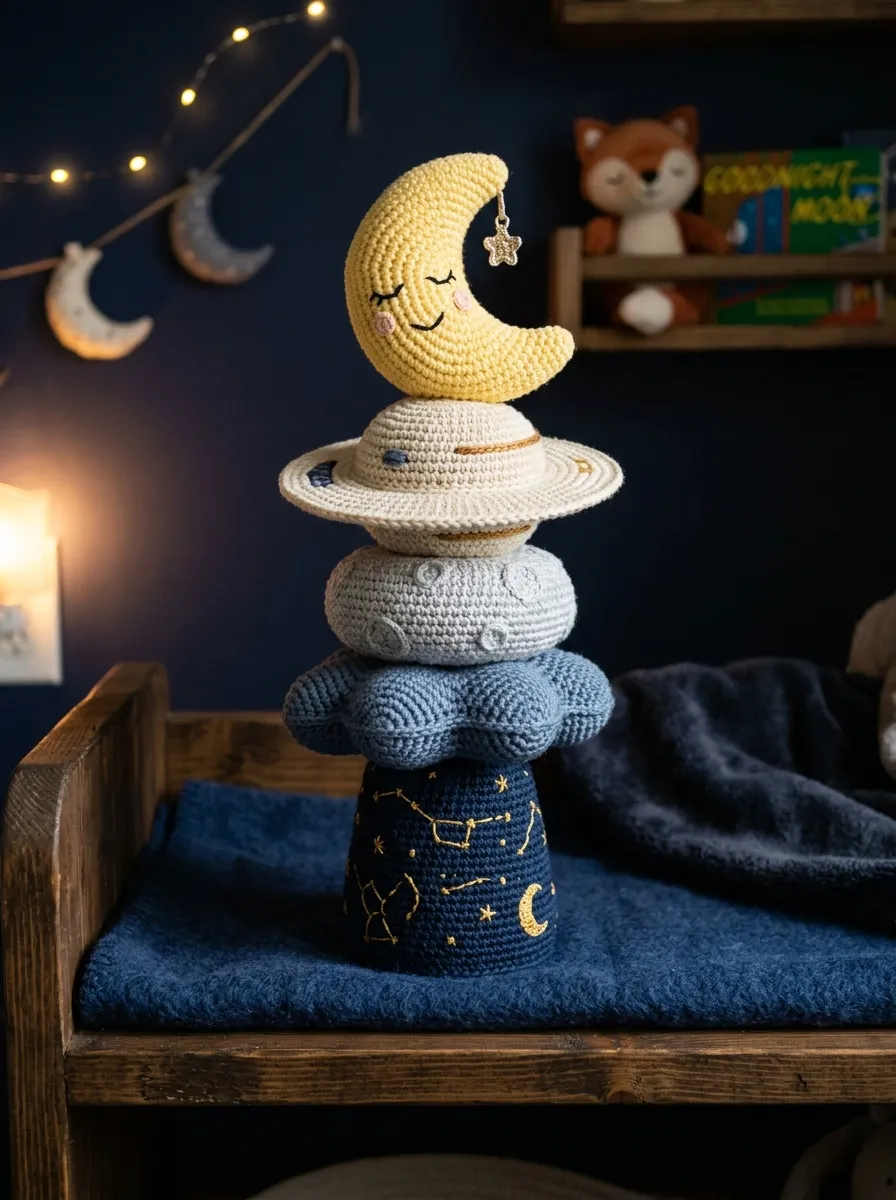
The celestial moon and stars stacking set captures the tranquil beauty of night skies, making it an ideal companion piece for bedtime routines and nursery decor. The central post is designed as an elongated deep midnight-blue spire embroidered with miniature metallic-gold constellation stars. The stacking tiers feature celestial bodies of varying sizes, beginning with a wide, dusky-blue cloud ring characterized by gentle undulating billows along its outer edge. The middle ring showcases a shimmering pale silver-gray full moon ring, followed by a soft cream-colored Saturn ring fitted with an encircling three-dimensional orbital rim. The entire set is crowned with a plump, smiling golden crescent moon topper that locks into the top of the post. The serene, cool-toned palette creates a soothing visual presence, helping calm infants before sleep while offering an elegant decor element that integrates naturally into modern celestial-themed rooms.
To construct the celestial spire, begin with midnight-blue yarn, working forty-two stitches into a magic ring and expanding to forty-eight stitches to form a stable circular base. Insert a flat circular weight into the base cavity, then work twenty-four centimeters upward in continuous spiral rounds, scattering French knot stars across the surface using metallic gold embroidery thread. For the lowest cloud tier, crochet a thirty-six stitch hollow ring, adding six outer billows by working alternating clusters of half double, double, and treble crochets into the front loops of every sixth stitch. Construct the second tier as a smooth ring in silver-gray yarn, maintaining even single crochet rounds to achieve a sleek, planetary surface. For the Saturn tier, crochet a twenty-four stitch cream ring, then surface-slip-stitch an independent concentric flat ring around its outer perimeter to simulate planetary rings. Craft the crescent moon topper by crocheting an asymmetrical tapered tube in golden-yellow yarn, curving the tips inward, and anchoring it firmly onto an inner hollow sleeve designed to slide over the spindle peak.
Idea 8: Botanical Succulent and Terracotta Stacker
Read This:

How to Make
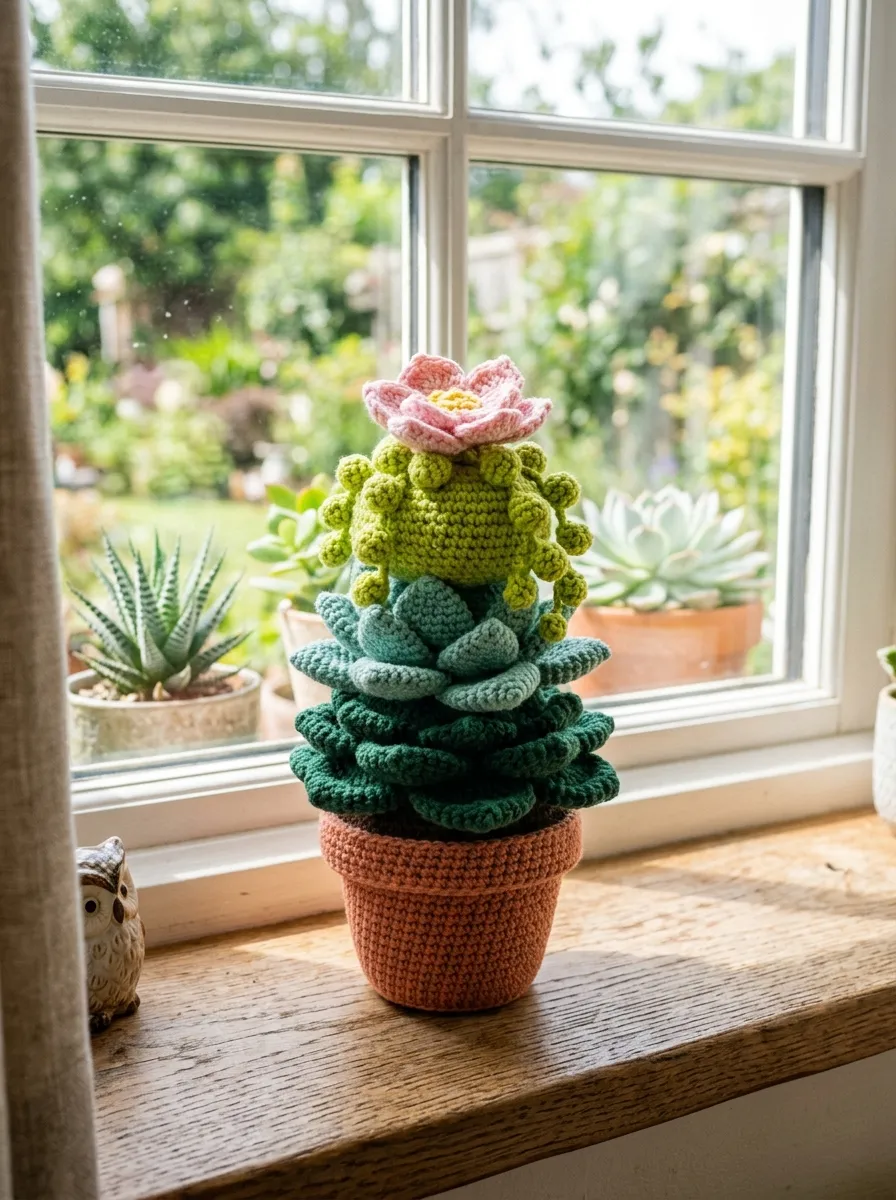
The botanical succulent and terracotta stacker blends indoor gardening aesthetics with developmental toy design, presenting an everlasting potted plant made entirely of soft yarn. The base is crocheted in a rich burnt-orange terracotta shade, shaped as a traditional flared flowerpot that houses the vertical trunk. The stacking tiers represent different varieties of succulent foliage, starting with a broad, flat rosette ring in deep forest green, followed by a pale seafoam echeveria ring with pointed leaf tips. The third tier depicts a string-of-pearls succulent, utilizing clusters of puffy bobble stitches worked in fresh lime-green yarn. The top piece is sculpted as an open succulent blossom in soft blush pink, complete with layered, overlapping petals that provide a natural handle for small hands. This creative project provides an accessible way to introduce botanical home decor into spaces where living plants might pose a safety or maintenance concern, offering sophisticated style and playful utility.
Start by shaping the terracotta pot base using burnt orange yarn, beginning with thirty-six stitches and working twelve rounds upward, executing a turned-down rim by working through the front loops on round ten to form a thick, authentic pot lip. Fill the lower half with weighted plastic pellets enclosed in a sealed fabric pouch to lower the center of gravity, topping the pellets with dense polyester stuffing. For the base succulent tier, crochet a thirty-two stitch hollow ring in dark green, attaching eight individually crocheted pointed oval leaves around the perimeter to form a botanical rosette. For the second seafoam tier, construct a twenty-eight stitch ring, detailing each leaf edge with a contrasting pale pink slip-stitch border to mimic desert succulents. The third tier uses lime yarn worked in continuous rounds of six-double-crochet bobble clusters to replicate rounded succulent beads. Craft the pink floral topper by crocheting three graduated rings of overlapping rounded petals, stitching them together at the core and leaving an open underside sleeve that fits snugly over the vertical central stem.
Idea 9: Retro Space Rocket Stacking Toy
Execution Process
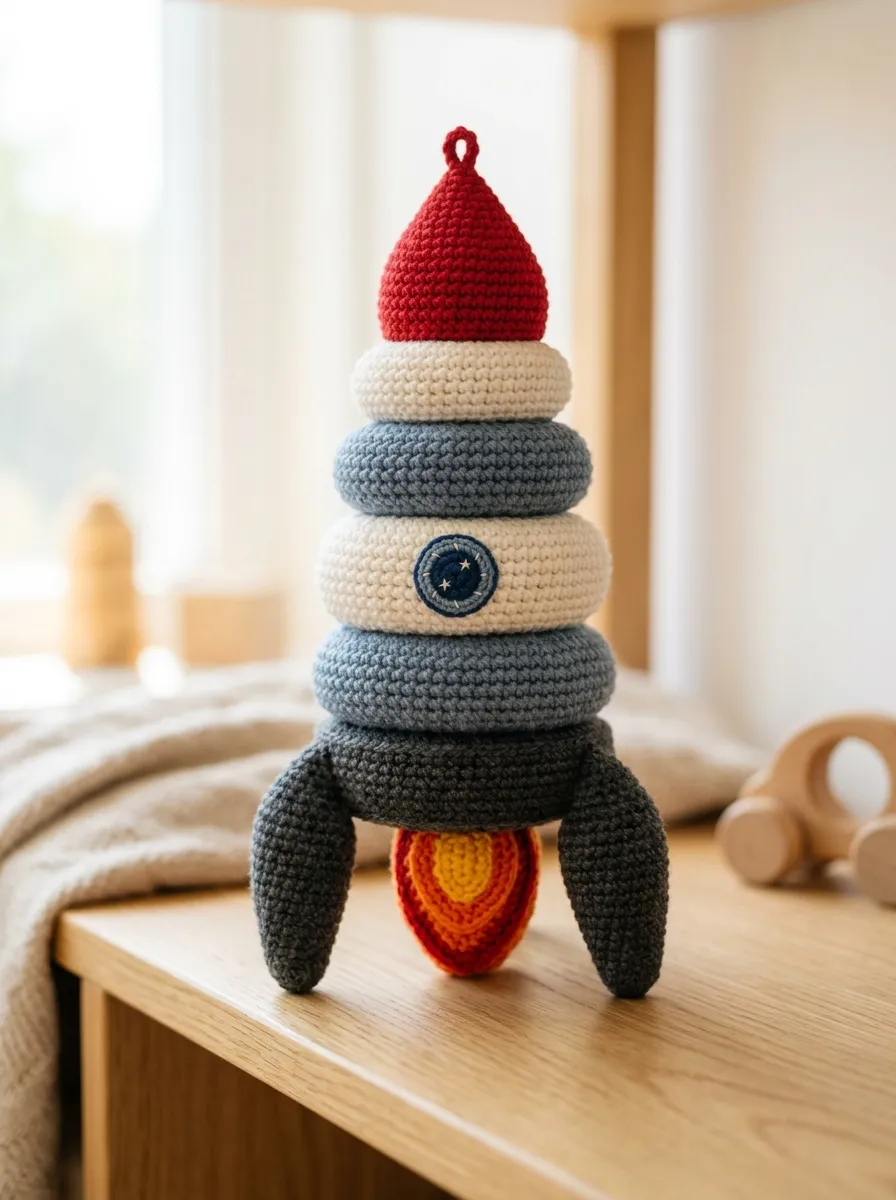
The retro space rocket stacking toy channels vintage science-fiction aesthetics through dynamic streamlined contours and bold color blocking. The central post functions as the internal exhaust plume, crocheted in fiery bands of crimson, orange, and golden yellow. The stacking rings form the graduated hull of the rocket ship, starting with a wide charcoal base ring fitted with three stabilizing aerodynamic fins that rest flat against the play surface. The middle rings represent the pressurized fuselage segments, worked in pristine white and slate blue, detailed with a small circular transparent vinyl or embroidered porthole window. The apex topper forms the aerodynamic conical rocket nosecone in vibrant cherry red, completing the sleek spacecraft silhouette when fully assembled. This project teaches crafters how to design rigid, projecting architectural elements—such as stabilizing tail fins—that maintain their shape without internal wire armatures, preserving complete safety for toddlers.
Begin by fabricating the fiery exhaust post, starting with a forty-eight stitch circular base in bright red, working upward through five rounds of red, five rounds of orange, and ten rounds of bright yellow to simulate rocket exhaust. For the lowest hull tier, crochet a thirty-six stitch ring in dark charcoal yarn, sewing three firm triangular fins symmetrically around the outer perimeter so they extend downward to touch the floor surface, providing secondary tip-over support. Construct the middle fuselage tier in clean white cotton yarn, embroidering a circular navy border to frame a light-blue porthole window centered along the front wall. The third tier utilizes cool slate blue yarn worked in twenty-four stitches to complete the upper fuselage section. Sculpt the pointed nosecone topper using cherry red yarn, starting with four stitches in a magic ring and expanding systematically over ten rounds to produce a crisp conical profile. Pack the nosecone firmly with fiberfill, insert a circular plastic disc inside the lower opening, and seam an inner hollow sleeve that anchors the cone firmly atop the spindle.
Idea 10: Safari Animal Stacking Totem
Read This:

Step-by-Step Guide
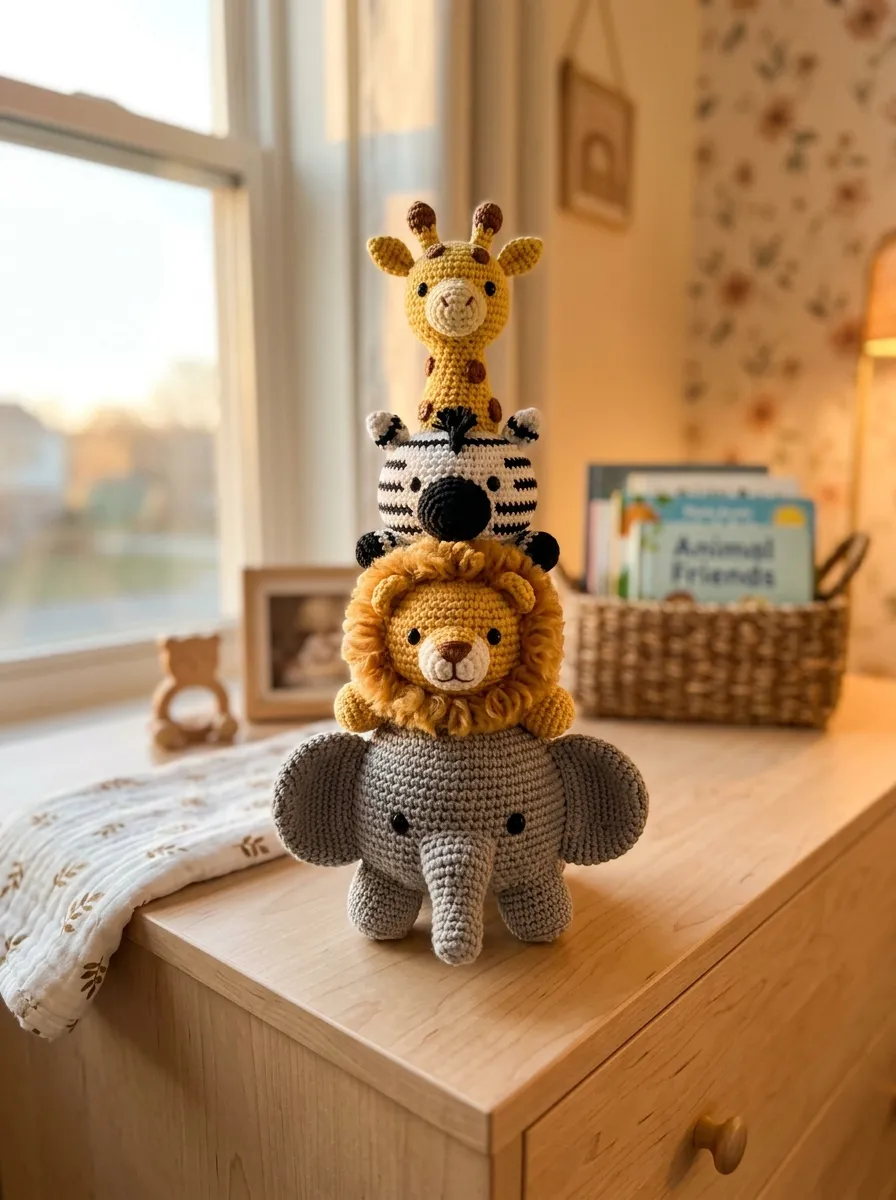
The safari animal stacking totem presents an engaging African wildlife adventure, stacking four iconic savannah animals into a cheerful vertical totem pole. The lowest, widest tier features a gentle gray elephant, complete with wide, flat ears and an embroidered curved trunk along the front face. The second tier depicts a tawny lion with a textured loop-stitch mane framing its friendly face, followed by a zebra ring featuring striking black and white vertical intarsia stripes. The summit piece is shaped as a cheerful giraffe head, detailed with two small ossicones, perky ears, and warm caramel spots embroidered over a butter-yellow ground. The tactile contrast between the smooth elephant skin, the looped yarn lion mane, and the structural giraffe horns delivers exceptional sensory discovery for developing infants. This project serves as an ideal heirloom gift, combining cheerful visual storytelling with practical developmental play mechanics that enhance any modern safari-themed nursery.
Construct the central acacia-trunk post using warm sand-toned yarn, creating a stable fifty-stitch flat circular base weighted with non-toxic plastic pellets, extending upward for twenty-five centimeters in dense single crochet rounds. For the base elephant tier, crochet a thirty-six stitch ring in heather gray, stitching two broad, flat circular ears flat against the lateral walls and sewing an elongated curved trunk down the center front. For the lion tier, construct a thirty-stitch ring in golden-caramel yarn, surface-crocheting a dense perimeter border of four-centimeter yarn loops around the circumference, cutting the loops to create a soft, brushed fringe mane. Craft the zebra tier in twenty-four stitches, alternating two stitches of black and two stitches of white across each round using the tapestry crochet technique to eliminate loose interior yarn floats. For the giraffe topper, crochet a tapered yellow oval, attaching two tiny conical horns topped with brown spheres, two leaf-shaped ears, and an embroidered brown muzzle before securing the head onto an inner sliding sleeve that caps the central post securely.
Common Beginner Mistakes and How to Avoid Them
Constructing amigurumi stacking toys introduces unique physical stresses and geometric constraints that differ significantly from standard static plush dolls. A frequent mistake among beginners is working with loose stitch tension, which causes the fabric walls to stretch open when packed with stuffing, allowing white polyester fiberfill to show through the stitches. To prevent this, crafters must downsize their crochet hook by at least one full millimeter relative to the yarn label recommendation, producing a dense, opaque barrier. Another common issue is under-stuffing the central vertical spindle, which causes the post to bend or droop under the weight of the stacked rings; using high-density fiberfill packed in small, firm increments ensures the column remains perfectly upright. Crafters also frequently miscalculate the inner aperture of the rings, making them either too tight to slide freely or so loose that they wobble unpredictably. Measure the circumference of the finished central post with a flexible tape measure before crocheting the rings, ensuring that the inner ring chains are exactly two stitches larger than the post circumference to allow smooth, effortless sliding during active play.
Practical Tips for Better Results
Achieving professional, boutique-quality results with amigurumi stacking sets depends on implementing specialized technical habits tailored to heavy-use children’s toys. Always utilize the invisible decrease method across all shaping rounds, inserting the hook exclusively through the front loops of two consecutive stitches before pulling through; this approach eliminates the unsightly bumps and gaps created by traditional decreases. To ensure the central post remains flat and stable on floors or tables, insert a circular plastic disc cut from a clean, flexible container lid into the interior base before adding stuffing. When joining yarn colors, execute the final yarn-over of the preceding stitch with the new color to produce a crisp, jogless transition line without jagged pixelation. Furthermore, avoid using plastic safety eyes or buttons on toys intended for infants under three years old, as persistent chewing can loosen locking washers and create severe choking hazards. Instead, embroider all eyes, noses, and decorative facial details using strong mercerized cotton embroidery floss, securing knots deeply within the interior stuffing cavity to guarantee maximum child safety.
Styling, Presentation, or Organization Ideas
Handmade amigurumi stacking toys serve as beautiful, high-texture decorative objects that enhance modern nursery design when thoughtfully displayed. Position the fully assembled tower on a low, natural timber Montessori shelf alongside wooden books and neutral woven baskets to create an inviting, accessible play environment. When styling a nursery dresser or open changing station, display the stacking set in a partially disassembled state—resting two rings casually beside the base post—to showcase the varying interior colors and invite hands-on exploration. For professional makers preparing inventory for craft markets or boutique photography, package complete stacking sets inside custom unbleached cotton drawstring bags stamped with a clean minimalist logo, tying the bag with natural jute twine and a wooden care instruction tag. Storing multiple stacking sets in a shared playroom is easily managed by assigning each set a shallow, open-topped seagrass bin, preventing small rings from scattering while maintaining a tidy, intentional aesthetic. The combination of rich fiber textures against smooth wooden furniture creates a warm, timeless atmosphere that elevates children’s spaces.
Budget or Time Planning
Completing a full amigurumi stacking set efficiently requires strategic material sourcing, organized project sequencing, and disciplined time management. Because stacking sets require multiple harmonious colors, purchase multi-pack yarn bundles or utilize leftover worsted cotton skeins from previous projects to minimize raw material expenses. A standard five-ring stacking set consumes approximately two hundred to three hundred grams of yarn in total, making it an exceptionally economical DIY project that costs very little to produce while yielding high retail or gifting value. From a scheduling perspective, expect to invest roughly eight to twelve hours of total hands-on crochet time per complete set. Organize your production workflow into structured operational blocks: spend the first two-hour session crocheting and weighting the central base spindle, dedicate two subsequent three-hour sessions to constructing the graduated rings, and reserve the final two hours for facial embroidery, surface detailing, and final assembly. Grouping similar tasks together prevents creative fatigue and ensures consistent stitch tension across all individual components.
Creative Expansion and Advanced Inspiration
Once you master foundational stacking toy geometry, consider exploring innovative technical variations that introduce fresh sensory dimensions to your fiber crafts. Experiment with integrating auditory elements by placing safe, sealed plastic rattle inserts, squeakers, or gentle chime bells inside the interior cavity of specific rings, turning visual sorting into an engaging auditory discovery game. Advanced makers can also experiment with mixed-fiber palettes, combining smooth mercerized cotton with textured boucle yarn, plush velvet chenille, or natural linen cords to create rich tactile contrasts that stimulate infant sensory development. Another creative direction involves designing interchangeable thematic sets, such as a four-season tree tower where rings can be swapped between springtime cherry blossoms, lush summer greens, autumn oranges, and frosty winter whites. You can also scale patterns up using jumbo blanket yarn and a ten-millimeter hook to transform a tabletop stacking set into an oversized nursery floor pouf set. These creative avenues empower makers to push beyond conventional patterns, establishing a distinctive artistic voice in modern developmental toy design.