Crochet enthusiasts and crafters frequently turn to Pinterest for charming, small-scale projects that bring personality into living spaces. Celestial themes have become a staple within the crafting community, inspiring makers to transform simple skeins of yarn into planets, rockets, comets, and twinkling stars. This comprehensive guide explores ten distinct amigurumi patterns focused on the wonders of the cosmos, providing full instructions on shaping, assembling, and detailing each celestial item. Readers will learn the essential foundational stitches, discover practical assembly methods, and master the art of working in continuous rounds to produce structured, three-dimensional plush figures. Engaging with space-themed fiber arts allows makers to practice precise stitch counts, color-shifting techniques, and embroidery details on a manageable, miniature scale. These soft handmade objects serve as nursery accents, educational play items, desk ornaments, and customizable gifts for astronomy enthusiasts. By breaking down the design principles and mechanical construction behind each piece, this tutorial equips fiber artists with the confidence to tackle varied geometric silhouettes. From basic spheres representing distant moons to structured cones forming spacecraft thrusters, this creative project series delivers clear, actionable methods that elevate yarncraft into an inspiring exploration of the galaxy.
Why Celestial Amigurumi Captivates Modern Makers
The ongoing fascination with cosmos-inspired crochet patterns stems from a natural balance between modern design simplicity and nostalgic playfulness. Minimalist interior decoration frequently incorporates clean celestial shapes, such as crescent moons and understated planetary rings, because these motifs blend effortlessly into neutral color palettes. Amigurumi craft projects offer immediate tactile satisfaction because their compact scale ensures that a project can be completed in just one or two sittings. For beginners entering the world of fiber arts, celestial forms offer an accessible entry point. Basic spheres serve as the structural foundation for suns, moons, and terrestrial planets, allowing novices to master the single crochet stitch, steady tension, and seamless decreases without navigating complicated garment shaping. The visual appeal of handmade space figures thrives across digital boards where makers share aesthetic arrangements of finished sets hanging from mobiles or nestled into workspace shelves. Furthermore, cosmic themes naturally invite creative freedom regarding yarn textures and palettes. A crafter can choose muted, Scandinavian-inspired earth tones for an understated aesthetic, or select vibrant primary shades for energetic children’s toys. This inherent adaptability guarantees lasting relevance for celestial designs within modern fiber arts.

Materials and Preparation for Celestial Fiber Projects
Successful execution of miniature space crochet requires careful selection of materials, specialized notions, and organized planning before picking up the hook. Smooth cotton or low-pill acrylic yarn in a DK or sport weight provides the crisp stitch definition necessary for tight amigurumi forms. A crochet hook sized between 2.25 mm and 2.75 mm ensures stitches remain compact enough to prevent polyester fiberfill from showing through the fabric. Essential preparation tools include a blunt tapestry needle for seamless assembly, fine embroidery floss for facial detailing, locking stitch markers to track spiral rounds, and sharp snips. Crafters must also source resilient, hypoallergenic stuffing that can be packed firmly into small extremities without shifting over time. Proper preparation begins by creating a small test gauge swatch to confirm that the hook size matches the selected yarn weight, ensuring a solid, dense fabric. Before starting any design, sort chosen colors into cohesive groupings to maintain visual balance across the planetary collection. Organizing notions in a divided tray keeps miniature safety eyes, sewing pins, and markers accessible during continuous work. Thoughtful material readiness eliminates interruptions, maintains steady stitch tension, and guarantees that every cosmic figure emerges with structural integrity.
Idea 1: Classic Golden Star Ornament
Step-by-Step Guide
The classic golden star serves as the quintessential celestial project, translating a basic geometric shape into a soft, tactile sculpture. This design relies on a flat, circular core from which five evenly spaced, tapering points emerge symmetrically. In minimalist style nurseries and cozy modern reading spaces, these stars provide warmth through cheerful mustard, marigold, or pale yellow yarn selections. Achieving crisp points without rounded tips requires precise stitch progression, transitioning smoothly from single crochet to double crochet stitches within each point. The central disc must remain firm and circular so that the outward projections do not pull the center out of alignment. Crafters can adapt this design into individual nursery drawer pulls, decorative shelf accents, or interconnected garland strands. Because the star features identical points, it offers beginners repeated practice with uniform stitch tension and small-scale edge shaping. Embroidering simple sleepy eye curves or rosy cheek accents transforms the geometric form into a character-driven plush companion that appeals to children and adults alike.
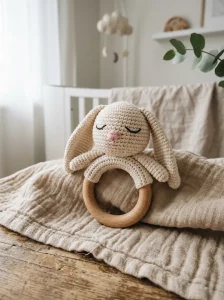
Begin by working six single crochet stitches into an adjustable magic ring using a bright golden yarn. Increase evenly across three rounds until eighteen stitches form a flat disc, then terminate the yarn to set aside the front face. Repeat this process to produce an identical backing piece, matching stitch counts precisely to ensure clean alignment during final joining. Lay the two circles together with wrong sides touching, then join the edges using slip stitches through both thicknesses. To create the first point, chain six, work a single crochet in the second chain from the hook, follow with a half double crochet, and finish with two standard double crochet stitches down the length of the chain. Anchor the point to the central disc three stitches away with a slip stitch, then immediately repeat the chain sequence for the remaining four points. Stuff the central cavity firmly with polyester fiberfill just before completing the final anchor join, keeping the stuffing centered away from the edges. Weave all loose ends securely into the interior using a tapestry needle.
Idea 2: Ringed Gas Giant with Textured Orbit
Execution Process
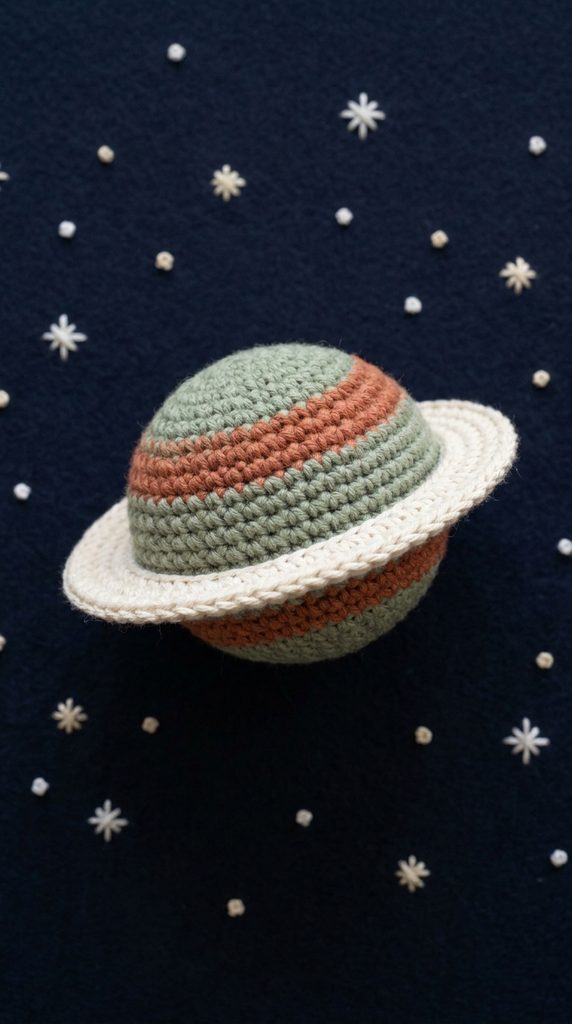
Planetary designs with concentric rings present an engaging exercise in scale, color coordination, and structural balance. This miniature gas giant utilizes a dense core sphere surrounded by an independent, tension-held circular band to simulate orbiting ice and cosmic dust. Choosing muted tones such as sage, dusty terracotta, or slate blue delivers a sophisticated aesthetic that fits seamlessly into modern home decor. The main planet requires consistent single crochet stitches worked in a continuous spiral, while the outer ring demands a tighter, flatter construction using basic chain loops and slip stitch stabilization. Maintaining a distinct contrast between the spherical planet body and the delicate outer orbit creates visual depth that mimics astronomical photography. The ring must hold its circular shape without drooping or folding against the sphere, which can be accomplished by selecting a slightly stiffer mercerized cotton yarn for the orbit piece. This design functions wonderfully as a hanging mobile element or as an educational desk accessory that showcases precision handiwork.

Create the spherical planet core by casting six single crochet stitches into a magic loop, increasing evenly over consecutive rounds until reaching thirty stitches around. Work five straight rounds without increasing to develop the central depth, shifting between complementary striping shades by completing the final pull-through of the transition stitch with the new color. Begin decreasing symmetrically using the invisible decrease method until six stitches remain, packing fiberfill firmly throughout the closure process to prevent dimpling. For the orbiting ring, crochet an independent chain long enough to encircle the finished planet’s equator with two millimeters of surrounding clearance. Join the chain into a circle with a slip stitch, taking care not to twist the foundation loop, and work two continuous rounds of half double crochet into the back loops. Fasten off with a long tail, slip the ring over the sphere at an angled orientation, and secure it at four opposing anchor points using invisible tacking stitches sewn with matching embroidery thread.
Idea 3: Pocket Space Explorer in Micro Helmet
How to Create
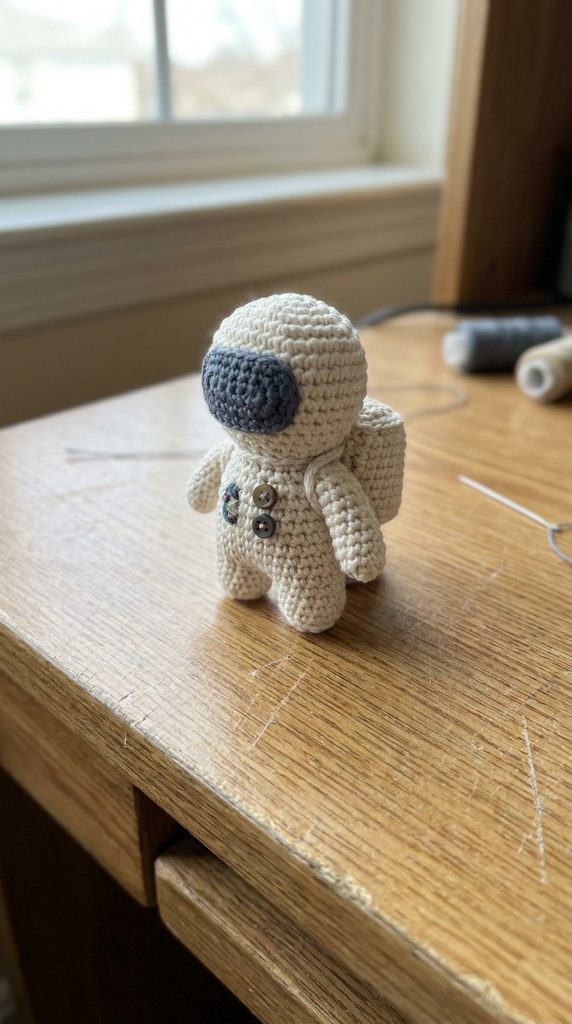
Crafting a miniature astronaut figure introduces multidimensional assembly, incorporating separate limbs, a weighted backpack life-support unit, and an oversized bubble helmet. This character embodies playful adventure through contrasting textural elements, pairing clean white suit fabric with reflective slate or metallic accents on the visor. The head and torso are crocheted as a continuous vertical unit to provide a stable foundation, while the limbs are attached using surface joins to permit gentle posability. A prominent rectangular oxygen pack sewn to the back balances the forward weight of the rounded visor, allowing the explorer to sit upright on flat surfaces without tipping forward. Crafters can customize the spacesuit with tiny embroidered mission patches, chest control buttons, or colored cuff rings. This project highlights the charm of narrative fiber art, offering makers an approachable character that sparks imaginative play and storytelling. The compact size makes it a delightful pocket talisman, bag charm, or themed bookshelf companion for dreamers of all ages.

Begin by working the rounded head in continuous rounds from the top downward, expanding to twenty-four stitches before tapering inward at the neck base with sharp decreases. Transition directly into the torso without cutting the yarn, increasing slightly to create a sturdy, bell-shaped waistline packed with dense stuffing. For the visor, use deep charcoal or metallic grey yarn to crochet an oval patch, starting from a foundation chain of five stitches and working around both sides of the chain. Stitch the visor securely across the upper facial area before attaching a clear plastic or fine-mesh accent layer if desired. Crochet four simple tubular limbs using spiral rounds of six single stitches, leaving long thread tails for sewing. Construct the square backpack by working eight rows of back-and-forth single crochet, folding the strip into a hollow cube, and lightly stuffing the cavity. Pin all components onto the body with straight pins to check alignment, then stitch limbs and equipment down firmly with a tapestry needle.
Idea 4: Blushing Crescent Lullaby Moon
Setup Method
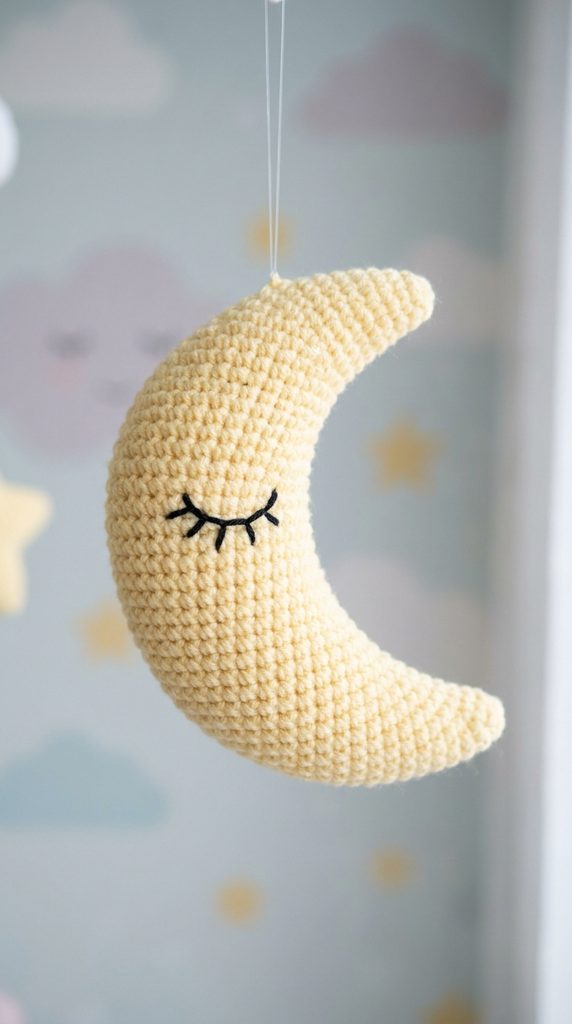
The crescent moon offers a graceful departure from standard spherical patterns, relying on asymmetric increases and decreases to generate a natural, sweeping curve. This design introduces soft curves and peaceful character elements into nursery spaces or tranquil bedroom corners. Choosing soothing hues like cream, soft butter, or pale mint reinforces the gentle aesthetic of a bedtime lullaby. The tapered ends of the crescent demand strict attention to stitch placement, transitioning gradually from narrow single stitches at the tips to wide, deep arches across the belly of the moon. Embroidering sleeping eyes with curved silk threads along the inner curve infuses the piece with gentle personality, turning a geometric phase of the moon into an endearing character. The smooth inward arc provides a natural cradle where small crocheted stars or clouds can be attached with fine thread. This versatile motif serves as an exquisite wall hanging component, mobile centerpiece, or tactile nursery keepsake that exudes handcrafted charm.
Begin at the upper tip of the crescent by placing four single crochet stitches into a magic ring. Gradually widen the profile by placing increases along only one side of the tube while working standard single crochets along the opposite edge, allowing the natural bias of the fabric to curve. Continue this asymmetric sequence across twenty rounds until the central belly reaches thirty stitches in circumference, maintaining a relaxed, uniform tension to keep the curved edge smooth. After completing the midpoint, mirror the shaping by applying invisible decreases exclusively along the original increase edge, gently tapering the cylinder back down to a four-stitch point. Stuff the piece gradually as the work progresses, using small, separated tufts of fiberfill pushed into the tips with the back of a crochet hook to avoid lumpiness. Close the final four stitches with a needle draw-string technique. Finish by using black embroidery floss to sew curved, downward-facing eyelids complete with delicate eyelashes midway along the inner curve.
Idea 5: Retro Rocket Ship with Vibrant Thrusters
How to Make
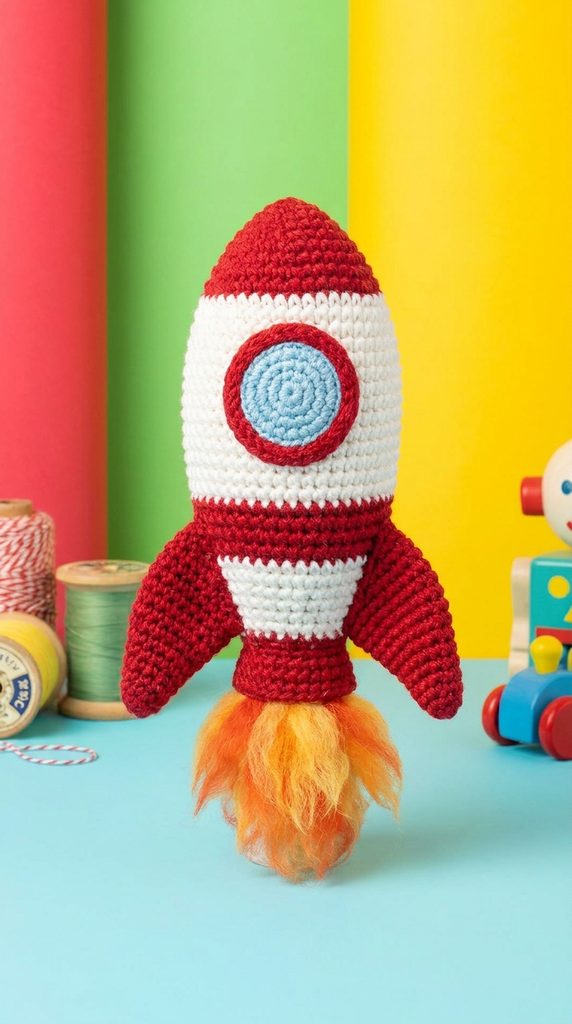
A retro-styled rocket ship brings dynamic movement and vibrant architectural shapes to any celestial amigurumi collection. Inspired by mid-century space concepts, this model features a streamlined conical fuselage, contrasting porthole windows, and three stabilizing triangular tail fins. Bold primary tones—such as bright cherry red, crisp white, and deep ocean blue—give the rocket an energetic, vintage presence suitable for playful children’s decor. The conical body requires deliberate, evenly spaced increases that build a tall, rigid shape capable of maintaining structural form when handled. The attached stabilizing fins act as functional tripod feet, allowing the rocket to stand upright without external armatures or supports. Adding fluffy, multi-strand yarn thruster flames in shades of bright orange and canary yellow adds textural contrast to the smooth cotton body. This project challenges makers to produce clean lines and rigid structural joins, yielding an action-oriented design that stands out vividly on any display shelf.
Crochet the rocket body starting from the nose cone using vivid red yarn, working two single crochets per round to maintain a sharp, narrow tip before widening out. Shift to white yarn after round eight to establish the main cabin, continuing the gradual conical expansion over twenty rounds until reaching thirty-six stitches. Insert a circular piece of recycled plastic or heavy cardboard into the base after stuffing to create a firm, flat bottom before closing the sphere. For the porthole, work a small circle of sky blue yarn bordered by a raised slip-stitch frame in silver-grey, then stitch it directly to the upper hull. Create three identical stabilizing fins by crocheting flat triangles in rows, folding each along its center line for added thickness, and securing them equidistant around the lower hull to form a self-supporting tripod base. Knot clusters of bright orange and golden embroidery thread into the center of the base plate, brushing out the yarn fibers with a fine comb to simulate soft engine plumes.
Idea 6: Whimsical Orbiting Satellite with Solar Arrays
Step-by-Step Guide
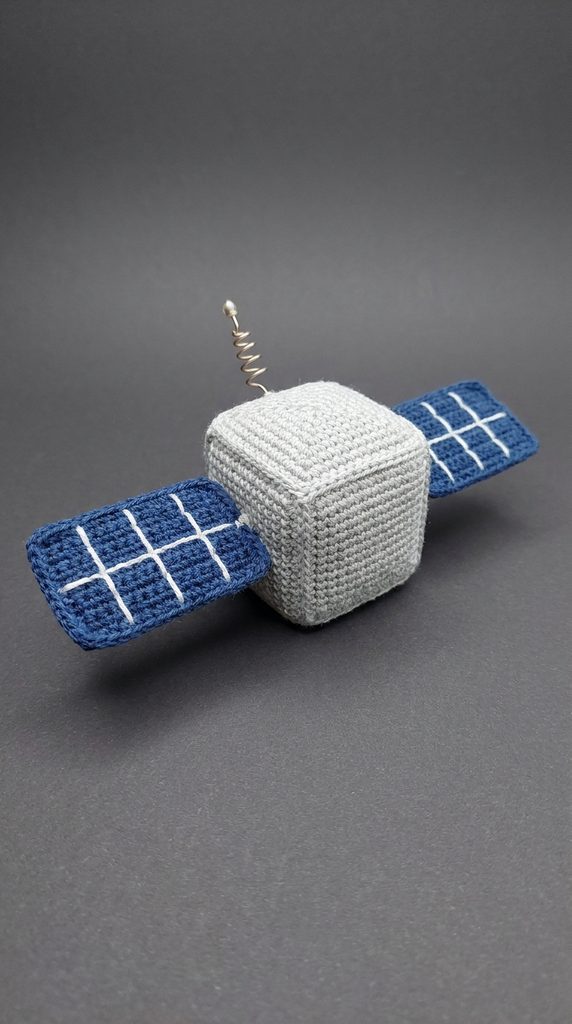
Crocheting an orbital satellite introduces mechanical, angular forms to the typically soft, rounded world of amigurumi. This unique project features a compact cube or cylinder core flanked by two extended rectangular solar panels, blending technical hardware with handmade yarn textures. Utilizing industrial shades like silver grey, graphite, and deep navy blue produces a modern design that appeals to science buffs, teachers, and engineering students. The core body must be stuffed firmly into a boxy silhouette, which requires working stitches into the back loops at the corner edges to create crisp, ninety-degree turns. The flat solar panels must remain rigid without curling, accomplished through tight, dense single crochet rows worked over a fine gauge plastic canvas insert. Tiny details—such as embroidered grid patterns on the solar wings and a delicate coiled wire antenna—elevate the model into an impressive conversational conversation piece. This project offers experienced crafters a rewarding exercise in structural reinforcement and geometric fiber assembly.
Construct the central satellite hub by working six square panels in back-and-forth single crochet rows of eight stitches by eight rows using medium grey yarn. Join five of the panels together using surface slip stitches along the exterior seams to create an open cube, then line the interior faces with thin cardstock to maintain crisp corners. Fill the core with firm polyester stuffing before stitching the sixth panel across the opening to seal the structural block securely. For the two solar panels, switch to deep royal blue yarn and crochet flat rectangles measuring twelve rows long by six stitches wide, using a sharp tapestry needle and white thread to embroider geometric solar cell gridlines across both surfaces. Sandwich a cut-to-size plastic strip between duplicate panel layers to provide structural stiffness, then sew the completed panels securely to opposing sides of the central cube. Attach a looped, thread-wrapped wire antenna to the top face to complete this detailed scientific showpiece.
Idea 7: Swirling Cosmic Nebula Pinwheel
Execution Process
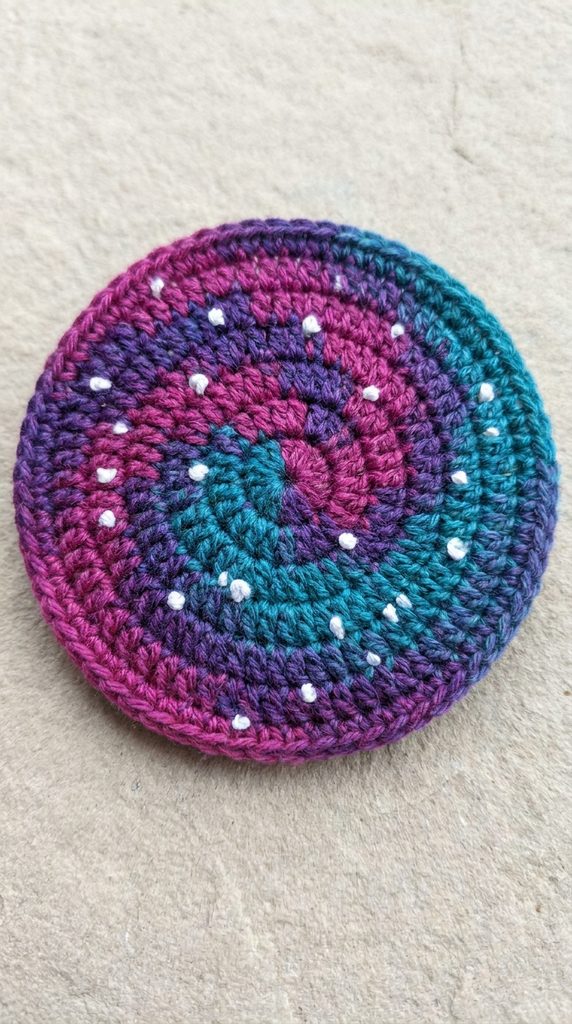
The cosmic nebula pinwheel captures the swirling, atmospheric mystery of deep space through blended gradients, spiraling color changes, and dynamic circular motion. This design moves away from realistic physical objects, interpreting interstellar dust clouds through artistic spiral geometry. Utilizing variegated yarns that shift smoothly through magenta, deep violet, indigo, and sparkling teal yields a visually captivating aesthetic reminiscent of deep space photography. The construction process employs the continuous spiral tapestry crochet technique, carrying multiple active yarn strands across each round to build sweeping, pinwheel-style curved arms. Because the shape remains essentially flat, this piece is exceptionally versatile in home decoration, functioning as an artistic drink coaster, a vibrant wall medallion, or a base pad for displaying other celestial amigurumi figures. Working with multiple colors simultaneously helps crafters build confidence in yarn management, tension control, and neat color transitions. The resulting swirl creates an eye-catching spiral motion that brings the illusion of cosmic rotation directly into the palm of your hand.
Begin by setting up a magic ring using three contrasting colors simultaneously, placing two single crochet stitches of each color into the starting circle for a total of six stitches. Work in a continuous spiral without joining rounds, increasing by one stitch in each color segment every round while carrying the inactive working yarns loosely along the back of the work. As the circle expands, shift from single crochet to half double crochet stitches to elongate the swirling tails, creating an arching, pinwheel effect across the outer rim. Keep an even, relaxed tension to prevent the circular disc from buckling inward or rippling along the edges. Once the nebula reaches the desired diameter of roughly four to five inches, taper each colored segment back down to single crochets followed by slip stitches to level the outer border. Block the completed pinwheel flat using damp pins on a foam board to ensure clean symmetry, then embellish the surface with randomly placed French knots in white silk floss to represent distant twinkling stars.
Idea 8: Miniature Cratered Moonlet
How to Create
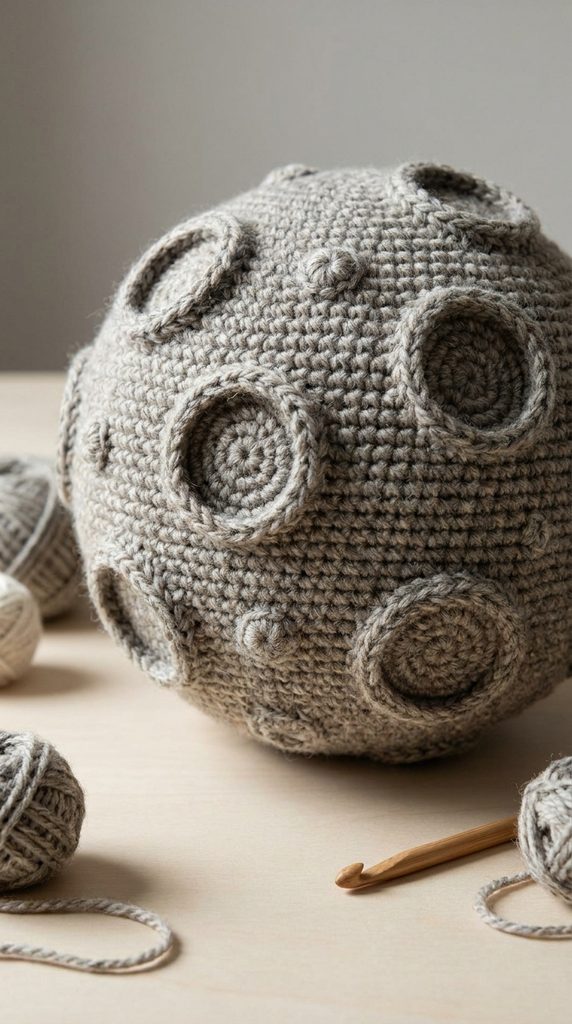
A cratered moonlet offers a rich textural experience, celebrating natural imperfections through raised ridges, indented hollows, and mottled stone-grey color variations. Unlike a smooth spherical planet, this design incorporates varied stitch heights and surface embroidery to mimic the ancient, battered landscape of our natural satellite. Working with heathered grey, oatmeal, or soft silver yarn gives the surface an authentic lunar rock feel, aligning cleanly with contemporary minimalist style aesthetics. Crafters build the lunar craters using specialized surface stitches, such as back-post single crochets and front-loop clusters, which form recessed depressions surrounded by raised circular rims. The tactile variation across the surface makes the moonlet engaging to hold, while its neutral coloring provides an understated accent piece that complements any shelf display. This project gives beginners practical experience with advanced stitch textures, demonstrating how structural surface variations can alter the character of a simple sphere.
Crochet the primary lunar globe by casting six stitches into an adjustable ring with heathered grey yarn, increasing evenly over consecutive rounds until the sphere spans twenty-four stitches. Integrate miniature craters directly into the fabric by working periodic cluster stitches—consisting of four incomplete double crochets closed together—followed by a firm slip stitch that pulls the cluster deep into the interior stuffing. Continue building the sphere across twelve standard rounds, scattering cluster depressions randomly across the surface to ensure an organic, natural distribution. Stuff the sphere firmly with dense fiberfill, shaping it into a slightly irregular, weathered ball before completing the final decrease rounds. To form larger, distinct craters, crochet separate circular rings of six chain stitches joined into a loop, working single crochets into the ring center to create raised, donut-shaped ridges. Sew these crater rims directly over the surface using whip stitches, pulling the center points inward with tension threads anchored to the opposite side of the globe.
Idea 9: Blazing Comet with Trailing Star Dust
Setup Method
The blazing comet pattern introduces energetic movement to fiber collections by pairing a dense, spherical nucleus with flowing, wispy tails of stardust. This dynamic concept translates celestial speed into tactile materials, using flowing threads and varied yarn weights to depict an icy celestial body sweeping across the sky. Opting for icy hues—such as crystal blue, crisp white, and pale silver—for the head, paired with iridescent or sheer fibers for the tail, produces an ethereal visual treat. The nucleus uses standard three-dimensional amigurumi construction, providing weight and form, while the tail relies on elongated chain loops, brushed roving, or delicate ribbon yarn. This project serves as an ideal holiday tree ornament, nursery curtain tieback, or mobile accent, bringing visual lift and diagonal energy wherever it is displayed. Making a comet encourages crafters to experiment with mixed fiber media, blending traditional structured crochet with fluid, unspun accents to achieve an expressive handmade finish.
Begin by crocheting the comet core as a tear-drop shaped sphere, starting with six single crochet stitches in an adjustable loop using pure white yarn. Increase symmetrically over four rounds to eighteen stitches, work four straight rounds to build volume, and then decrease rapidly along one side to produce an elongated, egg-shaped tail point. Stuff the core firmly, concentrating the filling within the front dome while leaving the trailing point softer and flatter. Fasten off the main yarn, leaving a sturdy tail to anchor the trailing embellishments. For the dust tail, cut twenty strands of contrasting pale blue, silver thread, and unspun roving yarn, each measuring ten inches in length. Loop these strands securely through the back stitches of the comet nucleus using a standard lark’s head fringe knot. Use a fine-toothed wool comb to gently separate the yarn plies into a hazy, cloud-like tail, trimming the ends diagonally to suggest rapid motion through space.
Idea 10: Smiling Sun with Braided Solar Flares
How to Make
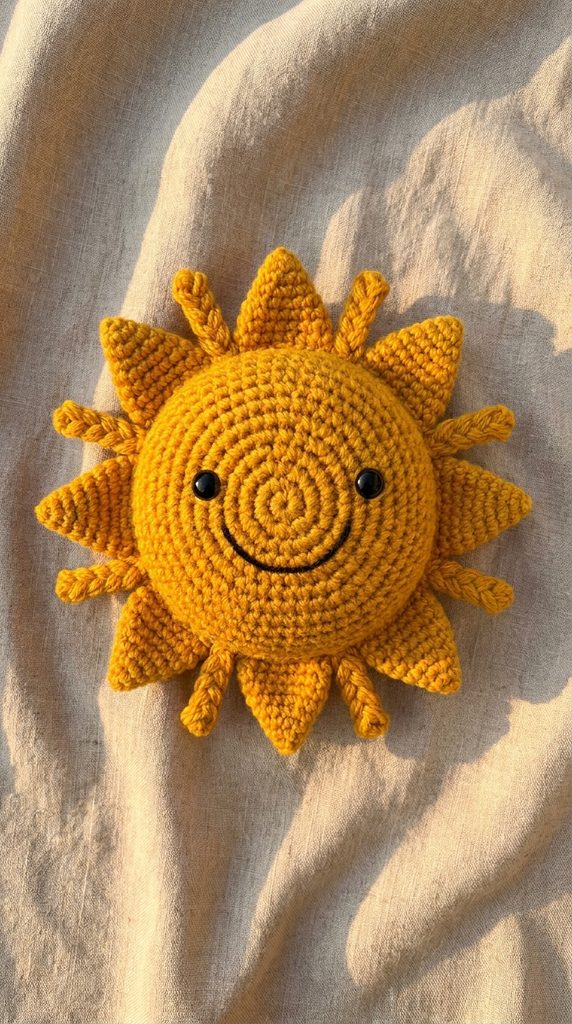
The smiling sun amigurumi radiates warmth and cheerfulness, serving as the luminous anchor for any handmade celestial collection. This bright design features a generous, golden circular face surrounded by an intricate crown of textured rays, solar flares, and braided yarn loops. Choosing warm, saturated tones—such as marigold, saffron, amber, and honey—creates an inviting palette that brightens children’s bedrooms, classroom reading nooks, or craft studios. The broad, flat face offers a spacious canvas for expressive embroidery, accommodating wide smiles, rosy cheeks, or tiny sleepy eyelids. Crafting the surrounding solar rays provides engaging variety, combining pointed picot borders, braided yarn tendrils, and small crocheted triangles to evoke solar warmth. The wide circular profile demands firm internal structure to prevent the face from bowing outward under the weight of the outer rays. This project spreads craft joy, completing the cosmic journey with a radiant design that ties the entire planetary system together.
Crochet two broad, matching circular discs using warm saffron yellow yarn, increasing evenly across six rounds until each piece measures thirty-six stitches along the perimeter. Set one disc aside for the back and decorate the front face by stitching two safety eyes between rounds four and five, spacing them five stitches apart. Embroider a wide, cheerful smile between the eyes using dark brown thread, applying soft pink powder or circular felt patches to create blushing cheeks. Place the two discs together with wrong sides facing inward, joining their borders with a round of single crochet stitches while packing the interior with light, even stuffing. To build the solar flares, work around the joined perimeter by alternating between small triangular points—formed with chains, half double crochets, and slip stitches—and extended four-inch looped strands of yarn. Secure all ends, then divide the extended strands into groups of three to plait small, neat braids around the crown, securing the ends with tight matching thread wraps.
Common Beginner Mistakes and How to Avoid Them
Beginners tackling celestial amigurumi often encounter common technical hurdles that can easily be avoided with proper guidance. One widespread error is selecting a crochet hook that is too large for the chosen yarn weight, which creates loose, open stitches that allow polyester stuffing to show through. Always drop down one or two hook sizes below the manufacturer’s recommendation on the yarn label to produce dense, tight fabric. Another frequent pitfall involves uneven or lumpy stuffing inside spherical planets and stars. Rather than packing large bundles of fiberfill into the opening at once, insert small, separated tufts gradually, smoothing the filling outward against the interior walls to create a firm, symmetrical shape. Tracking continuous spiral rounds without markers can cause missed increases, resulting in lopsided planets and distorted star points. Secure a locking stitch marker or a contrasting thread scrap into the final stitch of every round, moving it up systematically as you progress. Finally, pulling color-change yarns too tightly across the back of the work can pucker the fabric and distort your clean celestial silhouettes. Maintain a relaxed, steady tension during color transitions to preserve smooth, spherical curves.
Practical Tips for Better Results
Achieving professional, polished results in amigurumi crafting relies on small, thoughtful refinements to your daily techniques. First, use the invisible decrease method instead of standard decreases across all spherical forms. By working solely through the front loops of two adjacent stitches before completing the single crochet, you eliminate unsightly gaps and ridges, creating a seamless, uniform decrease surface. When attaching limbs, rings, or star points, pin every component into position using long, pearl-headed pins before sewing a single stitch. Stepping back to inspect your piece from multiple angles ensures that eyes, orbits, and thrusters sit symmetrically. For expressive, long-lasting facial detailing, choose stranded cotton embroidery floss rather than thick acrylic yarn, as finer threads allow for delicate, emotive expressions that do not overpower the face. When finishing your projects, weave yarn tails through the dense interior stuffing across several directions rather than simply knotting them at the surface; this internal friction anchors ends permanently without distorting delicate shapes. Finally, gently steam-block flat elements, such as rocket fins and satellite panels, under a damp pressing cloth to give them crisp, professional edges before final assembly.
Styling, Presentation, or Organization Ideas
Handmade celestial amigurumi offers endless opportunities for imaginative home decoration, nursery organization, and creative gifting presentations. A popular presentation method involves assembling several finished planets, a central sun, and tiny stars into an astronomical baby mobile. By securing the figures to a simple embroidery hoop with clear nylon thread, you create a floating galaxy that catches the breeze and draws the eye upward. In modern playrooms, these space characters can be displayed in wire baskets or arranged along floating wall shelves alongside children’s science books and star maps. If you enjoy functional craft projects, transform miniature stars, moons, and comets into personalized keychains, backpack pulls, or curtain tiebacks for a playful accent. For seasonal celebrations, an assortment of golden stars and glowing suns strung along natural jute twine makes a warm, cosmic garland for mantels and window frames. Presenting a set as a thoughtful gift is equally delightful when packed inside an illustrated tin or nestled into starry tissue paper inside a small wooden crate. These varied styling ideas ensure your handmade cosmic creations become functional art pieces throughout your home.
Budget and Time Planning
Approaching a multi-piece amigurumi set with clear planning ensures that crafting remains an affordable, relaxing, and organized hobby. Cotton and acrylic blend yarns are naturally budget-friendly, and a single fifty-gram skein provides enough yardage to produce several small planets, stars, and satellites. To keep costs low, review your existing yarn stash for suitable celestial shades before purchasing new supplies; small details like thruster flames and crater rings require only short remnants. Managing your project timeline is just as simple because these small figures work up quickly. An individual star, moonlet, or comet can comfortably be crocheted and stuffed in approximately one to two hours, making them ideal projects for quiet evenings or quick weekend crafting. Larger projects with multiple components, such as the rocket ship or satellite, may require three to four hours to account for panel blocking and careful assembly. Setting up a dedicated project basket with your chosen yarns, ergonomic hooks, and pre-cut notions prevents setup delays and keeps your workspace tidy. This thoughtful pacing makes creating an entire ten-piece solar system an enjoyable, low-stress creative pursuit.
Creative Expansion and Advanced Inspiration
Once you have mastered the foundational designs in this celestial collection, you can easily adapt and scale the patterns into advanced fiber projects. Experiment with specialty novelty yarns to introduce cosmic mystery: incorporate fine metallic strands into planetary rings, or choose glow-in-the-dark yarn for star points and moon faces to create a magical nighttime display. Experienced crafters can easily adjust overall scale by modifying yarn weights and corresponding hook sizes. Working these patterns with chunky blanket yarn and an eight-millimeter hook transforms pocket-sized figures into huggable nursery floor cushions, while micro-crochet thread and a one-millimeter hook turn them into delicate astronomy-themed jewelry. You might also consider embedding tiny rattle inserts, squeakers, or crinkle paper into the core stuffing to transform finished pieces into multi-sensory infant toys. For tech-inspired home displays, weave battery-powered micro LED fairy lights into the hollow core of the smiling sun or rocket thrusters to craft a soft bedside nightlight. Embracing these creative variations expands your amigurumi skills, inspiring you to continuously reimagine fiber art in fresh, imaginative ways.