Handmade accessories bring distinctive personality, tactile comfort, and functional identification to everyday academic supplies as students prepare for a new academic year. Personalizing backpacks, pencil cases, planners, and locker keys with miniature yarn pendants offers an enjoyable creative project that combines textile crafting with practical utility. In this comprehensive guide, makers will discover ten unique crochet charm concepts tailored specifically for the back to school season, covering classic educational emblems, motivational symbols, and playful desktop motifs. This tutorial outlines the exact structural techniques required to produce durable, compact items that withstand the friction of crowded school bags and daily hallway transit. Readers will learn how to select abrasion-resistant yarn fibers, manage tight-gauge stitch tension, integrate secure metal hardware, and execute clean embroidery details. Beyond basic construction, the article details practical methods for coordinating color palettes with student gear, reinforcing suspension loops, and attaching multi-functional clasps. Mastering these small-scale designs provides continuous DIY inspiration, allowing crafters to transform modest fiber remnants into durable keepsakes that brighten daily study routines. Following these structured guidelines ensures that every completed accessory delivers high visual appeal, reliable longevity, and effortless everyday utility.
Why This Idea Is Trending or Useful
Crochet charms continue to surge in popularity across modern Pinterest ideas because they merge nostalgic, handmade aesthetics with the contemporary trend of maximalist bag styling. Modern students and young professionals customize their everyday carry items using layered keychains, textured tags, and character dangles to establish immediate visual identity in shared environments. On a practical level, these small fabric markers solve the common problem of mixed-up school gear, allowing students to spot their identical navy or black backpacks instantly on crowded classroom hooks. Unlike rigid plastic tags or heavy metal keychains, cotton crochet charms are soft, lightweight, and completely silent, eliminating disruptive clattering against lockers or desks during quiet study halls. They also safeguard personal electronics by providing soft, non-abrasive cushioning that prevents exterior scratching on laptop sleeves or tablet pouches. For crafters, these miniature patterns serve as an accessible, beginner friendly creative outlet that demands minimal material investment and yields finished results within a single afternoon. The manageable scale encourages creators to experiment with varied stitch textures, geometric forms, and color combinations while producing thoughtful, functional gifts for classmates, teachers, and study groups.
Materials and Preparation
Producing resilient, professional-grade school charms requires deliberate material evaluation and systematic workspace planning before making the first slip knot. Mercerized cotton yarn in sport or DK weight represents the premier fiber choice because its tightly twisted, singed plies resist fuzzing, handle frequent laundering, and retain vibrant coloration despite exposure to sunlight and playground dirt. Avoid weak single-ply wools or shedding synthetic chenille, which quickly degrade under mechanical abrasion against rough canvas packs. Pair this durable cotton with a rigid steel crochet hook sized between 2.0 mm and 2.75 mm, selecting an implement at least one full millimeter smaller than the manufacturer label suggests to create an impenetrable, dense stitch barrier. Essential hardware includes 15 mm to 20 mm swivel lobster clasps, tempered stainless steel jump rings, sturdy ball-chain connectors, and split keyrings with flat cross-sections. Useful tools comprise blunt steel tapestry needles, sharp thread snips, fine-tipped jewelry pliers, and hypoallergenic polyester cluster batting. Preparation involves pre-cutting six-inch lengths of reinforcement cord, pre-washing hand-dyed skeins to prevent dye transfer onto school canvas, and setting up dedicated sorting trays for jump rings and clasps.
Idea 1: Classic Golden Hexagon Pencil Charm
Step-by-Step Guide
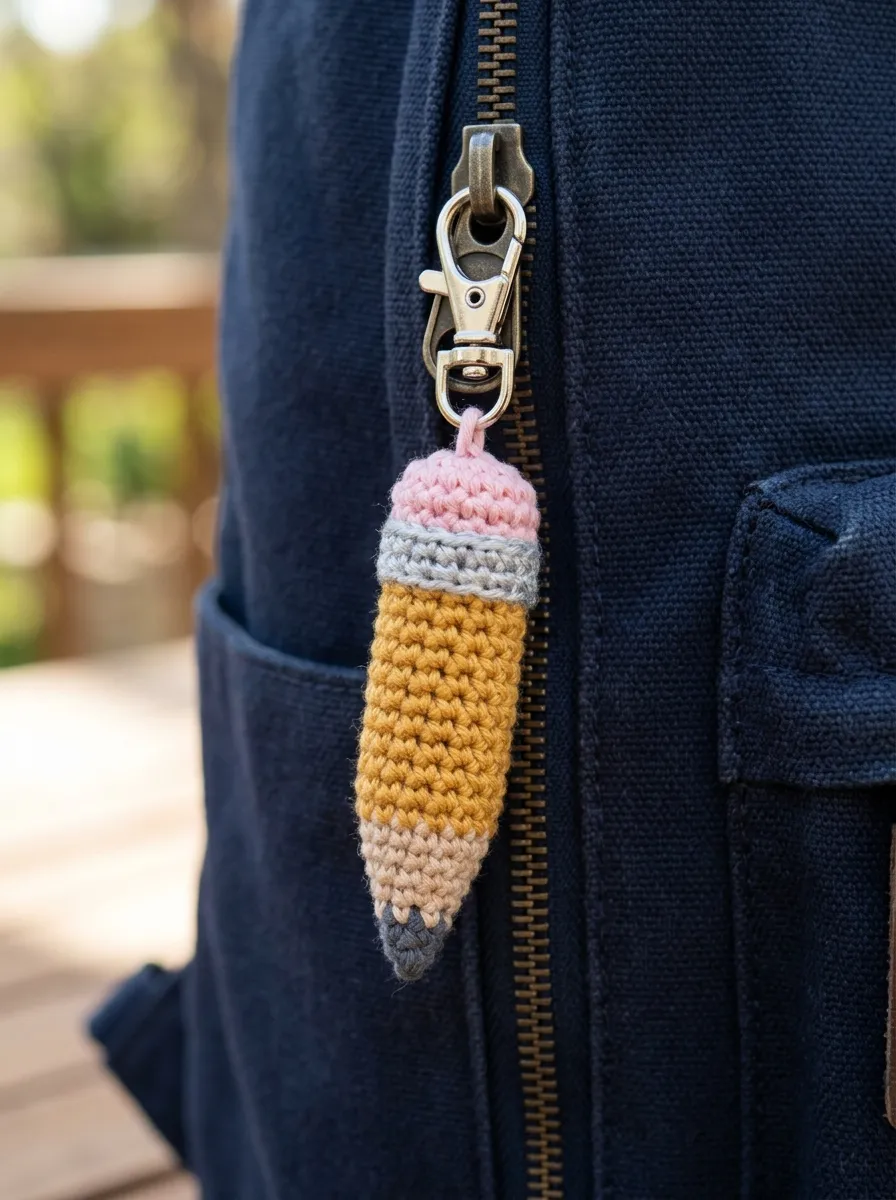
The traditional graphite pencil charm captures the quintessential spirit of classroom preparation through crisp geometric color-blocking and recognizable architectural lines. This design features a hexagonal golden-yellow barrel, an unsharpened wood-grain collar in soft biscuit, a sharp graphite point in slate gray, and a classic pink eraser cap held by a metallic silver ferrule band. The angular structure mirrors an authentic drawing instrument, providing a firm, elongated pendant that tucks smoothly alongside pencil box zippers. The distinct horizontal bands introduce engaging colorwork without requiring intricate tapestry carries, making it an exceptional foundational piece for beginners. Its streamlined profile prevents snagging on interior bag pockets, establishing a durable visual emblem of academic dedication and creative writing.
To construct this pencil pendant, begin at the graphite tip using slate gray sport-weight cotton yarn on a 2.25 mm hook. Cast four single crochets into an adjustable magic loop, expanding evenly across two rounds to establish a sharp six-stitch conical point. Switch cleanly to biscuit-toned yarn for two rounds to form the exposed carved wood taper, working through the back loops to create a defined transitional ledge. Transition to golden-yellow yarn to build the main hexagonal barrel, working in unincreased continuous spirals for fourteen rounds while maintaining a firm gauge to produce rigid walls. Switch to metallic silver or light gray thread for three rounds to represent the metal ferrule, followed by five rounds of dusty rose pink for the rubber eraser. Stuff the tubular cavity firmly with small pinches of polyester batting using the back end of a wooden dowel. Close the eraser flat by slip-stitching across the opposing inner edges, securing a 15 mm silver jump ring through the central closure seam, and attaching a sturdy swivel clasp.
Idea 2: Scarlet Heritage Apple with Leaf Accent
Read This:
How to Create
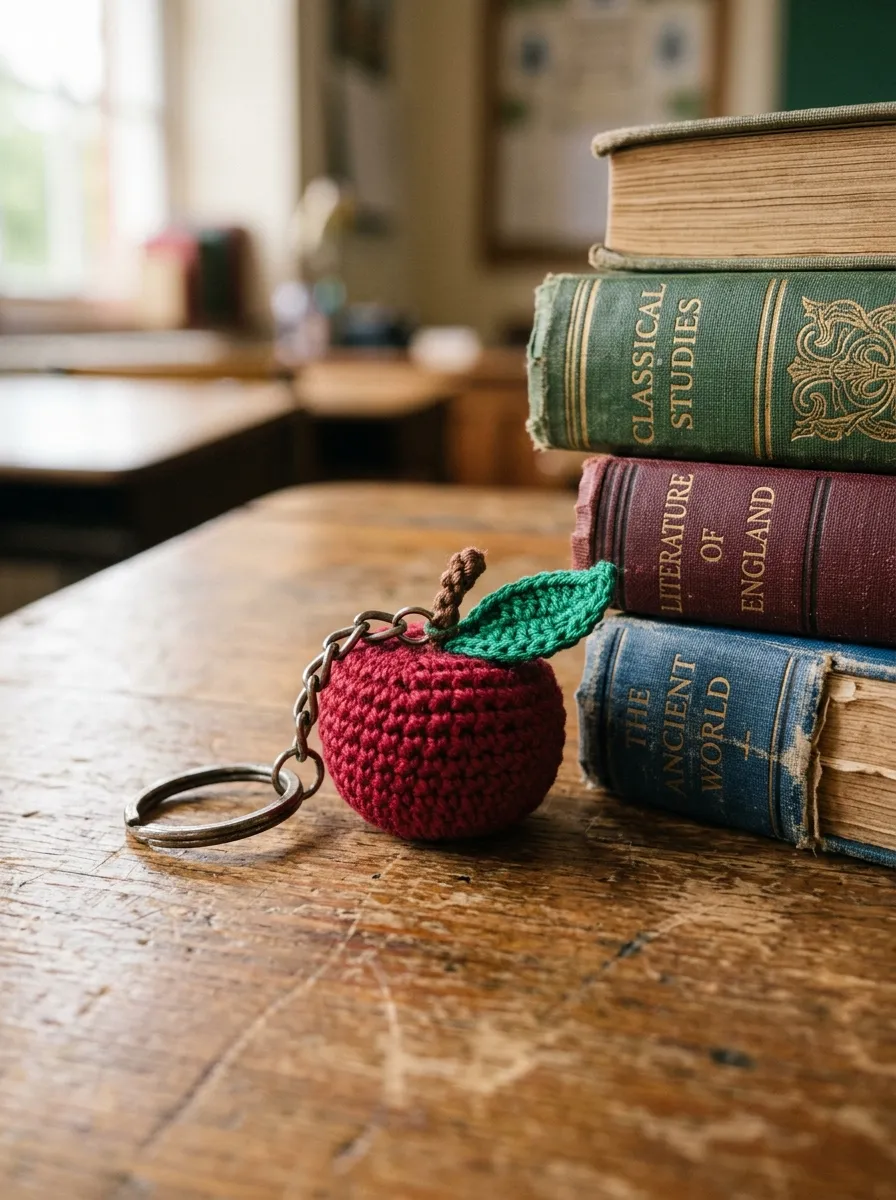
The red apple serves as an enduring, universally recognized symbol of learning, teacher appreciation, and scholastic tradition, translated here into a tactile, three-dimensional sphere. This design incorporates a rich scarlet or crimson body featuring a gently indented crown and base, topped by a textured brown woody stem and a vibrant emerald leaf. The spherical geometry provides a pleasant, squishy stress-relief accent that students can manipulate during intense study sessions or exam preparations. The warm red tone contrasts sharply against dark school bags, creating an unmistakable visual marker that stands out across crowded hallways. Its balanced proportions keep the charm compact, preventing excessive bouncing while students walk between campus classrooms.
Begin fabricating the apple by working from the lower calyx upward in continuous spiral rounds of single crochet using deep crimson cotton yarn. Work six single crochets into a magic ring, increasing systematically across five rounds to reach thirty stitches in circumference, followed by six plain rounds to develop vertical fullness. Execute invisible decreases evenly across the subsequent four rounds, pausing when an eight-stitch opening remains to pack the interior densely with hypoallergenic fiberfill. Finish the sphere with final decreases, leave an eighteen-inch yarn tail, and thread a long tapestry needle through the core from top to bottom, pulling the thread tightly to indent both poles into an authentic fruit shape. For the stem, attach chocolate brown yarn to the top center depression, working a tight five-stitch foundation cord for six rows. Crochet a miniature leaf in forest green using a sequence of slip stitches, single crochets, and double crochets around a central chain, securing it flush against the stem base before anchoring a key chain ring through the stem join.
Idea 3: Miniature Ruled Composition Notebook Tag
Execution Process
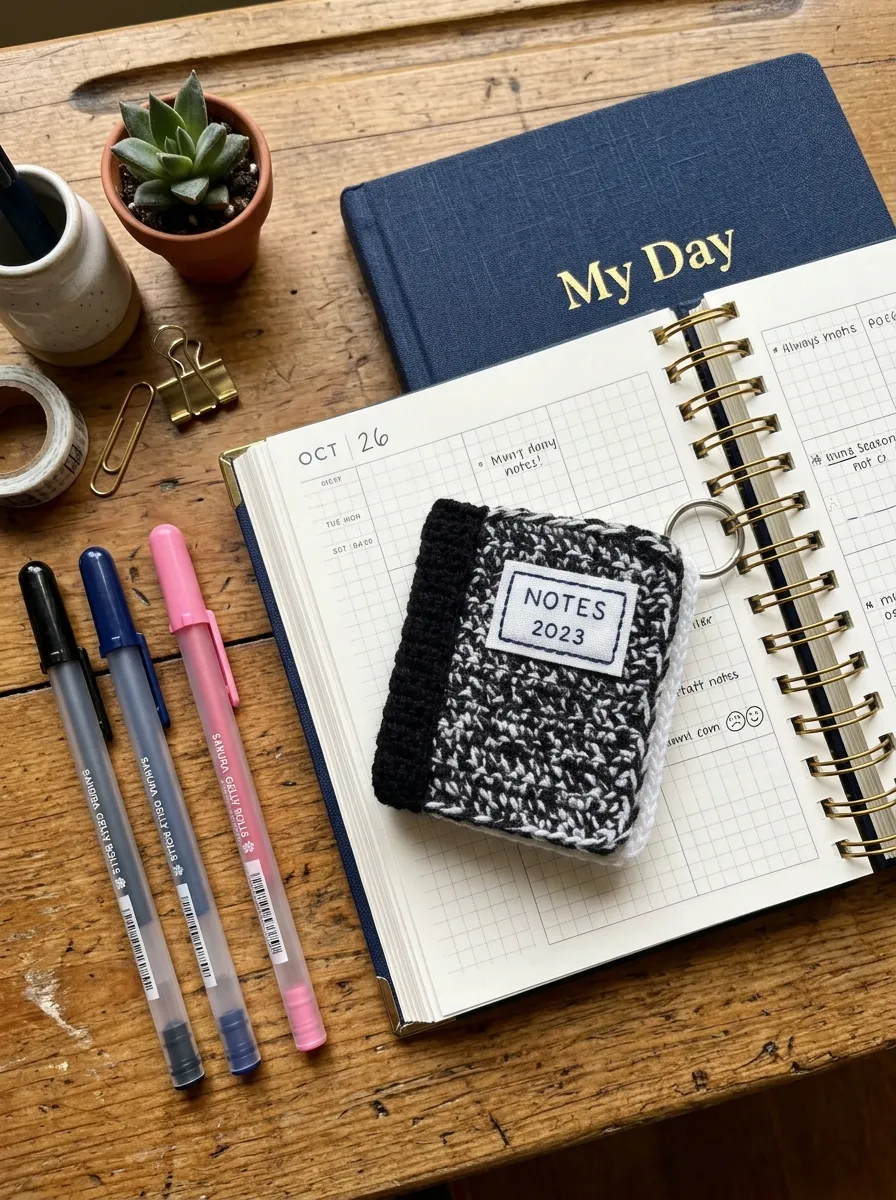
The composition notebook charm translates the iconic marbled notebook into a miniature, semi-rigid rectangular textile pendant suitable for planner loops and binder rings. This charm features a black-and-white mottled front cover, a crisp white paper-block edge along the fore edge, and a solid black spine binding strip. A small white rectangle worked in smooth surface stitches replicates the student label plate, offering space for miniature embroidered initials or room numbers. The flat, book-like profile slips neatly between notebooks and tablet dividers without creating bulky lumps, functioning as both an ornamental charm and an external zipper toggle. Its structured lines appeal to students who favor organized, minimalist school accessories with retro academic charm.
Start by crocheting the front and back cover panels as two separate flat rectangles using black and white cotton yarn worked in textured linen stitch to simulate the classic marbled pattern. Chain twelve stitches, working ten rows of alternating slip stitches and single crochets, dropping and picking up the contrasting color every two stitches across the row. Next, construct the inner paper block by crocheting twelve rows of dense half-double crochet in pure white yarn, maintaining identical perimeter dimensions to the covers. Layer the white core between the marbled covers, inserting a thin plastic stabilizer card cut from a clean dairy lid inside to ensure the pages remain perfectly flat over time. Join the three outer non-spine edges with a neat slip-stitch border in cream thread. Wrap the left-hand spine with five rows of solid black single crochet to form the authentic binding tape, finishing by sewing a 5 mm stainless steel jump ring directly through the top left corner of the black spine to mount a lobster clasp.
Idea 4: Miniature Graduated Drafting Ruler Ribbon
Read This:
Step-by-Step Guide
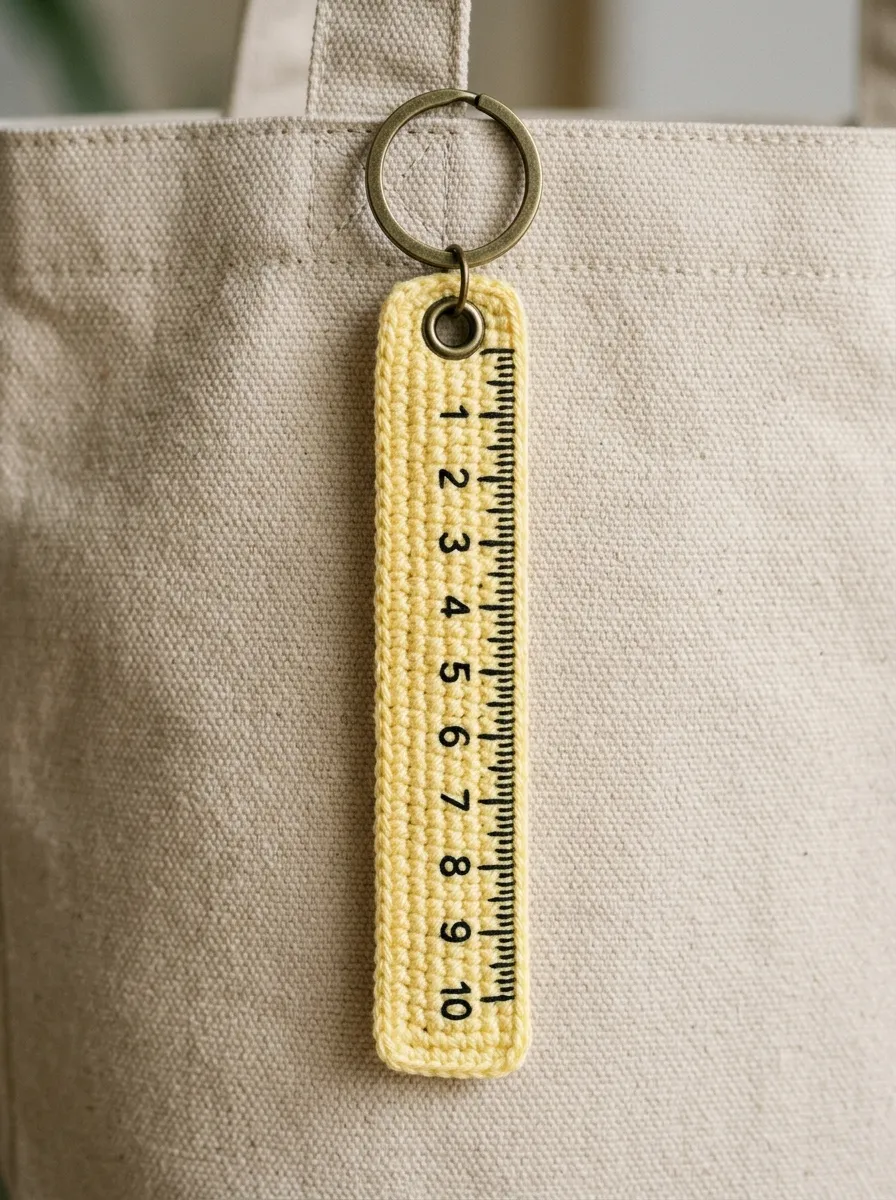
The drafting ruler ribbon charm celebrates precision, mathematics, and architectural study through a slender, flat measuring strip design. Crocheted in pale canary yellow, warm ivory, or natural birch wood tones, this charm features a rectangular strip adorned with black embroidered tick marks representing millimeter and centimeter increments. The clean, straight lines create an elongated vertical pendant that hangs gracefully from backpack lash tabs, locker keys, or pencil organizers. Its flat, ribbon-like structure eliminates internal stuffing entirely, making it one of the most lightweight, pocket-friendly accessories in the back to school collection. The graphic quality of the black measurement lines against the pale background provides high visual contrast that suits modern minimalist aesthetics.
To make the ruler charm, cast a foundation chain of twenty-four stitches using pale yellow DK-weight cotton yarn on a 2.0 mm hook. Work four rows of dense single crochet in back-and-forth flat fashion, ensuring the turning chains remain exceptionally tight to preserve razor-straight exterior margins. On the fourth row, fasten off with an invisible needle join, burying the working tail along the internal row structure. Using a sharp tapestry needle threaded with a single strand of black cotton embroidery floss, sew vertical straight stitches perpendicular to the top edge to replicate measurement markings. Alternate between long lines for whole centimeter marks and short lines for half-centimeter marks, spacing them precisely two crochet stitches apart along the entire upper margin. Block the finished ribbon lightly using a warm iron over a damp pressing cloth to eliminate any curl, then punch a miniature brass eyelet rivet through one short end, inserting a flat split ring through the grommet for secure backpack attachment.
Idea 5: Kawaii Toast with Strawberry Jam Accent
Setup Method
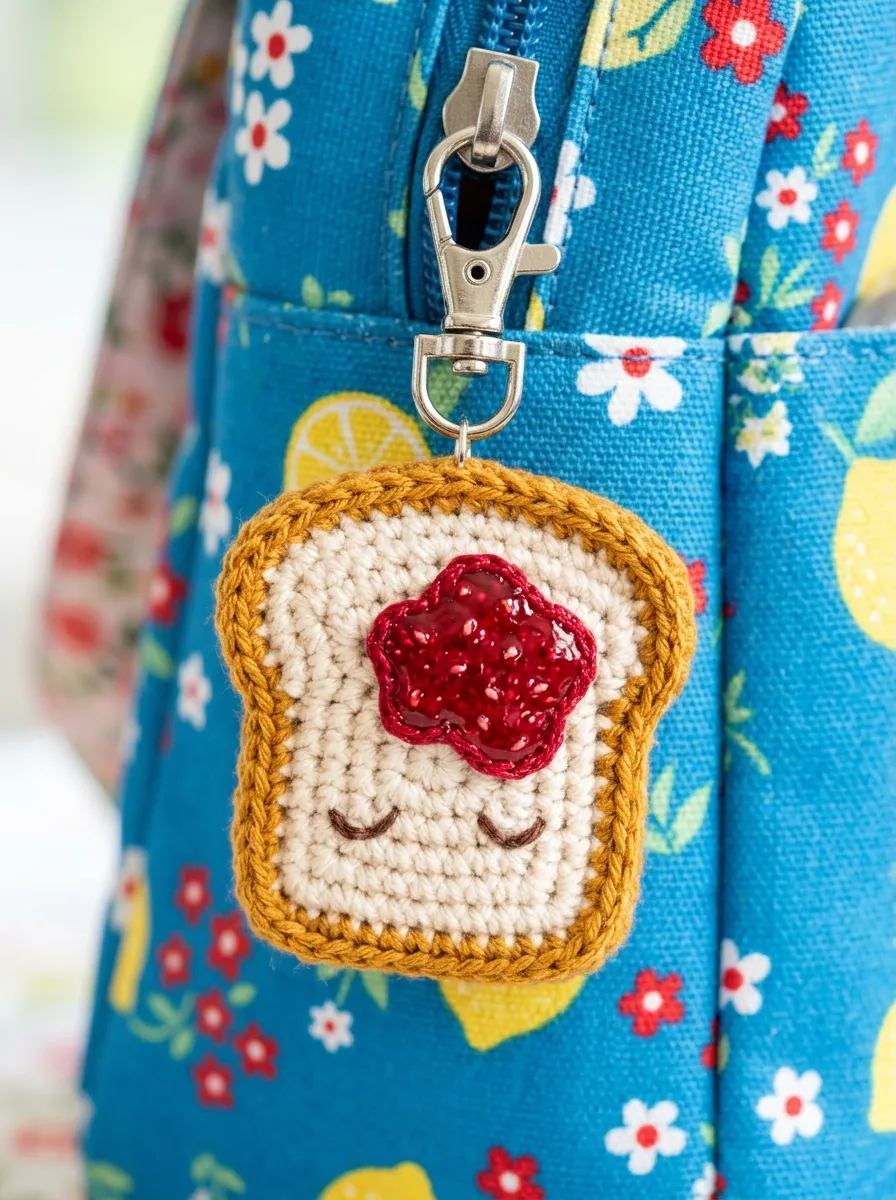
Whimsical food-themed designs bring playful warmth and comfort to daily cafeteria lunches, and a miniature slice of toasted bread delivers an endearing morning visual. This charm features an ivory or pale butter bread interior bordered by a raised, golden-brown crust perimeter, topped with a glossy patch of ruby strawberry jam. The slightly domed bread surface provides a pleasing tactile feel, while embroidered closed eyes and a small mouth convey a friendly, cheerful expression for long study days. The square silhouette with rounded top lobes creates a balanced, compact accessory that clips effortlessly to lunch totes, water bottle handles, and daily study packs.
Begin by crocheting the front toast face in pale cream cotton yarn, working eight rows of single crochet back and forth across ten stitches. To form the distinctive upper bread lobes, divide the final row into two separate five-stitch sections, working two rows of curved shaping with rapid edge decreases on each side. Crochet an identical matching panel for the back of the bread slice. Embroider two subtle sleeping eyelid arcs and a tiny triangular smile onto the front panel using fine dark brown sewing thread. For the jam layer, crochet an irregular oval in vibrant translucent red or ruby yarn, slip-stitching it directly to the center of the front slice. Place the front and back toast panels together, joining them with a single crochet border worked entirely in rich caramel-brown yarn to form the outer toasted crust, inserting a thin sheet of craft foam between the layers to maintain a semi-plump, uniform square profile before fastening off and anchoring a swivel clip to the top crust valley.
Idea 6: Wise Horned Owl Study Buddy

Execution Process
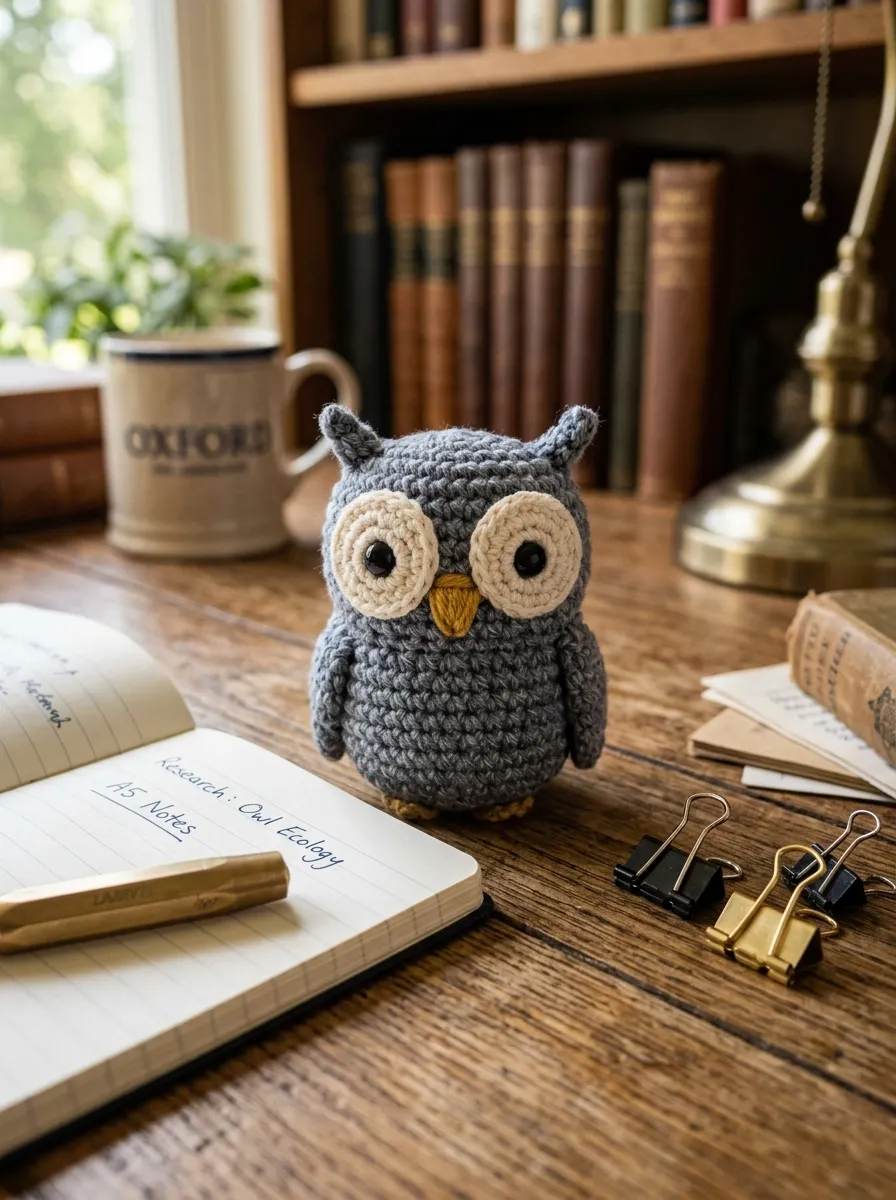
The horned owl stands as an enduring emblem of intellect, nocturnal study, and academic wisdom, making it a fitting mascot for secondary and collegiate scholars. This compact amigurumi charm incorporates a stout, egg-shaped body worked in deep slate gray or oatmeal tweed, complemented by oversized circular eye patches and pointed feather tufts at the brow. The rounded base allows the owl to sit upright on desks during lectures, transitioning smoothly from an active backpack dangle to a steady study companion. The layered facial components introduce depth and texture without making the piece excessively wide or cumbersome. Its studious presence serves as a visual reminder of focus, diligence, and academic success throughout the school year.
Construct the owl by forming an egg-shaped torso in heathered gray cotton yarn, beginning with six single crochets in a magic ring and expanding over four rounds to twenty-four stitches. Work seven plain rounds to establish the body height, tapering inward gradually with invisible decreases across the next five rounds to define the rounded head. Before closing the head, insert firm polyester fiberfill, ensuring the lower half contains slightly more stuffing weight to help the charm sit upright. To make the eyes, crochet two flat discs in cream yarn, embroidering solid black pupils in the center with satin stitches before sewing them side-by-side onto the upper face. Add an embroidered golden-yellow beak between the eye discs. For the ear tufts, pinch the two top corners of the closed head seam and pull through three strands of matching yarn, trimming the fringe to a sharp half-inch point. Attach a reinforced braided cord through the central head seam to receive a heavy-duty carabiner clip.
Idea 7: Bright Scholar Lightbulb Motivation Charm
Step-by-Step Guide
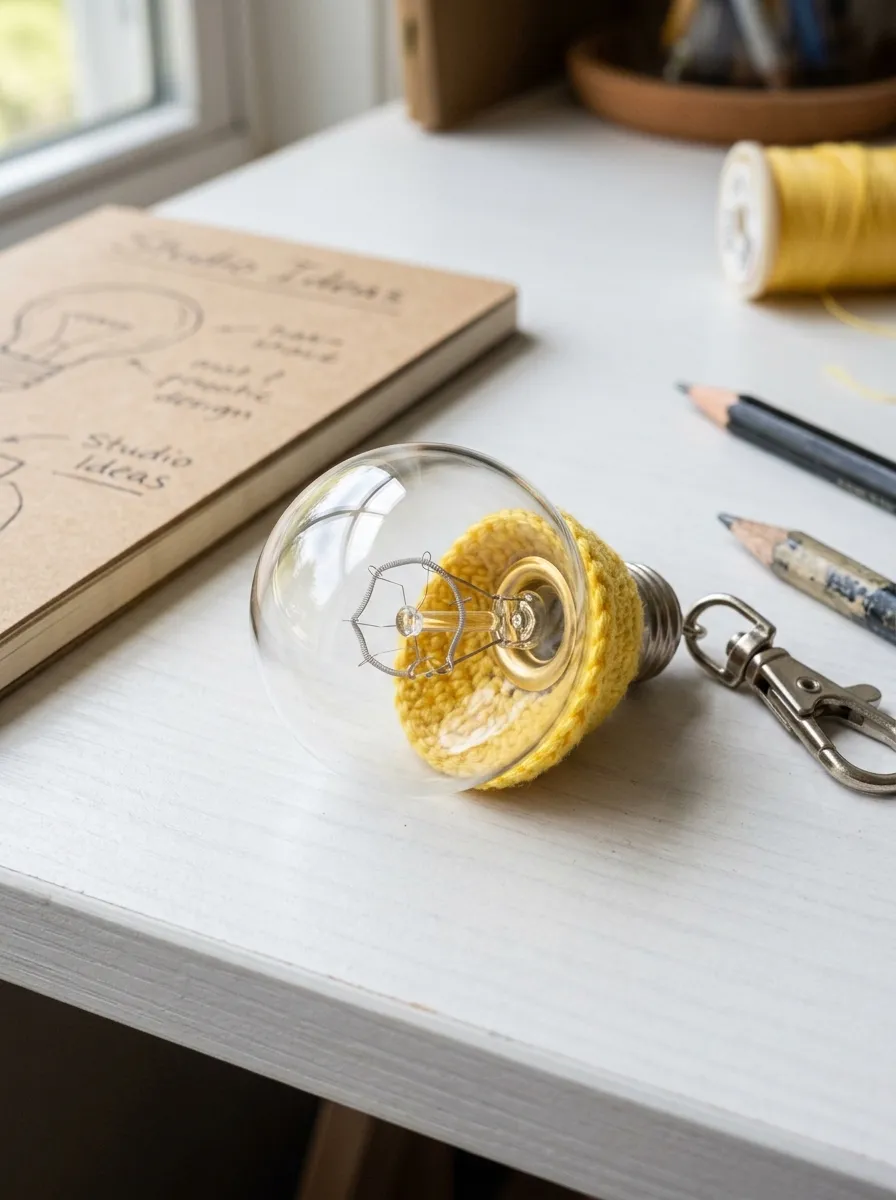
The incandescent lightbulb charm visually represents bright ideas, problem-solving, and creative inspiration, providing an uplifting motivational emblem for students tackling challenging subjects. This design features a teardrop-shaped glass bulb worked in cheerful sunshine yellow, anchored by a stepped metallic gray or silver screw-base at the bottom. The bulb portion maintains a rounded, hollow dome that tapers smoothly toward the metallic socket, establishing an authentic electrical silhouette. The bright yellow colorway stands out clearly against dark binder covers and backpacks, serving as an encouraging visual cue during exam preparation. The clean transitions between the glass and metal segments highlight precision stitch control and disciplined gauge management.
To make the lightbulb, start at the top dome using bright yellow mercerized cotton yarn, working six single crochets into a magic loop and increasing across three rounds to eighteen stitches. Work five rounds even to build the rounded glass casing, then execute four evenly spaced single crochet decreases across the next two rounds to create the natural inward taper toward the neck. Stuff the yellow bulb section firmly with batting, taking care to keep the outer perimeter smooth and spherical. Switch to light metallic silver or slate gray yarn, working three rounds of half-double crochet through the back loops only; this ridge technique simulates the threaded grooves of an authentic screw base. Finish the bottom socket with a final round of single crochet decreases worked in dark charcoal yarn to represent the contact foot. Pull the thread tail through to close the opening securely. Thread a 10 mm jump ring through the top center of the yellow dome, linking it directly to an easy-open backpack clip.
Idea 8: Miniature Felt-Tipped Marker Cap Dangle
Read This:
Setup Method
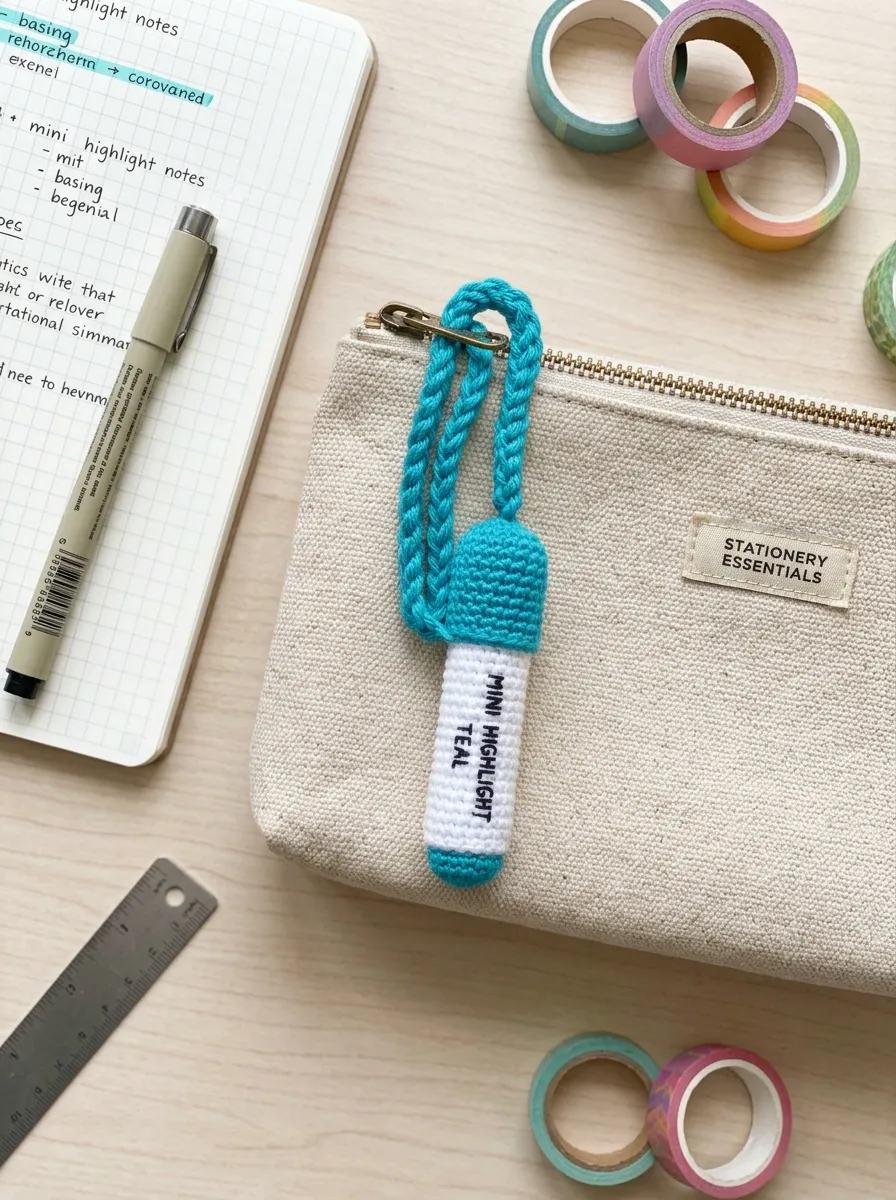
Capturing the bright, dynamic energy of art classes and study highlighting, this miniature marker charm mimics an everyday chisel-tip or bullet-tip classroom marker. The design features a crisp white or light gray cylindrical barrel topped by a brightly colored cap and matching base plug in electric teal, neon pink, or highlighter yellow. The long, slender tube hangs straight, providing an aerodynamic profile that slips in and out of tight bag compartments without snagging on surrounding fabrics. This project serves as an exceptional scrap-busting pattern, requiring minimal yardage of colorful cotton remnants to produce a cheerful, coordinated set of classroom accessories.
Begin constructing the marker by crocheting the bottom colored plug using vibrant teal cotton yarn, starting with six single crochets into a magic circle and working one round even in the back loops to define a sharp ninety-degree bottom rim. Transition to pure white yarn to form the main marker body, working in continuous non-turning spirals for twelve rounds to establish a uniform, smooth barrel. Stuff the slender interior cylinder firmly using a plastic straw or wooden skewer wrapped in thin batting to keep the marker rigid and prevent bending under pressure. Switch back to the teal yarn for the upper marker cap, working two rounds through the front loops to create a pronounced cap ridge that overlaps the white barrel. Continue upward in unincreased rounds for four cycles, tapering closed with rapid decreases to form the slightly rounded cap crown. Secure a strong braided nylon cord through the apex of the cap, looping it around a mini metal snap hook for instant pencil case attachment.
Idea 9: Golden Trophy Cup Achievement Emblem
How to Create
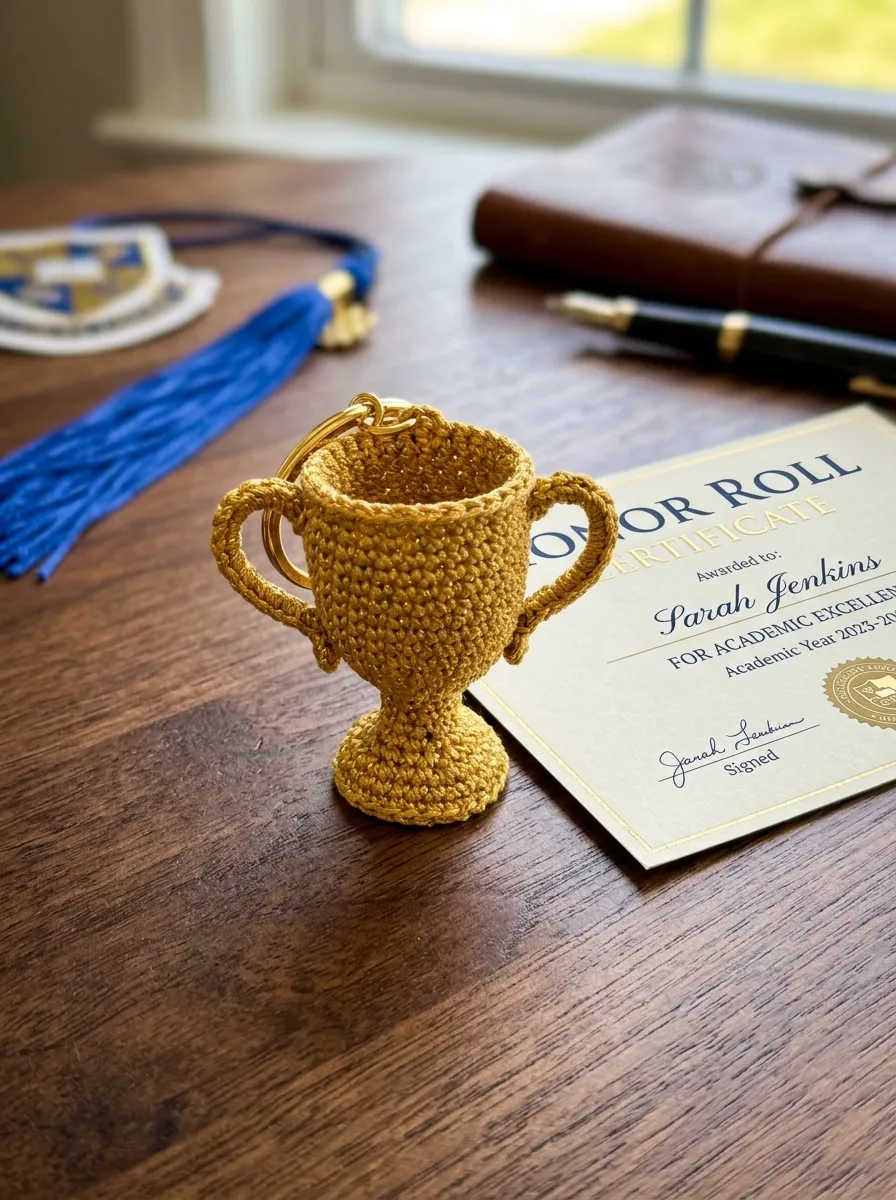
The golden trophy cup charm symbolizes hard work, athletic dedication, and academic achievement, serving as an encouraging token for students striving toward ambitious goals. This design features an elegant flared goblet body with a stepped circular pedestal base, flanked by two curved, symmetric loop handles on the sides. Crocheted entirely in shimmering goldenrod or metallic gold cotton thread, the trophy offers a bold, celebratory aesthetic that shines against everyday school gear. The structured vessel requires precise shaping to maintain its flared opening and narrow stem, demonstrating sophisticated micro-crochet mechanics in a beginner friendly, small-scale format. It functions as an ideal graduation gift, team token, or motivational milestone marker.
To build the trophy, begin at the wide upper rim using goldenrod cotton yarn on a 2.0 mm hook, joining a foundation chain of eighteen stitches into a circle. Work three plain rounds of single crochet, then decrease by three stitches across the next two rounds to produce the tapering chalice cup. Pause to shape the slender waist with a single round of tightly tensioned slip stitches, then expand outward immediately through front-loop double crochet increases to establish the flared circular foot. Pack the upper cup lightly with fiberfill, inserting a flat plastic disc inside the base to keep the pedestal stable. For the side handles, cast on eight chain stitches, work back with firm slip stitches, and sew the resulting narrow cords symmetrically to the sides of the cup from rim to waist. Fasten off with invisible joins, passing a central anchor thread upward through the middle of the cup to attach a durable split keyring and lanyard clasp.
Idea 10: Lucky Rainbow Palette Painter Accent
Read This:
Execution Process
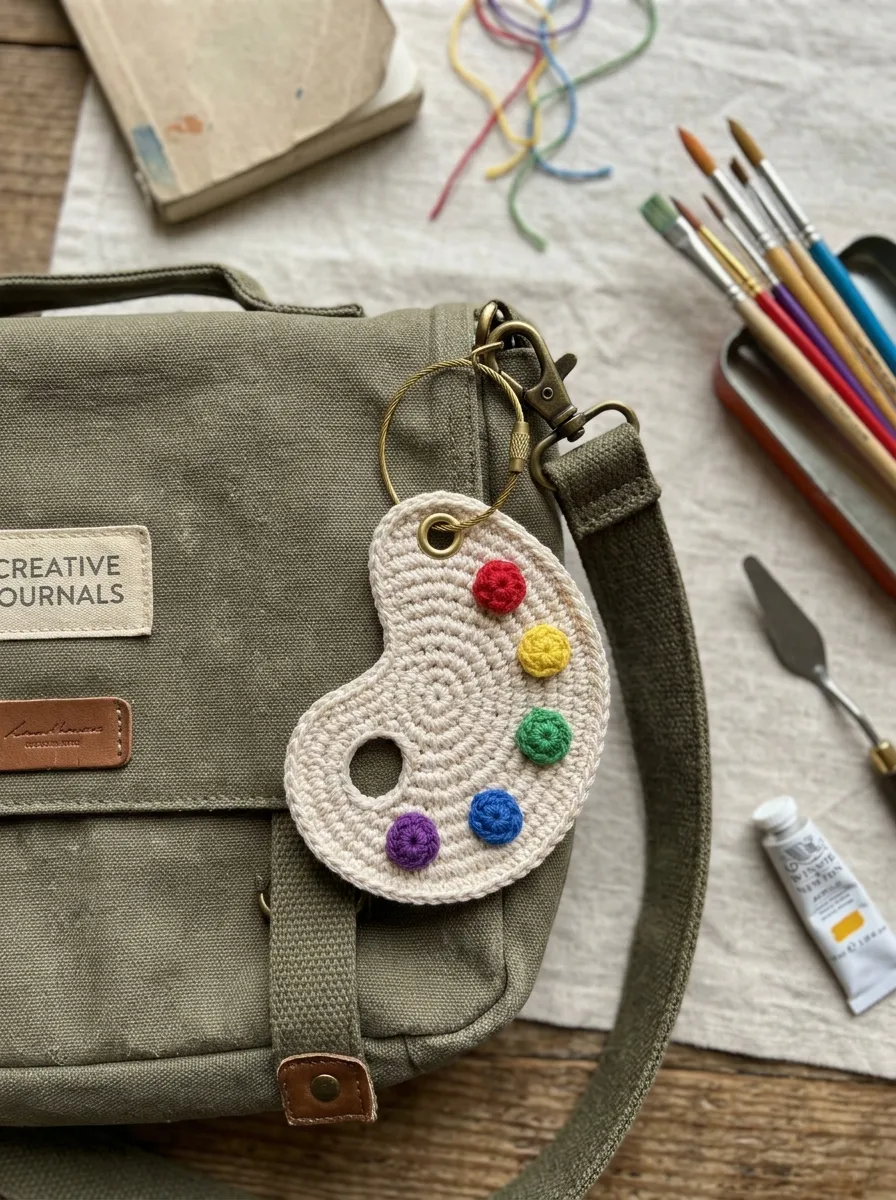
Celebrating visual arts, creativity, and self-expression, the painter palette charm introduces a colorful, artistic accent to school lockers and backpacks. This design presents a flat, kidney-shaped artist palette worked in warm natural wood or birch-colored cotton yarn, complete with a functional thumbhole cutout. Arranged neatly around the outer curve are five miniature embroidered or crocheted paint dollops representing a vibrant primary and secondary color wheel: red, yellow, green, blue, and violet. The flat, organic silhouette lays comfortably against smooth surfaces without curling, making it an exceptional charm for art students, design majors, and creative thinkers. The bright paint accents add visual variety to the neutral wood background, making the accessory easy to spot from a distance.
Fabricate the painter palette by working in flat oval rows using unbleached ecru or natural birch-toned cotton yarn. Start with a central foundation chain of eight stitches, working outward in concentric rounds with clustered half-double crochet increases at the curved ends to produce an asymmetrical kidney contour. On round three, create the thumbhole by chaining four stitches and skipping three baseline stitches, continuing around the perimeter and working directly into the chain space on the subsequent round to leave a clean, reinforced opening. Block the flat wooden palette thoroughly with steam to ensure smooth, uncurled borders. For the paint spots, use fine embroidery floss in red, yellow, green, blue, and purple to work raised French knots or miniature three-stitch satin circles along the curved outer edge. Pierce a small hole near the upper palette rim with a tapestry needle, installing a reinforced brass grommet and wire jump ring to secure the charm to a sturdy backpack carabiner.
Common Beginner Mistakes and How to Avoid Them
The most widespread mistake in miniature crochet charm production is using hook sizes that match standard yarn packaging guidelines, which are intended for soft apparel rather than structured accessories. Using a hook that is too large produces loose, porous fabric, allowing white polyester stuffing to show through the stitches and pull out during rough everyday bag use. Crafters should downsize their crochet hooks by 1.0 mm to 1.5 mm below packaging recommendations, creating dense stitches that contain internal batting securely. Another frequent error is attaching metal hardware directly to single strands of working yarn; everyday pulling quickly abrades through single threads, resulting in lost accessories. To prevent hardware detachment, always anchor jump rings through at least two structural stitch bars, or integrate a reinforced foundation cord passed through the solid core of the toy before closing seams. Beginners also tend to overstuff miniature charms, stretching the fabric and distorting clean geometric profiles into uneven shapes. Introduce stuffing gradually in tiny, wispy clusters using precision tweezers, pressing fibers into corners while checking outer contours to maintain smooth, balanced silhouettes throughout the piece.
Practical Tips for Better Results
Achieving boutique-level durability and clean stitch definition across school charms requires several reliable needlework habits. First, use the yarn-under single crochet technique (pulling the working yarn under the hook rather than wrapping over), which produces tight, cross-shaped stitches that eliminate fabric bias and prevent gaps during rounds of shaping. Second, track continuous spiral rounds using a fine strand of contrasting scrap yarn as a running stitch marker, laying the thread across rounds rather than using bulky plastic clips that stretch small loops out of alignment. When executing color changes on pieces like pencils or markers, always introduce the new hue during the final pull-through of the preceding stitch, ensuring crisp, level color bands without distracting horizontal blips. For flat elements like notebooks and palettes, light steam-blocking with an iron held two inches away over a damp pressing cloth relaxes tight fibers and locks straight edges in place. Finally, finish all charm closures with an invisible needle join instead of a knot, weaving yarn tails in multiple directions through the internal stuffing to permanently lock thread ends against daily friction.
Styling, Presentation, or Organization Ideas
Strategic visual presentation elevates handmade school charms, turning functional yarn projects into organized desk accents or thoughtful gift packages. When styling backpacks, practice balanced arrangement by clipping one large focal charm—such as the heritage apple or horned owl—to the main zipper toggle, balanced by a slender ruler or marker charm on the smaller front pouch. Group complementary designs on custom-cut kraft paper display cards featuring printed motivational quotes or school year milestones, securing the charm strap through a top hole punch. For classroom or desk organization, suspend finished charms from small magnetic hooks placed inside metal locker doors or along the wire grid of a desktop memo board, creating an orderly display that keeps keys and USB drives accessible. If preparing charms as teacher appreciation gifts or back to school party favors, nestle each piece inside a clear glassine envelope tied with striped baker twine and a personalized bookplate label. Pairing the charms with coordinated stationery items, such as matching wooden pencils or color-themed notebooks, creates an attractive, cohesive gift set that highlights the time and care invested in handmade craftsmanship.
Budget or Time Planning
Careful planning and smart material use keep back to school crochet projects practical, fun, and economical. Because miniature charms require only ten to twenty yards of fiber each, they serve as ideal scrap-busting projects that turn leftover cotton remnants into useful items without requiring new yarn purchases. When stocking up on supplies, purchase core neutral yarns—such as unbleached ecru, goldenrod, and slate gray—in economical hundred-gram skeins, using smaller, affordable mini-skeins for accent colors like apple red or marker teal. Source metal hardware, including lobster clasps, split rings, and ball chains, in bulk multipacks from jewelry supply distributors rather than retail craft stores, bringing per-unit hardware costs down to pennies. In terms of production time, a single charm typically takes between thirty and sixty minutes from the starting magic ring to final hardware installation. Crafters can streamline their work by batch-processing: crochet all main bodies during one session, complete facial embroidery and stuffing in a second block, and assemble all jump rings and clasps in a final finishing run. This production-line method saves time, reduces repetitive setup steps, and ensures consistent quality across all completed accessories.
Creative Expansion and Advanced Inspiration
Once you master foundational shaping and hardware attachment, these miniature crochet techniques offer endless possibilities for advanced customization and creative expansion. Consider integrating mixed-media elements into your school charms, combining crocheted fabric bodies with natural wooden beads, custom acrylic monogram tags, or miniature safety-pin brooches for rich textural variety. Experienced makers can experiment with fine embroidery floss and 1.0 mm steel hooks to micro-scale these designs into delicate planner paperclips, zipper pulls for laptop sleeves, or wearable stud earrings for spirit weeks. Another creative avenue involves personalizing color palettes to match specific school, collegiate, or sports team colors, turning standard designs into customized varsity accessories for athletic events and pep rallies. You can also add functional interactive elements, such as inserting small neodymium magnets inside the base of desktop charms so they hold paperclips on study desks, or adding a lavender-scented sachet inside the stuffing core to provide calming sensory relief during exam periods. These creative variations elevate basic classroom charms into versatile, multi-functional keepsakes that students and educators will value all year long.