Crochet enthusiasts and craft collectors continually turn to handcrafted yarn figures as a primary source of creative inspiration. Amigurumi, the Japanese art of knitting or crocheting small stuffed yarn creatures, offers makers a focused way to build tactile art with minimal equipment. Among the vast library of patterns shared across modern design communities, cat motifs remain consistently popular due to their customizable shapes, expressive profiles, and wide utility as home accents. This guide explores structural techniques, fiber choices, and assembly methods necessary to construct ten distinct feline designs from single-stitch fundamentals to finished presentation pieces. Readers will discover clear fabrication blueprints, tension management techniques, and practical assembly routines that turn basic skeins into polished decorative items. Engaging in this fiber medium refines core yarn control while producing tangible decorative objects suitable for gifts, seasonal displays, or desk accessories. By understanding stitch geometry, proportional planning, and sensible finishing workflows, anyone can translate simple loops into durable, expressive shapes. This comprehensive walkthrough outlines practical knowledge, structural troubleshooting, and design variations, equipping both new crafters and seasoned makers with the skills needed to complete ten charming projects with confidence and consistency.
Why Handcrafted Miniature Cats Capture Modern Creative Spaces
Miniature yarn projects hold a significant place in contemporary design boards because they combine functional minimalism with warm, personal craftsmanship. Handcrafted feline figures fit seamlessly into aesthetic desk configurations, nursery arrangements, and organized bookshelf vignettes where soft textures balance clean, modern interior elements. Beyond purely visual appeal, these projects serve as an accessible entry point for beginners seeking manageable DIY accomplishments that do not require weeks of production time. Working on three-dimensional fiber forms introduces makers to the mechanics of continuous rounds, spherical shaping, and spatial assembly without imposing high upfront supply costs. Compact feline patterns yield high creative payoff because subtle changes in ear placement, facial embroidery, or tail posture completely redefine the character of the finished piece. This structural versatility encourages fiber artists to experiment with existing yarn scraps, turning leftover supplies into cohesive collections through smart color selection and uniform gauge control. The intersection of budget-conscious fabrication, simple geometric foundations, and high visual warmth keeps small crocheted animals at the forefront of modern crafting trends.
Essential Materials and Preparation for Structural Crochet
Successful execution of tight three-dimensional crochet relies on deliberate tool pairing and methodical planning before pulling the first loop through a slipknot. Crafters should select smooth, worsted-weight mercerized cotton or tight-twist acrylic yarn paired with an ergonomic hook approximately one to two sizes smaller than recommended on the skein label. Dropping from a standard 4.0 mm hook to a 2.5 mm or 3.0 mm hook produces dense, firm single crochet walls that effectively conceal internal synthetic fiberfill without gaping. Alongside core yarn and hooks, gather high-contrast locking stitch markers, blunt steel tapestry needles, sharp thread snips, and firm, high-loft polyester stuffing. Preparation begins by checking fiber consistency across chosen color palettes, ensuring all yarn plies maintain uniform diameter to prevent distorted proportions during multi-part joins. Establish an organized, flat staging workspace equipped with small bowls for pins, safety eye backings, and embroidered facial threads to keep delicate structural components sorted during construction. Measuring out tail lengths for sewing before fastening off ensures strong anchor points, laying the foundation for a controlled, frustration-free assembly process across any chosen pattern.
Idea 1: Minimalist Round Desk Cat
Step-by-Step Guide
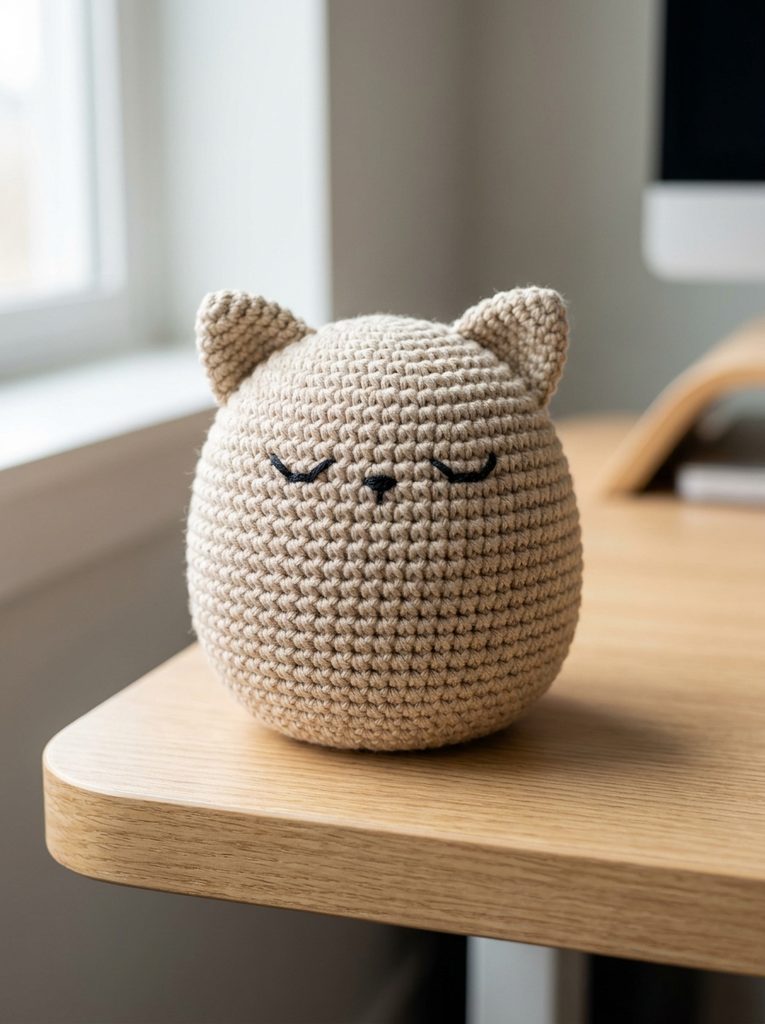
The minimalist round desk cat emphasizes spherical geometry and clean negative space, making it an ideal decorative accent for organized workspaces and compact book ledges. This design relies on a continuous, seamless globe for the body, paired with subtle, low-profile triangular ears that maintain a sleek visual profile. By eliminating elongated limbs and focusing purely on a self-supporting, weighted bottom, the finished object sits upright independently without tipping. The aesthetic value comes from its restrained simplicity, often executed in neutral tones such as warm oatmeal, slate gray, or soft ecru. Two small embroidered horizontal lines create sleeping eyes, presenting a serene, modern composition that complements contemporary home decor and uncluttered office accessories.
Round 1: 6 sc in magic ring [6]
Round 2: Inc in each st around [12]
Round 3: (1 sc, inc) x 6 [18]
Round 4: (2 sc, inc) x 6 [24]
Rounds 5-10: Sc in each st around [24]
Round 11: (2 sc, dec) x 6 [18]
Round 12: (1 sc, dec) x 6 [12]
Round 13: Dec x 6 [6]
Fasten off and cinch closed.
Begin by forming a magic adjustable ring with your base neutral yarn, working six single crochet stitches directly into the center circle before cinching tightly. Increase evenly across consecutive rounds until the base diameter reaches your desired footprint, typically twenty-four to thirty stitches for a palm-sized sphere. Work even rounds upward without increases to build vertical wall height, periodically inserting a small fabric pouch filled with clean glass craft pellets at the base for bottom-heavy stability. Insert firm polyester stuffing around the weight packet, shaping the sphere into a uniform ball, then complete matching decrease rounds to seal the sphere smoothly. Crochet two miniature triangular ear cones separately, pin them symmetrically along the upper curve, and stitch them securely down using an invisible whip stitch before embroidering subtle facial details.
Idea 2: Sleeping Curled Calico Ornament
Execution Process
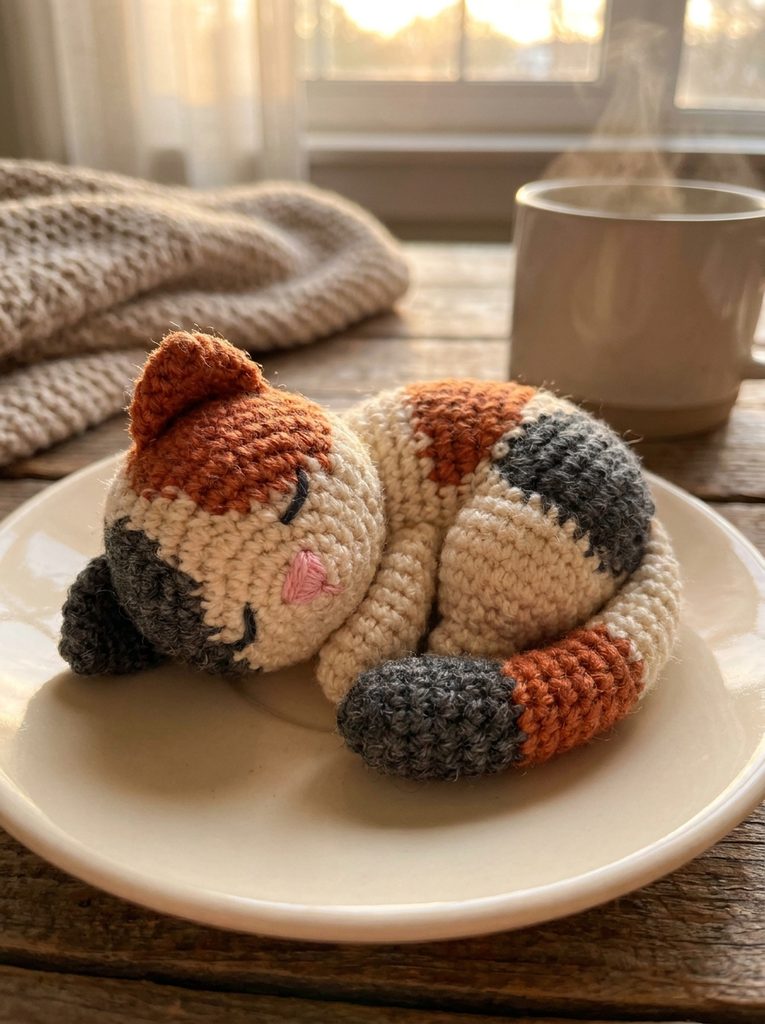
The sleeping curled calico ornament translates the natural resting posture of a sleeping cat into a crescent-shaped decorative centerpiece. This design features an arched spinal curve that loops smoothly into a tapered, tucked tail, creating a self-contained organic form without separate leg attachments. Irregular patches of soft peach, warm chocolate, and cream yarn replicate classic calico markings through controlled, non-repeating color changes worked directly into the continuous spiral. The relaxed posture makes it an exceptional accent for display inside small wooden bowls, on decorative tiered trays, or nestled beside potted houseplants. The seamless structural flow prevents delicate protruding parts from snagging, offering a durable yet expressive result that appeals to lovers of realistic animal morphology.
Body Curve:
Work an asymmetrical tube:
Rounds 1-8: Sc around, placing increases on the outer edge (sts 1-3)
and single decreases on the inner edge (sts 10-12) to force a natural crescent bend.
Maintain a 20-stitch circumference throughout the midsection.
To form the curved body shape, start from the rounded head segment using a standard circular increase, then transition into an asymmetrical stitch sequence along the torso. Alternate short rows and selective single-side increases along the outer spinal edge while working decreases along the inner belly edge to force the crocheted tube into a natural crescent contour. Introduce secondary calico colors by carrying inactive strands inside the stitches, pulling the new hue through the final two loops of the preceding single crochet to maintain razor-sharp color transitions. Stuff the body section by section as you progress, maintaining medium-firm density so the crescent bend retains its structural curve without collapsing outward. Finish by tapering the tail with successive decrease rounds, then curl the tail end flush against the body wall and sew it flat with matching yarn.
Idea 3: Standing Tuxedo Kitten Figurine
Setup Method
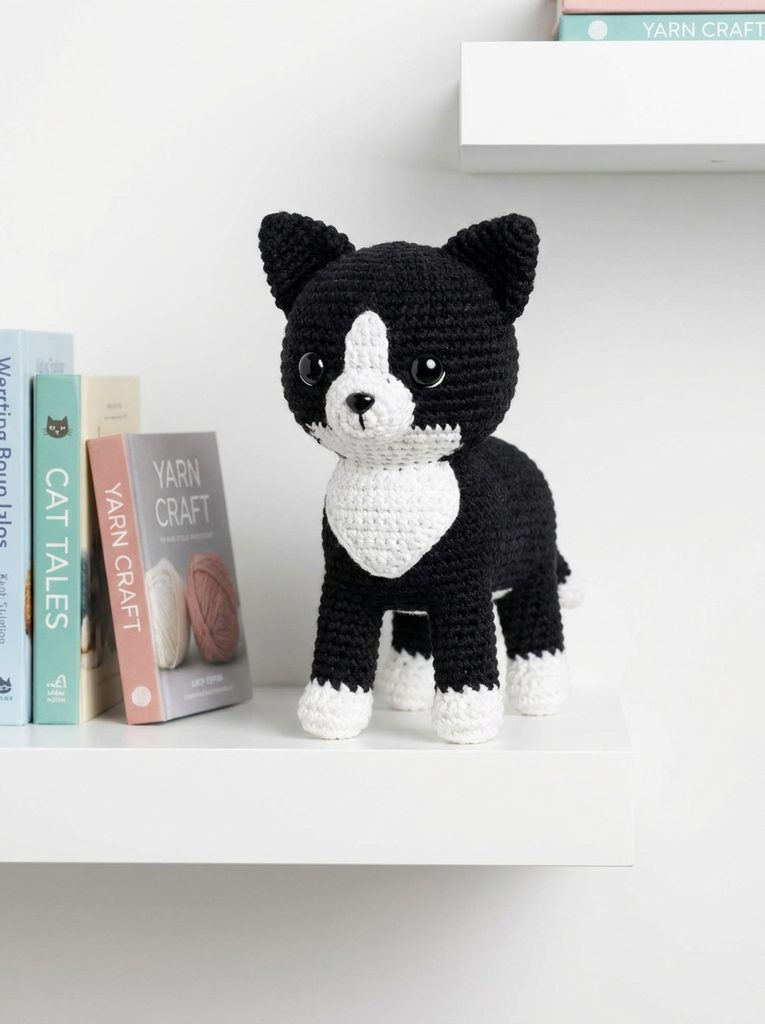
The standing tuxedo kitten figurine introduces four-legged structural engineering, featuring an upright, alert posture with balanced weight distribution across all paws. Characterized by high-contrast black and crisp white yarn placement, this pattern establishes clear demarcation lines along the chest bib, white paws, and facial blaze. The head remains erect, supported by a reinforced neck column that holds its shape through firm internal packing rather than internal plastic armatures. This dynamic upright stance brings life to desktop surfaces and curated shelving units, offering a classic silhouette that showcases precision stitch placement and clean color blocking. The deliberate contrast between dark body fibers and pristine white accents produces a graphic, modern appearance suitable for formal display.
Legs (Make 4):
Start with white yarn.
Round 1: 5 sc in magic ring [5]
Round 2: Inc in each st [10]
Round 3: Sc around [10]
Switch to black yarn.
Rounds 4-7: Sc around [10]
Join all 4 legs in Round 8 using ch-2 bridges to begin the unified underbelly.
Fabrication starts by creating four identical cylindrical paw tubes in clean white yarn, switching cleanly to dense black yarn after three rounds to build the upper legs. Align the four finished leg tubes in a rectangular grid on your work surface, connecting them directly across their inner rim edges using short chain bridges and single crochet stitches to form a continuous underbelly foundation. Work upward in continuous rounds around the combined perimeter of all four legs to construct the torso, inserting continuous fiberfill firmly into each leg chamber before closing the undercarriage. Taper the upper chest area inward toward the neck opening, establish a firm stitch count, and securely mount the separately crocheted white-bibbed head using perpendicular mattress stitches through both loops.
Idea 4: Long-Legged Nordic Hanging Cat
How to Create
The long-legged Nordic hanging cat adopts the stylized proportions of Scandinavian minimalist folk art, utilizing elongated, slender limbs paired with a narrow cylindrical torso. This design eschews heavy spherical shapes in favor of an airy, modern silhouette that drapes gracefully over the edges of floating wall shelves, picture frames, or window sills. The limbs feature minimal stuffing, allowing them to hang naturally with relaxed flexibility, while the torso and head maintain firm, structured forms. Muted, heathered wool blends—such as charcoal, dusty rose, or sage green—enhance the Scandinavian aesthetic, providing an understated, design-forward look that blends effortlessly into modern rustic interiors.

Limb Construction:
Round 1: 6 sc in magic ring [6]
Rounds 2-28: Sc around [6]
Do not stuff the upper 20 rounds.
Flatten the opening and work 3 sc through both layers to seal.
Begin by constructing the narrow limbs, working continuous six-stitch rounds over twenty-five to thirty rows without increases, ensuring tight, uniform thread tension throughout the long progression. Add a small pinch of stuffing exclusively into the bottom paw tip, leaving the remaining length of the limb hollow so it folds and drapes freely when positioned on furniture edges. Construct the simple cylindrical torso from the base upward, pausing midway to align and insert the flat open ends of the leg tubes directly into the working row, crocheting directly through both torso loops and limb edges simultaneously. Once the body is stuffed and cinched at the neck, craft a slightly flattened oval head, embroider simple vertical slit eyes with matte black embroidery floss, and secure the finished feline atop any elevated surface.
Idea 5: Kawaii Boba Cup Kitten Hybrid
Step-by-Step Guide
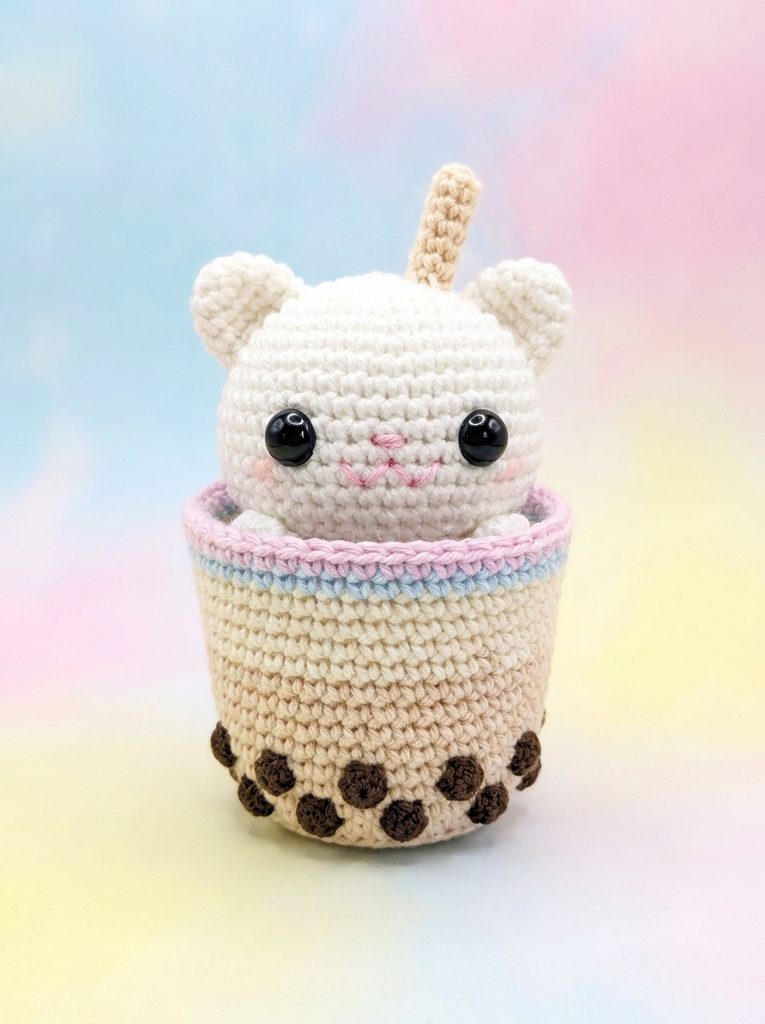
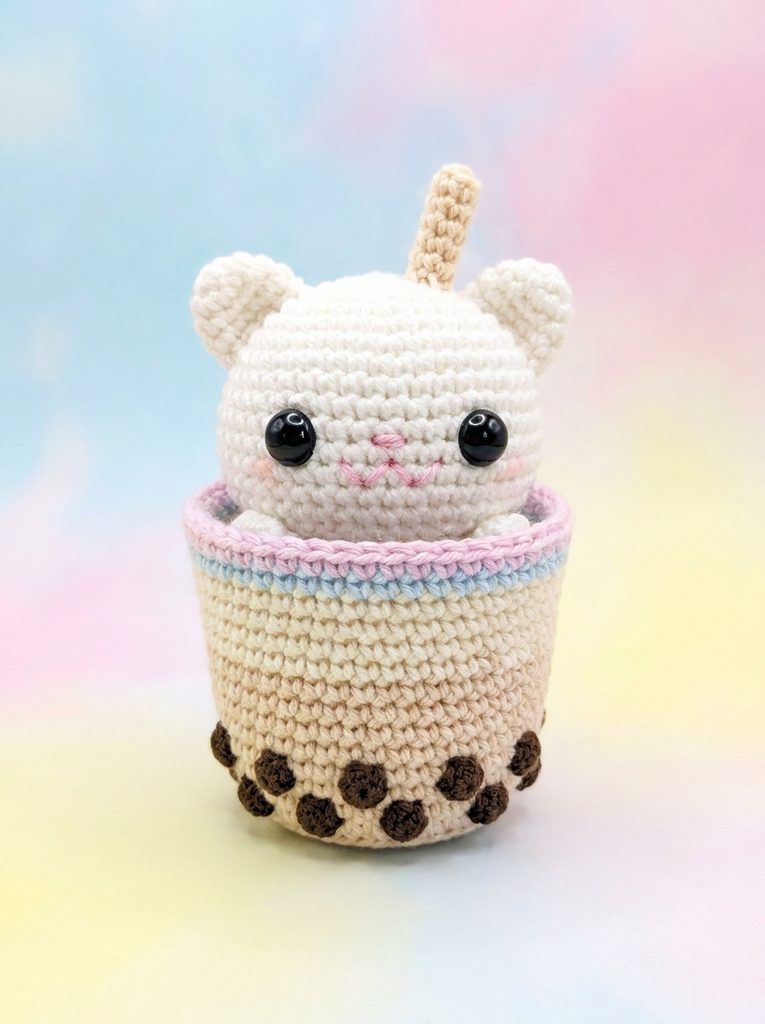
The Kawaii boba cup kitten hybrid combines playful pop-culture imagery with functional amigurumi design by nesting a stylized kitten form inside a miniature beverage container. The lower half of the project mimics a tapered takeaway cup complete with a textured rim, while the upper section reveals a rounded kitten head crowned with perky ears and a wide crochet straw accent. This compact, all-in-one design provides high novelty value and structural rigidity, making it an engaging handmade project for themed gift giving or workspace styling. Soft pastel color palettes—such as milk tea beige, matcha green, or taro lavender—paired with dark embroidered tapioca pearls along the cup base create an instantly recognizable and visually balanced craft piece.
Cup Base:
Work in back loops only (BLO) for Round 5 to create a defined base edge.
Round 5: BLO, sc in each st around [30]
Rounds 6-14: Sc around, working 2 increases evenly on rounds 8 and 12 to create a tapered cup angle.
Round 15: Front loops only (FLO) slip stitch around for the cup rim.
Execute the tapered cup foundation by crocheting a flat circular base in your chosen beverage color, working a single round into the back loops only to establish a crisp, upright ninety-degree perimeter ridge. Build the walls upward with slight periodic increases to mirror the outward flare of a commercial cup, finishing the top edge with a front-loop slip stitch round to create a distinct, dimensional rolled rim. Switch to cream or white yarn directly in the remaining back loops of the rim round to transition seamlessly into the rounded kitten head, eliminating the need to sew separate primary body sections together later. Firmly stuff the entire cup interior to create a wide, flat bottom, insert safety eyes near the lower facial plane, embroider tiny smiling mouth whiskers, and attach a hollow crocheted straw between the upright ears.
Idea 6: Loaf-Style Floor Cushion Cat
How to Make
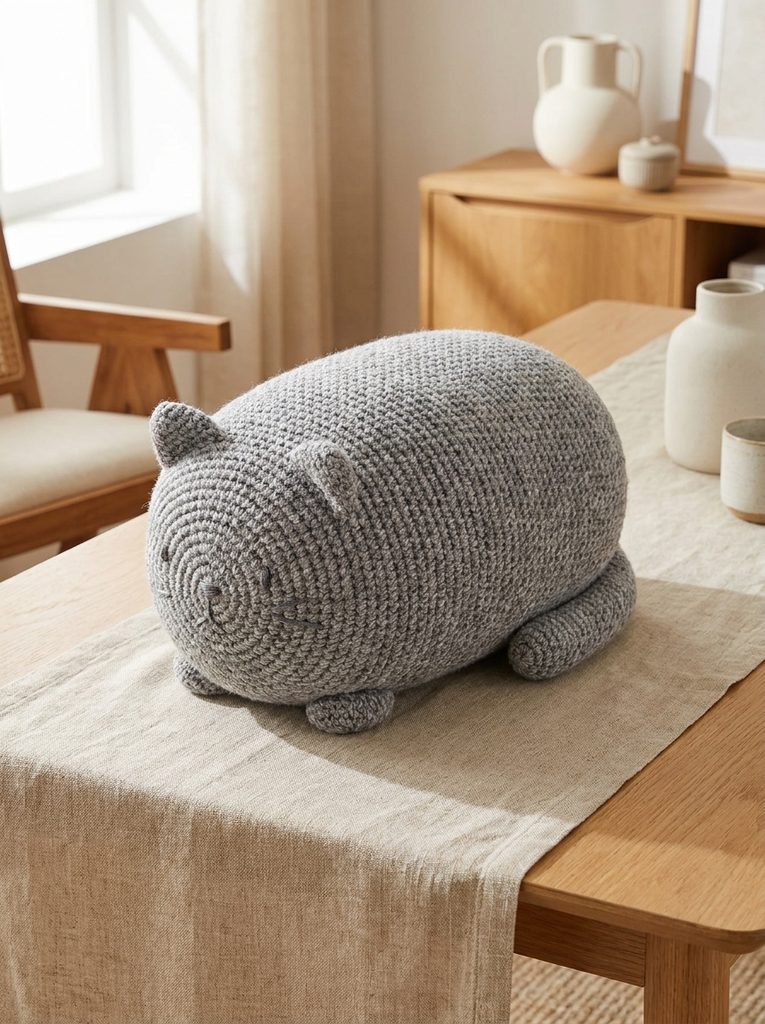
The loaf-style floor cushion cat replicates the familiar, compact posture of a cat resting with all paws and limbs tucked entirely beneath its chest. This design produces a rectangular, rounded-edge block with a broad base, low center of gravity, and smooth, continuous exterior walls. Its compact form makes it exceptionally durable, easy to clean, and ideal for handling as a tactile plush toy, pincushion, or weighted bookend. The absence of thin protruding limbs simplifies the construction process, focusing the maker’s attention on creating even, clean stitch rows across an expanded oval base. A subtle facial profile and small flat ears applied to the front curve complete the recognizable, streamlined silhouette without unnecessary visual clutter.
Oval Base Foundation:
Chain 12.
Round 1: Sc in 2nd ch from hook, 9 sc, 3 sc in last ch.
Turn to work along the opposite side of the chain: 9 sc, 2 sc in starting ch [24]
Round 2: Inc, 9 sc, 3 inc, 9 sc, 2 inc [30]
Rounds 3-6: Expand oval symmetrically at both ends.
Begin the project by laying down a central foundation chain of twelve to fifteen stitches, then crochet completely around both sides of the chain line to establish an elongated oval base. Expand the oval symmetrically by placing clusters of three increases at each curved end across subsequent rounds until reaching the desired width and length of your cushion foundation. Work straight vertical rounds without stitch changes for fifteen to twenty rows, building solid walls that frame a firm, loaf-like cavity capable of holding dense stuffing materials. Fill the rectangular shell evenly, focusing extra polyester fiber into the lower corner turns to maintain crisp definition, then close the rear opening using horizontal decreases before sewing small, flat oval paws flush beneath the body.
Idea 7: Pocket-Sized Keyring Striped Tabby
Execution Process
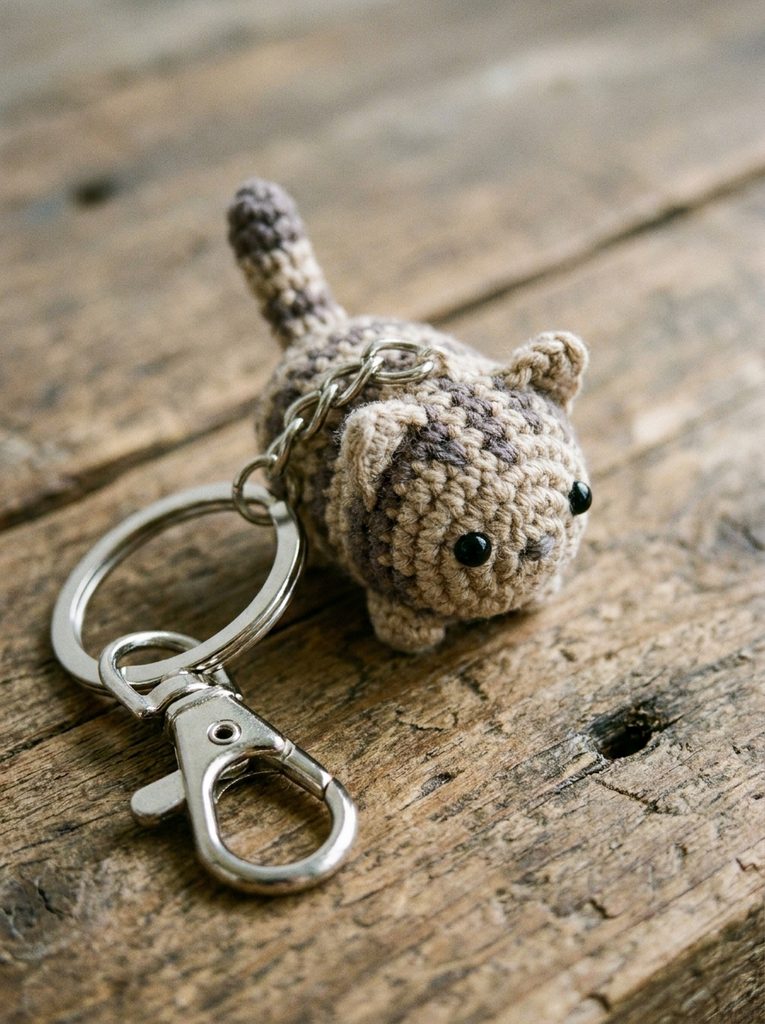
The pocket-sized keyring striped tabby scales amigurumi construction down to an ultra-portable format measuring less than three inches from ears to base. Despite its compact footprint, this design incorporates detailed two-row color striping across the head and back, mimicking classic domestic tabby fur patterns with precision. The small size makes it an excellent scrap-busting endeavor, requiring minimal yardage of each color while producing a high-density, durable pendant that withstands everyday pocket use. Paired with sturdy split rings and swivel lobster clasps, these miniature cats serve as functional lifestyle accessories for backpacks, key chains, and zipper pulls, offering endless opportunities for personalized color combinations.
Stripe Rhythm:
Rounds 1-2: Sand yarn, sc around [18]
Rounds 3-4: Slate yarn, sc around [18]
Repeat sequence.
To avoid color jogs, use an invisible slip stitch join at the end of each two-round block
instead of working in an unbroken spiral.
Using a fine 2.0 mm crochet hook paired with sport-weight mercerized cotton yarn, begin with an adjustable six-stitch ring in your primary sand or beige colorway. Introduce your contrasting slate or brown stripe yarn at round three, executing clean color joins on every alternating two-row block by pulling the new working yarn through the final pull-through of the previous stitch. Pack the miniature cavity with small, shredded fiber clusters using the blunt end of a wooden dowel to achieve uniform firmness without stretching the tiny stitches open. Secure small, four-millimeter plastic safety eyes firmly onto the front face before closing the final four-stitch base opening, then anchor a reinforced chain loop securely through the top center of the head to attach split hardware.
Idea 8: Vintage Patchwork Scrappy Cat
Setup Method
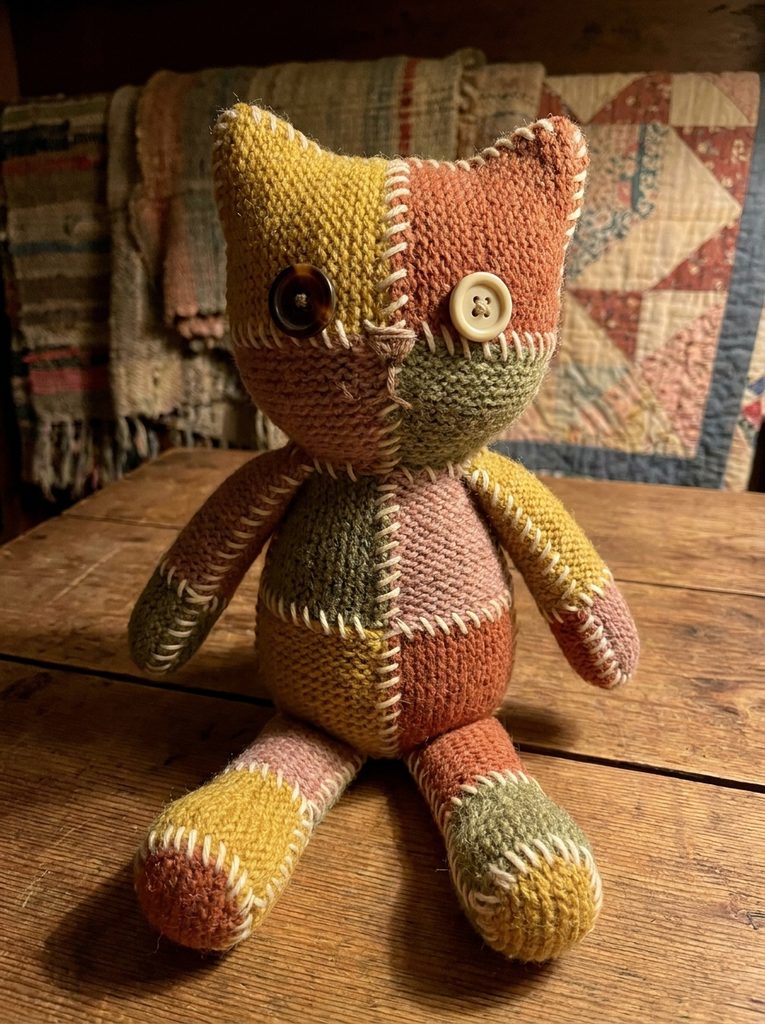
The vintage patchwork scrappy cat embraces a vibrant, eclectic aesthetic by combining distinct geometric squares or alternating yarn textures into a charming folk-art figurine. Instead of using a uniform skein throughout, this project thrives on intentional color blocking, making it the ultimate creative outlet for utilizing remnant skeins left behind from previous crafting endeavors. The finished doll features deliberate, high-contrast seam joins along the limbs, torso, and face, evoking the look of treasured heirloom toys and traditional textile quilts. This approach allows makers to experiment with contrasting fiber blends—such as pairing smooth cotton with bouclé or brushed alpaca—adding rich tactile diversity and unique character to the finished decorative piece.
Square Face Panels (Make 6 for Cube Torso):
Row 1: Ch 9.
Row 2: Sc in 2nd ch from hook and each ch across [8]
Rows 3-8: Ch 1, turn, sc across [8]
Assemble squares into a 3D cube using an exposed slip stitch ridge in a contrasting color.
To construct the patchwork body, work small individual square panels using single crochet flat rows, maintaining uniform row counts across all squares to ensure edge lengths align precisely during joining. Join six square panels into a structured three-dimensional cube using an exposed whip stitch or exterior slip stitch ridge worked in a strong contrasting thread color to emphasize the quilted look. Create limbs and head segments using irregular stripe patterns derived from your yarn scrap reserves, deliberately switching yarn colors mid-round without adhering to strict repeating intervals. Stuff the patchwork components with medium density to retain a slightly soft, primitive doll feel, then assemble the segments with thick linen thread, finishing with mismatched vintage embroidery patterns along the facial plane.
Idea 9: Plant Pot Perching Feline
How to Create
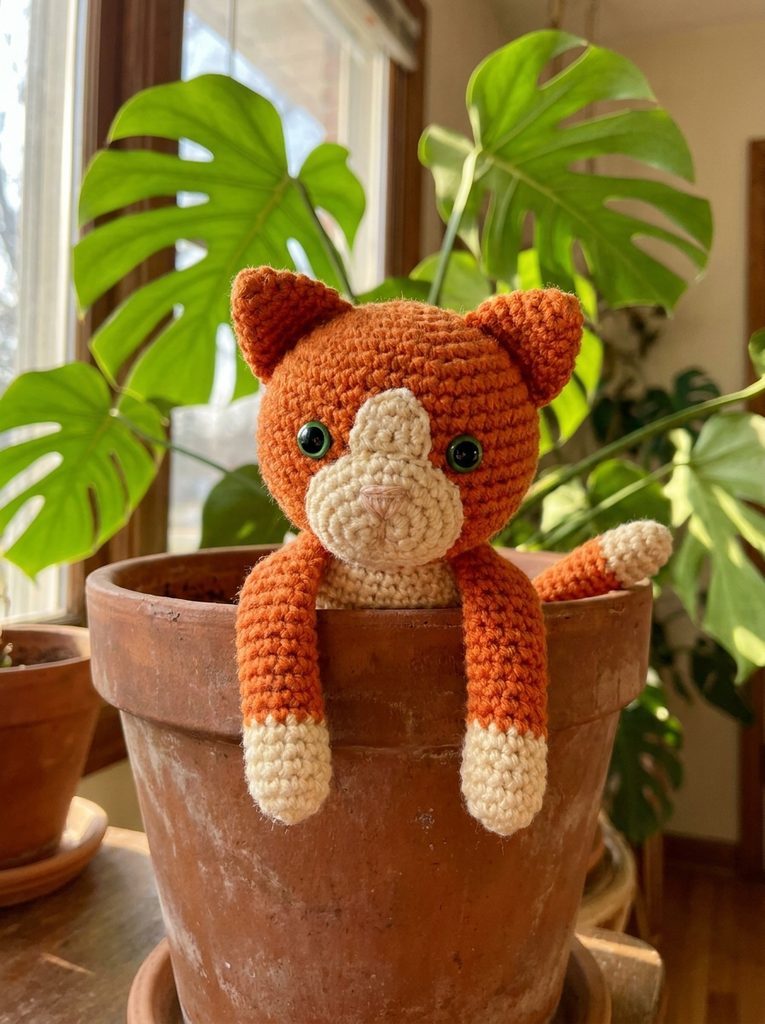
The plant pot perching feline features an anatomically adapted posture designed specifically to hook onto the ceramic lip of standard indoor houseplant containers. Crafted with curved, weighted front paws and a hooked spinal alignment, this cat sits steadily along the rim of terra cotta planters without shifting or falling into the potting soil. This unique functional application bridges the gap between textile craft and botanical interior styling, adding a whimsical, organic focal point to indoor gardens, plant stands, and patio displays. Using resilient, non-fading acrylic or treated cotton yarns ensures the figure maintains its clean look even when exposed to indirect plant mister moisture or strong windowsill sunlight.
Front Hooking Paws (Make 2):
Round 1: 6 sc in magic ring [6]
Rounds 2-5: Sc around [6]
Row 6: Turn, ch 1, 3 sc (leave 3 unworked to create an elbow notch).
Rows 7-9: Work 3 sc back and forth.
Round 10: Pick up all 6 sts to resume continuous tube.
This permanently sets a rigid 90-degree bend.
To form the hooking mechanism, build the front legs with an intentional ninety-degree structural elbow bend created through short-row heel turns halfway up the arm tube. Insert a flexible, plastic-coated craft wire or pipe cleaner inside both front legs, securing the wire ends with needle-nose pliers so sharp wire tips cannot pierce outward through the crochet fabric. Attach the wired legs directly to the upper chest plate of the cat’s torso, angling them downward so they form a stable two-pronged hanger that fits snugly over five-to-eight-millimeter planter rims. Weight the rear lower body segment with a clean ceramic pebble or heavy bead packet before stuffing the torso, ensuring the lower half acts as an effective stabilizing counterweight against the pot wall.
Idea 10: Sleeping Crescent Moon Wall Cat
How to Make
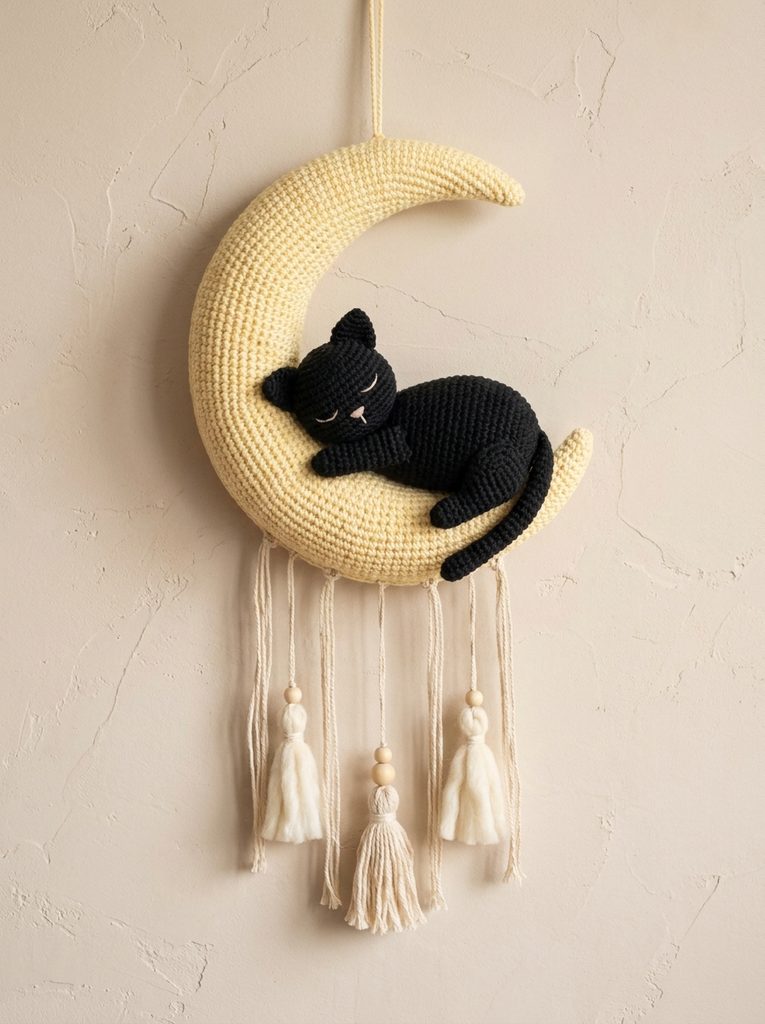
The sleeping crescent moon wall cat combines a slender, curled feline form with an integrated celestial crescent backdrop, designed to hang cleanly against flat wall surfaces. This wall-mounted arrangement frames a serene cat figure resting atop the lower curve of an illuminated or pale yellow crochet moon, serving as a peaceful decorative piece for gallery walls and quiet spaces. Because this piece is displayed flat against vertical surfaces rather than standing freely, it features a flattened profile that relies on clean perimeter shapes and dimensional face relief. The structural harmony between the crisp edges of the moon and the soft curves of the sleeping cat makes it an engaging, refined addition to contemporary fiber art collections.
Crescent Base:
Chain 35.
Row 1: Sc across, turn.
Row 2: Sl st 3, 4 sc, 6 hdc, 10 dc, 6 hdc, 4 sc, sl st 2.
Work targeted increases across the outer rim while working slip stitches along the inner curve
to produce a crescent that tapers to sharp points at both tips.
Crochet the crescent moon base by working varied stitch heights—ranging from tight slip stitches up to tall double trebles—along an arched foundation chain to create tapering horns at both ends. Work an identical second crescent panel, join the two panels around a cut piece of flexible plastic craft canvas cut to size, and close the perimeter with a crisp slip-stitch edge for permanent structural rigidity. Next, crochet a low-profile, softly stuffed cat body curled into an matching arc, using short rows to tuck the head smoothly against the front paws in a restful sleeping pose. Lay the cat inside the cradle of the crescent moon, tack it securely in place along the back panel with transparent nylon thread, and attach a discreet hanging loop at the upper horn.
Overcoming Common Beginner Assembly and Tension Mistakes
Building clean amigurumi figures requires overcoming common structural pitfalls that frequently challenge new crafters. The most prevalent mistake is using a crochet hook that matches the yarn label’s standard gauge instead of downsizing by one to two sizes. When the hook diameter is too large, it creates loose, open single crochet stitches, allowing white synthetic polyester fill to show through the fabric walls. Another frequent issue is uneven or loose stitch tension, which causes matching parts like ears, arms, or leg pairs to turn out visibly mismatched in size.
Common Tension and Assembly Pitfalls:

[Loose Stitch Gauge] ---> Fix: Downsize hook 1.0 mm to 1.5 mm below yarn label.
[Fiberfill Show-Through] ---> Fix: Use the "yarn under" (x-stitch) technique for tighter walls.
[Misaligned Limbs]   ---> Fix: Anchor parts with long steel pearl-head pins before sewing.
[Wobbly Head Column] ---> Fix: Pack neck firmly with a dense core roll of stuffing.
To solve gaping and structural issues, always choose an ergonomic hook sized between 2.25 mm and 3.0 mm for standard worsted or DK fibers, and practice the “yarn-under” single crochet method to yield tight, square-shaped stitches. Inconsistent symmetry during limb placement can be avoided by pinning all components securely in place with long steel pearl-head pins before stitching a single permanent knot. Carefully examine the pinned figure from the front, back, and profile views to ensure the eyes, ears, and limbs are aligned symmetrically before attaching them permanently. Finally, avoid under-stuffing the neck column, as an unsupported neck will cause the head to wobble or droop over time. Pack the neck channel firmly with a dense core roll of fiberfill to provide lasting vertical stability across the entire finished piece.
Practical Techniques for Professional Finishing and Detailing
Elevating a basic crocheted project into a refined, professional-looking finished piece comes down to careful detailing and deliberate surface finishing. Adopting the “yarn under, yarn over” single crochet technique (commonly called the x-stitch) produces a neat, stacked stitch pattern with higher lateral resistance to stretching compared to standard stitches. When closing the final circular openings of spherical bodies or limb tips, avoid basic chain fastenings; instead, thread the yarn tail through a blunt steel tapestry needle and weave it through the front loops only of each remaining stitch, then pull gently to form a flat, seamless closure.
For facial embroidery, substitute thick craft yarn with split strands of high-luster cotton embroidery floss, which allows you to create sharp, expressive facial features without distorting the underlying crochet fabric. Outline whiskers, nose triangles, and sleeping eyes using deliberate running backstitches, anchoring yarn tails internally by carrying them back and forth through the stuffed center cavity across several passes. Soft cosmetic blush or diluted watercolor craft markers applied carefully with a short, stiff bristle brush add subtle rosy warmth to inner ear folds and cheek planes. Finally, use a dry, clean toothbrush or wire carding comb to gently raise a soft, fuzzy halo along furry body segments, adding textural variety that makes the finished piece feel intentional, tactile, and thoroughly finished.
Curating Displays, Arrangements, and Cohesive Collections
Thoughtful staging and presentation transform individual handcrafted amigurumi cats into polished decorative accents that elevate your interior living spaces. Grouping three distinct cat figures of varying heights and postures creates a visually balanced vignette on a floating shelf, mantle, or desk surface. Incorporating complementary natural elements—such as turned raw-wood blocks, shallow earthenware dishes, or small potted succulents—balances the soft yarn textures with smooth, rigid materials, producing a clean, modern aesthetic.
| Display Strategy | Best Display Location | Ideal Complementary Accents |
|---|---|---|
| Triadic Grouping | Bookshelves & Mantels | Wooden risers, dried florals, neutral ceramics |
| Minimalist Solitary | Work Desks & Floating Shelves | Small potted succulents, clean notebook stacks |
| Framed Shadowbox | Nursery & Gallery Walls | Neutral fabric backdrops, raw wood frames |
| Glass Bell Cloche | Tiered Trays & Side Tables | Smooth river stones, micro-LED fairy lights |
When styling pieces for wall displays or seasonal gallery boards, mount flat-backed figures inside deep natural-wood shadowboxes lined with neutral linen or cream cardstock. This framing protects the delicate fiber sculptures from household dust while casting crisp, dimensional shadows that highlight their handcrafted stitch textures. If displaying figures on low coffee tables or entryway consoles, consider setting your miniature cats under clear glass bell cloches atop solid walnut bases. This presentation frames the fiber work as fine, collectible art rather than an ordinary plaything, keeping delicate whiskers and carefully blocked limbs protected and beautifully presented.
Time Management and Budget Planning for Fiber Projects
Efficient time management and budget-conscious planning allow you to complete multi-piece amigurumi collections without project fatigue or unnecessary craft spending. Most palm-sized feline designs consume between twenty and forty grams of yarn, meaning a single fifty-gram skein of quality cotton yields multiple small projects with minimal leftover waste. Maintaining an organized inventory of core structural shades—such as warm white, soft gray, linen, and charcoal—allows you to crochet diverse patterns without repeatedly purchasing specialty single-use skeins.
Target Workflow for a 4-Hour Project:

[0:00 - 1:15] Head & Torso Core Fabrication
[1:15 - 2:00] Limbs, Ears & Tail Fabrication
[2:00 - 2:30] Stuffing, Balancing & Weight Packets
[2:30 - 3:30] Pinning, Limb Attachment & Seaming
[3:30 - 4:00] Facial Embroidery & Final Detailing
Streamline your making time by adopting a batch-fabrication approach: crochet all matching extremities—such as paws, outer ears, and tails—in a single focused session before moving on to the main body components. Completing all small pieces first reduces repetitive tool changes, keeps your hand tension consistent across paired parts, and speeds up the final assembly phase. Set realistic crafting goals, dedicating focused forty-five to sixty-minute sessions to complete individual segments without rushing the delicate sewing steps. Storing ongoing project parts in sealed, clear project pouches keeps matching yarn lots, tapestry needles, and corresponding pattern notes neatly organized together, saving valuable setup time whenever you sit down to craft.
Creative Expansions and Advanced Structural Adaptations
Once you master basic spherical shaping and limb attachment, you can expand these core feline foundations into more complex, custom fiber art pieces. Experimenting with varied yarn weights allows you to radically transform a single pattern: use thick chenille yarn with a large 6.0 mm hook to create an oversized plush, or switch to fine lace-weight thread paired with an ultra-fine 0.75 mm hook to make a delicate micro-miniature. Introducing wire armatures—such as continuous aluminum craft wire cores wrapped in masking tape—into slender limbs allows your finished cat dolls to hold dynamic, poseable balance points on complex display surfaces.
You can also personalize plain body shells by introducing surface embroidery, such as tiny floral sprigs, leafy branches, or geometric stars worked directly onto the finished crochet stitches with fine silk floss. Integrate practical utility into decorative pieces by sewing high-strength neodymium magnets securely inside paw tips, allowing your miniature cats to cling to metal desk lamps, refrigerators, or steel shelving brackets. Alternatively, insert brass split rings or swivel clasps directly into upper head rounds to convert small designs into durable bag charms and wearable key accessories. Mastering these advanced construction and functional variations equips you to transform basic stitch counts into personalized, enduring fiber art that brings warmth and handmade character to any living space.