Creating decorative beaded wreaths using budget-friendly supplies from Dollar Tree offers an accessible method for styling elevated interior spaces without high financial investment. Wooden beads provide an organic, tactile aesthetic that complements farmhouse, Scandinavian, and modern bohemian aesthetics. However, retail home decor outlets often charge premium prices for simple beaded rings, turning basic craft supplies into expensive luxury goods. Learning to assemble these items at home using inexpensive metal hoops, split wooden beads, natural jute cord, and faux greenery provides significant practical advantages. This comprehensive tutorial covers ten distinct design variations engineered to suit front entryways, fireplace mantels, gallery walls, and interior door knobs. Readers will discover the structural mechanics of securing bead strands onto wire armatures, balancing floral focal points, calculating symmetrical spacings, and applying non-toxic paint finishes. Mastering these foundational crafting techniques allows DIY enthusiasts to build durable accent pieces that look professional and custom-made. By repurposing dollar store wire rings, round craft beads, hot glue sticks, and floral wire, anyone can produce refined decorative statements on a modest budget while expanding their creative confidence.
Why This Idea Is Trending or Useful
Beaded wreath projects have gained tremendous traction across modern Pinterest inspiration boards because they blend modern design minimalism with accessible crafting. Today’s popular interior trends emphasize clean geometric lines, sustainable materials, and natural wood tones that warm up residential living spaces. Assembling your own wreath offers high practical value, allowing you to tailor specific dimensions, wood stains, and seasonal foliage arrangements to your exact room palette. This beginner friendly craft eliminates the intimidation of advanced carpentry, requiring only basic tools and affordable materials that are readily available at retail dollar stores. The DIY appeal extends beyond holiday decorating, providing year-round home decor options that easily transition between spring florals, autumnal foliage, and winter evergreens. In addition, the minimalist style characteristic of raw wooden beads prevents seasonal clutter, offering an organized, cohesive focal point for compact entryways and apartment walls. These trending ideas demonstrate that thoughtful material selection and neat structural execution can yield handmade decorations that rival boutique store offerings while keeping project budgets exceptionally low.

Materials and Preparation
Assembling professional-quality beaded wreaths begins with selecting durable craft foundations, dependable adhesives, and compatible hanging hardware. Primary supplies from Dollar Tree include wire wreath rings, flat wooden craft rings, packages of natural wooden beads in assorted diameters, floral wire, natural jute twine, glue gun sticks, and seasonal faux botanical picks. Essential tools include a dual-temperature hot glue gun, sharp wire cutters, fabric shears, a rotary tape measure, and fine-grit sanding paper for smoothing rough bead holes. Preparation starts by inspecting your wooden beads, sorting them by diameter, and lightly sanding down any loose splinters or rough edges around the drill holes. Lay your metal or wood base flat on a clean table protected by a silicone craft mat to establish your design layout before applying adhesive. Planning considerations require determining the overall hanging weight, balancing the center of gravity to prevent lopsided hanging, and verifying whether your chosen faux botanicals match the intended room aesthetic. Applying an acrylic craft sealer or natural wood wax beforehand protects the porous wood from humidity and dust, ensuring the finished decoration endures for multiple seasons.
Dollar Tree Beaded Wreath Inspirations
Idea 1: Split Wood Bead Farmhouse Ring with Faux Eucalyptus
Step-by-Step Guide
The split wood bead farmhouse ring utilizes half-round wooden beads adhered directly onto a flat wooden or metal craft ring to produce a seamless, architectural silhouette. Split wooden beads feature a flat rear face, providing a broad surface area that bonds securely to flat wreath bases without rolling or shifting out of alignment. The spherical outer surface creates dimensional depth and catches natural light, producing gentle shadow lines that enhance the texture of bare walls. Faux silver dollar eucalyptus picks provide a muted botanical contrast that softens the geometric regularity of the pale birch beads. This easy project is tailored for modern farmhouse, Scandinavian, or transitional entryways, offering a clean, understated aesthetic that remains appropriate across all four seasons.

To construct this wreath, gather a flat ten-inch wooden craft hoop, a package of half-inch split wood beads, two faux eucalyptus picks, floral wire, and hot glue. Begin by test-fitting the split beads around the perimeter of the hoop to verify that the spacing remains uniform without awkward gaps at the closing joint. Apply a pea-sized dot of high-temperature hot glue to the flat back of each bead, pressing it firmly onto the craft frame for five seconds. Work continuously around the circle until the wooden base is entirely concealed by the spherical beads. Next, bundle the two eucalyptus stems together with floral wire so the leaf tips point in opposite directions, creating a balanced crescent spray. Secure this botanical bundle to the lower third of the beaded ring using floral wire and glue, concealing the wire wrap beneath a small tied loop of cream cotton ribbon.

Idea 2: Geometric Hexagonal Wire Frame with Natural Wood Beads
How to Create
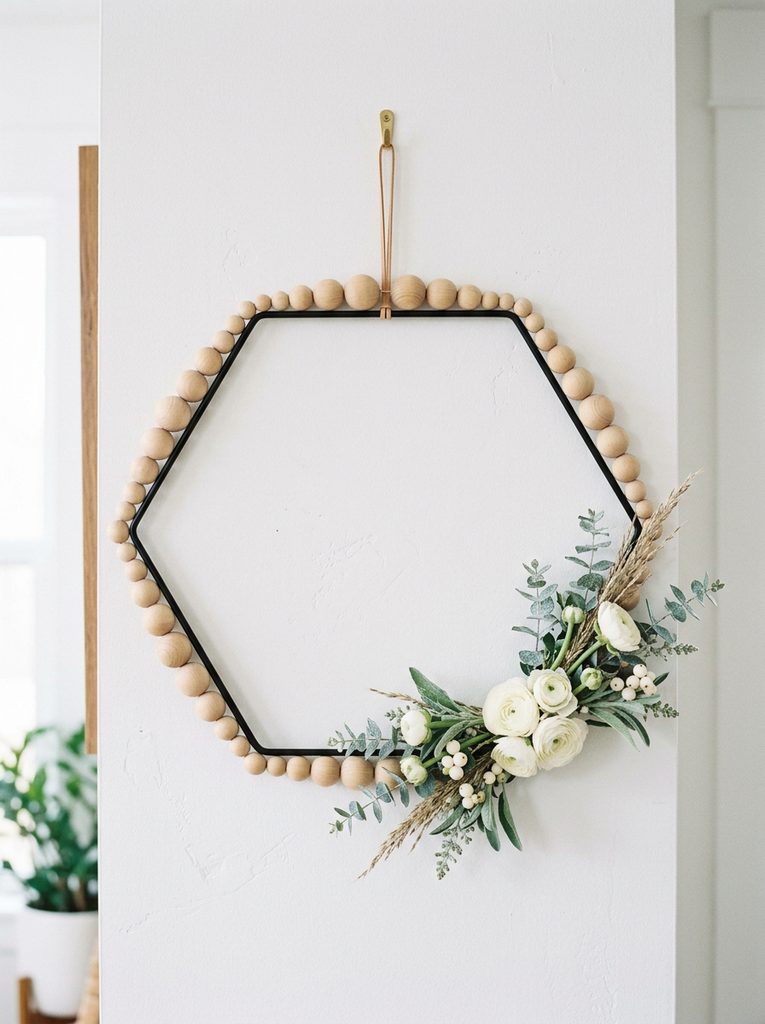
The geometric hexagonal wire frame beaded wreath merges sharp angular lines with smooth spherical beads to create a striking contemporary wall piece. Standard circular wreaths can sometimes appear traditional or predictable; adopting a six-sided hexagonal wire armature introduces architectural structure that complements modern minimalist style interiors. Threading round wooden beads directly onto the perimeter wire segments softens the hard metallic angles while celebrating natural wood grain variations. By leaving the top half of the geometric form exposed and concentrating faux botanical accents strictly along the bottom corner, the design achieves intentional negative space. This project offers a functional, stylish focal point above console tables, office desks, or bathroom vanity mirrors.

Begin by acquiring a twelve-inch hexagonal metal wire wreath frame from the craft section, along with three packages of three-quarter-inch round wooden beads and thin floral wire. Use heavy-duty wire cutters to snip one outer wire strut cleanly near a corner weld, opening a pathway to thread the beads onto the perimeter. Slide the wooden beads sequentially onto the outer perimeter wire until each straight facet is completely filled, bending the cut wire back into its original position and securing the joint with a tight wrap of floral wire. Ensure the beads sit snugly against one another to conceal the underlying metal armature. Select three small faux white ranunculus blossoms and several sprigs of frosted boxwood, wiring them securely across the bottom horizontal segment of the hexagon. Conceal the mechanics with hot glue, and hang the finished piece using invisible monofilament cord.
Idea 3: Minimalist Half-Beaded Embroidery Hoop Wreath with Cotton Ribbon
Execution Process
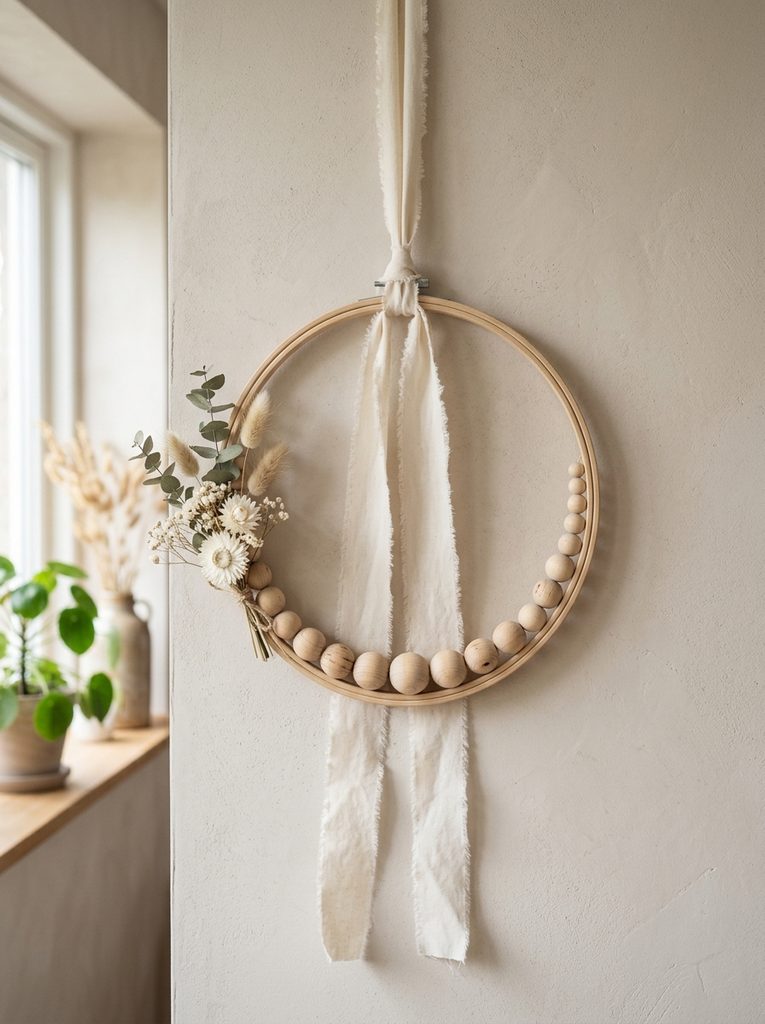
The minimalist half-beaded embroidery hoop wreath uses partial asymmetry to produce a refined, Scandinavian-inspired wall hanging. Leaving half of the smooth bamboo embroidery ring exposed highlights the contrast between clean timber grain and dimensional wood beads. Threading beads onto a curved segment of floral wire and mounting it flush against the outer rim creates a crescent-shaped border that draws the eye downward toward a tailored ribbon tail. The restrained use of materials makes this project exceptionally lightweight, allowing it to hang securely on delicate interior plaster walls, glass cabinet doors, or window latches without requiring heavy mounting brackets. It represents an ideal weekend craft for beginners looking to practice spatial composition and balance.
To assemble this design, separate an eight-inch wooden embroidery hoop and retain only the solid inner ring. Take a fifteen-inch length of eighteen-gauge craft wire, creating a tight loop at one end to serve as a bead stopper. Thread sixteen to twenty assorted wooden beads onto the wire, alternating between twelve-millimeter and twenty-millimeter diameters to establish a gradual tapering sequence from the center outward. Curve the beaded wire along the bottom half of the embroidery hoop, wrapping the wire ends tightly around the wood ring to anchor the crescent firmly. Fasten a few drops of hot glue behind the central beads to eliminate any movement against the hoop. Complete the project by tying a loose, single-knot hanger from a two-inch wide frayed cream cotton ribbon, allowing fifteen-inch tails to drape gracefully beneath the bottom edge.
Idea 4: Distressed Chalk-Painted Wood Bead Holiday Wreath with Jute Tassel
How to Make
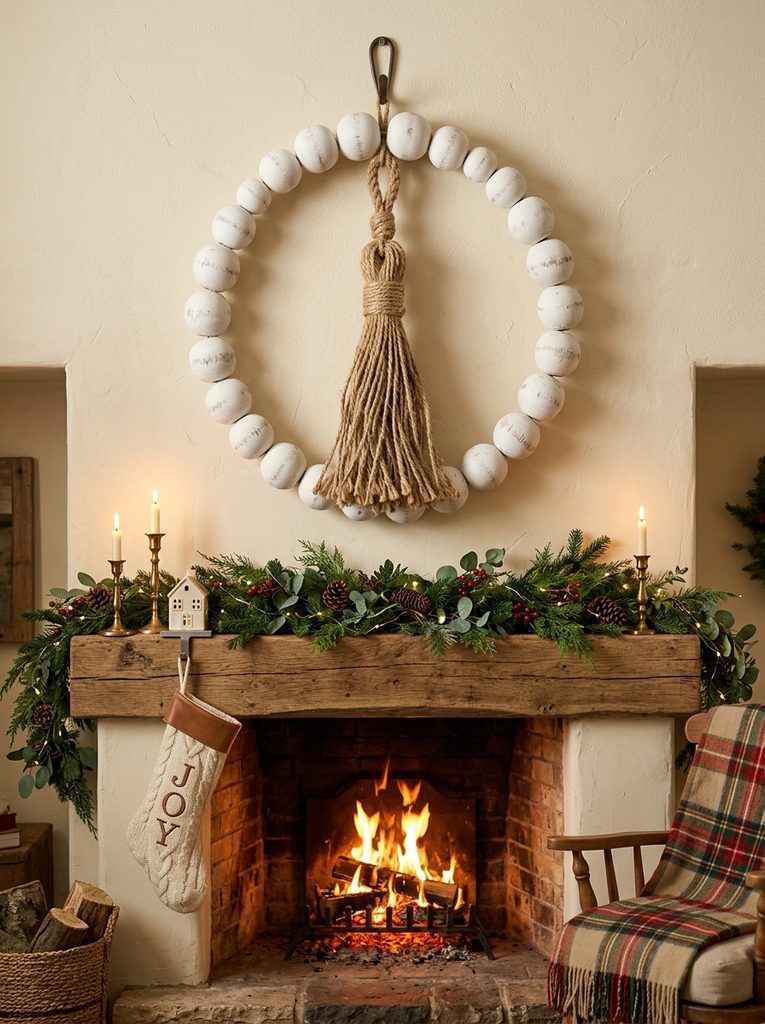
The distressed chalk-painted wood bead holiday wreath adapts raw craft supplies into a vintage-inspired decorative accent suitable for seasonal mantels and doors. Raw wooden beads are coated with matte chalk paint and lightly distressed with sandpaper to replicate aged antique porcelain or weathered whitewashed wood. Stringing these treated beads onto a circular wire core produces an irregular, handcrafted texture that pairs well with rustic textiles like natural jute, raw linen, and unbleached muslin. The focal point features an elongated handmade jute tassel suspended directly from the center of the ring, giving the piece balanced vertical proportion. This wreath offers an economical way to produce high-impact holiday decor that seamlessly matches neutral interior color schemes.

Start by threading forty-five three-quarter-inch wooden beads onto a flexible eighteen-gauge floral wire ring measuring ten inches across, twisting the wire ends tightly with pliers to form a closed loop. Apply two light coats of white or soft ivory chalk paint across the entire beaded ring using a foam sponge brush, allowing thirty minutes of drying time between coats. Once completely dry, rub medium-grit sandpaper gently over the raised curves of each bead to expose subtle patches of underlying wood grain, wiping away excess dust with a damp rag. Make a five-inch tassel by wrapping natural jute twine around a piece of cardboard thirty times, binding the top neck with wire, and cutting the bottom loops open. Tie the tassel to the interior apex of the wreath so it hangs suspended within the center, finishing with a simple twine loop at the top for mounting.
Idea 5: Tiered Double-Ring Beaded Chandelier Wreath with Fairy Lights
Setup Method
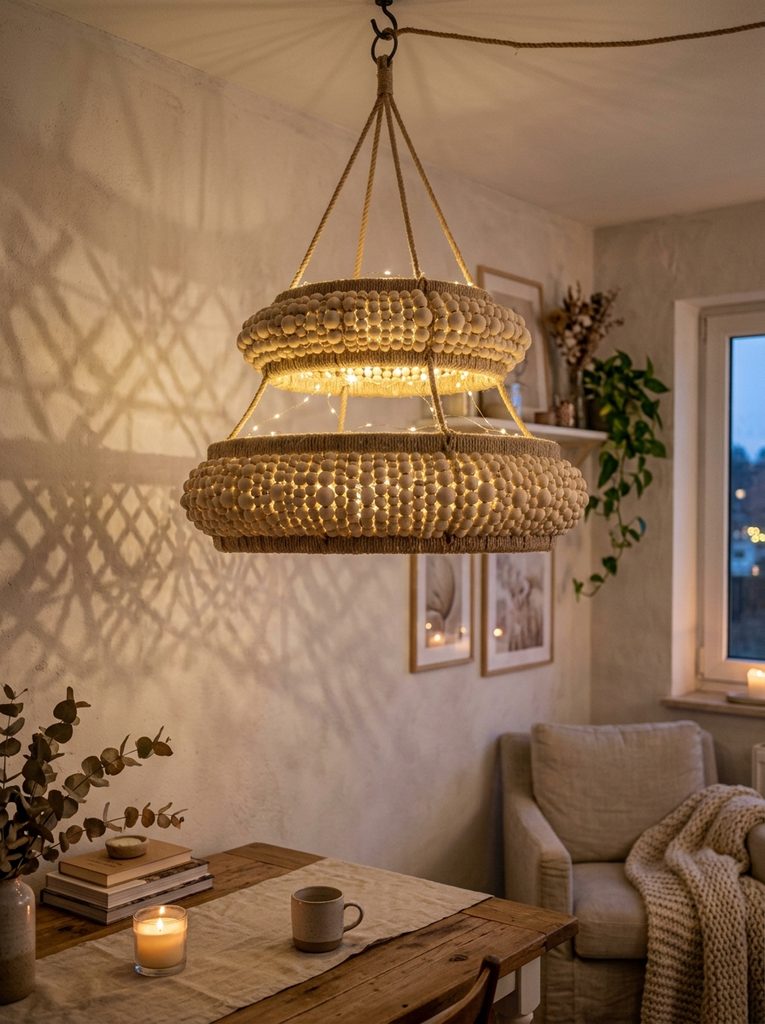
The tiered double-ring beaded chandelier wreath is an advanced dimensional project that functions as an overhead ceiling pendant or a substantial wall installation. By connecting two concentric wire rings of different diameters with vertical jute strands, the craft creates an open, cage-like structure that adds visual depth to open-concept rooms. The reflective wooden beads catch the ambient illumination from battery-operated micro LED fairy lights woven between the horizontal tiers, casting delicate shadows across adjacent walls. This project delivers practical value for covered outdoor porches, dining table canopies, or nursery reading corners, demonstrating how basic dollar store supplies can be combined into architectural lighting fixtures with sophisticated charm.
Begin by selecting an eight-inch wire hoop and a twelve-inch wire hoop from Dollar Tree. Thread three-quarter-inch wooden beads onto both rings, securing the connection joints with wire cutters and pliers so both rings maintain rigid, planar circular shapes. Cut six equal twelve-inch lengths of thick jute twine, knotting them at equal intervals around the perimeter of the larger ring. Extend these twine cords upward and tie them securely to the smaller hoop, positioning the smaller ring four inches above the larger ring to establish a tapered, tiered chandelier frame. Weave a ten-foot strand of warm-white, battery-operated micro LED wire lights around both beaded tiers, concealing the battery pack inside a small burlap pouch fastened to the top hanging junction. Suspend the completed chandelier using a metal ceiling hook.
Idea 6: Neutral Bohemian Raffia and Bead Sunburst Wreath
Step-by-Step Guide
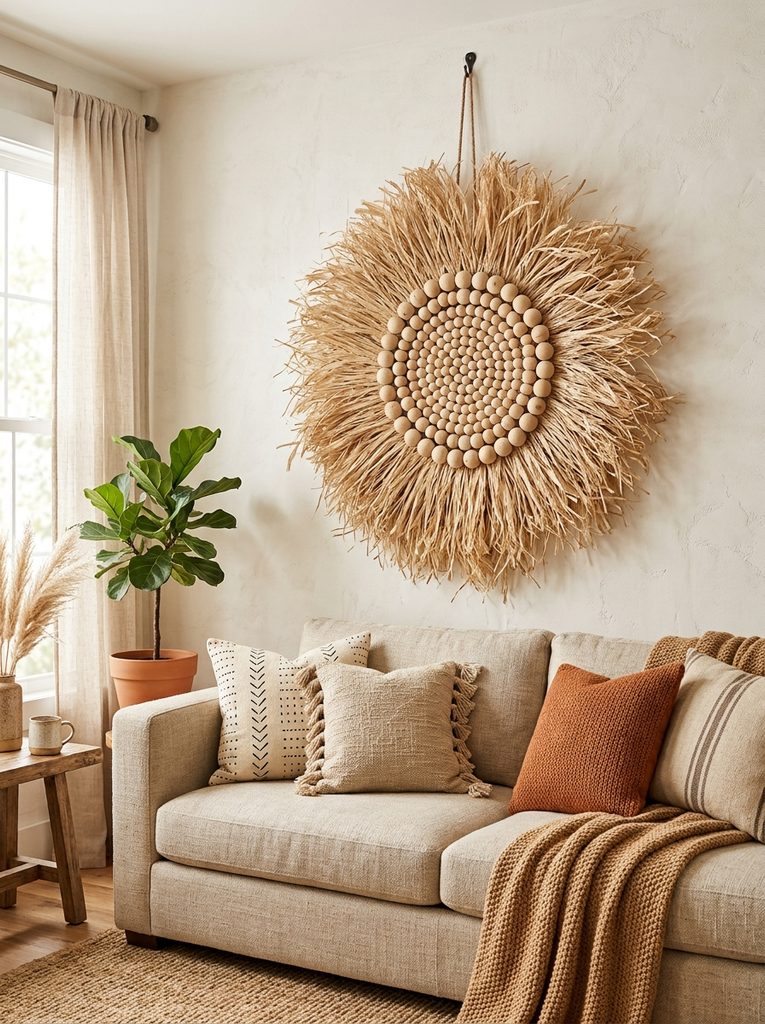
The neutral bohemian raffia and bead sunburst wreath uses textural contrast between smooth wooden spheres and frayed natural fibers to produce an expansive, earthy wall installation. A central beaded ring serves as the structural anchor, while dozens of natural raffia strands radiate outward like sunbeams, creating dynamic motion and warmth. This style draws inspiration from coastal and tribal design traditions, making it an excellent centerpiece for blank living room walls above sofas or headboards. The neutral beige and wheat color palette coordinates effortlessly with woven baskets, linen drapery, and indoor houseplant collections, providing an organic focal point built entirely from budget materials.
To create this project, start with an eight-inch flat wooden wreath form and a package of half-inch split wood beads. Glue the split beads closely together around the innermost edge of the wooden ring to form a clean interior border. Cut approximately eighty twelve-inch strands of natural paper raffia or dried palm raffia. Fold each raffia strand in half, looping it through the outer perimeter of the wooden frame using a clean lark’s head knot, pulling the tail ends tight against the wood. Continue knotting strands around the entire outer circle until the fringe is full and dense. Lay the wreath flat on a table and use sharp fabric shears to trim the raffia fringe into an even, symmetrical circle extending four inches beyond the frame. Gently comb the raffia fibers with your fingers to separate the texture.
Idea 7: Seasonal Interchangeable Monogram Wood Bead Wreath
How to Create
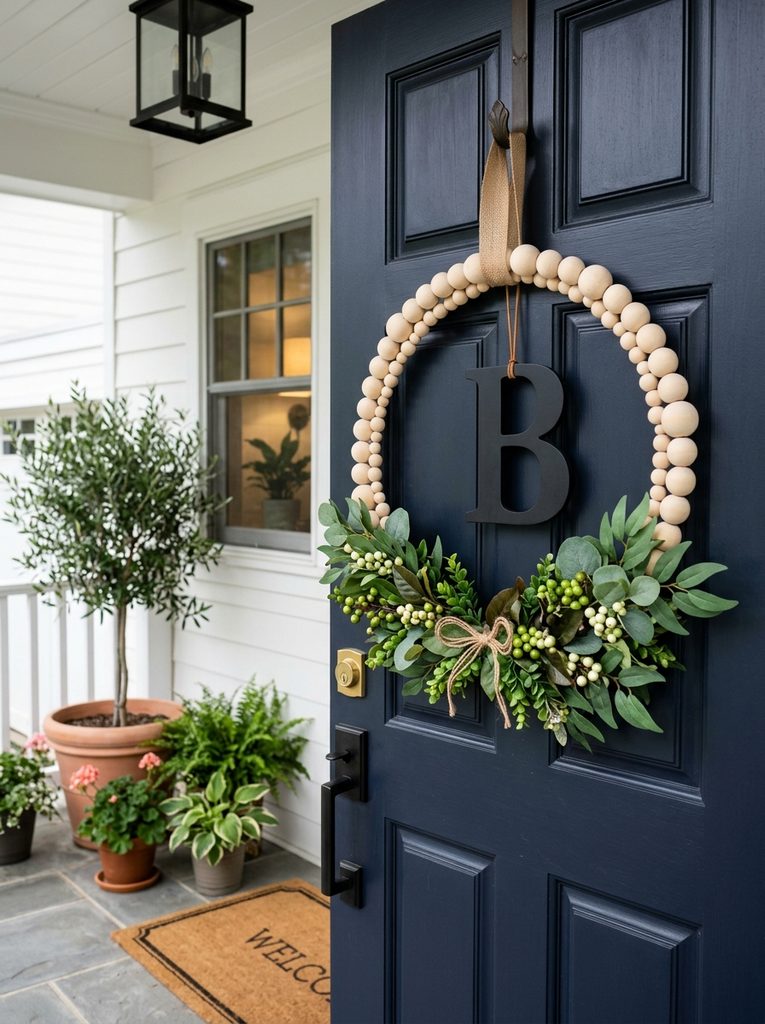
The seasonal interchangeable monogram wood bead wreath is an adaptable home decor foundation designed for year-round utility through swappable accent pieces. Rather than crafting separate wreaths for every holiday, this concept utilizes a timeless, fully beaded circular base that remains mounted permanently on the front door or wall. A laser-cut wooden monogram letter sits suspended in the middle, while a discreet magnetic strip or hook-and-loop patch anchored at the bottom enables homeowners to switch out seasonal floral sprigs in seconds. This functional design saves valuable closet storage space and minimizes decorating expenses, providing ongoing DIY satisfaction with minimal seasonal effort.
Begin by stringing thirty-five large wooden beads onto a twelve-inch circular metal wire wreath form, securing the wire ends with pliers to form a rigid circle. Paint an unfinished five-inch wooden monogram letter from the dollar store craft aisle with matte black acrylic craft paint, sealing it with a satin clear coat. Suspend the monogram directly in the center of the beaded ring by attaching thin, transparent fishing line from the top of the letter to the upper wreath wire. Mount a small strip of heavy-duty adhesive hook-and-loop tape to the lower interior curve of the beaded hoop. Create small, interchangeable seasonal floral clusters—such as autumn berries, spring daisies, or holiday pine picks—fastening the corresponding hook-and-loop mate to each bundle. Switch floral clusters as the seasons change while preserving your main beaded base.
Idea 8: Coastal Sea Glass and Bead Accent Ring with Dried Florals
Execution Process
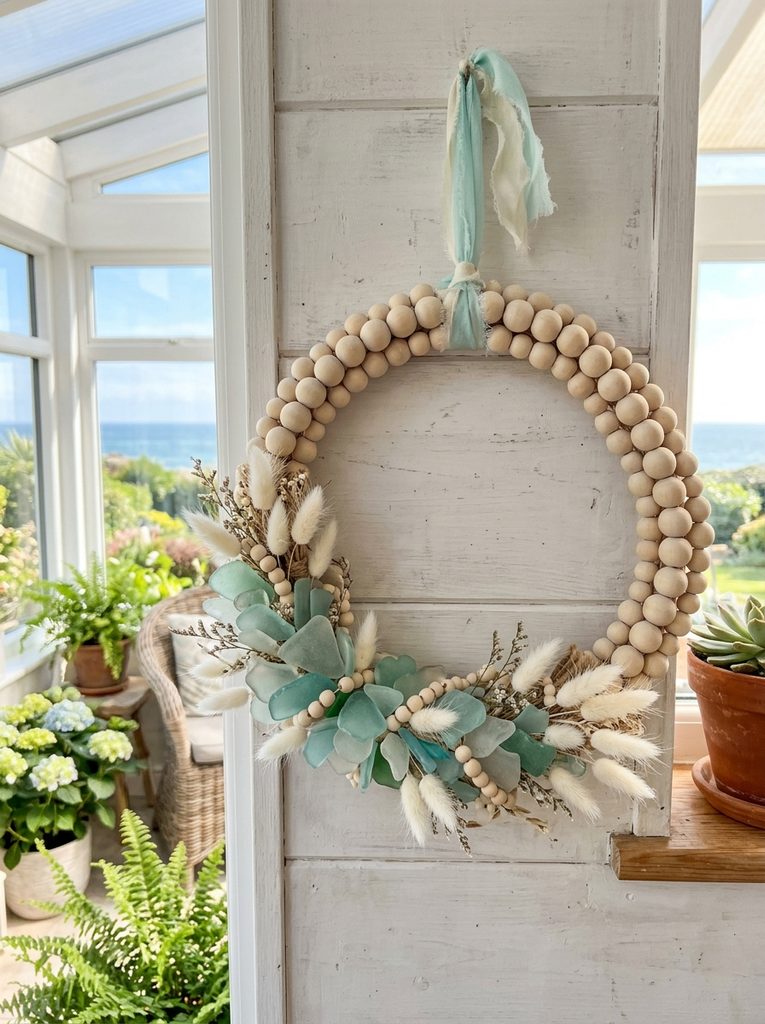
The coastal sea glass and bead accent ring integrates smooth wooden textures with translucent tumbled glass and delicate dried botanicals for a breezy, maritime aesthetic. Dollar store tumbled sea glass chips in soft aqua, seafoam, and cobalt shades introduce subtle color that catches the light beautifully against pale raw timber beads. By concentrating sea glass fragments and preserved lagurus bunny tails along one quadrant of the wreath, the design establishes an intentional asymmetrical balance that feels fresh and modern. This small-scale project works exceptionally well as an accent piece in bathrooms, coastal cottages, or sunrooms, bringing natural coastal elements indoors without resorting to kitschy maritime cliches.
To build this wreath, select an eight-inch flat wood craft ring, forty medium raw wooden craft beads, a bag of decorative sea glass chips, and a bundle of dried neutral bunny tails. Thread the beads onto craft wire and anchor the strand around the outer perimeter of the wood ring with hot glue. Along the bottom-left quadrant of the ring, apply clear-drying silicone adhesive or heavy-duty craft glue across a four-inch area. Carefully press flat pieces of aqua and green sea glass into the adhesive in an overlapping mosaic arrangement, allowing two hours for the glue to cure. Once set, tuck small dried bunny tail stems and bleached preserved baby’s breath behind the sea glass cluster, securing their bases with tiny dots of hot glue. Hang the wreath using a narrow strip of sheer ocean-blue chiffon ribbon.
Idea 9: Wire Floral Form Beaded Garland Swag Wreath
How to Make
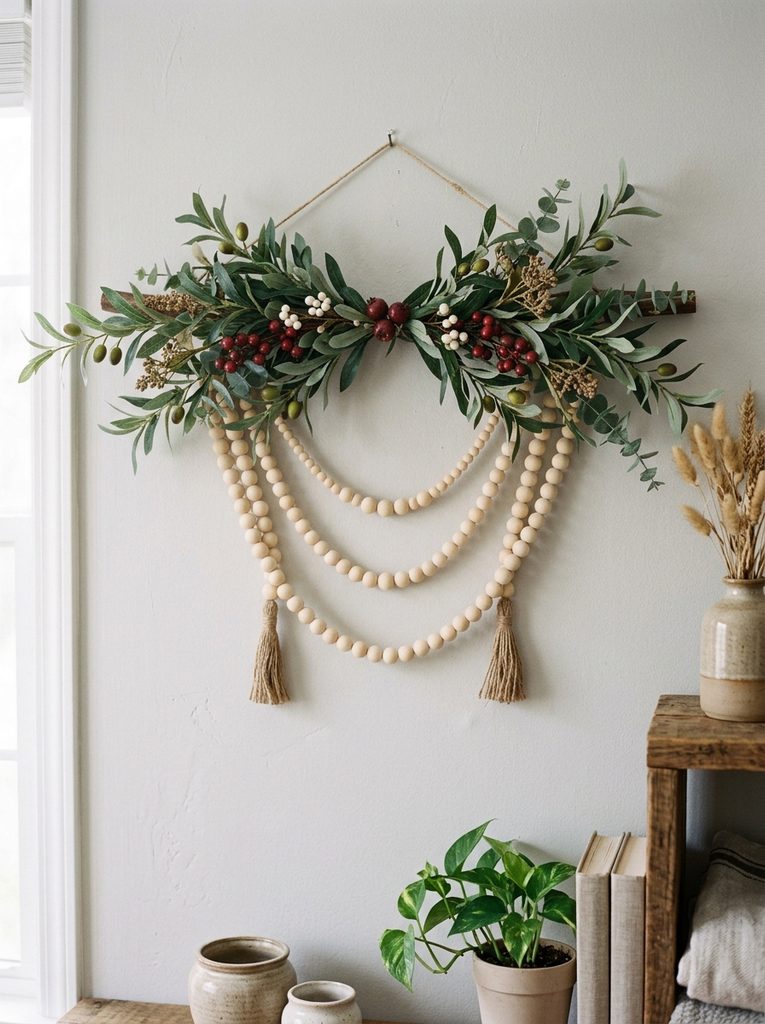
The wire floral form beaded garland swag wreath departs from conventional closed circles by utilizing an open crescent or half-moon garland silhouette. This contemporary layout resembles a hanging horizontal swag, with graduated strands of wooden beads draping loosely beneath a structured botanical bough. The curved drop of the bead swag introduces graceful vertical movement, making it particularly effective for wall areas directly beneath floating wall shelves, windowsills, or decorative mirrors. Combining stiff wire foliage armatures with flexible, draping bead swags balances structural rigidity and fluid motion, producing a sophisticated piece that elevates everyday interior spaces.
Begin by acquiring a crescent-shaped wire form or bending a straight twelve-inch piece of heavy floral wire into a gentle downward arc. Cut three lengths of natural jute twine measuring twelve, fourteen, and sixteen inches to form tiered swags. Thread small-to-medium wooden beads onto each twine strand, tying knots at both ends to keep the beads secure. Tie the ends of these three beaded garlands to the left and right ends of the curved wire base so they drape in concentric, cascading tiers beneath the wire. Next, attach faux olive branches and cedar picks across the top of the wire base using green floral tape, arranging the foliage so it points outward from the center. Add a focal cluster of dried orange slices or white porcelain berries at the central midpoint to conceal the twine attachment points.
Idea 10: Autumn Harvest Wood Bead Wreath with Burlap Bow and Berries
Setup Method
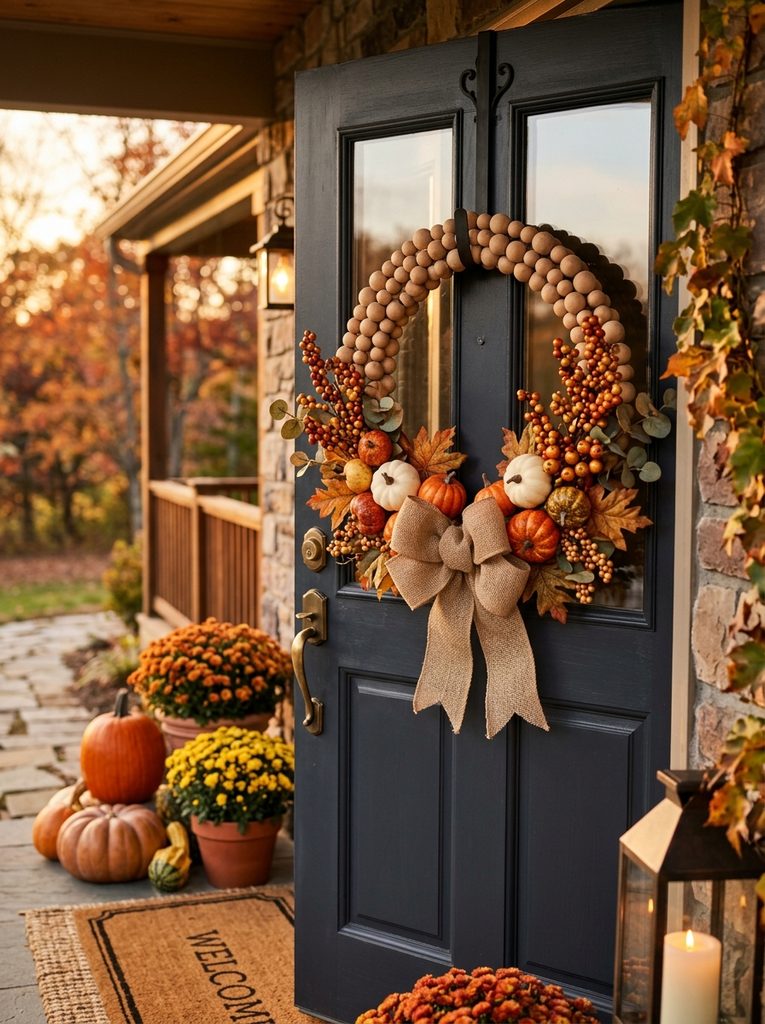
The autumn harvest wood bead wreath combines warm, earthy materials to celebrate seasonal transitions with classic visual warmth. Deep amber, mustard, and rust-toned faux berries introduce rich seasonal pigment that contrasts with the neutral, unfinished wood beads. A wide burlap bow anchors the base, grounding the project with rustic farmhouse texture that feels homey and inviting. The simple circular geometry of the beaded ring balances the fuller, looser arrangement of harvest foliage, ensuring the wreath remains tailored rather than unruly. This project provides an ideal weekend craft for welcoming autumn guests, whether hung on an apartment front door or positioned above a Thanksgiving dining table.
To construct this autumn piece, thread fifty three-quarter-inch wooden craft beads onto a fourteen-inch metal wire hoop, twisting the ends with needle-nose pliers and snipping excess wire. Select two faux fall floral picks featuring miniature foam pumpkins, pip berries, and autumn oak leaves in rust and gold tones. Use floral wire to strap the stem ends of the picks securely to the bottom center of the beaded hoop, angling the branches upward along both sides to form a five-inch foliage collar. Construct a four-loop bow from two-and-a-half-inch wired burlap ribbon, wrapping the center with floral wire. Glue or wire the burlap bow directly over the central foliage junction to conceal all stems and wire connections. Trim the bow tails into sharp inverted V-notches, misting the finished wreath lightly with craft sealer for outdoor longevity.
Common Beginner Mistakes and How to Avoid Them
A frequent mistake in DIY beaded wreath making is using an insufficiently rigid base, causing the finished ring to sag into an uneven oval under the weight of beads and floral accents. Thin craft wire often bends under tension, especially when loaded with dense wooden spheres and hot glue. To prevent this, always select heavy-gauge floral wire, double up your wire rings, or anchor beads directly onto sturdy wooden craft hoops. Another common error is applying hot glue directly to round beads without providing a flat contact point or secondary wire reinforcement. Round beads have minimal surface contact with flat frames, which can lead to adhesive failure during temperature shifts. Prevent detached beads by stringing them onto a continuous wire core before gluing, or choose flat-backed split wooden beads for surface mounting. Additionally, crafters often overwhelm the design by crowding too many large faux flowers onto the frame, completely hiding the unique texture of the beads. Maintain balanced proportions by reserving at least fifty percent of the beaded perimeter completely exposed, allowing the natural wood craftsmanship to remain the primary design feature.
Practical Tips for Better Results
Achieving professional, long-lasting results with Dollar Tree beaded wreaths relies on proper tool selection, structural reinforcement, and careful material finishing. Always use a dual-temperature hot glue gun on its high-heat setting when bonding wood to metal or wood to wood, as higher temperatures create a deeper, more permanent bond. If you plan to stain your wooden beads, thread them onto bamboo grilling skewers resting across a cardboard box; this allows you to apply liquid wood stain or diluted acrylic wash evenly with a sponge brush without messy cleanup. To keep bead strands taut and prevent visible gaps along curved wire frames, place a small dab of clear glue between every fifth bead during the stringing process. When integrating faux florals, use sharp needle-nose pliers to bend stem wires into small hooks that latch directly over the frame before securing them with floral wire. Finally, protect wreaths displayed on front doors from humidity and UV exposure by applying two thin coats of clear matte spray sealant across both the wood beads and silk botanicals to prevent fading and cracking.
Styling, Presentation, or Organization Ideas
Styling your handcrafted beaded wreaths thoughtfully enhances the visual harmony of your home decor while highlighting their textural appeal. Hang your wreath against dark, contrasting surfaces—such as charcoal accent walls, deep navy front doors, or stained wood paneling—to make pale birch and ivory beads stand out crisply. For interior wall displays, mount wreaths from decorative cast-iron hooks, vintage door knobs, or wide velvet ribbon bands suspended from crown molding. When decorating mantels, lean a medium beaded wreath against a large framed mirror or layered architectural window frame to build visual depth without putting nails into masonry. You can also lay smaller ten-inch beaded wreaths flat on dining tables or coffee tables to serve as rustic candle rings, centering a glass hurricane vase and pillar candle inside the circle. In craft rooms, store spare wooden beads and wire frames in clear stackable plastic bins labeled by diameter, keeping materials organized and ready for seasonal wreath updates.
Budget or Time Planning
Creating custom beaded wreaths using dollar store supplies is an exceptionally economical DIY craft that yields impressive visual returns within an approachable budget. Standard materials from Dollar Tree—such as wire frames, packages of wooden beads, faux greenery picks, floral wire, and burlap ribbon—typically cost between one dollar and twenty-five cents to five dollars per completed project. In comparison, similar boutique or specialty home decor store wreaths often retail for thirty to sixty dollars, delivering significant savings of eighty to ninety percent through home assembly. In terms of time commitment, an individual wreath can be assembled in thirty to forty-five minutes, making it an ideal creative project for a relaxed afternoon. The preparation, stringing, and gluing phases require roughly twenty minutes of active work, followed by fifteen minutes of floral arranging and ribbon styling. Preparing multiple wire bases simultaneously streamlines the crafting process, allowing you to produce coordinated holiday gifts or seasonal sets efficiently without extra planning stress.
Creative Expansion and Advanced Inspiration
Once you master basic circular beaded wreaths, you can explore advanced assembly techniques and creative material pairings to further elevate your projects. Experiment with ombre color gradients by soaking natural wooden beads in varying dilutions of fabric dye or acrylic paint, stringing them from light ivory to deep walnut around the frame. You can also introduce tactile variety by alternating smooth wooden beads with felted wool balls, metallic spacer rings, or faceted glass beads to add subtle shimmer. Consider constructing asymmetrical double-tier wreaths by linking two interlocking metal rings of different sizes with wired bead strands, filling the intersection with cascading air plants or dried eucalyptus. For festive occasions, incorporate personalized elements such as hand-lettered wooden plaques, mini hanging chalkboards, or battery-operated micro fairy lights hidden beneath the foliage. These creative expansions allow you to adapt the foundational beaded wreath concept to evolving interior design trends, keeping your handmade home decorations fresh, dynamic, and uniquely your own.