Handmade amigurumi teether designs merge natural wooden teething rings with soft, textured crochet figures to create engaging sensory rattles and soothing toys for infants. Exploring modern nursery ideas across visual discovery platforms reveals an increasing focus on sustainable baby gifts that combine organic textures with refined, minimalist styling. This tutorial teaches you how to design, shape, stuff, and securely anchor ten unique amigurumi teething figures onto natural wooden bases. Throughout this guide, makers will discover reliable crochet techniques, including continuous spiral shaping, seamless decreases, safe facial embroidery, and high-strength ring joining methods. Constructing these handmade accessories provides significant practical value by providing natural relief for teething discomfort while offering engaging shapes that encourage early fine-motor development. Understanding how to manage stitch tension prevents internal polyester filling from shifting out of the fabric, ensuring that every completed piece remains durable and safe throughout daily handling. Each concept featured in this comprehensive resource provides step-by-step assembly instructions, safety guidelines, and material recommendations. Mastering these foundational methods allows you to produce beautiful, boutique-quality nursery keepsakes that balance charming character design with dependable, everyday functionality.
Why Organic Crochet Teething Rings Trend in Modern Nurseries
The widespread appeal of amigurumi wooden teething rings across modern craft boards stems from their blend of practical utility, natural materials, and timeless aesthetic appeal. Contemporary nursery styling frequently favors calm, neutral color schemes, natural fibers, and sustainable wooden accents, stepping away from bright, molded plastic toys. A wooden teether wrapped in handmade cotton crochet meets this design standard by offering an earthy, tactile presence that looks beautiful on nursery shelving and in lifestyle photography. From an infant development perspective, these pieces provide dual-density textures; the hard, smooth beechwood soothes sensitive gums during teething, while the soft, ribbed crochet stitches offer gentle sensory stimulation. For beginners, crafting teething rings provides an approachable introduction to three-dimensional amigurumi because the small animal heads, fruit motifs, and geometric wraps require far less time and yarn than full-sized plush dolls. In addition, these projects make cost-effective handmade gifts for baby showers, using modest amounts of organic cotton yarn. Combining approachable techniques, functional relief, and organic design ensures that handcrafted teething rings remain a staple project for modern fiber artists.
Workspace Preparation, Raw Materials, and Safety Guidelines
Achieving clean, safe results when making baby teethers requires sourcing certified non-toxic supplies and maintaining a clean work environment before starting. The wooden foundation must consist of natural, unvarnished, untreated hardwood rings, such as smooth European beechwood or maple, measuring between fifty-five and seventy millimeters in diameter. Always inspect wooden rings for cracks, rough grain, or splinters, sanding any rough spots with fine-grit paper before attaching yarn. For the crochet elements, select light worsted or sport-weight mercerized organic cotton yarn that resists fraying, holds up to saliva, and tolerates regular washing without fuzzing. Essential tools include a two-and-a-half-millimeter steel crochet hook to maintain tight tension, locking stitch markers, a blunt-tip metal tapestry needle, hypoallergenic polyfill stuffing, and dark embroidery floss. Do not use plastic safety eyes, metal bells, or small external beads on teethers, as these components present choking hazards if dislodged; facial features should always be embroidered directly into the crochet fabric. Preparing your materials methodically ensures that your finished project is physically sound, beautifully detailed, and safe for everyday use.
1. Natural Bunny Ears on Untreated Beechwood Ring
Step-by-Step Guide
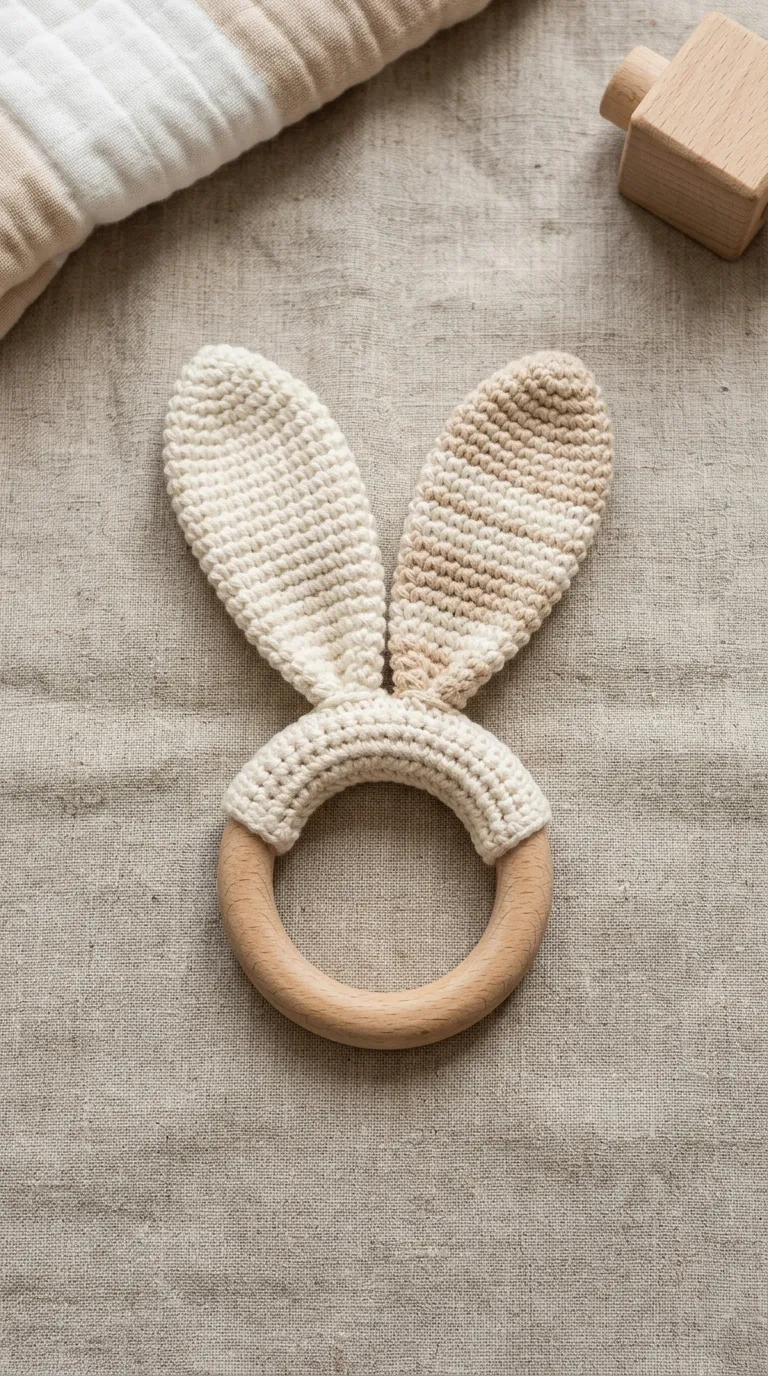
The natural bunny ear teether utilizes clean lines, soft fabric folds, and minimalist shaping to create a classic, Scandinavian-inspired nursery accessory. This design features two elongated, double-layered crochet ears that slide around the wooden ring through a slip-knot loop, or sew directly onto a contoured crochet foundation band. The long, flexible ears provide an easy-to-grasp handle for developing hands, while the flat crochet surface offers an appealing, flexible chew surface that contrasts with the firm wooden ring. Choosing soft neutral shades like oatmeal, unbleached ecru, biscuit, or warm linen creates an understated aesthetic that matches modern wooden nursery decor. Leaving the ears unstuffed allows the piece to be easily hand-washed and dried, preventing trapped moisture inside the fabric. The combination of untreated hardwood and soft organic cotton produces a clean, functional teething piece that photographs beautifully across curated nursery boards.
Begin by working the first ear panel using a two-and-a-half-millimeter hook and light worsted organic cotton yarn. Start with a magic ring containing six single crochet stitches, working in a continuous spiral while increasing by three stitches every third round until reaching eighteen stitches across. Continue working six even rounds without increases to form the elongated body of the ear, then decrease by two stitches on alternating rounds until ten stitches remain. Fasten off and crochet an identical second ear panel, leaving a fourteen-inch yarn tail on both pieces. Next, construct the wooden ring base band by chaining eight stitches, working back and forth in rows of single crochet until the strip wraps snugly around the wooden ring circumference. Wrap this crochet band around the top portion of the sixty-millimeter beechwood ring, sewing the long edges together with an invisible whip stitch using your tapestry needle. Finally, position the two unstuffed bunny ears side by side atop the seamed crochet band, sewing through both thicknesses of the ear bases and the underlying band with tight, reinforced mattress stitches.
2. Sleeping Fawn with Stitched Meadow Spots
Read This:
Setup Method
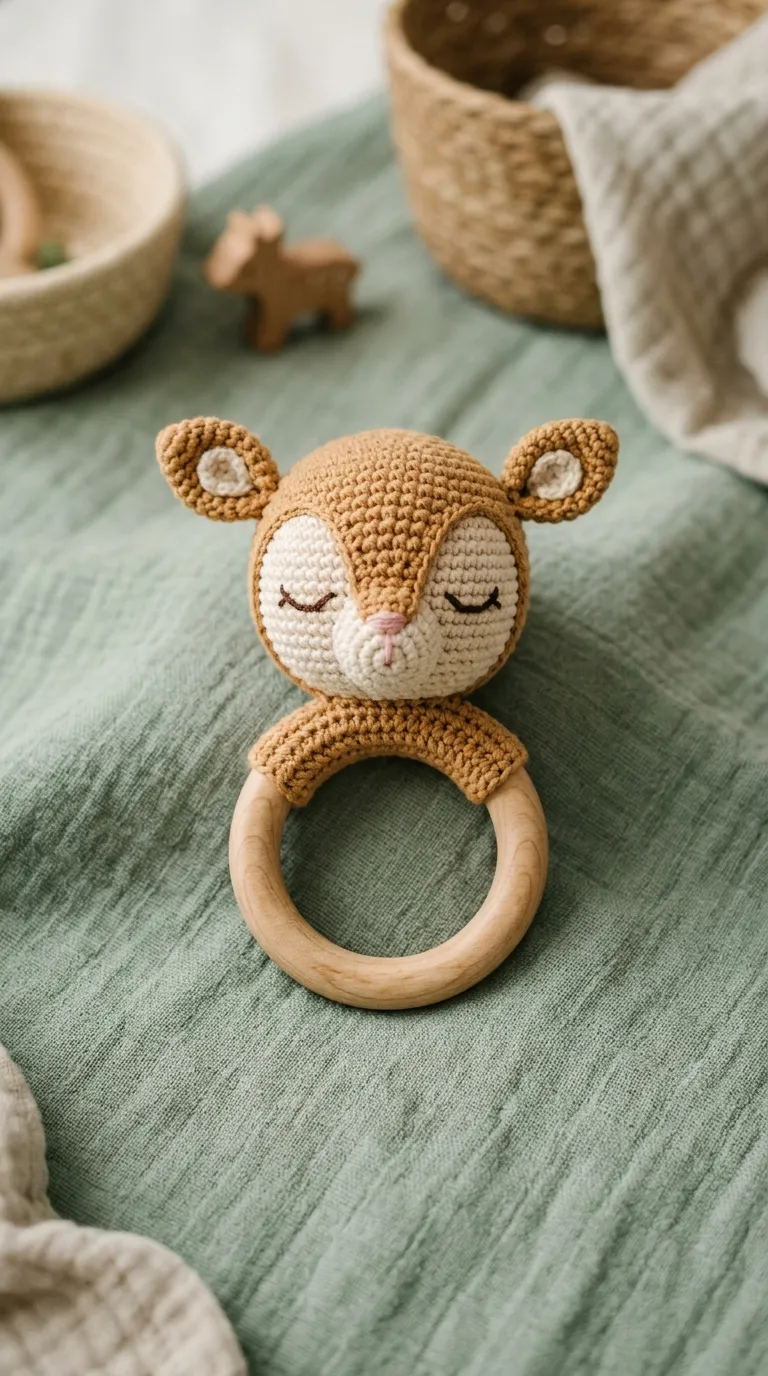
The sleeping fawn teether introduces peaceful forest charm through a gently tapered deer head, delicate curved eyelids, and embroidered white spots. The amigurumi head sits centered on the wooden ring, flanked by small folded ears and tiny, unpadded horn nubs that provide varied chewing surfaces. Soft fawn brown or light camel yarn forms the head, while a cream muzzle and snow-white embroidered accents add soft, natural contrast. The closed, sleeping eyes are hand-stitched into the crochet fabric, ensuring a smooth, tactile surface that will not scratch delicate gums. This woodland design brings a warm, storybook feel to modern nurseries, coordinating effortlessly with botanical wall art, neutral woven blankets, and forest-themed decor. The small size of the deer head keeps the piece light and balanced, preventing the teether from tipping over when resting on a changing table or shelf.
To construct the fawn, begin at the snout tip using soft cream cotton yarn, working six single crochet stitches into a magic ring and increasing gradually to twelve stitches over two rounds. Switch smoothly to warm fawn-colored yarn on round five, increasing evenly across alternating rounds until the circumference reaches thirty-six stitches. Work five continuous rounds to establish the head height, insert hypoallergenic polyfill firmly into the muzzle, and embroider two crescent sleeping eyes between rounds eight and nine using black embroidery thread. Add six small French knots across the upper forehead using white yarn to create the meadow spots before working decrease rounds to close the head sphere. Crochet two small teardrop ears and two petite antler nubs in unbleached cream yarn, sewing them symmetrically across the crown of the head. Crochet a snug four-stitch-wide ribbed strip around the wooden ring, and secure the finished fawn head to this base using heavy-duty cotton yarn, pulling the stitches tight to ensure a stable, wobble-free anchor.
3. Textured Honeybee with Ribbed Ring Wrap
How to Make
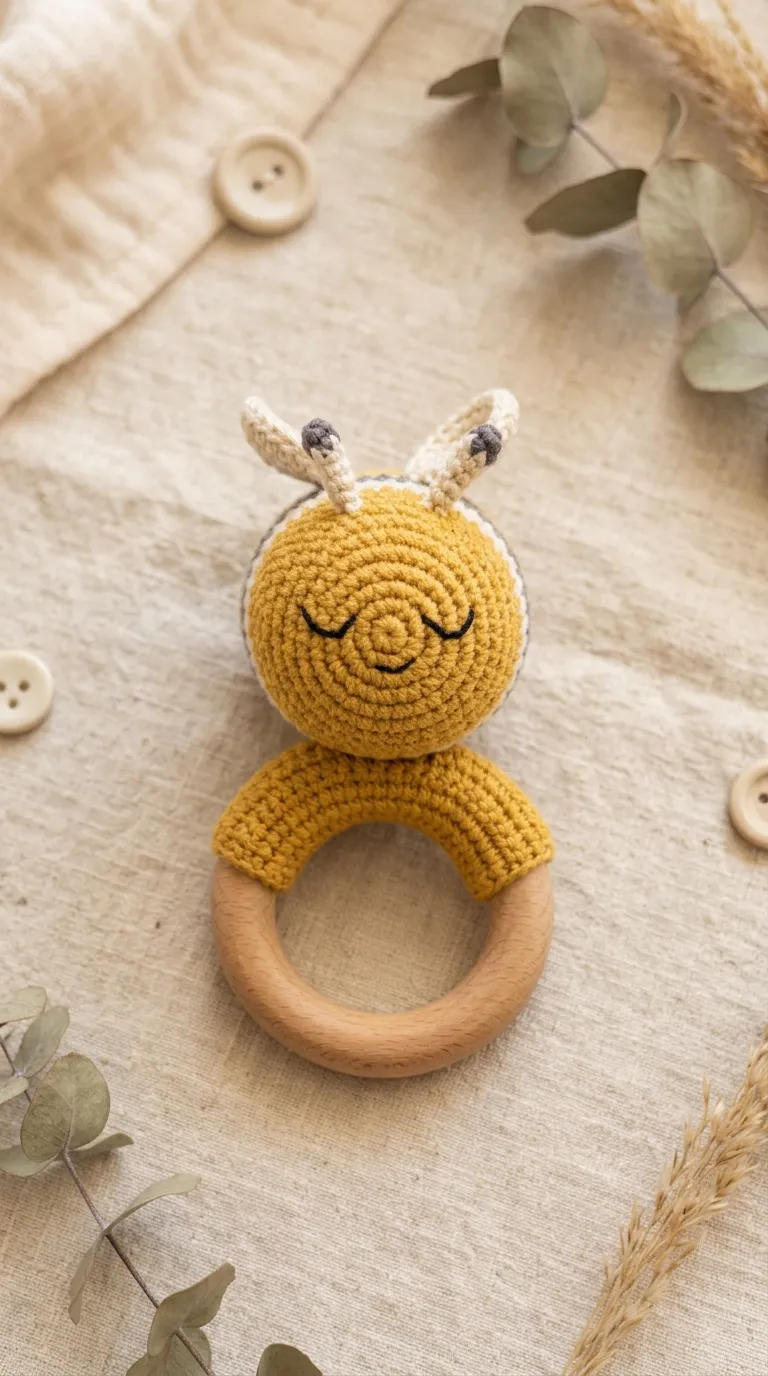
The textured honeybee teether combines gentle visual charm with stimulating surface textures, pairing bold amber stripes with a textured ring wrap. The amigurumi centerpiece consists of a rounded oval bee body featuring alternating stripes of golden mustard, soft charcoal, and cream yarn. Two petite, rounded wings crocheted with raised front-post stitches sit atop the back, providing additional tactile surfaces for curious fingers. The ring wrap itself uses a textured moss or ribbed ridge stitch rather than basic flat single crochet, creating an engaging, non-slip surface around the wooden ring. The warm mustard and charcoal palette brings a modern, gender-neutral look that feels fresh and cheerful. This design is particularly effective for supporting tactile discovery, as the smooth wood, ribbed ring wrap, and raised amigurumi wings offer a rich variety of comforting textures for teething infants.
Start by shaping the bee body from the front face using golden mustard cotton yarn, working six single crochets into a magic ring and expanding systematically to thirty stitches. Alternate two rounds of mustard yellow with two rounds of charcoal gray, carrying the unused yarn inside the body to prevent loose interior floats. Before completing the final decrease rounds, insert firm polyfill stuffing and embroider subtle sleeping lashes on the yellow face using charcoal floss. Close the rear of the body using continuous decreases, weave the final tail through the front loops, and pull tight to seal the opening. Crochet two small circular wings in soft cream yarn by working double crochets into a foundation ring, finishing the outer edges with a row of slip stitches for extra structure. Sew the wings flat against the upper striped back. To complete the assembly, crochet a ribbed foundation strip around the wooden ring using back-loop-only single crochet stitches, and secure the bee body firmly to the center of this textured base using reinforced cross-stitches.
4. Calm Slate Koala with Fuzzy Ear Accents

Execution Process
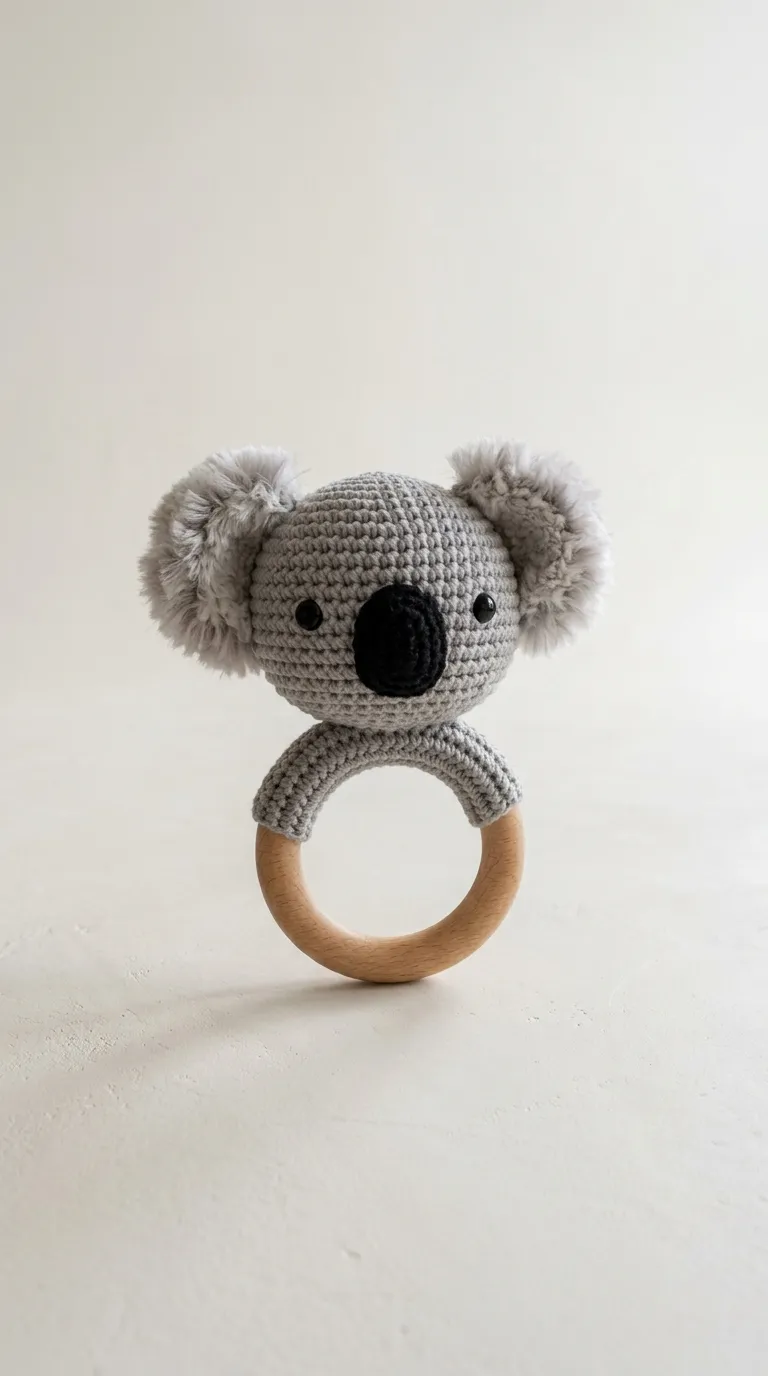
The calm slate koala teether captures an understated modern look through its rounded facial features, oversized oval nose, and wide, curved ears. Sculpted in soft dove gray or muted slate cotton yarn, the koala head brings a tranquil, neutral presence that fits seamlessly into minimalist and monochrome nursery spaces. The defining visual element is the large, satin-stitched black nose that covers the center of the face, balanced by sleepy embroidered eyes. The rounded ears are worked in dense single crochet and finished along the edges with looped fringe stitches that are brushed out gently to simulate natural fur texture. This design emphasizes structural simplicity and balanced proportions, providing a comforting, easy-to-hold accessory. The wide, low profile of the koala head sits flush against the wooden ring, creating a sturdy connection that holds up well against enthusiastic tugging and chewing.
Begin the koala by working a round head sphere in light gray cotton yarn, increasing from six single crochets to thirty-six stitches, followed by six straight rounds to build depth. Embroider a wide, vertical satin-stitch oval nose directly across the center of the face between rounds nine and thirteen using matte black stranded embroidery cotton, and add tiny sleeping eye lines on either side. Pack the head firmly with polyfill stuffing, making sure the lower half maintains a rounded contour, and work even decreases to seal the base. For the ears, crochet two curved semicircles, working the final outer round in loop stitches; cut the loops carefully and brush them with a clean, stiff toothbrush to create a soft, lint-free textured rim. Stitch the ears along the upper diagonal lines of the head. Crochet a ten-row cotton foundation band to wrap around the top of the wooden ring, and secure the finished koala head firmly to the band using a series of hidden ladder stitches worked with strong cotton thread.
5. Citrus Clementine with Sprouted Green Leaf

Step-by-Step Guide
The citrus clementine teether brings playful botanical energy to modern teething collections with its bright fruit shape and simple, cheerful colors. A vibrant orange sphere serves as the main focus, topped by a tiny woody stem and an unstuffed emerald green leaf that drapes over the side. The circular fruit shape mirrors the round contour of the wooden ring, establishing a pleasing geometric balance between the wood and the crochet element. Using bright terracotta, peach, or warm clementine orange yarn introduces an appetizing, uplifting splash of color that stands out against neutral linens and wooden furniture. The pointed green leaf is crocheted tightly to give it natural structure, providing a flexible, narrow chewing surface that easily reaches sore back gums. This gender-neutral, food-inspired concept is a fun, creative project that offers a modern alternative to traditional animal motifs.
To create the clementine, use bright orange cotton yarn to work six single crochets into a magic ring, increasing over five rounds until reaching thirty stitches across. Work six rounds without increases, keeping your tension tight to produce a firm, durable fabric. Insert dense polyester fill, shaping the piece into a slightly flattened sphere rather than a tall globe, and work continuous decreases until six stitches remain before closing. To create the realistic dimpled top of the fruit, thread a needle with orange yarn, pass it vertically through the center of the sphere from bottom to top, pull the thread taut to indent the crown slightly, and knot it securely inside the base. Crochet a small leaf using forest green yarn by working a sequence of single, half-double, and double crochets along a nine-stitch foundation chain, finishing with a slip stitch point. Sew the leaf and a tiny brown embroidered stem nub to the top indentation. Attach the completed clementine firmly to a matching orange crochet band sewn around the beechwood ring.
6. Peaceful Sloth with Cream Eye Mask
Read This:

Setup Method
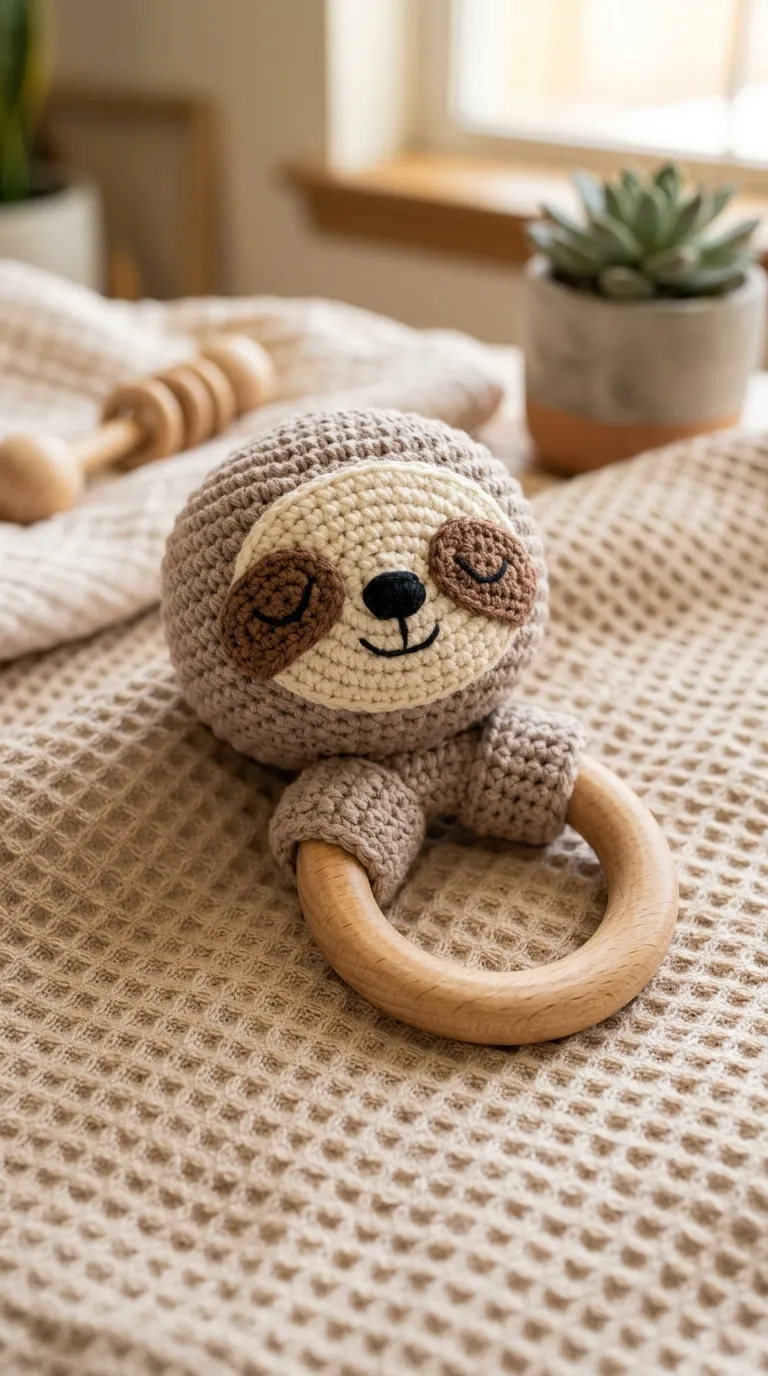
The peaceful sloth teether features a sweet, relaxed character that encourages a calm, soothing atmosphere in the nursery. Defined by a soft warm-taupe head, a distinct cream-colored facial mask, and dark embroidered eye patches, the sloth embodies a slow, peaceful charm. The head sits centered on the wooden ring, framed by two tiny, rounded ears that sit close to the main shape to keep the silhouette compact. The dark eye patches are embroidered diagonally downward, giving the little sloth its characteristic serene, resting expression. Choosing earthy tones like taupe, oatmeal, and dark espresso brings an organic, modern feel that coordinates with bohemian, jungle, and neutral nursery spaces. The rounded amigurumi head serves as an easy-to-grasp handle, while the smooth beechwood ring provides firm, natural teething relief.
Begin by crocheting the sloth head using soft taupe cotton yarn, working in spiral rounds from a magic ring up to thirty stitches. Before closing the shape, create the facial mask: crochet a flat, elongated horizontal oval in cream yarn, and stitch two angled espresso brown thread patches onto either side of the center. Embroider tiny sleeping eye lines directly over these dark thread patches using black floss, adding a small horizontal nose line in the middle. Sew this cream facial mask securely onto the front of the taupe head using fine whip stitches. Stuff the head firmly with hypoallergenic fill to give the face a smooth, rounded look, then work single crochet decreases to close the lower opening. Crochet two tiny, cupped ear nubs in matching taupe yarn and sew them flush against the sides of the head. Finally, sew a flat cream foundation band around the top curve of the beechwood ring, and anchor the completed sloth head to this band with reinforced double stitches along the base.
7. Pastel Daisy Blossom with Golden Center
How to Make
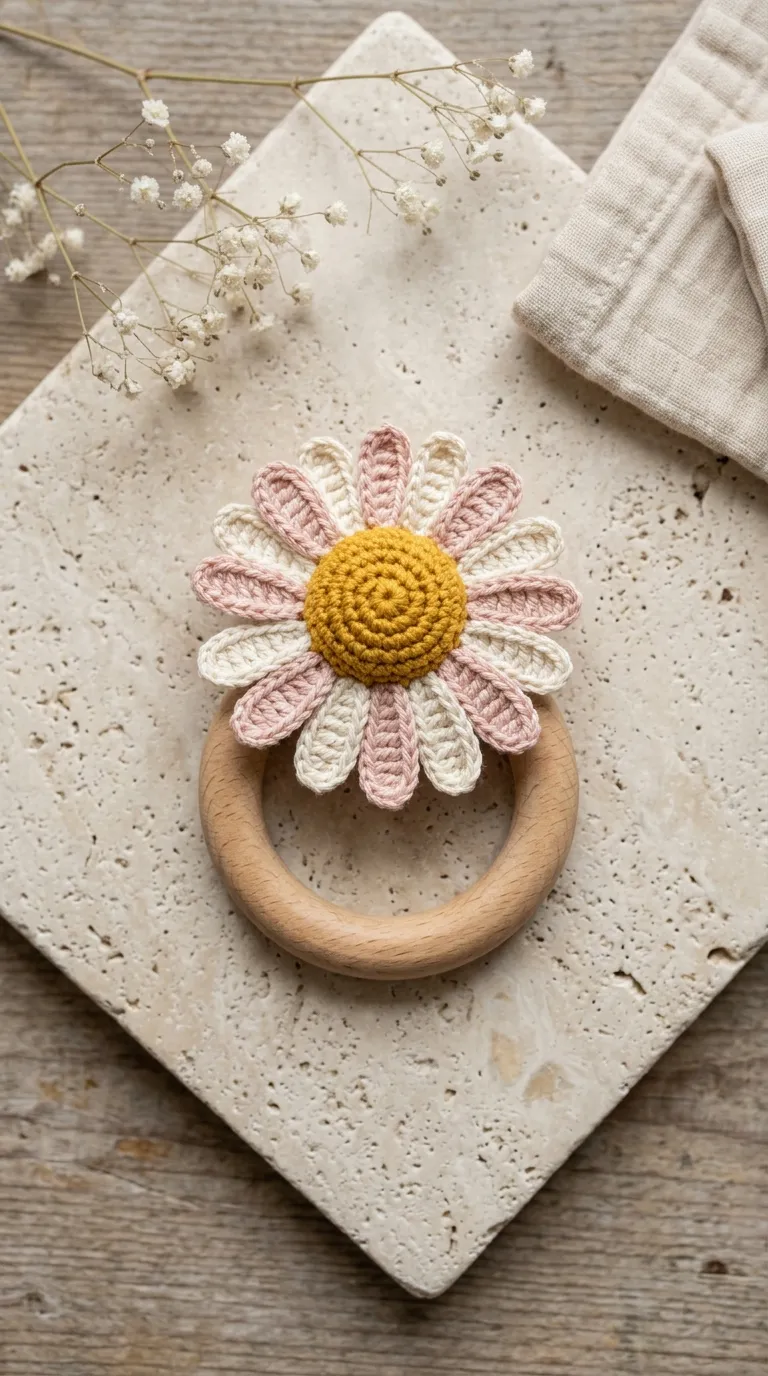
The pastel daisy blossom teether reimagines traditional floral motifs into a clean, modern, and baby-safe sensory accessory. This design features a raised, golden-yellow center disc surrounded by six to eight rounded, unstuffed white or pale blush petals that fan out along the top of the wooden ring. The flat petals frame the circular wooden ring naturally, creating a cohesive, balanced silhouette that feels light and open. Soft daisy styling brings a sweet, garden-inspired touch to nursery decor, coordinating beautifully with floral swaddles, warm wicker accents, and light wood furnishings. The individual flower petals remain flexible and unpadded, offering soft surfaces that infants can easily chew and explore. The raised golden center is stuffed firmly to create an appealing dimensional dome, offering a sturdy contrast to the surrounding petals and the smooth wooden base.
Begin by making the golden center of the blossom using warm mustard or pastel yellow cotton yarn. Work six single crochets into a magic ring, increasing over four rounds to twenty-four stitches, followed by two straight rounds to create a shallow, rounded dome. Pack this center piece with firm polyfill, then work decreases down to twelve stitches. Without fastening off, switch to crisp white or pale blush yarn to begin the surrounding petals. Work the petals directly into the front loops of the golden center: chain six, work single and half-double crochets back down the chain, slip stitch into the next base loop, and repeat this sequence around the circumference to form eight radiating petal shapes. Press the petals flat using your fingers to help them hold their shape. Crochet a matching white foundation strip around the top of the wooden ring, and secure the back of the blossom firmly to the band using hidden mattress stitches around the inner perimeter of the petals.
8. Woodland Bear with Contoured Snout
Read This:

Execution Process
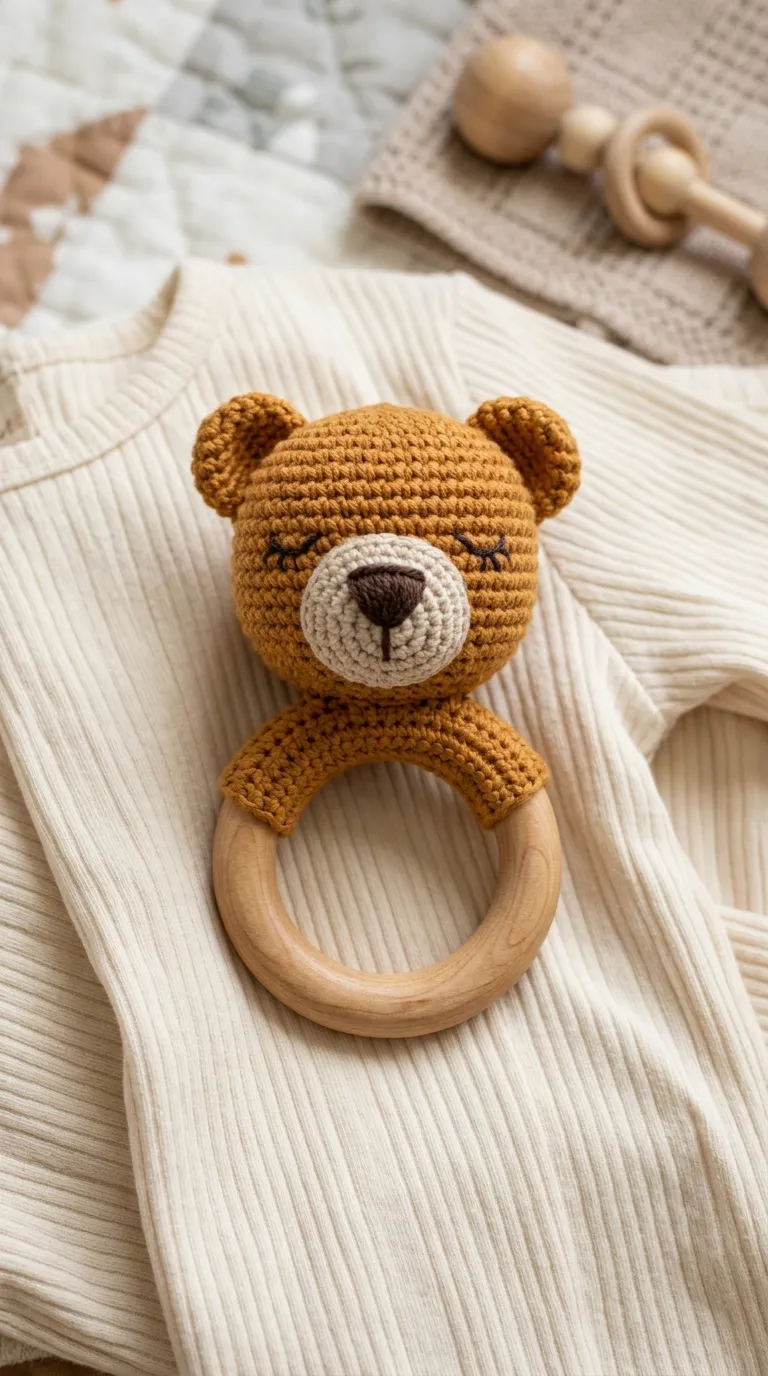
The woodland bear teether highlights clean, modern lines through a simple rounded head, a contrasting muzzle, and small rounded ears. Crocheted in rich camel, warm chocolate, or soft taupe yarn, the bear head brings a classic, grounded presence that feels timeless. The muzzle is shaped separately in an oatmeal tone, creating an appealing two-tone look that adds dimension to the face without requiring complex shaping. Simple embroidered sleeping eyes and a triangular satin-stitched nose give the bear a calm, peaceful look that avoids busy or sharp details. This versatile design suits rustic, woodland, and modern neutral nursery decor alike, pairing naturally with linen fabrics, woven storage baskets, and natural timber furniture. The sturdy, compact head provides a comfortable grip for little hands, while the durable, tight stitches ensure the teether easily withstands daily use.
Start by working the bear head in camel-colored cotton yarn, expanding in continuous single crochet rounds from six stitches up to thirty-six stitches. Continue for six even rounds to build vertical height. In a separate oatmeal yarn, crochet the snout by working an oval shape from a four-stitch foundation chain, increasing around the ends until twelve stitches are formed. Embroider a distinct inverted-triangle nose and a small vertical mouth line onto this snout using dark brown embroidery floss before stitching it to the lower third of the main head. Embroider two curved, sleeping eye arcs just above the snout line. Stuff the head firmly with polyfill, then work regular single crochet decreases to close the bottom opening. Crochet two small rounded ear cups, flattening them without stuffing, and sew them symmetrically to the upper head. Crochet a four-stitch-wide camel band around the wooden ring, and secure the finished bear head to this base using heavy cotton yarn, stitching through multiple loops to prevent any movement.
9. Modern Minimalist Ribbed Crescent Arch
Step-by-Step Guide
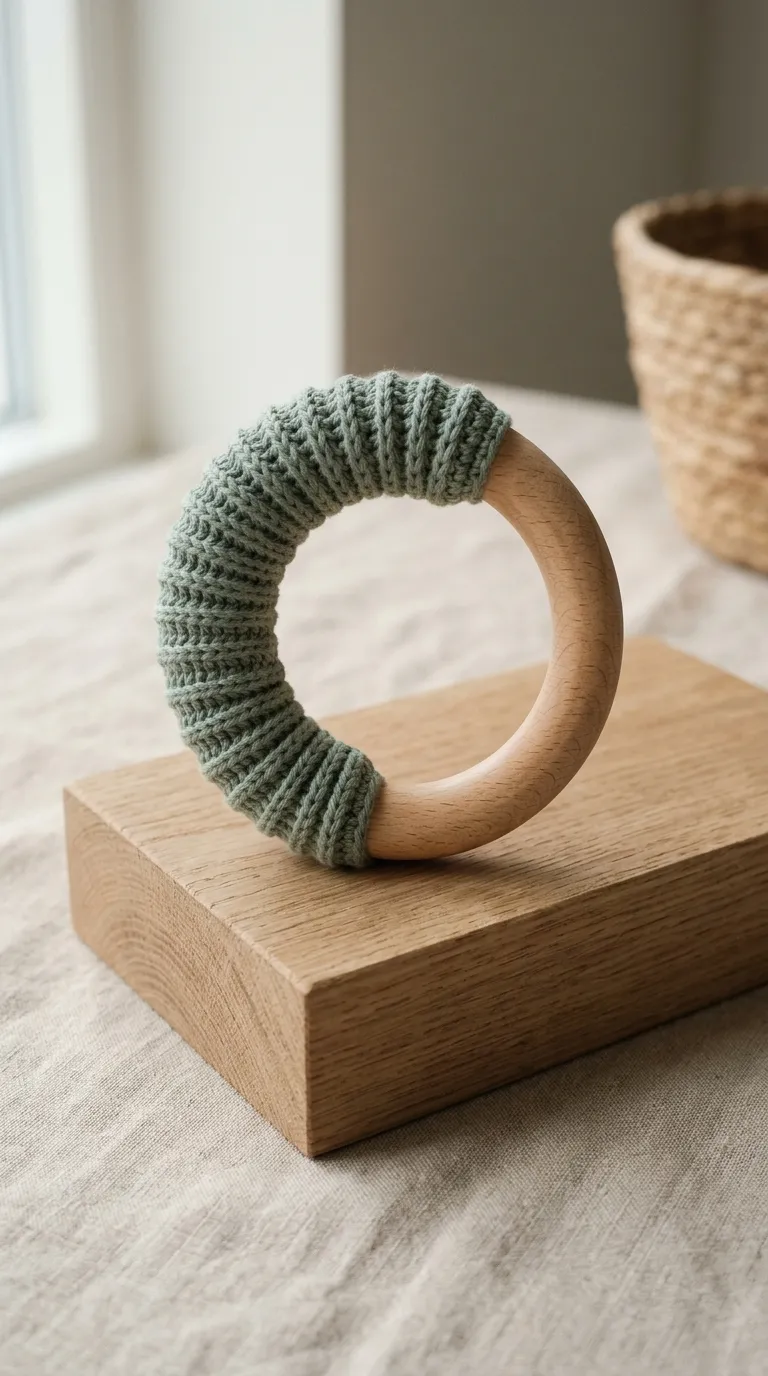
The modern minimalist ribbed crescent arch teether steps away from traditional animal faces in favor of pure geometric form and clean architectural lines. This contemporary design features an asymmetrical, curved crochet sleeve worked in a tactile ribbed stitch that hugs one side of the wooden ring. The sleeve tapers naturally from a wide center to narrow ends, creating an elegant crescent silhouette that frames the wood without hiding its natural grain. Choosing modern colors like muted sage green, terracotta, warm clay, or dusty slate creates a high-end look suitable for design-forward nurseries. Because this style features no animal elements or stuffed sections, it dries exceptionally quickly after washing, making it one of the most practical and low-maintenance options for daily use. The pronounced texture of the ribbed stitches provides satisfying relief for tender gums, giving this teether a purposeful, modern balance of form and function.
To make this ribbed crescent arch, use a two-and-a-half-millimeter hook and your choice of muted cotton yarn to chain twenty-five stitches, verifying that the chain length covers roughly one-third of your wooden ring circumference. Starting in the second chain from the hook, work rows of single crochet through the back loops only to create a stretchy, accordion-like ribbed fabric. On every fourth row, work short-row turns across the center twelve stitches only, leaving the outer edges unworked to create a natural curve that matches the round shape of the wooden ring. Continue this pattern until the ribbed strip wraps completely around the thickness of the ring. Slide the crocheted crescent onto the wooden ring, align the long edges along the inner curve, and seam the sides together using a tapestry needle and matching yarn. Weave all loose ends securely inside the ribbed ridges, ensuring the finished sleeve fits snugly around the wood without slipping or twisting during use.
10. Floating Cloud with Pastel Raindrop Accents
Read This:
Setup Method
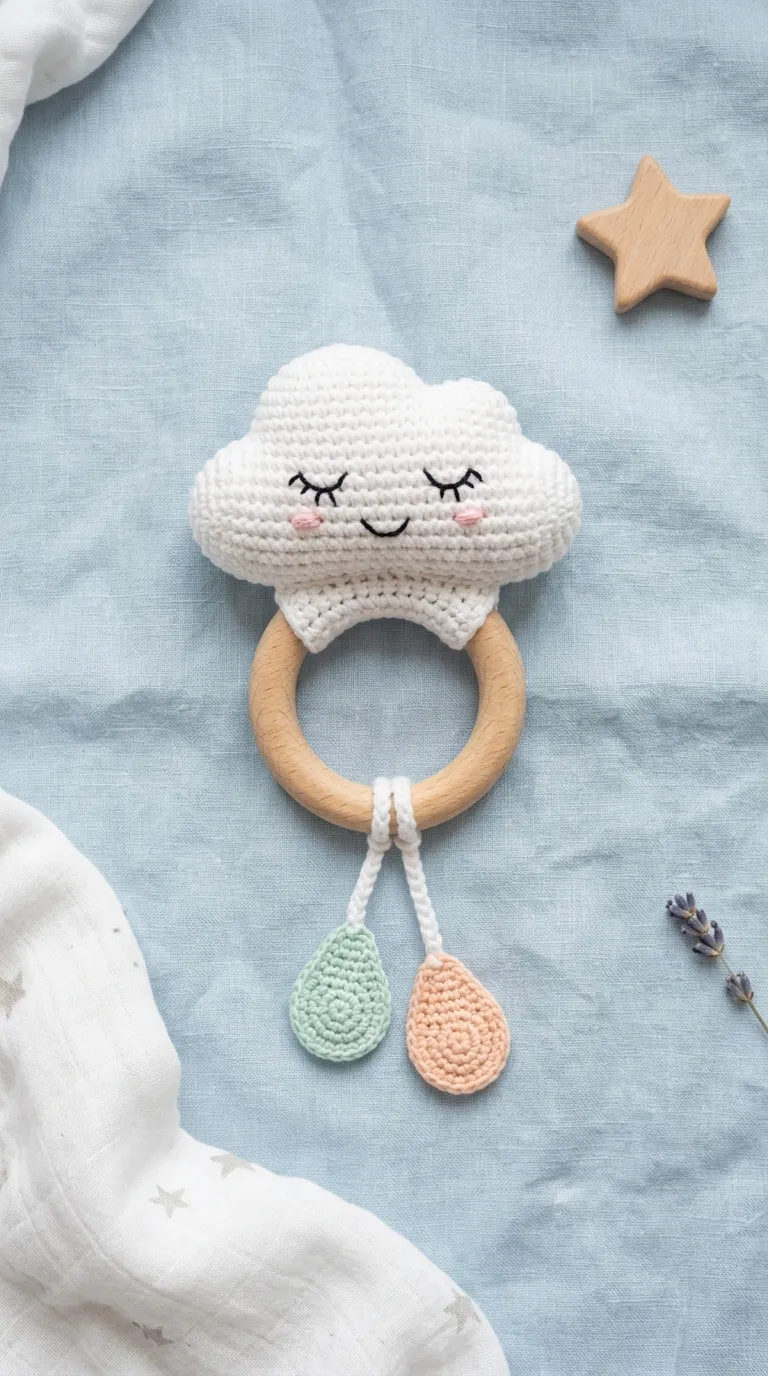
The floating cloud teether brings a light, dreamy atmosphere to modern nursery styling through its soft, puffy contours and sweet tactile details. The amigurumi centerpiece consists of a scalloped white cloud figure that perches atop the wooden ring like a soft cushion. Two petite, flat raindrops in muted pastel shades—such as soft sky blue, pale mint, or gentle peach—hang from short, securely anchored cords below the cloud, swinging gently as the baby moves the ring. The cloud is finished with simple embroidered sleeping eyes, giving it a peaceful, friendly expression. This celestial design is an excellent fit for whimsical nursery spaces, pairing effortlessly with mobile decor, star prints, and soft knit blankets. The puffy cloud provides an easy, comfortable grip, while the small dangling raindrops offer engaging shapes for little fingers to grasp, tug, and explore.
Begin by crocheting the cloud body using crisp white cotton yarn, starting with two separate small rounded domes that are joined together to form the outer puffs, followed by working even rounds around both sections to create an organic, lobed cloud shape. Embroider two small curved sleeping eyes across the center using light gray embroidery thread. Stuff the cloud gently with polyfill, keeping the profile soft and pillowy rather than hard, then decrease to close the lower edge. Next, crochet two small flat raindrops using soft blue or mint cotton yarn: work a tiny four-stitch ring, shaping a point at the top with a sequence of single and double crochets. Attach each raindrop to a short, four-centimeter braided cotton cord, stitching the top ends securely into the base of the cloud. Finally, crochet a wide white foundation band around the top curve of the wooden ring, and secure the cloud firmly to this band using hidden, reinforced stitches that run through both the cloud base and the raindrop attachment points.
Common Sourcing and Assembly Pitfalls to Avoid
A frequent mistake when making amigurumi teething rings is choosing treated, stained, or low-density softwoods that cannot withstand moisture from teething infants. Never use softwoods like pine, which can splinter, or rings coated in chemical varnishes, polyurethane finishes, or artificial glosses. Always source certified raw, untreated organic hardwoods like European beech or maple, smoothing the surfaces with natural, food-grade beeswax or organic coconut oil if light conditioning is desired. Another critical safety issue is using plastic safety eyes or small glued-on decorations. Even securely fastened safety washers can loosen over time under persistent chewing and regular washing, creating a severe choking hazard; always embroider facial features directly into the crochet fabric with colorfast cotton thread. In addition, using an oversized crochet hook can result in loose stitches that stretch over time, allowing internal polyester stuffing to poke through. To prevent this, always choose a hook that is one-half to one millimeter smaller than the yarn band recommends, creating a dense, firm fabric that keeps all stuffing safely sealed inside.
Practical Methods for Professional Assembly and Tension Control
Achieving a clean, professional finish on handmade teething toys requires firm stitch tension, durable seam joins, and careful finishing details. Use the yarn-under single crochet technique (x-stitch) rather than the standard yarn-over method when shaping amigurumi pieces; this technique produces tighter, more uniform square stitches that resist stretching under pressure. When anchoring three-dimensional figures to the wooden ring, never sew the piece directly onto the bare wood, as the yarn will slide around the ring and loosen the seams. Instead, always crochet a tight foundation band around the wooden ring first, using back-loop-only stitches or tight single crochets, and whip-stitch the seam closed with heavy cotton thread. Once this base band is anchored firmly to the wood, sew the amigurumi head directly to the fabric band using reinforced mattress stitches that pass through multiple structural loops. This two-part construction creates a stable, permanent anchor that prevents the head from wobbling or separating from the wooden ring, even through months of energetic use.
Nursery Presentation, Gifting, and Storage Ideas
Presenting and packaging handmade teething rings thoughtfully enhances their perceived value while keeping these baby accessories clean and protected. For baby shower gifts and boutique craft displays, place the teether inside an unbleached organic cotton drawstring bag stamped with a simple botanical logo, accompanied by a care card printed on recycled kraft cardstock detailing proper cleaning instructions. For lifestyle photography on visual platforms, photograph the teether flat on a natural linen blanket, styled beside a pair of soft knit baby booties, a wooden hairbrush, or a rolled muslin swaddle under soft, natural morning light to capture true yarn colors and wooden grain textures. In the nursery, store teethers in open cotton-rope baskets or shallow wooden trays on low shelves, keeping them easily accessible for daily play while doubling as charming nursery decor. Always remind parents to surface-clean wooden teethers using a damp cloth and mild soap rather than submerging the wood in water, preserving the smooth, natural wood grain for lasting use.
Planning Timelines and Material Budgeting
Organizing your supplies and production steps efficiently allows you to make batches of teething rings smoothly without unnecessary delays or excess costs. A typical amigurumi teether takes roughly two to three hours of hands-on work, split between crocheting the animal head, assembling small details like ears and snouts, hand-embroidering facial features, and sewing the final piece to the ring. Maximize your crafting time by working in focused, assembly-line stages: crochet several wooden ring bands in one session, prepare and stuff all the animal heads in the next, and complete all facial embroidery in a single final run. Buying untreated hardwood beech rings in bulk packs of twenty or fifty units significantly lowers your unit costs compared to buying single rings at retail craft stores. Keep a dedicated, organized craft basket stocked with your preferred two-and-a-half-millimeter hooks, tapestry needles, pre-cut lengths of embroidery thread, and non-allergenic polyfill, allowing you to pick up and work on small components whenever you have a few spare minutes.
Creative Expansions and Advanced Design Variations
Once you have mastered these core teething ring designs, you can explore advanced variations to add further sensory engagement to your nursery collections. Consider inserting a baby-safe, fully enclosed plastic rattle capsule into the center of the polyfill stuffing before closing the amigurumi head, adding a gentle sound element that stimulates auditory awareness. You can also experiment with dual-ring designs, linking a smaller forty-millimeter wooden ring to the main teething ring using a reinforced crochet strap to create an engaging, interactive motion toy. Another compelling direction is incorporating contrasting textures along the ring band, such as alternating sections of smooth cotton with plush bobble stitches or soft popcorn clusters to give sore gums varied surfaces to explore. You can also create coordinating baby shower gift sets, pairing your finished teether with a matching pacifier clip, a lightweight sensory blanket, or a classic amigurumi rattle worked in the same color palette. These thoughtful design touches help you build a distinctive, cohesive collection of baby essentials that are as practical and durable as they are charming.