Handmade crochet brings warmth, character, and texture into personal spaces, and few fiber art subjects offer as much creative potential as the regal peacock. Amigurumi peacocks combine structural yarn sculpting with vibrant color harmony, capturing the striking elegance of nature within accessible, plush forms. This comprehensive guide explores ten distinct amigurumi peacock project ideas designed to help crafters build decorative accents, functional nursery items, and tabletop conversation pieces. Readers will discover the foundational techniques needed to construct sturdy avian bodies, sculpt delicate crest feathers, and assemble eye-catching tail fans that hold their shape over time. Working through these step by step tutorials expands your knowledge of continuous round crocheting, flat motif assembly, fiber blending, and tension management. Whether your goal is producing an artistic heirloom keepsake or a charming desk companion, peacocks provide an expansive palette of deep teals, shimmering blues, rich emeralds, and warm golds. Each concept detailed in this article emphasizes clear construction methods, allowing you to transform basic yarn skeins into sophisticated handmade decoration pieces that elevate your home decor while refining your crochet skills.
Why This Idea Is Trending or Useful
Amigurumi peacock designs consistently attract attention across modern design boards due to their unique balance of dramatic aesthetics and versatile practical value. In an era where handcrafted textile art is increasingly celebrated within contemporary interior styling, these avian creations provide an immediate pop of organic color that enlivens neutral living spaces. The DIY appeal rests in the adaptability of the bird’s signature tail feather pattern, which crafters can scale up for bold statement pieces or down for compact pocket charms. For beginners, tackling a peacock project offers a structured path toward mastering essential three-dimensional crochet mechanics without becoming overwhelming. Because the animal naturally separates into modular components—such as the body, neck, head crown, and independent tail feathers—makers can complete small sections at their own pace before moving to final assembly. This modularity makes it a remarkably beginner friendly project that yields intricate-looking results. Beyond pure ornament, finished peacocks serve practical functions as sensory baby toys, nursery mobile accents, decorative curtain tiebacks, and memorable gifts, proving that expressive creative ideas can merge seamlessly with functional home styling.
Materials and Preparation
Achieving clean definition and structural stability in amigurumi peacocks requires careful material selection and systematic preparation of your workspace. Mercerized or unmercerized sport-weight to worsted-weight cotton yarn is the ideal choice for bird sculptures because cotton does not stretch out of shape, produces crisp stitch definition, and prevents internal fiberfill from migrating through stitches. Select an ergonomic crochet hook sized down from the yarn label recommendation, typically 2.5 mm or 3.0 mm, to ensure tight fabric tension. Essential tools include a blunt tapestry needle for seamless seaming, locking stitch markers to track spiral rounds, sharp embroidery scissors, and non-allergenic polyester stuffing. You will also need galvanized craft wire or plastic-coated pipe cleaners if you plan to create posable necks or structural tail fans. Prepare your creative space by laying out your saturated teal, royal blue, emerald green, and gold yarn skeins alongside your notions on a clean surface. Pre-winding your yarn into center-pull cakes prevents tangling during complex color changes, while sketching out the desired placement of components ensures balanced assembly during the final construction phases.
1. Minimalist Desktop Peacock Figurine

Step-by-Step Guide
The minimalist desktop peacock figurine focuses on clean lines, compact proportions, and modern design balance suitable for small workspaces and bookshelves. This concept strips away overly complicated lace textures in favor of an egg-shaped body, an alert upright neck, and a neat semi-circular tail fan that rests flush behind the torso. The design emphasizes solid color blocks, featuring a deep royal blue body contrasted with a smooth emerald tail framed by understated golden borders. Because the base is broad and weighted, the figurine balances securely on flat surfaces without tipping over or leaning forward. This approach fits seamlessly into modern home decor environments that prioritize uncluttered surfaces and clean craft execution. Beginners benefit from the simplified geometry, as the entire sculpt relies on foundational single crochet increases and decreases worked in continuous rounds. The compact size also makes it an exceptionally fast project for testing color combinations before tackling larger textile sculptures.
Begin by crocheting the bottom-weighted torso using rich royal blue cotton yarn and a 2.5 mm hook, working six single crochet into an adjustable magic circle and increasing steadily until you reach a thirty-six-stitch base. Insert a small fabric pouch filled with plastic poly-pellets or clean craft stones into the lower cavity to provide ballast, then fill the remainder of the body with dense polyester fiberfill. Continue tapering the upper rounds inward to form a slender, upright neck that transitions directly into the rounded head, stuffing firmly as you progress. For the tail, crochet five identical tear-shaped feather motifs in bright emerald green with royal blue centers, joining them side-by-side along their lower edges using a single crochet border worked in shimmering gold yarn. Whipstitch the joined tail fan securely against the rear curvature of the blue body using a tapestry needle. Embroider two subtle sleeping eyes with black thread and top the head with three wire-supported loop stitches.
2. Realistic Standing Peacock with Wire Armature

Read This:
How to Create
The realistic standing peacock with wire armature replicates the regal, high-stepping posture of Indian blue peacocks found in classical botanical gardens. Unlike rounded, cartoon-like plush toys, this advanced design incorporates an internal galvanized wire skeleton that runs from the wire-wrapped feet up through the legs, spine, and long, curved neck. This internal support system allows you to articulate the bird’s stance, tilt the head curiously, and balance the weight of an expansive fan without causing the neck to sag. The aesthetic value lies in authentic anatomical proportions: a slender chest, a backward-sloping back, and an elaborate crown crest made of delicate thread strands topped with tiny crochet droplets. This project appeals to intermediate crafters looking to move beyond simple amigurumi into structural textile sculpture. The finished piece makes an extraordinary mantle display, tabletop centerpiece, or curated gallery shelf feature.
To build the internal skeleton, cut two sixteen-inch lengths of sixteen-gauge craft wire, twisting them together at the midpoint to form a central spine while leaving the lower ends free to shape into three-toed bird feet. Wrap the wire feet tightly with fine floral tape, followed by close spirals of pale gray embroidery floss secured with clear textile glue. Crochet the bird’s body around this central wire armature, starting at the chest with royal blue yarn, stuffing firmly around the metal core to keep the wire centered within the fiberfill. Shape the long neck with gradual decreases, curving the internal wire into an elegant S-shape before closing the head. Crochet a multi-layered train featuring twelve individual ocellus eye feathers created with nested rings of turquoise, bronze, dark blue, and emerald green yarn. Hand-sew the feather shafts in overlapping layers along the back of the torso, securing the root firmly to the bird’s spine.
3. Sensory Nursery Peacock Rattle

Execution Process
The sensory nursery peacock rattle reimagines the magnificent plumage of the bird as an interactive, baby-safe developmental toy for infant play. This design combines varied tactile textures, auditory feedback, and contrasting colors to stimulate a baby’s developing senses while maintaining clean aesthetic appeal. The head and neck serve as an ergonomic handle sized comfortably for tiny clutching hands, while the tail consists of five flat, petal-like feathers that crackle and rattle when touched. Using organic unmercerized cotton yarn guarantees a gentle, chemical-free surface that is safe for teething and easy to clean in the washing machine. All facial features and feather eyes are thoroughly embroidered directly onto the crocheted fabric using cotton floss, eliminating hard plastic components to ensure complete child safety. The charming design bridges playful nursery decor with functional early-learning toy design, making it an exceptional handmade gift for baby showers.
Commence by crocheting the handle-style neck and head using soft cyan or light teal organic cotton yarn, keeping the stitches exceptionally tight to prevent internal stuffing from shifting out. Insert a sealed plastic rattle insert into the center of the head, surrounding it with soft hypoallergenic fiberfill before stitching the neck closed. For the sensory tail, crochet ten flat teardrop motifs in contrasting mint green and soft lavender shades, pairing them into five double-layered feathers. Before sealing the perimeter of each feather with a slip-stitch seam, insert a layer of clean, food-grade crinkle film between the two crocheted panels to produce an engaging rustling sound during play. Embroider simple circular eyes onto the face with charcoal embroidery floss, ensuring all knot tails are drawn deep inside the head. Attach the five crinkly feathers firmly in a row across the base of the handle using heavy-duty cotton thread, double-knotting all attachment points securely.
4. Vintage Fan Peacock Bookend

Read This:

Setup Method
The vintage fan peacock bookend combines nostalgic charm with functional everyday utility, serving as a weighted decorative anchor for personal book collections. This project utilizes an expansive, fan-shaped tail that rests flat against a solid vertical surface, supporting books while displaying ornate crochet lace stitches reminiscent of Victorian doilies. By integrating a weighted internal brick or heavy wooden block within the lower body, the sculpture gains the necessary mass to hold thick hardcovers upright on open shelving. The deep jewel-toned color palette—featuring navy, moss green, deep copper, and mustard—matches moody home decor aesthetics and rustic library spaces. This design gives crafters an opportunity to experiment with openwork lace patterns, picot edges, and post-stitch ribbing within a three-dimensional amigurumi framework, producing a distinguished household accent that feels sophisticated and practical.
Prepare the foundational base by wrapping a clean half-brick or dense wooden mounting block in batting and enclosing it within a snug, rectangular single-crochet sleeve worked in deep navy yarn. Crochet the seated peacock breast and neck as a half-sculpture that seamlessly branches out from the front panel of the fabric-covered block, shaping the head with smooth increases and stuffing firmly with dense fiberfill. To construct the sweeping bookend tail, switch to openwork lace techniques, crocheting a large semi-circular doily fan using moss green and copper yarn, incorporating shells, clusters, and picot edging across fifteen expanding rounds. Starch the completed lace fan using liquid fabric stiffener and block it flat on a foam board with rustproof pins until completely rigid. Once dried, sew the bottom straight edge of the stiffened fan securely to the back of the weighted base, reinforcing the seam with clear craft adhesive along contact points.
5. Petite Peacock Pocket Pal Keychain
Step-by-Step Guide
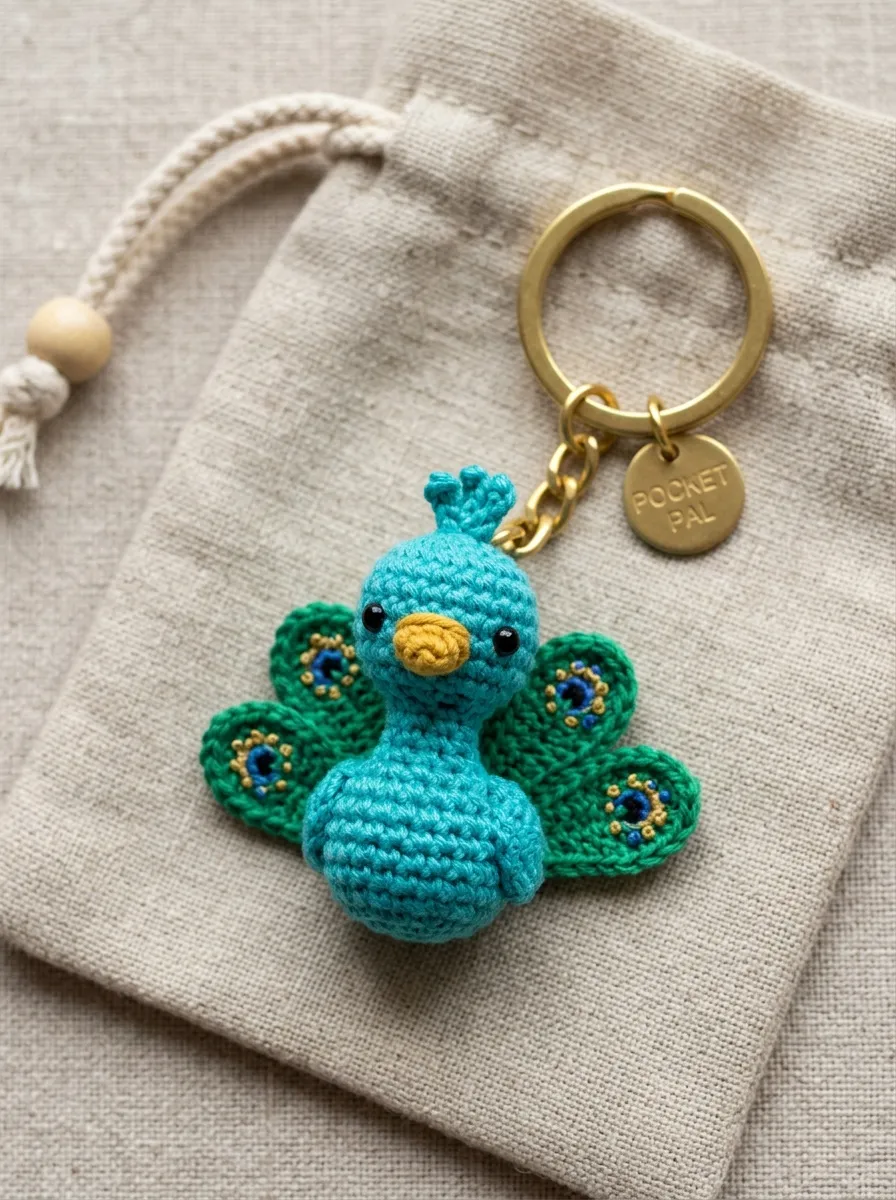
The petite peacock pocket pal keychain is an easy project tailored for crafters who enjoy rapid, portable creations that use up scrap yarn. Measuring roughly two and a half inches in height, this miniature bird simplifies the iconic peacock silhouette into an adorable, palm-sized character suitable for bag charms, zipper pulls, and keyrings. The entire body is worked in one continuous piece from top to bottom, minimizing the sewing of separate limbs and appendages. The plumage is represented by a small three-feather cluster attached to the back, accented by miniature embroidered French knots that suggest the iridescent eye patterns of full-sized feathers. Because it consumes minimal yarn, this project is ideal for scrap-busting leftover blue, teal, and gold fibers from larger textile endeavors. The finished charm brings a playful, handmade touch to everyday carry items while remaining sturdy enough to handle friction inside bags and pockets.
Using a fine 2.0 mm crochet hook and sport-weight turquoise cotton yarn, begin at the top of the head with six single crochet in a magic ring, working four rounds even before shaping the beak. Work a tiny three-stitch bobble in golden yellow yarn directly into the fifth round to form an integrated beak, continuing in turquoise to shape the cheeks and tapered neck. Expand the lower body into a rounded sphere, pausing to insert six-millimeter black safety eyes on either side of the beak before filling the cavity with fiberfill. Close the bottom base cleanly with an invisible decrease round. Crochet three tiny, two-inch flat oval feathers using bright emerald yarn, finishing each with a single gold French knot near the tip. Group the feathers in a tight fan, sew them to the lower rear of the body, and securely anchor a heavy-duty split-ring keychain through the crown of the head.
6. Whimsical Hanging Peacock Wall Planter

How to Create
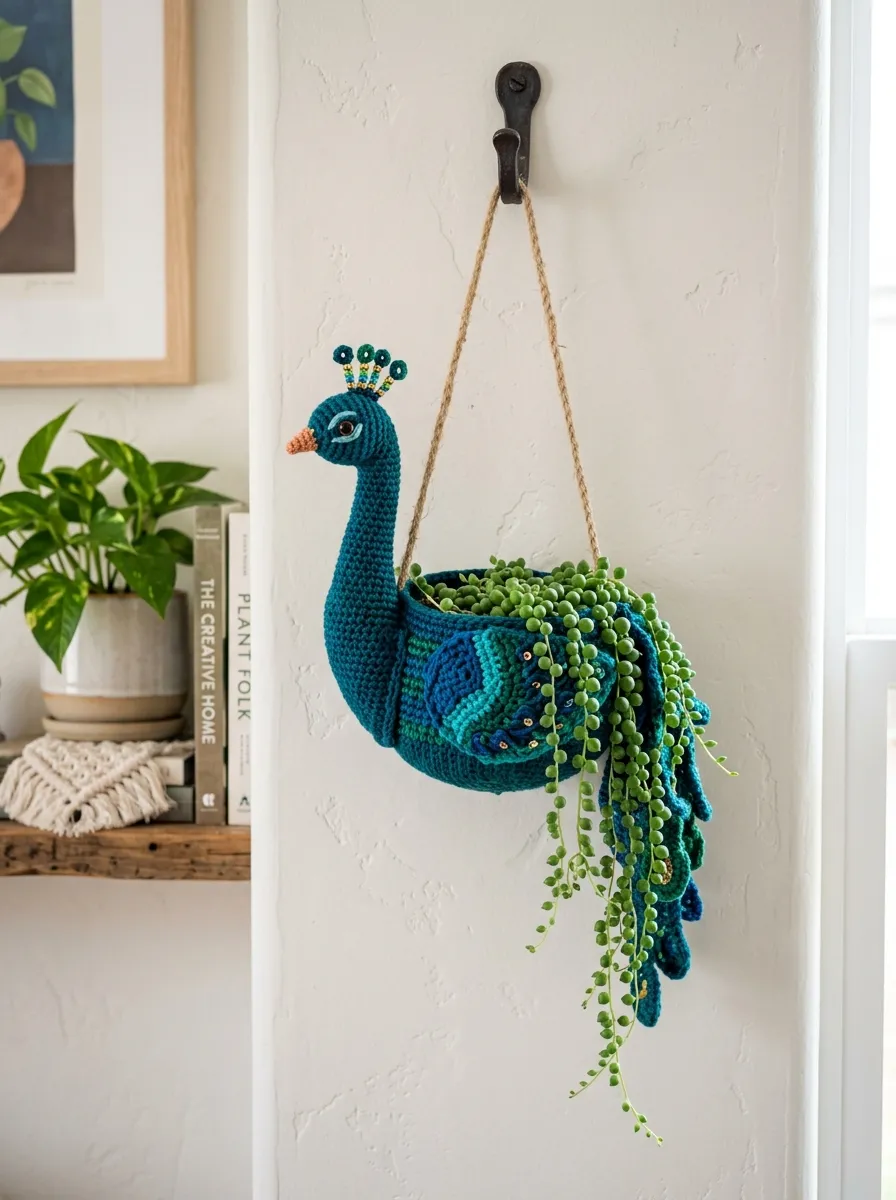
The whimsical hanging peacock wall planter combines the popularity of indoor houseplants with playful three-dimensional textile sculpture. In this unique design, the body and breast of the peacock are crocheted to form a rounded, open basket pocket that holds a small potted succulent, trailing ivy, or air plant. The plant’s trailing green vines cascade outward from the top opening, creating living, organic tail feathers that spill toward the floor. An amigurumi neck and head rise from the front rim of the basket, while the side wings hug the container to complete the illusion of a resting bird. This project transforms ordinary vertical wall spaces into dynamic indoor garden features. It is well-suited for crafters who enjoy functional home decor projects that combine fiber arts with natural botanical elements, adding personality to sunrooms, craft studios, and kitchen herb corners.
Select a durable, non-stretching natural hemp or heavy worsted cotton cord in teal blue, working with a 3.5 mm hook to create a dense, rigid fabric. Crochet a flat circular base six inches in diameter, then work continuous even rounds in back-loop-only stitches to build the upright cylindrical planter walls to a height of five inches. Along the front third of the top rim, crochet an amigurumi peacock neck and head that curves upward gracefully, inserting a small length of flexible aluminum craft wire through the neck to hold its alert shape. Crochet two textured leaf-shaped wings in navy and forest green, stitching them to the exterior sides of the planter basket. Fasten a sturdy three-strand braided hanging cord to the top edges of the basket, insert a lightweight plastic liner pot containing your favorite trailing plant, and suspend the finished wall planter from a secure screw hook.
7. Royal Peacock Feather Accent Cushion

Execution Process
The royal peacock feather accent cushion elevates standard throw pillows through the application of dimensional, crocheted amigurumi appliques. This project centers on a smooth, solid-colored woven fabric or crochet pillow base, adorned with an overlapping spiral array of three-dimensional peacock eye feathers that radiate from the center. Each individual feather features a padded, raised central ocellus that lifts off the background fabric, creating an inviting textural surface that catches dynamic room lighting. The rich palette of cobalt, turquoise, olive, and metallic bronze brings depth to living room sofas, bedroom reading chairs, and entryway benches. This method provides an accessible path for beginners who want to craft large home decor accents without crocheting an entire bulky cushion from scratch, allowing for modular assembly and relaxed weekend stitching.
To begin this project, prepare an eighteen-inch square cushion cover using a neutral linen, velvet, or plain single-crochet fabric. Next, crochet sixteen individual peacock eye feather appliques using sport-weight yarn in dark purple, vibrant cyan, olive green, and shimmering bronze. For each feather, crochet a small dimensional oval center, lightly stuffing the cavity with a pinch of fiberfill before closing the back loops to create a domed eye. Surround the domed center with concentric oval rounds of half-double and double crochet stitches, ending with an outer border of feathery picot extensions worked in rich emerald green. Pin the completed feather appliques onto the front face of the pillow cover in an overlapping circular fan pattern. Using a matching fine sewing thread and sharp hand needle, carefully hand-stitch the outer perimeters of each feather securely to the pillow fabric before inserting an eighteen-inch down or synthetic cushion form.
8. Graceful Peacock Curtain Tieback
Read This:

Setup Method
The graceful peacock curtain tieback is an ingenious functional accessory that introduces handcrafted character to window treatments. This design features a slender, elongated amigurumi peacock whose flexible neck, body, and tail wrap securely around bundled drapery fabric, fastening discreetly with a hidden magnetic snap or wooden toggle button. The bird’s chest rests prominently against the front of the curtain, while its layered, elongated tail fan wraps around to hold the fabric gather in place. The tailored, functional nature of this project makes it an ideal housewarming gift that adds an artistic focal point to living rooms, formal dining spaces, and guest bedrooms. Crafters can easily tailor the colors to complement existing curtain textiles, selecting muted sage and cream for neutral rooms, or deep sapphire and gold for dramatic, formal drapery.
Crochet the peacock body as an elongated, slender cylinder measuring ten inches in length using worsted-weight royal blue cotton yarn and a 3.0 mm hook. Leave the central core pliable by stuffing it lightly with fiberfill, inserting an internal eighteen-inch floral stem wire wrapped in cotton batting to allow the body to bend easily around thick curtain bundles. Crochet a well-defined head with a curved beak, attaching it to the upper end of the flexible body, and add delicate embroidered facial details and a tiny yarn crest. For the tieback tail, crochet five elongated strap-style feathers in rich turquoise, finishing each end with a flat round medallion worked in deep emerald and bronze. Sew strong neodymium magnetic clasp discs inside the tip of the head and the underside of the tail fan, ensuring the magnets align and snap together firmly when the bird is wrapped around your window curtains.
9. Nesting Peacock Vanity Catchall Dish

Step-by-Step Guide
The nesting peacock vanity catchall dish functions as an elegant organizational vessel for rings, earrings, loose keys, and daily jewelry items. The bottom of the bowl is crocheted in a flat, dense spiral using stiff cotton yarn to create a sturdy, flat-bottomed tray, while the curved peacock head and neck rise from one side of the rim to serve as a designated ring post. The rear rim of the bowl flares upward into a scalloped, shell-patterned tail fan that frames the contents of the dish. Working with multiple strands of yarn or utilizing specialized thermal crochet stitches ensures the bowl walls remain firm and upright without collapsing during daily use. This compact organizer is a charming addition to bedside nightstands, bathroom vanities, and entryway console tables, keeping daily essentials tidy while showing off your handmade style.
Begin by holding two strands of fine mercerized cotton yarn together using a 3.0 mm crochet hook, working six single crochet into a magic ring using dark teal yarn. Expand the circle in flat, concentric rounds until the base measures five inches across, keeping your stitch tension firm to produce a rigid, sturdy fabric. Work two rounds in back-loop-only single crochet to establish a sharp ninety-degree angle, then continue working upward for five rounds to form the shallow vertical bowl sides. Along a two-inch section of the front rim, crochet an amigurumi peacock neck and head that extends upward three inches, stuffing it firmly with fiberfill so it remains completely rigid to hold rings securely. Along the opposite rear rim, work five expanding rows of shell stitches in alternating emerald and gold yarn to form the flared decorative tail fan. Weave in all loose ends tightly along the underside of the base to finish the catchall.
10. Regal Peacock Celebration Tree Topper

Read This:

How to Create
The regal peacock celebration tree topper provides a luxurious, dramatic crowning element for seasonal holiday trees, botanical decorative swags, and festive centerpieces. Designed with a hollow conical base hidden beneath the plumage, the peacock mounts securely over the central branch of an artificial or natural pine tree, resting poised at the summit. The bird’s expansive, multi-tiered tail drapes down the upper branches of the tree, blending the rich jewel tones of handcrafted crochet with green pine needles. Accents of metallic gold thread, sparkling crystal beads, and rich peacock eye motifs create an opulent, luminous presentation that catches glowing holiday tree lights. This advanced, heirloom-quality project offers seasoned crafters an ambitious canvas for combining structural cone foundations, bead crochet accents, and intricate feather layering, creating a treasured family heirloom brought out year after year.
To construct the base, crochet a sturdy eight-inch hollow cone in deep navy yarn, working stiff, tight stitches from the pointed tip downward to establish a four-inch circular opening at the base. Crochet a separate fully three-dimensional peacock torso and neck in brilliant sapphire blue yarn, sewing it firmly to the upper shoulder of the cone so the bird appears perched proudly on the summit. For the cascading train, crochet twelve individual elongated feathers of varying lengths from six to twelve inches, incorporating fine metallic gold embroidery thread alongside royal blue, emerald, and bronze yarn. Thread tiny clear glass seed beads onto the gold thread before stitching, sliding a bead into the center of each picot edge stitch to catch ambient tree lights. Arrange the completed feathers in three cascading, overlapping tiers down the back of the conical base, sewing them securely to the fabric to complete the topper.
Common Beginner Mistakes and How to Avoid Them
When crocheting amigurumi peacocks, crafters frequently encounter unique structural and assembly challenges that can detract from the beauty of the finished piece. The most common error is loose stitch tension, which causes the fabric to stretch under the weight of internal stuffing and exposes white polyester fiberfill through the gaps. To eliminate this issue, always downsize your hook by at least one full size below the yarn label’s suggestion, ensuring dense, opaque single crochet stitches. Another frequent mistake is neglecting internal weight and balance; because peacock tail fans are naturally heavy and expansive, birds without weighted bases or wire supports often tip over backward. Prevent this by placing poly-pellet pouches or clean smooth stones inside the lower torso before closing the body rounds. Novice makers also struggle with curling tail feathers; flat crochet motifs naturally cup when stitch counts are inaccurate. Block all flat feather pieces thoroughly using steam or wet blocking boards before sewing them together. Finally, avoid placing safety eyes unevenly on the head; use locking stitch markers to plan eye placement symmetrically on either side of the beak before permanently securing the washers.
Practical Tips for Better Results
Achieving professional, boutique-quality finishes on amigurumi peacocks requires careful attention to detail during both the stitching and assembly phases. Always use the invisible decrease technique instead of a standard single crochet decrease when shaping the neck and head curves; by working into the front loops of two adjacent stitches, you eliminate unsightly bumps, gaps, and fabric distortions. When executing the many color transitions required for the peacock’s eye feathers, complete the final yarn-over of the preceding stitch with the new yarn color to produce clean, sharp color boundaries without visual bleeding. Invest in a collection of long, pearl-headed pins to position and hold every feather, wing, and crest component firmly in place before picking up your tapestry needle. This allows you to evaluate the overall symmetry, balance, and proportions of the bird from multiple angles. When finishing the piece, lightly mist the completed tail plumage with a solution of water and clear fabric stiffener to help the feathers hold a crisp, upright fan shape without wilting over time.
Styling, Presentation, or Organization Ideas
Effectively styling and presenting your finished amigurumi peacocks enhances their artistic value, transforming individual crochet projects into cohesive, eye-catching home decor moments. When photographing these pieces for online inspiration platforms or personal craft portfolios, stage the birds in front of neutral, textured backdrops—such as natural light linen, painted plaster, or raw light-toned wood—which allows the deep teals, emeralds, and shimmering golds of the plumage to take center stage. Incorporate complementary natural elements into the scene, such as polished brass candle holders, fresh monstera leaves, or vintage hardback books, to ground the whimsical bird within a sophisticated interior aesthetic. If you are gifting a peacock creation, place the bird inside an open kraft paper basket lined with unbleached crinkle paper, accompanied by an artisan card detailing yarn fiber contents and washing instructions. For storing your handmade pieces safely, keep them inside clear, breathable cotton bags or closed glass cloches to protect the delicate feather crests and surface fibers from airborne dust, ensuring your heirloom creations maintain their vibrant color and crisp shape for years.
Budget or Time Planning
Crafting detailed amigurumi peacocks can be both budget-conscious and time-efficient when organized with a clear, step by step production plan. Because peacocks feature modular designs requiring multiple colors, you do not need to buy full-sized skeins of every shade; instead, purchase mini skein packs or source small scrap bundles from your existing yarn stash for the accent colors in the feather eyes and crests. To streamline your production schedule, adopt a batch-crafting workflow rather than completing one piece from start to finish. Dedicate your first session entirely to crocheting all the small modular units—such as the ten or twelve individual feather centers—followed by a second dedicated session for completing the bodies and stuffing. This grouping of repetitive tasks builds muscle memory, speeds up your crochet rhythm, and significantly cuts down on overall creation time. A petite desk peacock can easily be completed within an afternoon of four to five hours, while elaborate wired centerpieces or tree toppers typically require ten to twelve hours of focused stitching spread comfortably across a weekend.
Creative Expansion and Advanced Inspiration
Once you feel confident executing basic amigurumi peacock structures, you can explore advanced artistic variations that push your creative boundaries and elevate your textile work. Experiment with combining different fiber types in a single piece, pairing smooth, matte cotton yarn on the body with fine silk or metallic lurex threads in the tail fan to mimic the natural iridescence of real peacock plumage. You can also explore micro-crochet techniques, using fine lace-weight sewing thread and a 0.75 mm steel hook to scale down these project patterns into miniature, intricate earrings, brooches, or charm pendants. Another compelling artistic avenue is integrating mixed-media components, such as mounting your crocheted peacock onto a natural driftwood branch, embedding tiny turquoise mineral beads along the feather stems, or incorporating real preserved peacock feathers into the back of a hand-sculpted textile bust. By viewing these amigurumi patterns as creative jumping-off points, you can continually develop unique, heirloom-quality art pieces that express your evolving personal style while celebrating the boundless charm of handmade fiber craft.