Handmade infant accessories blend functional developmental support with timeless textile artistry. An amigurumi teether represents an exceptional handmade decoration and functional sensory toy that pairs natural, untreated hardwood rings with soft, tightly crocheted cotton yarn. This complete guide delivers actionable creative ideas, structural assembly methods, and practical crochet techniques to craft heirloom-standard infant teething rings. Readers will explore ten distinct thematic concepts, essential fiber choices, safety-first joinery, and ergonomic configurations tailored for tiny hands. Unlike plastic commercial products, crocheted wooden teethers provide varied tactile feedback that soothes aching gums while encouraging early motor grasp reflexes. The craft relies on accessible single crochet stitches worked in continuous spirals, paired with sturdy slip-stitch seaming methods that any beginner can master. By examining each stage of creation—from selecting food-grade beechwood rings to embroidering secure facial details without hard parts—you will gain the foundational knowledge required to design safe, beautiful, and enduring infant teething accessories with total confidence.
Why This Idea Is Trending or Useful
Artisanal baby gifts and organic nursery accessories dominate contemporary Pinterest ideas because modern caregivers prioritize non-toxic materials, sustainable craftsmanship, and minimalist style over mass-produced goods. Amigurumi teethers address this design movement by pairing bare, splinter-free natural wood with organic cotton yarn in muted, earthy color palettes. From a functional perspective, the contrast between the firm wooden perimeter and the soft, textured crochet surface provides dual sensory relief for teething infants. The circular wooden ring serves as an intuitive, ergonomic handle that babies can grip, shake, and bring to their mouths independently. For makers, this easy project represents a practical, budget-friendly endeavor that requires minimal yarn yardage and basic tools, making it accessible to crochet novices. Furthermore, these compact toys double as charming nursery decor accents when hung on wooden display pegs or arranged in baby shower gift baskets. The combination of clean aesthetic appeal, developmental value, and genuine utility ensures that handmade amigurumi teethers remain an enduring trend in baby decor and handcrafted gift giving.
Materials and Preparation
Executing a durable and infant-safe teething ring requires specific materials chosen for safety, washability, and tactile comfort. Select sport or DK weight, unmercerized organic cotton yarn; untreated cotton fibers absorb moisture without shedding lint and remain breathable against delicate skin. Pair this yarn with an ergonomic crochet hook sized half a millimeter smaller than the manufacturer’s label indicates, typically between 2.25 mm and 2.75 mm, to ensure dense, gap-free stitches that completely contain internal polyester stuffing. Procure natural, unsealed, and untreated beechwood rings measuring between 2.5 and 3 inches in outer diameter, ensuring the wood is sanded silk-smooth without chemical varnishes or lacquers. Gather sharp thread snips, a blunt-tipped steel tapestry needle, hypoallergenic polyester fiberfill, and a non-toxic water-resistant fabric marker. Begin your preparation by wiping the wooden rings clean with a damp cloth and drying them thoroughly. Organize your yarn into tangle-free center-pull skeins, inspect the rings for surface flaws or micro-splinters, and pre-plan color combinations on paper to ensure a cohesive color story before casting your starting chain.
Idea 1: Sweet Woodland Fawn Ring
How to Make
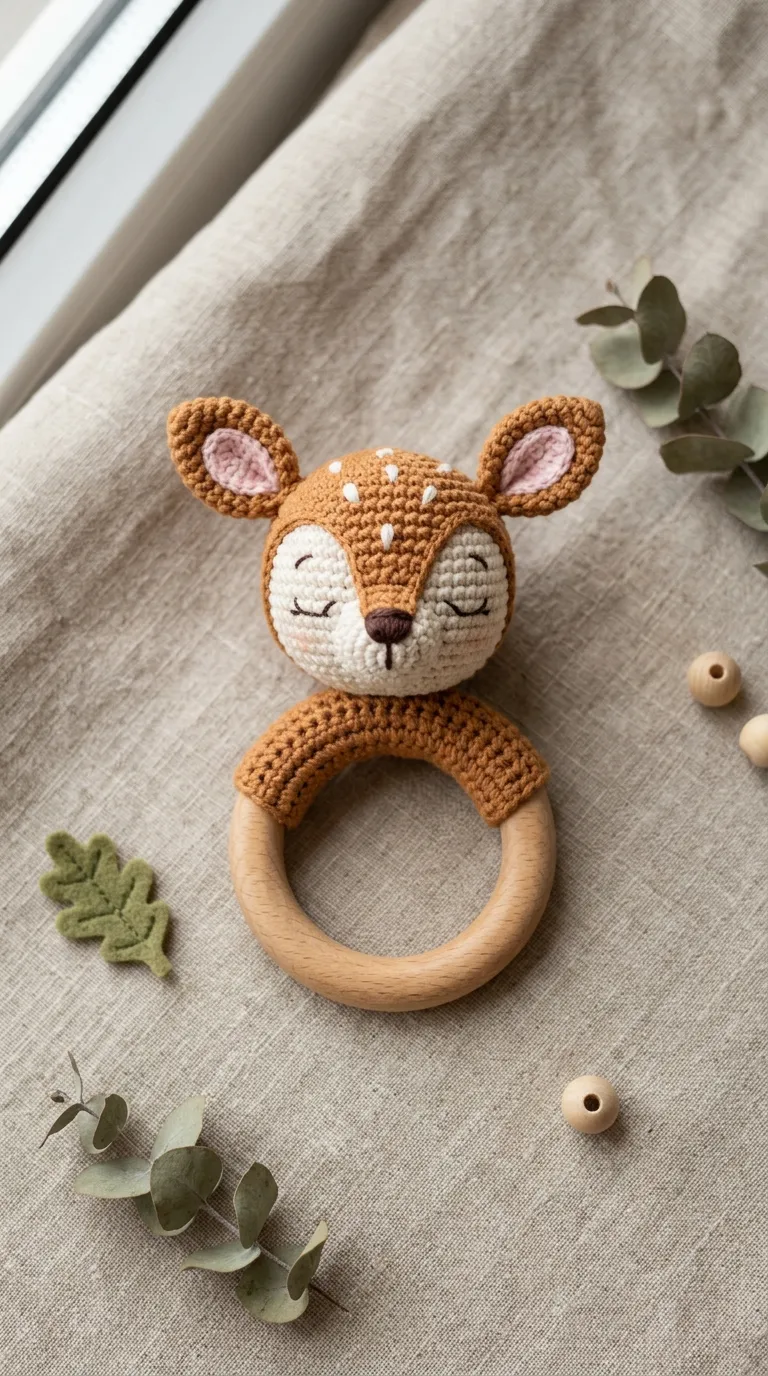
The sweet woodland fawn teether captures pastoral charm through a stylized deer head mounted seamlessly onto an organic wooden base. This design relies on warm fawn brown, creamy white, and soft oatmeal tones to establish an earthy, gender-neutral aesthetic suited for rustic nurseries. The deer head is kept compact and lightweight, ensuring it does not tip the wooden ring forward when an infant holds it. Tiny rounded ears and miniature spotted embroidery introduce delicate textural variety across the top of the ring. Emphasizing soft curves and smooth transitions between the snout and cranium gives the fawn an approachable, gentle appearance. The open lower ring remains completely accessible for biting, while the upper crocheted character provides a tactile focal point for curious fingers.
To build the fawn teether, crochet a small sphere for the head using continuous spiral rounds of single crochet, working strategic increases to shape a soft, protruding snout in cream yarn before transitioning into fawn brown. Stuff the head firmly with hypoallergenic fiberfill, ensuring the density is uniform throughout, then close the base securely. Crochet two small teardrop ears and two miniature stubby antlers, leaving long yarn tails for assembly. Using charcoal cotton thread, embroider two curved sleeping eye crescents across the front face, knotting the ends deeply within the interior stuffing cavity. Next, crochet a flat rectangular strip measuring eight rows wide and twenty stitches long in matching fawn yarn to wrap around the top quadrant of your three-inch wooden ring. Pin the fawn head firmly to the top of this sleeve and whipstitch the edges shut around the wood using doubled yarn, ensuring every join is tight and secure.
Idea 2: Sleepy Sloth Ring Wrap
Read This:
Step-by-Step Guide
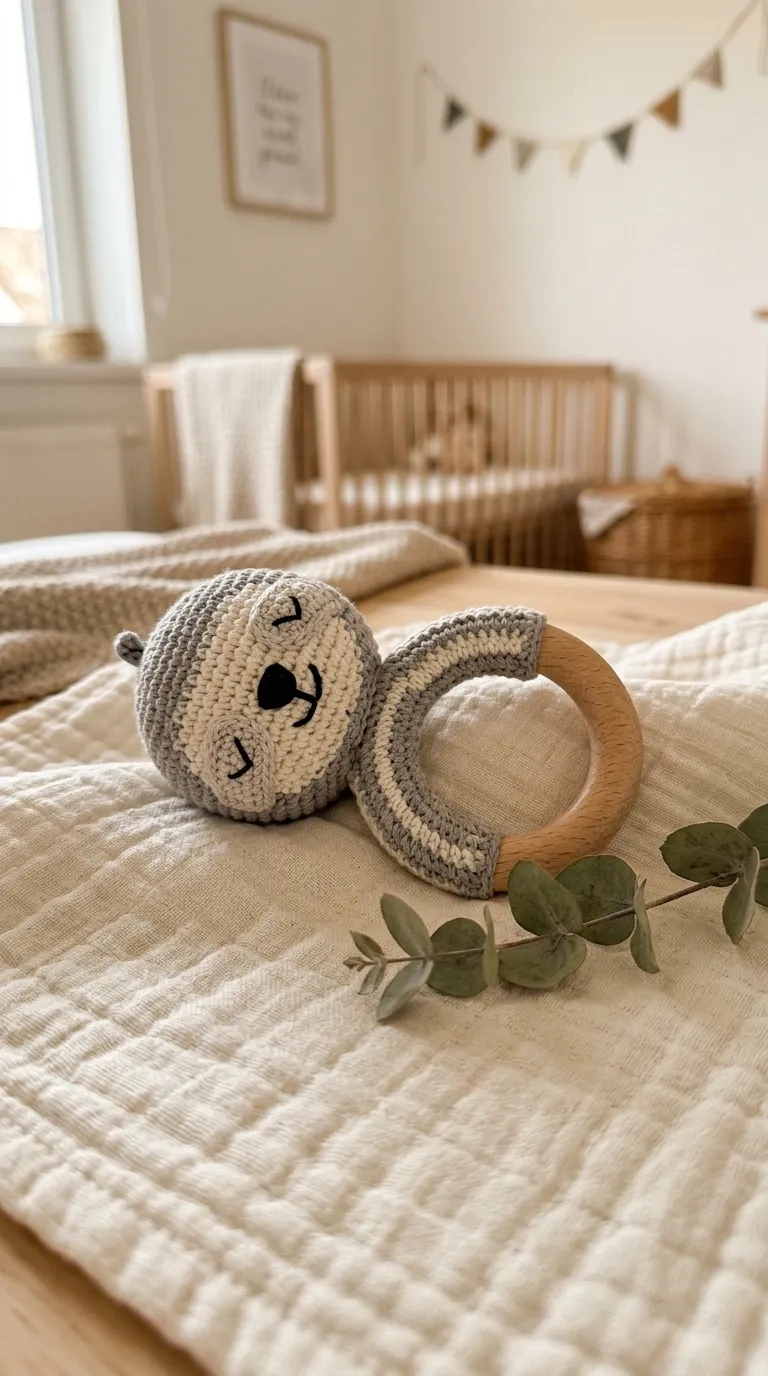
The sleepy sloth concept embraces a relaxed, modern minimalist style by wrapping the animal’s limbs directly around the wooden ring circumference. Using heather gray, cream, and charcoal cotton yarn, this project showcases a stylized sloth face resting snugly against the wooden curve. Unlike upright mounted characters, the sloth’s horizontal orientation distributes the crochet mass evenly along the wooden arc, offering an exceptionally balanced grip for infants. The embroidered closed eyes and gentle smile evoke calm and rest, making it a fitting companion for nursery spaces. The textural shift between the wooden ring and the sloth’s ribbed crochet body invites sensory exploration through small fingers.
Begin by crocheting the sloth head using a modified flattened oval shape worked in continuous spiral rounds of gray yarn, incorporating an eye mask patch crocheted in cream yarn. Fasten the eye patch onto the head and hand-embroider two gentle horizontal slits for eyes and a small triangular nose using dark gray thread. Next, crochet an elongated rectangular sleeve that covers roughly one-third of your smooth beechwood ring, working back-loop single crochet stitches to produce horizontal ridges that mimic fur texture. Position the sleeve around the wooden ring and sew the longitudinal edges together with a mattress stitch, pulling the seams taut against the wood so the fabric cannot twist. Finally, align the finished sloth head at the center of the textured sleeve, passing doubled thread repeatedly through both the base of the head and the sleeve fabric to lock the character permanently into place.
Idea 3: Sunburst Lion with Textured Mane
Execution Process
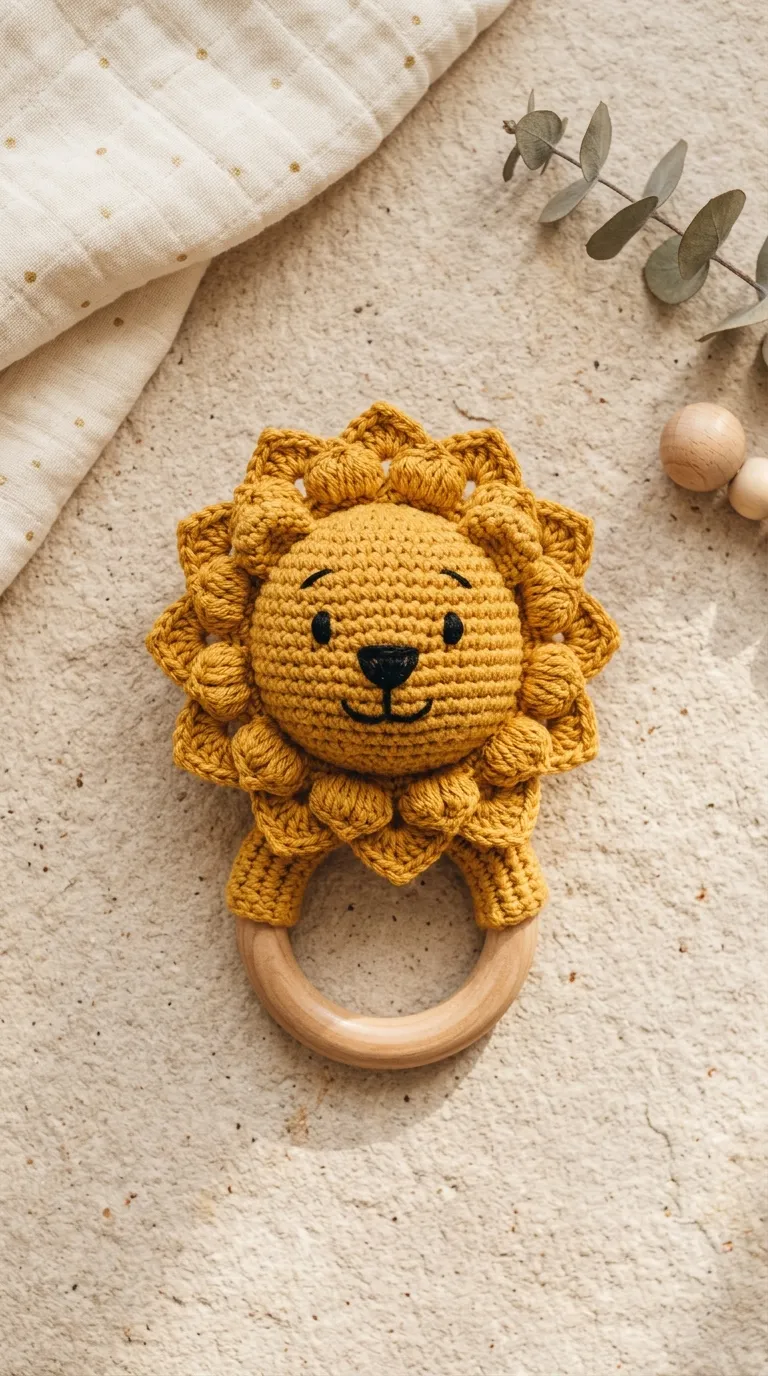
The sunburst lion teether combines playful nursery charm with rich, multi-dimensional texture designed to engage an infant’s sense of touch. Styled in mustard gold, warm sand, and cream, this concept uses a round animal head framed by a dynamic mane composed of fringed loop stitches or small picot petals. The lion’s radiant mane fans outward across the top curve of the wooden ring, providing a visually captivating silhouette from both the front and side views. The contrast between the smooth wooden arc and the dense, textured mane offers complementary surfaces for chewing and tactile discovery. This design complements contemporary Scandinavian or bohemian baby spaces that celebrate warm sun-drenched color palettes.
Construct the lion head by working a classic amigurumi sphere in mustard yellow cotton yarn, working even decreases toward the base while packing the fiberfill core tightly to maintain shape under pressure. In the final round of the cranium, execute a secondary outer round by working three chain stitches and a slip stitch into every front loop around the facial perimeter to create a neat, dense ring of mane petals. Embroider a clean triangular nose and minimalist sleeping eyes onto the front using black cotton embroidery floss, running the thread tails through the core to hide the ends. Next, crochet a four-centimeter-wide mounting sleeve in matching yellow yarn, wrapping it tightly over the top arc of your smooth wooden ring. Seam the sleeve closed with a tapestry needle, then stitch the back of the lion’s head directly onto the sleeve using deep, overlapping anchor stitches that anchor the figure firmly to the wooden base.
Idea 4: Whispering Sage Garden Bunny

Read This:

How to Create
The whispering sage garden bunny teether offers a classic, timeless aesthetic centered on elongated, floppy ears and a sweet, simple silhouette. Rendered in muted sage green, ivory, and soft blush pink, this design brings a garden-inspired freshness to modern nursery layouts. The standout feature is a pair of long, textured rabbit ears attached to a small spherical base, giving infants plenty of soft fabric to grasp, chew, and twist. The ears can either be stuffed lightly or left unstuffed to create a flexible, ribbon-like texture that drapes gracefully over the ring. This lightweight construction ensures the finished teether remains effortless for younger babies to lift and manipulate.
To create this bunny teether, crochet a compact sphere for the head using continuous rounds of sage green cotton yarn, stuffing it with polyfill until it is firm and smooth. Crochet two elongated leaf-shaped ear pieces by chaining fifteen stitches and working graduated rows of single and half double crochet around both sides of the central chain foundation. Fold the lower base of each ear in half and sew a couple of holding stitches through the fold to yield a natural cupped contour before attaching them securely to the top of the bunny’s head. Embroider small nose whiskers and delicate sleepy eyes onto the face using fine charcoal thread. Crochet a matching sage mounting sleeve, wrap it firmly over the upper section of your beechwood ring, and whipstitch the edges closed. Secure the head to the upper surface of the sleeve with tight, reinforced stitches, making sure the long ears stand upright or fold naturally over the wooden curve.
Idea 5: Minimalist Modern Rainbow Arc

How to Make
The minimalist modern rainbow teether introduces geometric balance and subtle arches directly over the natural curve of the wooden ring. Using muted earth tones like terracotta, mustard, olive green, and natural flax, this design replaces figurative animal shapes with clean, architectural lines. Three or four concentric color bands form an arch that follows the curve of the wooden foundation, resulting in an integrated, low-profile accessory. This shape sits closer to the wooden ring than upright animal heads, lowering the center of gravity and making the teether less likely to roll out of an infant’s hands. Its clean look aligns with modern interior styling, doubling as an attractive decorative element when placed on a nursery shelf.
Begin by crocheting the innermost arc of the rainbow using terracotta yarn, chaining twenty stitches and working three rows of single crochet while placing even increases along the outer edge to create a gentle curve. Switch to mustard yarn without cutting your working posture, adding another concentric band that follows the perimeter of the previous color. Repeat this sequence with olive and flax yarns, ensuring the finished piece curves smoothly without curling or buckling at the edges. Crochet a flat, matching back panel of the same size, place a thin sheet of natural cotton batting between the two layers for soft padding, and slip-stitch the perimeter edges together. Wrap the base edge of the finished rainbow arch around your wooden ring and whipstitch it directly to the wood using a tapestry needle, pulling the stitches snug to lock the arch in place.
Idea 6: Golden Honeycomb Bear
Read This:
Setup Method
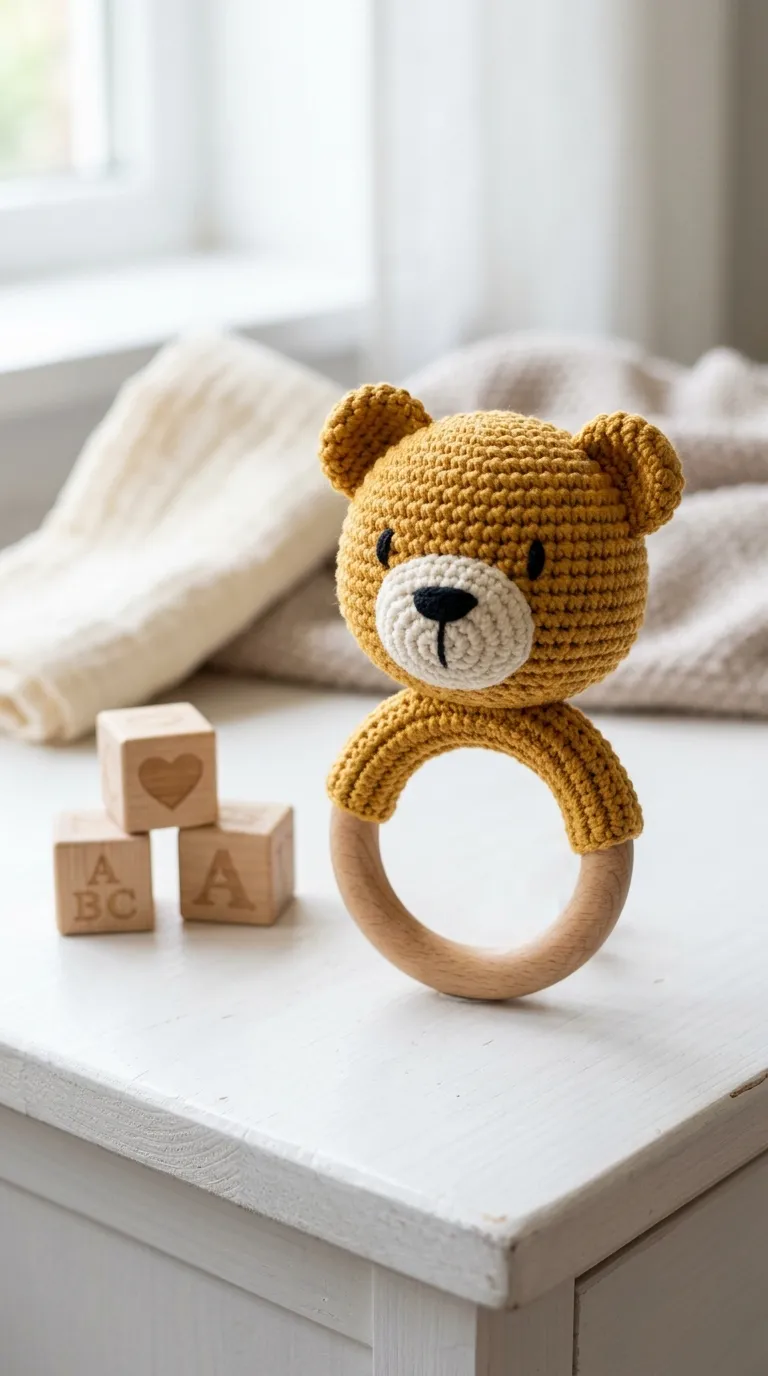
The golden honeycomb bear teether pairs rich honey-gold yarn with warm wood to create an inviting, nature-inspired baby toy. This concept features a stylized, rounded bear face with small semicircular ears and a cream-colored muzzle, projecting a warm and friendly presence. The simple geometry of the bear’s head makes this an ideal project for beginners who want to build a sturdy, durable teething ring. Because the profile remains round and compact, the finished toy slides easily into diaper bags, stroller caddies, and small storage pockets without snagging. The rich amber hue also complements the natural grain of untreated beechwood, creating a visually unified handmade piece.
Start by crocheting the bear’s head as a standard sphere in golden yellow cotton yarn, working continuous spiral rounds from the crown down to the base, stuffing the chamber firmly before working the final decrease rounds. Crochet a flat circular disc in cream yarn to serve as the snout, and sew it onto the lower third of the yellow head with small, hidden whipstitches. Embroider a horizontal nose bar and mouth line in dark brown thread across the cream muzzle, along with two small French knots or curved lines for the eyes. Next, crochet two small cupped ears and attach them symmetrically to rounds four and five on either side of the head. Crochet a four-centimeter-wide mounting band in golden yellow yarn, wrap it snugly around the wooden ring, and seam the bottom edges together. Stitch the bear head firmly to the top of the sleeve, running doubled threads through both pieces to ensure a solid join.
Idea 7: Oceanic Little Sea Turtle

Step-by-Step Guide
The oceanic sea turtle teether brings coastal serenity to infant accessories through a stylized shell, soft flippers, and a peaceful head profile. Designed in coastal tones like dusty teal, sage green, and soft ecru, this piece offers distinct textural zones across its different parts. The turtle’s shell features an attractive textured surface worked in front-post single crochet stitches, providing raised ridges that feel interesting against sore gums. The small, flat side flippers can flutter freely, giving developing fingers an easy grasp point. This marine theme fits seamlessly into modern coastal nurseries or gender-neutral ocean room themes.
To make the sea turtle, crochet the domed upper shell using dusty teal cotton yarn, incorporating raised front-post stitches every four stitches to create subtle geometric ridges across the shell. Crochet a flat bottom disc in ecru yarn, place a modest amount of polyfill between the layers, and single crochet the edges together around the circumference. Next, crochet a small rounded head and four flat oval flippers in sage green yarn, sewing the flippers securely between the upper and lower shell edges. Embroider simple sleeping eyelids on the head using dark brown floss, then attach the head to the front edge of the finished shell. Crochet an ecru connecting sleeve around the top quadrant of your beechwood ring, stitch it closed, and securely sew the turtle’s flat belly directly onto the sleeve, creating a stable, low-profile assembly that sits flush with the wooden arc.
Idea 8: Desert Sunset Cactus Bloom

Read This:
Execution Process
The desert sunset cactus bloom teether reimagines southwestern botanical motifs as a soft, safe, and modern infant accessory. Styled in muted sage green, warm desert terracotta, and dusty coral, this design features a ribbed cactus body topped with a soft, multi-layered blossom. The vertical ridges along the cactus stem create a unique ribbed texture that infants can easily grasp and run their fingers along. The bright bloom at the top introduces a pop of color, making the finished teether an eye-catching accent for bohemian crib setups. This compact shape keeps the crocheted element neatly aligned with the ring, preserving the natural balance of the toy.
Crochet the cactus element by working flat rows of single crochet back-loop-only stitches in sage green yarn, forming a ribbed rectangular fabric panel. Fold the panel in half lengthwise, seam the side edges together into a hollow cylinder, pull the top opening closed with a running stitch, and stuff the interior firmly with fiberfill. Next, craft a small desert blossom by working a small magic ring in coral yarn, adding five petal clusters made of half double crochet shells, and attaching it to the top peak of the cactus. Crochet a terracotta-toned sleeve measuring twelve rows long, wrap it tightly around your wooden ring, and seam the longitudinal edges together using a whipstitch. Finally, position the ribbed cactus upright on the terracotta sleeve and sew the base down with doubled thread, making multiple passes through the ribbed fabric to keep the cactus standing straight.
Idea 9: Soft Nordic Fox Ring

How to Create
The soft Nordic fox teether draws on Scandinavian design principles, using clean lines, bold color contrast, and balanced proportions to catch a baby’s eye. This design combines burnt copper orange, winter white, and charcoal gray into an iconic woodland animal silhouette. The fox’s pointed muzzle and triangular ears provide distinct shapes for tactile discovery, while the high contrast between the white cheeks and orange fur naturally attracts a developing infant’s visual focus. This piece fits effortlessly into modern forest-themed or minimalist nurseries, working equally well as a functional teether and a lovely photo prop.
Begin by crocheting the fox head from the tip of the nose upward, starting with a few rounds of clean white cotton yarn to form the tapered snout. Switch smoothly to burnt orange yarn and work symmetrical increases along the sides to shape the wider cheek areas, stuffing the head firmly as you go. Crochet two small triangular ears in orange yarn, sew small inner-ear triangles in white onto the front, and attach both ears to the top corners of the head. Using fine black cotton embroidery thread, stitch a small triangular nose at the tip of the snout and embroider two slanted, sleeping eye lines on either side of the face. Crochet an orange mounting band, wrap it snugly around the top of your smooth beechwood ring, and whipstitch the bottom edges together. Anchor the base of the fox head to the sleeve with close, tight stitches, checking that the tapered snout tilts slightly forward for an inviting profile.
Idea 10: Cozy Meadow Sheep with Bobble Curls

Read This:

Setup Method
The cozy meadow sheep teether pairs plush, bumpy textures with smooth, polished wood, making it an engaging sensory piece for infants. Styled in classic cream, warm taupe, and soft white, this concept uses all-over bobble stitches to create a coat that feels like real woolly fleece. The contrast between the raised bobble bumps and the flat wooden ring gives babies two distinct surfaces to explore with their fingers and gums. The calm, neutral color story fits seamlessly into farmhouse, rustic, or modern neutral nurseries. This project also allows makers to practice textured decorative stitches while keeping the overall size small and manageable.
To construct the sheep, crochet the head starting with a smooth circular face in taupe yarn, working even single crochet rounds before transitioning to cream yarn for the cranium. Work alternating rounds of single crochet and five-double-crochet bobble stitches to create a dense, textured fleece cap across the top and back of the head. Stuff the head cavity firmly with fiberfill, making sure the face remains smooth while the bobbles pop outward. Crochet two small, teardrop-shaped ears in taupe yarn and sew them symmetrically to the sides of the fleece cap. Embroider simple sleeping eyes on the taupe face using charcoal embroidery floss. Crochet a matching bobble-stitch sleeve to wrap over the top arc of your wooden ring, join the edges tightly underneath with a mattress stitch, and sew the sheep head firmly to the textured base using reinforced cotton yarn.
Common Beginner Mistakes and How to Avoid Them
Creating an amigurumi teether requires careful attention to safety and structural integrity that goes beyond decorative crochet work. The most critical mistake beginners make is using plastic safety eyes or small glued-on embellishments. While suitable for adult display pieces, plastic components pose a serious choking hazard if an infant’s gums pry them loose from the fabric mesh. Always use flat, embroidered facial features worked directly into the crochet fabric with colorfast, non-toxic cotton embroidery thread. Another common issue is crocheting with loose tension, which stretches the fabric and lets internal fiberfill poke through the holes. Avoid this by using a hook that is one to two sizes smaller than recommended for your yarn, ensuring your single crochet stitches are tight, solid, and opaque. Finally, makers often use flimsy thread or too few stitches when attaching the crocheted character to the wooden ring, which can cause the head to wobble or detach over time. Always sew the amigurumi head to an intermediate crocheted sleeve using doubled thread and reinforced whipstitches, creating a secure, locked join around the wooden ring.
Practical Tips for Better Results
Achieving a clean, professional finish on an amigurumi teether comes down to consistent tension, careful joinery, and quality material prep. Always condition your natural beechwood rings with a thin layer of food-grade organic coconut oil or beeswax polish before assembly; this conditions the grain, protects against moisture, and brings out the natural warmth of the wood without leaving chemical residues. When decreasing rounds on animal heads or small spheres, use the invisible decrease technique rather than standard single crochet decreases. The invisible decrease works through the front loops only, creating a flat, seamless curve that eliminates unsightly gaps and keeps fiberfill fully enclosed. When attaching the crocheted character to the wooden ring sleeve, pin the components securely in place with long ball-headed pins before you sew; this stops the parts from shifting while you work. Finally, take care to weave all starting and ending yarn tails through the center of the stuffed toy multiple times, locking the fibers in place so they cannot work free during regular use or gentle wash cycles.
Styling, Presentation, or Organization Ideas
A thoughtful presentation enhances the appeal of a handmade amigurumi teether, whether you are staging photos for social media or packaging gifts for new parents. Display your teethers against natural, textured backgrounds like unbleached linen fabric, raw wood trays, or woven sea-grass baskets. These organic backdrops complement the natural beechwood and matte cotton yarn, creating a warm, artisanal look. Pair the finished teether with coordinating nursery items, such as a matching crochet blanket, a hand-poured soy candle, or a soft muslin swaddle, to photograph complete, cohesive baby shower gift sets. For practical nursery storage, hang the teethers on a minimalist wooden wall peg rail, keeping them organized, clean, and displayed as charming wall decor between uses. When preparing pieces for gifting or retail sale, wrap each teether in translucent tissue paper and place it in a sturdy kraft paper box tied with natural jute twine, including a printed care card detailing gentle washing instructions and wood maintenance tips.
Budget or Time Planning
Careful planning helps you manage your costs and work efficiently, making teether crafting an enjoyable, budget-friendly endeavor. A single 50-gram skein of organic cotton yarn costs only a few dollars yet provides enough yardage to make three or four complete teether sets, making the material cost per piece very low. You can purchase smooth beechwood rings in bulk packs of ten or twenty online to reduce your unit costs significantly while ensuring a steady supply of matching supplies. Organize your crafting into structured batches to make the most of your studio time. Dedicate one session to crocheting several animal heads and limb pieces, another session to embroidering facial details and stuffing, and a final focused hour to seaming the sleeves and mounting the characters onto the wooden rings. Working in focused stages keeps your assembly line efficient and lets you produce a complete, gallery-quality baby teether in about two to three hours of hands-on crafting time.
Creative Expansion and Advanced Inspiration
Once you feel comfortable with basic teether construction, you can explore creative variations that add sensory interest and practical versatility to your designs. Try inserting a small, fully sealed plastic rattle insert into the center of the stuffed amigurumi head; this adds a gentle, soothing sound whenever the infant shakes the wooden ring. You can also craft a matching, detachable pacifier clip by crocheting an eight-inch ribbed strap anchored with a lead-free metal suspender clip, creating a coordinated two-piece travel set. Another engaging approach involves mixing different woods, such as pairing dark walnut rings with light cream yarns to create a sophisticated, high-contrast look. As the child grows out of the teething phase, the soft crochet animal can be easily snipped away from the wooden ring, fitted with a small hanging loop, and preserved as a sweet holiday tree ornament or childhood keepsake. These simple adaptations expand your crafting possibilities, ensuring your handmade pieces continue to bring joy long after the baby’s teething days are done.