Crochet enthusiasts consistently turn to nature for design concepts, and woodland fungi remain among the most celebrated subjects in modern craft spaces. This comprehensive guide examines ten unique amigurumi mushroom crochet concepts designed to expand your fiber art repertoire. Readers will learn the essential construction mechanics, yarn selection strategies, shaping methods, and assembly techniques required to build balanced miniature sculptures. Exploring these designs is useful because small-scale yarn art requires minimal yardage while teaching core stitch manipulation, precise tension control, and dimensional stuffing practices. Miniature mushrooms function exceptionally well as functional keychains, educational nature displays, pincushions, and whimsical accents across various interior settings. By following structured stitch combinations and standard shaping sequences, crafters can produce uniform botanical forms with professional finishes. The instructions presented here clarify the balance between hook size and stitch density, ensuring interior fiber fill remains hidden beneath tidy loops. Whether you are seeking a weekend creative project or looking to refine specific amigurumi fundamentals, these curated models offer practical techniques for crafters of all skill levels.
Why This Idea Is Trending or Useful
Forest-inspired motifs dominate visual boards because they effortlessly bridge natural elements with playful fiber design. In contemporary digital craft communities, miniature botanical projects gain rapid traction due to their high visual impact and modest resource investment. The practical value of an amigurumi mushroom lies in its versatility: a completed piece transitions easily into nursery mobiles, desk trinkets, or festive seasonal garlands. From a design perspective, the contrast between a curved cap and a straight stem introduces foundational geometry that complements both rustic and minimalist aesthetics. The DIY appeal remains strong because these forms can be assembled in a single afternoon using leftover skeins, transforming odd remnants into purposeful handmade objects. Furthermore, accessibility for beginners is unmatched, as the construction relies almost entirely on single crochet worked in continuous rounds without complex seam allowances. Beginners can bypass complicated garment measurements and focus strictly on uniform tension, stitch definition, and smooth decreases, yielding high aesthetic satisfaction with minimal technical barrier.
Materials and Preparation
Thorough preparation ensures clean execution and structural longevity for every crochet piece. Standard worsted weight cotton or acrylic yarn serves as the optimal base, paired with an ergonomic hook typically sized between two and three millimeters to maintain a tight, opaque fabric. Working with a hook smaller than the yarn band recommendation prevents stuffing from showing through open spaces. Alongside primary yarns, assemble polyester fiberfill, blunt tapestry needles, removable locking stitch markers, sharp thread snips, and safety eyes ranging from six to eight millimeters. For flat-bottomed variations, lightweight cardboard or plastic discs provide internal stem stabilization. Planning considerations involve inspecting your yarn fiber properties, as mercerized cotton produces crisp cap lines, while brushed acrylic yields a soft woodland texture. Before casting on, prepare a dedicated workspace with ample natural light, wind yarn cakes to ensure smooth feed tension, and mark pattern intervals carefully to track continuous spiral increases without losing stitch orientation.
Idea 1: Classic Spotted Woodland Toadstool
How to Create
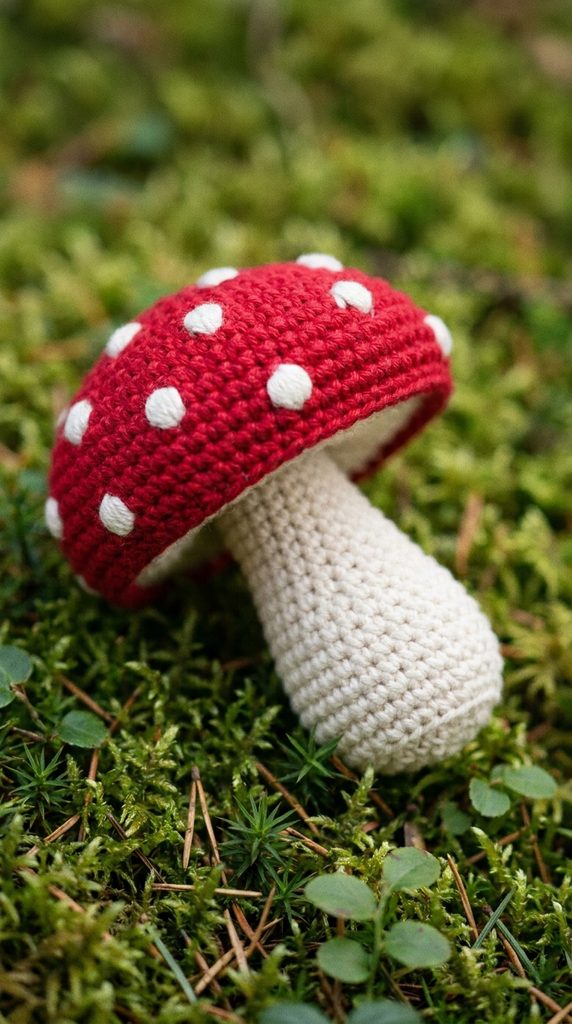
The classic spotted toadstool draws inspiration from traditional folklore, featuring a domed scarlet cap adorned with raised chalk-white dots resting on an ivory base. This design relies on high visual contrast and proportional balance, positioning the cap diameter at twice the thickness of the stem to establish an iconic silhouette. The underside utilizes an inverted cream disc that locks into the outer red hemisphere, replicating natural fungal gills. Because the proportions remain compact, this form serves as an ideal baseline for testing different yarn textures, from smooth sport-weight cotton to textured blends. The aesthetic appeals directly to vintage botanical collections and cottage-inspired visual displays. Incorporating crisp structural edges around the outer cap perimeter ensures that the finished object sits neatly when placed on flat surfaces or suspended as an ornament.
Begin by establishing an adjustable magic ring with crimson yarn, working six single crochet stitches directly into the center. Expand the circle through systematic increases across consecutive rounds until the circumference reaches thirty-six stitches, keeping your tension firm and even. Work several continuous rounds without alterations to build vertical wall height, creating the signature curved dome. Switch to off-white yarn to crochet a separate flat circular base of matching diameter, which will close off the bottom. Stuff the upper cap firmly with dense polyester batting, ensuring no voids remain near the crown. Construct the stem starting from a narrow magic circle, widening gradually toward the base before inserting a small plastic disc to guarantee a flat profile. Embroider neat surface spots using a tapestry needle threaded with white cotton yarn, securing internal knot anchors before sewing the stem firmly to the gill base using whip stitches.
Idea 2: Pastel Garden Bonnet Mushroom
Execution Process
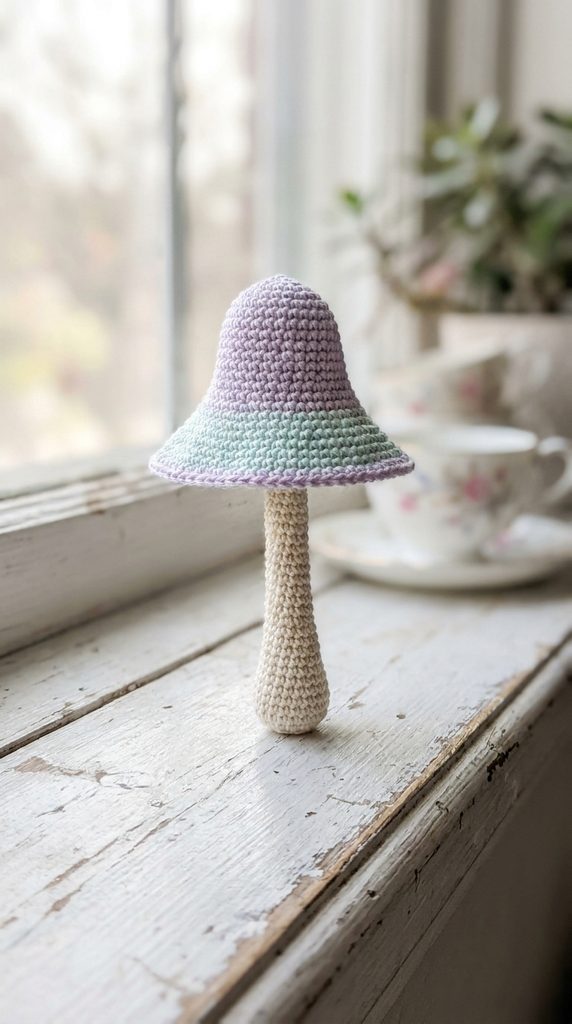
The pastel bonnet mushroom introduces soft lavender, mint, and pale buttercup hues to create a gentle interpretation of slender wild field fungi. Unlike heavy domed varieties, bonnet mushrooms possess a distinctly flared bell shape with elongated proportions, mimicking delicate species found in damp meadows. The central design feature is an extended, graceful stipe that tapers upward toward a gently peaked cap apex. This sculptural silhouette works exceptionally well within soft modern interiors, nursery arrangements, and spring seasonal wreaths. The light color scheme highlights stitch consistency, making clean loops and consistent tension critical to the final aesthetic. This variation avoids added surface embroidery, relying instead on clean structural lines and subtle color shifts to achieve a polished, minimalist botanical presentation.

Construct the pointed cap apex by placing four single crochet stitches into an adjustable ring using soft pastel yarn. Increase by two stitches every alternate round to generate an elongated cone rather than a rapid, wide hemisphere. Once the foundation cone reaches the desired length, execute rapid increases in the final two rounds to form an outward bell flare. Fasten off with an invisible join, leaving a long yarn tail for assembly. For the stem, utilize a pale cream thread worked in continuous rounds of six stitches, inserting a floral wire coated in paper tape through the core to provide flexible internal support. Lightly pack minimal fiberfill around the wire using the blunt end of a crochet hook. Secure the stem deep inside the peaked cap recess, stitching along the inner ridge so the flared outer brim remains free, light, and naturally suspended.
Idea 3: Rustic Morel with Surface Honeycomb Ridges
Step-by-Step Guide
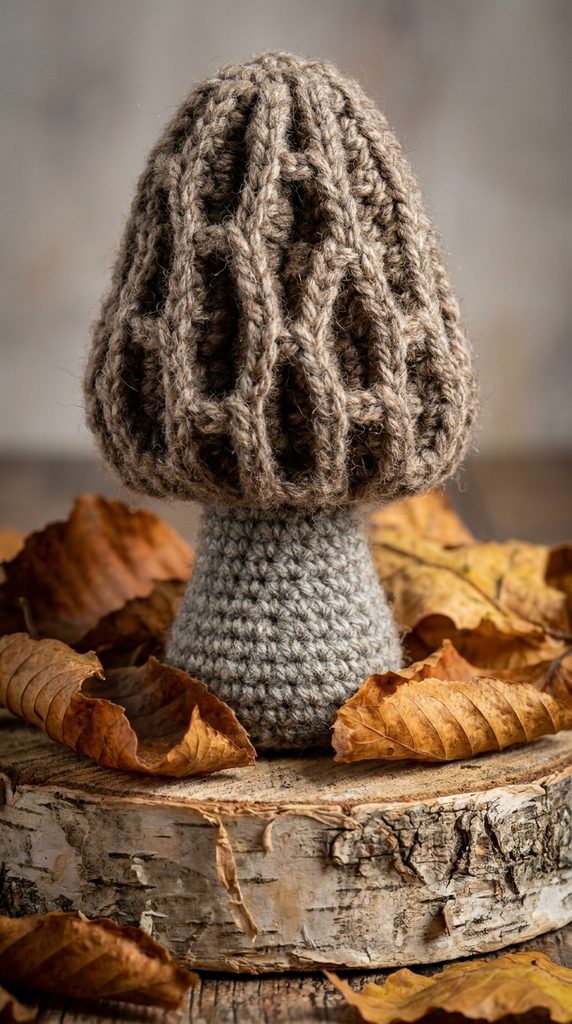
The morel mushroom offers an earthy, rustic presence characterized by an intricate honeycomb exterior and a muted tan, taupe, or deep brown color palette. This design moves away from smooth geometric domes, introducing tactile, textured stitch architecture that replicates natural woodland decay and forest floor organic matter. The cap forms an irregular conical cylinder marked by pockets, indentations, and surface ridges, giving it an authentic wild-harvested appearance. It appeals to crafters seeking advanced textural challenge without deviating from beginner-friendly stitch mechanics. When completed, this piece serves as a striking decorative element in farmhouse displays, natural history shadow boxes, and rustic autumn centerpieces. Its naturalistic, subdued tones blend seamlessly into neutral interior environments, emphasizing structural complexity over bright coloration.
Initiate the morel core by creating an elongated tan cone using standard single crochet, establishing an internal form that will anchor the exterior texture. Once this structural base reaches approximately twenty-four stitches in circumference, integrate continuous rounds of front post stitches, alternating with surface slip-stitch chains to produce deep, organic grooves across the surface. Alternatively, utilize the textured popcorn stitch at staggered intervals throughout the body, working each cluster with five partial double crochets closed together to mimic natural fungal pits. Maintain a firm internal tension so the ridges stand proud from the fabric foundation. Fill the textured cone with small, deliberate amounts of fiberfill to preserve the dimpled contours. Assemble the stem using a weathered stone-gray yarn worked in wide rounds, joining it to the lower base of the textured cone with secure internal whip stitches.
Idea 4: Miniature Desktop Pincushion Mushroom
Setup Method
The desktop pincushion mushroom combines sculptural amigurumi with everyday functional studio utility, offering a weighted, stable home accessory for sewing spaces. This design features an extra-wide, gently flattened cushion cap sitting atop a short, broad pillar stem engineered to prevent tipping during frequent use. By substituting lightweight fiberfill with a dense mixture of crushed walnut shells or fine glass crafting beads at the base, the piece gains sufficient ballast to rest securely on a sewing table. The top surface provides an expansive, taut canvas suitable for holding pins, needles, and thread clips. The overall appearance channels vintage utility design while remaining completely customizable in color, pattern, and surface trim to coordinate with specific craft room palettes.
Start the expansive upper cushion by working six single crochet into a magic ring using durable mercerized cotton, increasing steadily until the circle measures sixty stitches across. Work four rounds straight to produce a shallow edge, then work rapid decrease rounds through the back loops only to create a sharp internal shelf for the under-cap. Cut a circle of stiff plastic or dense cardboard matching the inner diameter and place it inside the crown to preserve a level pinning platform. Stuff the upper chamber densely with raw wool or firm polyester batting to ensure needles slide in smoothly without snagging interior strands. For the base, crochet a wide cylinder, filling the lower third with clean sand or glass beads enclosed in a secure fabric pouch before adding standard stuffing. Sew the wide stem directly to the flat back-loop ridge of the cap using double-strand thread.

Idea 5: Kawaii Pocket Mushroom with Safety Eyes
How to Make
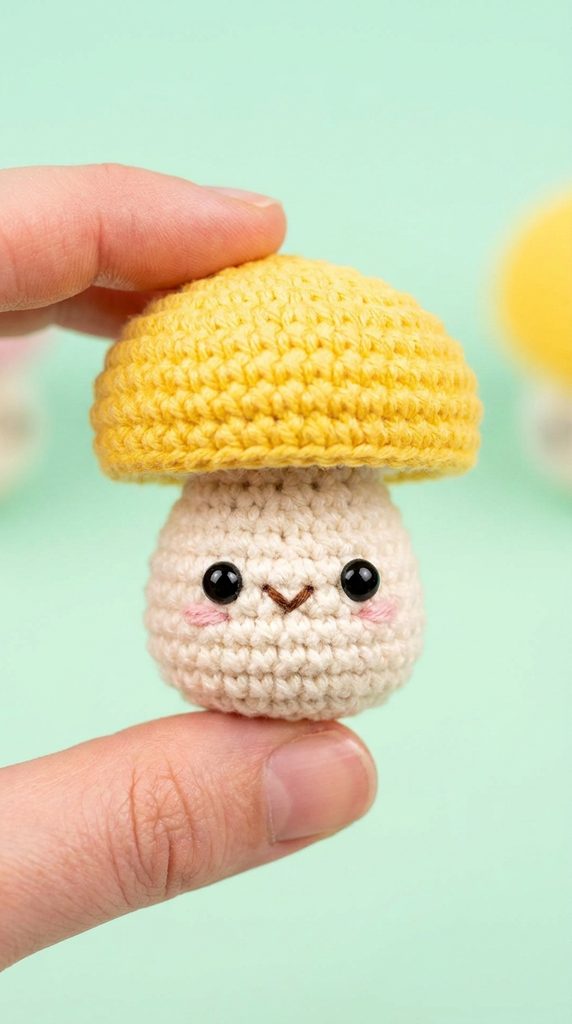
The kawaii pocket mushroom emphasizes character-driven fiber craft, incorporating expressive facial features into a compact, palm-sized form. This concept pairs a rounded cap with an oversized, squat stem, generating friendly, exaggerated proportions commonly celebrated in contemporary amigurumi toy design. The primary visual anchors are glossy black safety eyes positioned low on the stem, accompanied by a simple embroidered smile and delicate pink blush marks applied with dry chalk pastel or yarn stitches. This design functions wonderfully as a small portable charm, a backpack accessory, or a comforting desk mascot. The rapid construction timeline and minimal material requirements make it an exceptional project for group crafting sessions, introductory classroom instruction, or quick handmade gift production.
Begin by crocheting the cap using bright coral, sunflower yellow, or sky blue yarn, expanding an initial six-stitch circle to thirty stitches across five rounds. Crochet four rounds without increases, fasten off cleanly, and set the cap aside. To construct the expressive body, work an ivory stem starting with six stitches, expanding to twenty-four stitches to match the cap scale. Before narrowing the neck, insert six-millimeter black plastic safety eyes between rounds eight and nine, spacing them four visible stitches apart. Secure the safety washers firmly on the interior side. Embroider a tiny horizontal mouth using a single ply of black embroidery floss centered beneath the eyes. Lightly tap cosmetic blush onto the cheeks below the eyes using a dry cotton swab. Firmly stuff both components, align the open edges, and join them together by working a continuous slip-stitch seam through both thicknesses simultaneously.
Idea 6: Minimalist Flat-Cap Stool Mushroom
How to Create
The minimalist flat-cap stool mushroom takes inspiration from architectural modernism and Japanese wooden craft, highlighting precise geometry, straight planes, and unadorned surfaces. This model discards exaggerated curves in favor of a crisp, horizontal disc cap paired with a clean cylindrical post stem. Rendered in monochromatic tones, oatmeal heather, or unbleached linen yarn, it fits cleanly into contemporary Scandinavian interiors and minimalist open-shelf displays. The visual elegance relies entirely on stitch precision, perpendicular seams, and flat, unyielding faces. Without decorative surface embroidery, any irregularity in gauge becomes visible, making this an excellent study in maintaining steady yarn feed and flawless hook manipulation. The finished object projects quiet sophistication, acting as an understated sculptural nod to woodland botany.
Begin crafting the flat upper surface by working consistent circular rounds with an unbleached linen-cotton blend, placing increases symmetrically until reaching thirty-six stitches. Instead of curving downward gradually, execute a single round worked strictly in the back loops only, creating an immediate ninety-degree downward edge that forms a sharp rim. Work two rounds even, then work an inward turning round through the front loops only to establish a clean lower platform. Cut two rigid plastic discs from recycled container lids, inserting one against the top face and one against the bottom to preserve absolute flatness. Lightly fill the space between the discs with batting. Construct a straight, narrow stem using single crochet worked around a wooden dowel core. Sew the dowel-supported stem into the exact geometric center of the lower cap disc, ensuring the assembly remains perfectly upright and structurally plumb.

Idea 7: Tiered Cluster of Wild Shelf Fungi
Execution Process
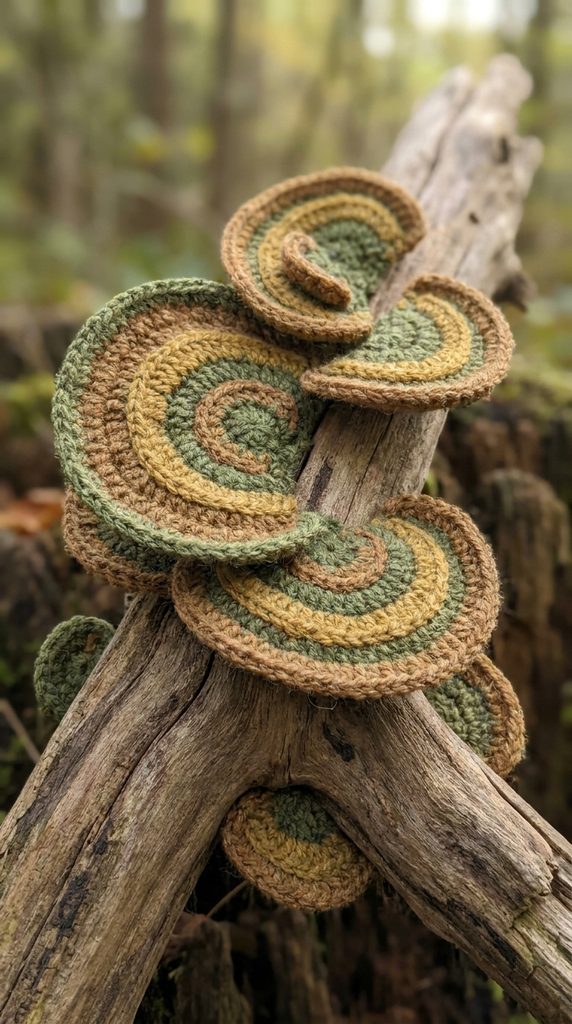
The tiered cluster design shifts away from traditional freestanding mushrooms, interpreting the fan-shaped bracket fungi that grow horizontally from tree trunks and weathered woodland logs. This composition features three or four overlapping semi-circular caps of graduating dimensions, connected along a common vertical mounting spine. The color scheme mimics natural forest shelves, utilizing concentric rings of slate gray, moss green, ochre, and warm bark brown. This sculptural arrangement is designed primarily for wall display, shadow boxes, or mounting against driftwood blocks as rustic home decor. Crafting shelf fungi introduces readers to non-circular amigurumi construction, utilizing turned rows, elliptical increases, and directional shaping to build asymmetrical, organic fans that project outward into three-dimensional space.
To create the individual fan brackets, work in flat back-and-forth rows rather than continuous spirals, starting with three single crochet stitches into an adjustable ring. Turn the work at the end of each row, placing increases at both outer edges and along the central axis to form an expanding semi-circle. Introduce subtle color shifts every two rows to establish the characteristic growth rings found on wild bracket species. After reaching the desired width, crochet two identical semi-circles, place them together with right sides facing outward, and join the curved perimeter using a firm single crochet border, inserting minimal stuffing to maintain a relatively flat profile. Repeat this process to produce small, medium, and large brackets. Assemble the set by stitching the flat straight edges to a firm, crocheted vertical bark column, layering the brackets so they cascade naturally over one another.
Idea 8: Hanging Car-Charm Mushroom Trio
Step-by-Step Guide
The hanging car-charm mushroom trio adapts micro-amigurumi techniques to produce a functional automotive or window hanging, combining lightweight construction with balanced kinetic suspension. This arrangement features three miniature mushrooms suspended at staggered heights from braided or beaded cotton cords connected to an upper wooden loop. Each miniature mushroom measures less than two inches in height, avoiding excessive weight or visual obstruction while providing pleasant motion. The design allows for playful color coordination, matching seasonal palettes, vehicle interior accents, or bohemian home styling. Working at this reduced scale sharpens manual dexterity and teaches crafters how to manage fine-gauge threads without sacrificing stitch clarity or structural firmness.
Utilize fine fingering-weight yarn paired with a 1.75-millimeter crochet hook to maintain diminutive dimensions throughout each element. For each micro-mushroom, cast four single crochet into a ring, expanding to twelve stitches over three rounds to form an acorn-sized cap. Work two rounds even, then switch directly to a pale stem color without fastening off, working back-loop decreases to draw the fabric inward into a tidy four-round stem. Stuff each miniature piece with a tiny pinch of wool fleece inserted via a blunt tapestry needle eye. Finish the base by gathering the final six stitches and cinching them tight. Thread the remaining yarn tails through the center of the crown to create an integrated suspension loop. Thread each cord through wooden beads, tying them at staggered intervals of two, three, and four inches beneath an unfinished natural birch ring suitable for hanging.

Idea 9: Fairy Garden Luminary Mushroom
Setup Method
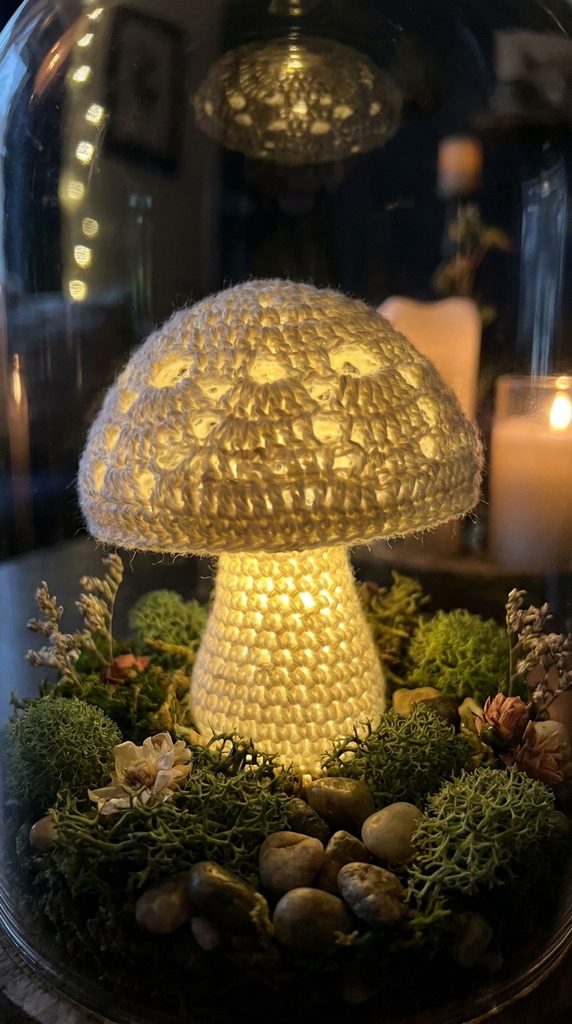
The fairy garden luminary mushroom blends fiber construction with gentle illumination, featuring an open, translucent under-cap engineered to house a small battery-operated LED tea light. This imaginative project turns traditional amigurumi into an ambient nightlight, fairy garden accent, or bedside decor piece. The design requires a wide, hollow bell cap worked in an airy stitch pattern or light-toned yarn that diffuses warm light evenly across the fiber surface. The stem is built as an open hollow column that acts as a stable housing for the light base, with an accessible access port at the bottom for easy battery replacement. This combination of structural support and functional illumination elevates standard crochet into an interactive decorative home installation.
Select an off-white or pale cream sport-weight cotton yarn to maximize light translucency across the cap walls. Work the mushroom cap starting from a magic ring, systematically expanding outward to forty-eight stitches to build a spacious, hollow dome. Incorporate subtle eyelet rounds using chain-one spaces between single crochets along the lower third of the cap to permit pinpoints of light to escape outward. Instead of closing the under-cap with dense fabric, crochet an open net structure using chain loops that cradle a standard plastic LED tea light securely beneath the dome. For the stem, construct a wide, hollow cylinder using sturdy mercerized cotton, stiffening the finished piece with a light application of fabric stiffener or diluted craft glue brushed along the interior walls. Secure the illuminated cap atop the hollow pillar, ensuring the base switch remains easily accessible from underneath.
Idea 10: Layered Chanterelle with Wavy Ruffled Gills
How to Make
The layered chanterelle captures the sculptural, trumpet-like form of one of the forest’s most prized culinary fungi, defined by its golden-apricot coloration and distinctive fluted edges. Moving away from symmetrical spheres, this design utilizes an inverted cone silhouette where the stem flows seamlessly upward into an expanding, wavy cap margin. The defining characteristic is the series of prominent, forked false gills that run down the exterior of the upper stem, creating dramatic depth, shadow, and organic texture. This piece functions beautifully in autumn table scapes, seasonal market displays, and realistic fiber botany collections. Mastering the chanterelle encourages crafters to explore continuous stem-to-cap transitions, continuous ribbing, and rapid, dynamic edge expansion that breaks outside standard spherical amigurumi rules.
Begin at the base of the stem using deep golden or saffron yarn, working an eight-stitch spiral upward for twelve rounds to establish a solid, slender foundation. Gradually increase by two stitches every third round to create an elegant, continuous flare that transitions smoothly from the stem into the lower cap body without an abrupt joint seam. Once the flare reaches thirty stitches, work multiple single crochets, half double crochets, and double crochets into single stitches around the outer perimeter to produce an undulating, ruffled rim that mimics natural chanterelle margins. To construct the signature exterior gills, attach matching yarn along the outer base of the flare and surface slip-stitch vertically down toward the mid-stem, creating raised, branching veins along the exterior walls. Lightly stuff the lower stem while leaving the upper trumpet cavity hollow, preserving its natural concavity.

Common Beginner Mistakes and How to Avoid Them
The most frequent error in amigurumi construction is using a crochet hook that matches the yarn label rather than sizing down significantly. Using the manufacturer’s suggested hook size produces loose stitches, which stretch open when stuffed and expose the white polyester interior. Always choose a hook one to two sizes smaller than recommended on the yarn band to maintain an opaque, dense fabric. Another widespread challenge involves tracking rounds in continuous spiral crochet without marked boundaries, leading to misplaced increases and asymmetrical cap forms. Crafters must place a locking stitch marker in the final stitch of every round, moving it upward without exception as work advances. Additionally, many beginners overstuff the project unevenly, creating lumpy, distorted contours that stretch the yarn stitches out of alignment. Avoid this by adding small, fluffed pinches of fiberfill gradually, packing it against the outer walls first before filling the center core. Finally, attaching safety eyes after stuffing has already been completed causes unnecessary stress; always lock eye washers securely into place before initiating decrease rounds.
Practical Tips for Better Results
Achieving professional results in amigurumi mushroom crafting relies on fine-tuning technical habits and selecting proper finishing tools. When working single crochet in the round, utilize the yarn-under technique instead of the standard yarn-over method. Yarn-under creates tight, square-shaped “X” stitches that stack vertically with minimal gaps, producing a smoother, more uniform surface across curved caps. To close open pieces seamlessly, master the invisible decrease: insert the hook only into the front loops of the two target stitches before pulling the working yarn through, preventing the visible ridges associated with standard decrease stitches. Maintain an even, firm working tension throughout the entire project, as loose stitches destabilize tall stems. When assembling separate pieces, pin every component firmly in position using long pearl-headed quilting pins before taking a single whip stitch. This step guarantees that caps remain centered and do not drift askew during final attachment. Lastly, steam completed pieces lightly with a handheld garment steamer, holding the nozzle several inches away to relax the fibers and set clean shapes without crushing the natural stitch loft.
Styling, Presentation, or Organization Ideas
Handmade amigurumi mushrooms offer versatile styling options across interior living spaces, bringing organic woodland charm into home displays. Arrange a collection of varying heights, caps, and color palettes inside a clear glass cloche atop an antique wooden base, adding preserved reindeer moss, dried lichen, and natural river pebbles to create an enclosed woodland terrarium. On open floating shelves, group three mushrooms of differing scales together, adhering to interior design principles of odd-numbered visual balance. For functional entryway organization, insert small screw-eyes into the crowns of lightweight toadstools, attach split key rings, and hang them from a wall-mounted coat rack to keep house keys organized. In children’s rooms or craft spaces, string six to eight pastel mushrooms along an unbleached cotton twill tape to form a horizontal garland draped across a mantel, window frame, or bookshelf face. You can also mount flat-bottomed mushrooms directly onto raw wood slices or natural cork coasters, creating stable, whimsical desk paperweights that serve as tactile handmade accents.
Budget or Time Planning
Crocheting amigurumi mushrooms is inherently cost-effective, but organized resource planning maximizes both time and budget efficiency. Because individual mushrooms consume between fifteen and forty yards of yarn, crafters can produce dozens of pieces from leftover yarn remnants without purchasing dedicated new skeins. When purchasing fresh materials, invest in versatile neutral shades like cream, linen, and walnut brown, which serve as universal stems across countless colorful caps. To streamline production time, execute pieces using assembly-line methodologies: crochet all required caps during one session, craft all stems in the next, and dedicate a final continuous block of time strictly to facial embroidery, stuffing, and assembly. A single miniature mushroom typically requires between thirty and forty-five minutes from cast-on to final trim, making it an exceptional candidate for high-volume charity donations or handmade market inventory. Organizing supplies in clear, labeled modular storage bins prevents lost notions and broken hooks, allowing crafters to sit down and begin crocheting immediately without losing time sorting through scattered materials.
Creative Expansion and Advanced Inspiration
Once you master basic mushroom geometry, you can expand your creative repertoire into advanced structural variations and mixed-media projects. Experiment with alternative fiber textures by substituting traditional smooth cotton with velvet chenille, bouclé, or brushed alpaca yarn, generating ultra-plush sensory toys with unique surface properties. Advanced crafters can integrate intermediate wire armatures through the stem and into the cap brim, creating fully poseable, articulating fungi that wrap around branches, shelves, or plant pot rims. You can also introduce needle-felting techniques, working loose wool roving directly onto completed crochet caps to establish blended, painterly color gradients or complex realistic speckling that standard embroidery cannot replicate. Another compelling direction involves crafting life-sized fungal ecosystems inside upcycled vintage teacups, hollow books, or antique sewing boxes, combining crochet with dried botanical elements, clay accents, and embedded fiber optics. Treating each amigurumi mushroom as an architectural foundation opens endless artistic possibilities, elevating simple stitches into sophisticated, collectable fiber art installations.