Crochet bag charms have evolved into one of the most prominent miniature accessory trends across contemporary fiber arts, circulating widely as top trending ideas across modern digital craft platforms. This comprehensive tutorial details ten distinct crochet bag charm patterns, breaking down the exact yarn choices, hook pairings, hardware attachments, and three-dimensional shaping methods required to produce durable daily accessories. Readers will learn how to build sturdy geometric bases, incorporate tactile elements like bobbles and ruffles, handle fine thread gauges, and anchor split rings securely to withstand daily movement. Designing handmade purse charms provides an accessible avenue for mastering three-dimensional crochet construction while producing functional, personalized accents for totes, backpacks, and cross-body bags. Beyond personal accessory styling, these compact projects serve as thoughtful handmade gifts, craft market bestsellers, and creative stash-busting exercises that require minimal material investment. Understanding the mechanical relationship between stitch density, fiber friction, and metal clasps guarantees that finished charms retain their structural beauty under continuous wear. By following practical step by step instructions, crafters of any background can assemble polished, professional-grade charms with complete confidence.
Why This Idea Is Trending or Useful
The popularity of crochet bag charms across modern inspiration boards stems from their balance of practical utility, retro charm, and contemporary fashion relevance. In everyday styling, these lightweight fiber accents personalize mass-produced leather handbags, canvas book bags, and travel luggage without causing surface scratches, scuffs, or unnecessary weight. Their aesthetic appeal bridges nostalgic cottagecore traditions with sleek modern design, utilizing soft creams, earthy sage, vibrant citrus, and pastel palettes that elevate everyday wardrobe essentials. From a practical DIY perspective, miniature charms offer unmatched accessibility for beginners because they bypass complex garment sizing, extensive flat blocking, and multi-skein financial commitments. A single charm can be completed within an hour using small yardages of scrap yarn, making it an easy project that delivers immediate creative satisfaction. Furthermore, compact crochet pieces introduce novice crafters to diverse shaping techniques—such as tapestry color changes, spiral spirals, gathered petals, and flat discs—within manageable small-scale canvases. These combined attributes make bag charms a rewarding, budget-friendly endeavor that combines functional organization with artisanal textile decoration.
Materials and Preparation
Achieving durable, professional outcomes in crochet charm fabrication requires systematic material curation and organized preliminary setup before looping your first foundation chain. Recommended core fibers include mercerized cotton, sturdy linen blends, and high-twist fingering acrylics; mercerized cotton is particularly suitable because its smooth surface resists friction pilling and keeps stitches crisp under daily handling. Essential hardware includes metal lobster swivel clasps, split keyrings, flat-head jump rings, fine-chain drop extenders, and locking stitch markers. Core tools involve ergonomic aluminum hooks chosen one half-size smaller than standard yarn recommendations to maintain tight, non-porous tension, along with bent-tip tapestry needles and jewelry pliers. Preparation begins with measuring hardware opening dimensions to ensure smooth yarn loop clearance and testing yarn colorfastness before project construction. Crafters should also inspect internal materials, choosing high-density polyester fiberfill to prevent shifting inside three-dimensional pieces. Pre-sorting yarn bobbins, laying out metal findings on felt-lined trays, and establishing a clear workspace streamline assembly, ensuring each finished piece achieves structural balance and secure hardware bonding.
1. Miniature Clustered Berry and Leaf Dangle
Step-by-Step Guide
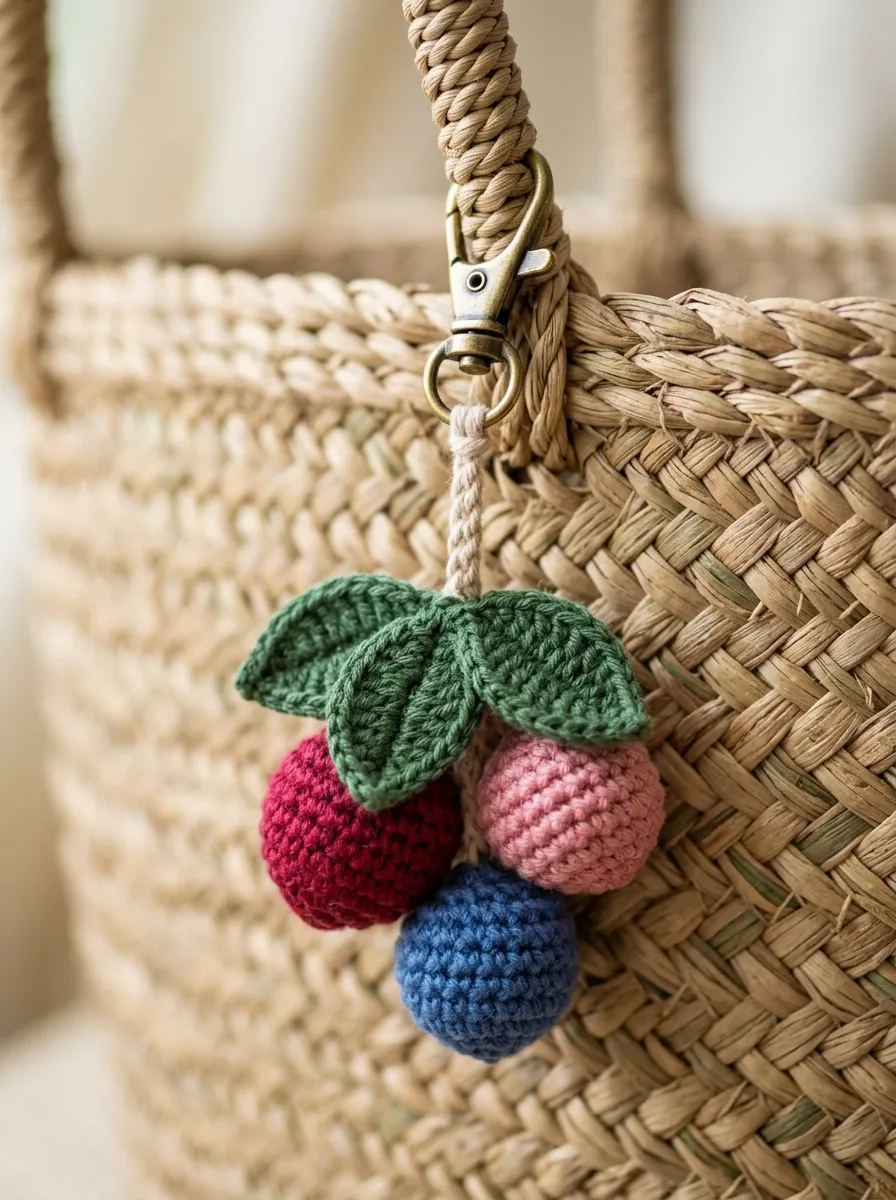
The miniature clustered berry and leaf dangle utilizes organic botanical forms to create an asymmetrical charm suitable for woven straw market baskets and casual summer totes. The design features a cascading trio of plump, spherical berries worked in deep crimson, blush, and blueberry tones, suspended at varying heights beneath a textured double-leaf calyx. The berries are constructed with tight single crochet rounds that completely conceal the interior stuffing, maintaining firm spherical profiles that retain their volume under handling. The adjoining leaves feature a raised central rib worked over surface slip stitches, giving the foliage natural curvature and stability. A twisted cord or braided chain connects the cluster directly to a polished brass trigger clasp, allowing the berries to sway naturally with the movement of the bag. This project introduces crafters to continuous micro-sphere shaping, proportional stem planning, and organic cluster assembly.
Begin by working six single crochet stitches into an adjustable magic ring using fine crimson cotton yarn and a two-millimeter hook. Increase evenly over three rounds to eighteen stitches, work three rounds even to build spherical height, and pack the interior firmly with a dense pinch of polyester fiberfill. Decrease back down to six stitches, fasten off, and weave the yarn tail through the remaining front loops, leaving an eight-inch tail to serve as the suspension stem. Repeat this process twice more using coordinating yarn shades, varying the final stem lengths to two, three, and four inches. For the leaf cap, join forest-green yarn with eight foundation chains, working slip stitches, half double crochets, and trebles along both sides of the chain to form a tapered oval leaf. Gather the three berry stem tails together, knot them securely around a small brass jump ring, and thread the ring through the leaf base. Finally, connect the assembly to a swivel lobster clasp using flat-nose jewelry pliers.
2. Retro Groovy Daisy Flower Wheel
Read This:
Execution Process
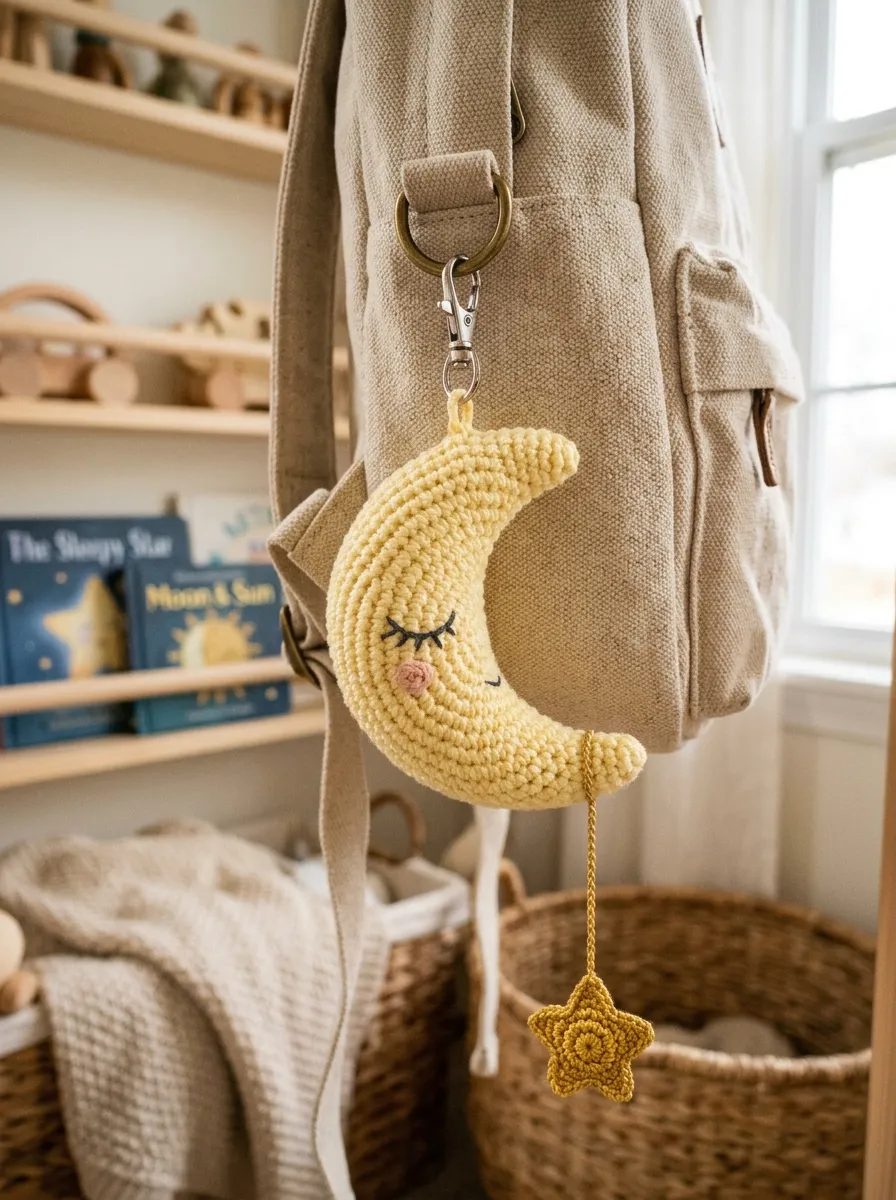
The retro groovy daisy flower wheel channels vintage 1970s aesthetics, featuring bold geometric color blocking and structured circular lines that pair effortlessly with casual denim bags and canvas utility totes. The core structure consists of a flat, double-thick circular center disc worked in mustard-gold yarn, surrounded by twelve radiating white petals with rounded outer tips. Working the central disc as a double-layered circle creates a sturdy base that prevents the flower from curling or drooping during use. The contrasting petal round utilizes elongated triple crochet clusters that fan outward cleanly, creating visual movement without adding unnecessary bulk. This flat-profile charm rests comfortably against bag panels without catching on straps or exterior pockets. It serves as an accessible project for practicing foundation circles, treble clusters, and clean border finishing.
To build the sturdy core, crochet two identical flat circular discs by working three rounds of double crochet in mustard yellow, reaching twenty-four stitches around. Place the two discs back to back with their wrong sides touching, and join them together by working single crochet stitches through both layers around the outer perimeter, enclosing a small circle of thin plastic canvas inside to preserve flat rigidity. Join crisp white cotton yarn into any outer single crochet stitch to begin petal construction. Chain four, work three partially closed treble crochets into the same stitch, yarn over and draw through all loops on the hook to form a plump petal cluster, chain four, and slip stitch into the adjacent base stitch. Repeat this petal sequence around the entire perimeter to complete twelve symmetrical petals. Finish by looping a twenty-chain cord in forest green through the upper petal gap, securing the ends around a split ring.
3. Amigurumi Sleepy Moon and Star Charm
How to Create
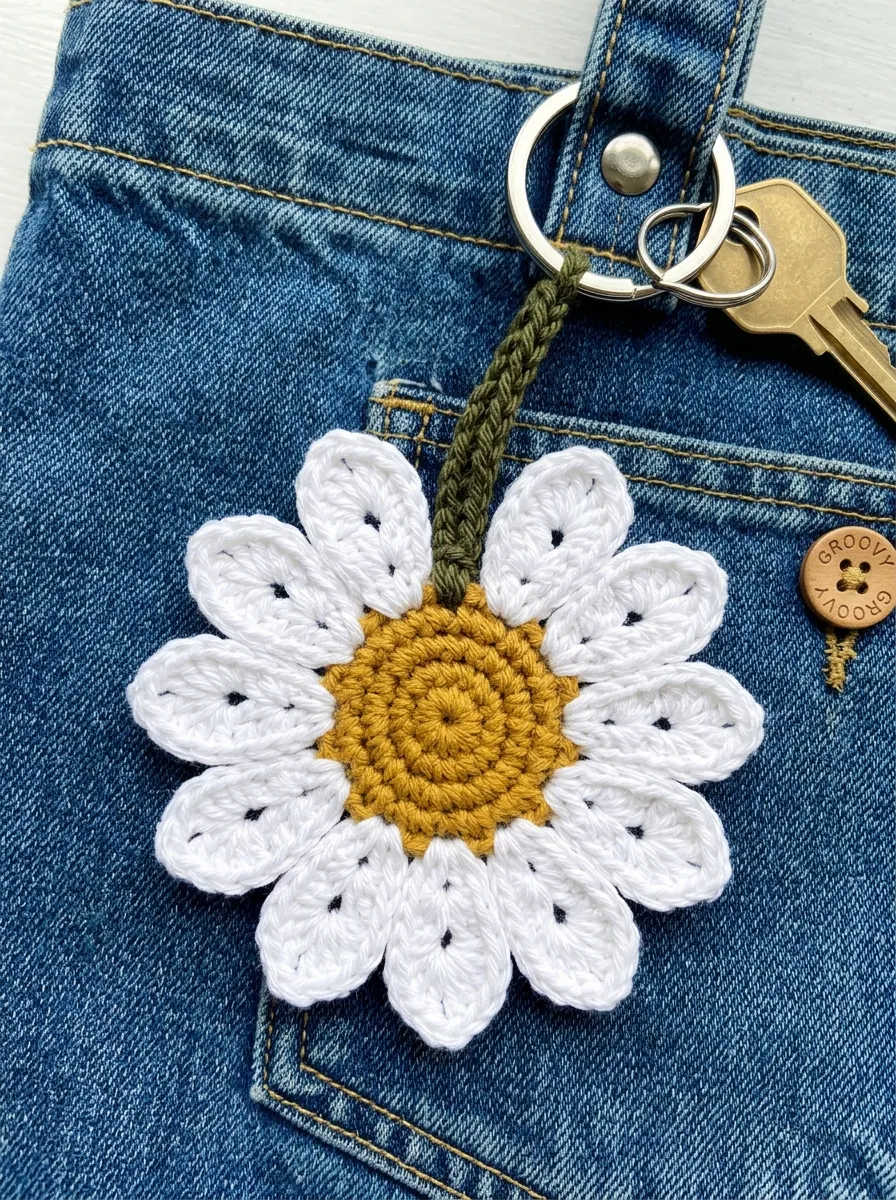
The amigurumi sleepy moon and star charm brings a calm, celestial look to everyday backpacks, structured luggage, and quiet nursery diaper bags. The central feature is an elongated, crescent moon sculpted in soft pale-lemon yarn, balanced by a tiny, five-pointed golden star dangling delicately beneath the lower tip. The moon’s curvature is achieved through asymmetrical stitch distribution, working increases along the outer spine while decreasing along the inner concave arc. Hand-embroidered sleeping eyes, completed with dark charcoal thread, give the moon an expressive, tranquil character that suits minimalist style accessories. The small star uses basic geometric points worked directly into an adjustable ring, creating a lightweight accent that swings freely with every step. This design helps crafters practice curved tubular shaping, expressive facial embroidery, and balanced multi-piece suspension.
Begin the crescent moon at the narrow top tip by working four single crochet stitches into a magic ring using pale yellow fingering-weight cotton. Increase by two stitches along the outer curve every second round while working plain stitches across the inner edge, gradually expanding the tube to sixteen stitches at the central belly. Pack the crescent with small tufts of fiberfill as you progress, maintaining even, pliant density that supports the curve without distorting stitch boundaries. Reverse the sequence with mirrored decreases toward the bottom tip, fastening off with an invisible needle closure. Embroider a delicate curved eye arc along round twelve using two strands of dark embroidery floss. For the dangling star, work five sets of single crochet, chain two, and slip stitch into a five-stitch magic ring using golden thread. Connect the star to the moon’s lower tip using a two-inch length of metallic silver cord, then anchor a swivel snap hook to the top peak.
4. Textured Bobble Heart Keepsake
Read This:

Setup Method
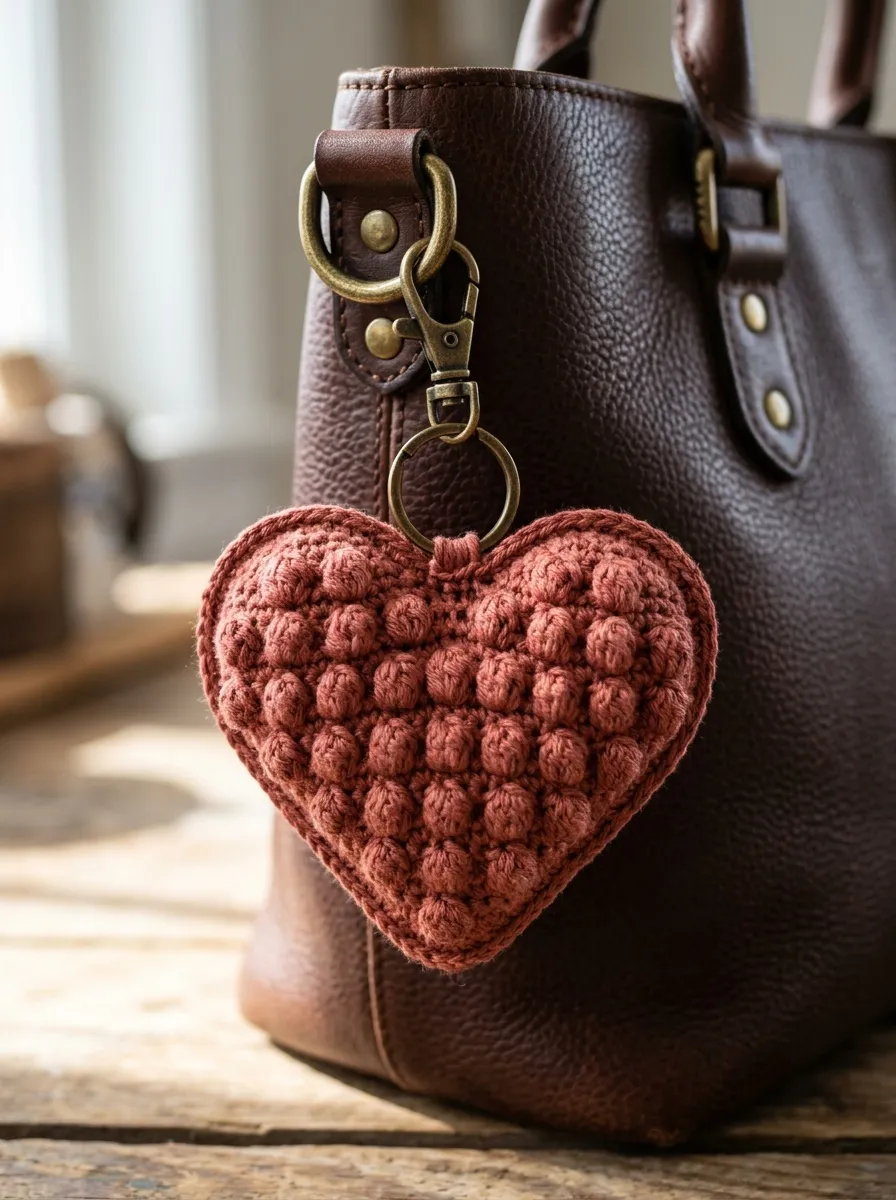
The textured bobble heart keepsake blends classic romantic silhouettes with modern, tactile surface work, making it an eye-catching accent for structured leather satchels and weekend travel bags. The front face of the heart is covered in a grid of dense, three-dimensional bobble stitches, while the back remains smooth single crochet to sit flat against the bag’s exterior. This textural contrast adds visual depth while preventing excess friction against delicate garment fabrics. The heart is formed by joining two separate rounded lobes into a unified cup before tapering smoothly down to a sharp, centered bottom point. The raised bobbles catch natural ambient light, emphasizing the sculptural quality of the handmade stitches. This design allows crafters to practice multi-piece cup joins, symmetrical decrease shaping, and uniform cluster tension.
Start by constructing the two upper lobes separately using warm terracotta or dusty-rose cotton yarn. Work six single crochet stitches into a magic ring, increase to twelve stitches over two rounds, and crochet one round even before setting the first lobe aside with working loop intact. Complete an identical second lobe, then join the two lobes together by working continuous single crochet stitches around the perimeter of both pieces, establishing twenty-four stitches across the combined rim. On the following round, introduce the texture by alternating one five-loop bobble stitch with three plain single crochet stitches across the front face only, keeping the rear stitches plain. Decrease symmetrically by two stitches at each outer lateral edge on every subsequent round, tapering the heart down to four stitches before fastening off. Pack the cavity firmly with fiberfill, weave the lower tail closed, and attach an antiqued bronze jump ring through the central dip between the lobes.
5. Layered Ruffled Carnation Pom-Pom
Step-by-Step Guide
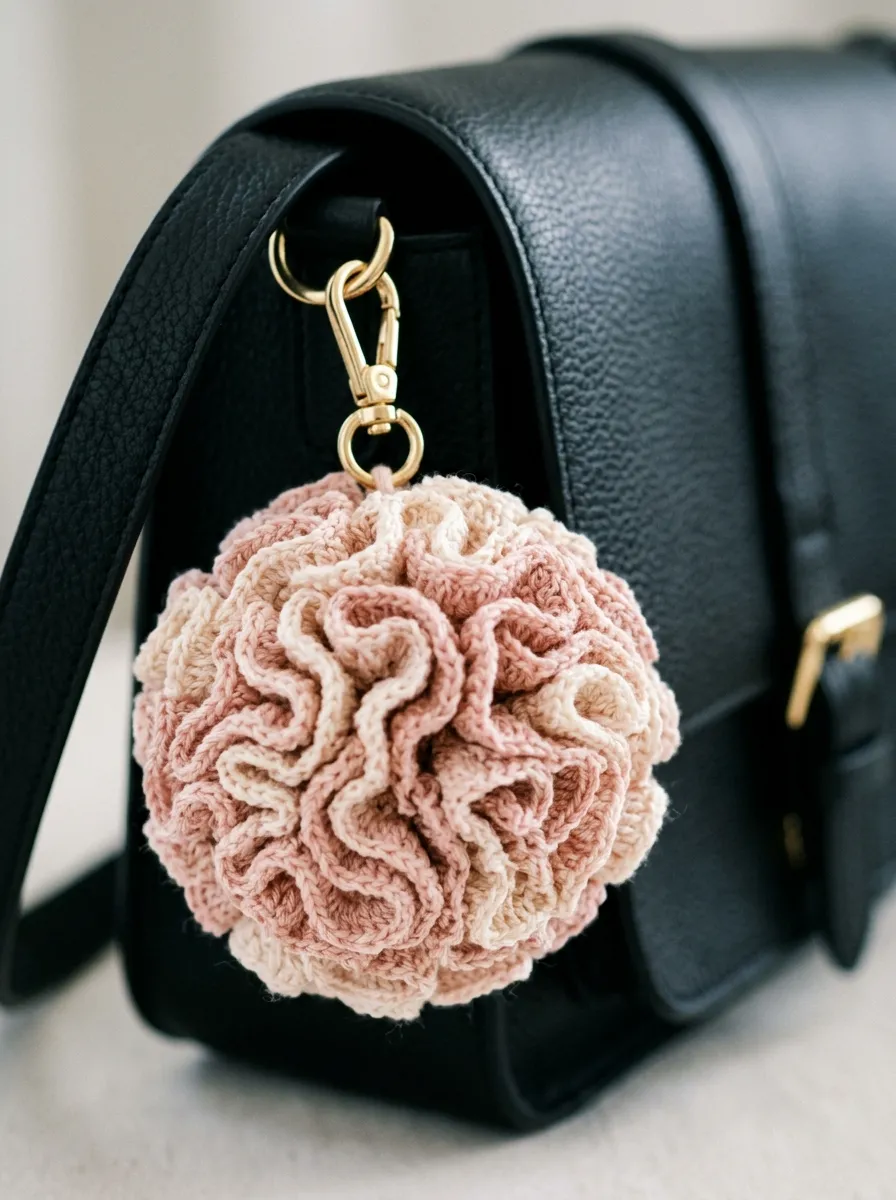
The layered ruffled carnation pom-pom translates botanical elegance into a soft, voluminous textile accent that brings movement to minimalist style handbags. Unlike traditional yarn pom-poms made from trimmed strands that can shed under heavy use, this charm is constructed from continuous, ruffled crochet spirals that maintain their structural integrity indefinitely. The design features dozens of undulating fabric folds created by working exponential stitch increases into a tight central cord, mimicking the natural petals of a double-flowered carnation. Rendered in monochromatic cream, soft blush, or vibrant crimson, this durable textile pom-pom offers an understated aesthetic that softens structured leather accessories. The compact, dense layout protects the yarn fibers from daily abrasion, establishing this as a resilient, low-maintenance creative project.
Begin by chaining twenty-five stitches using sport-weight mercerized cotton yarn and a 2.5-millimeter hook, leaving an extended ten-inch starting yarn tail. Work three double crochet stitches into the second chain from the hook and into every chain across, producing a gently curving spiral strip of seventy-two stitches. Turn the work, chain three, and work three double crochet stitches into every single stitch across the second row, rapidly increasing the stitch count to over two hundred stitches and causing the fabric to ruffle tightly. For the final row, work three single crochets into every stitch across, creating a dense, crinkled petal edge. Fasten off, leaving a twelve-inch finishing tail. Thread the starting tail onto a tapestry needle and roll the ruffled strip tightly around itself into a compact, spherical flower head, passing the needle through the base multiple times to lock the folds together. Fasten the base to a metal key clip with double-pass securing stitches.
6. Monochromatic Striped Mini Pouch Charm
Read This:

How to Create
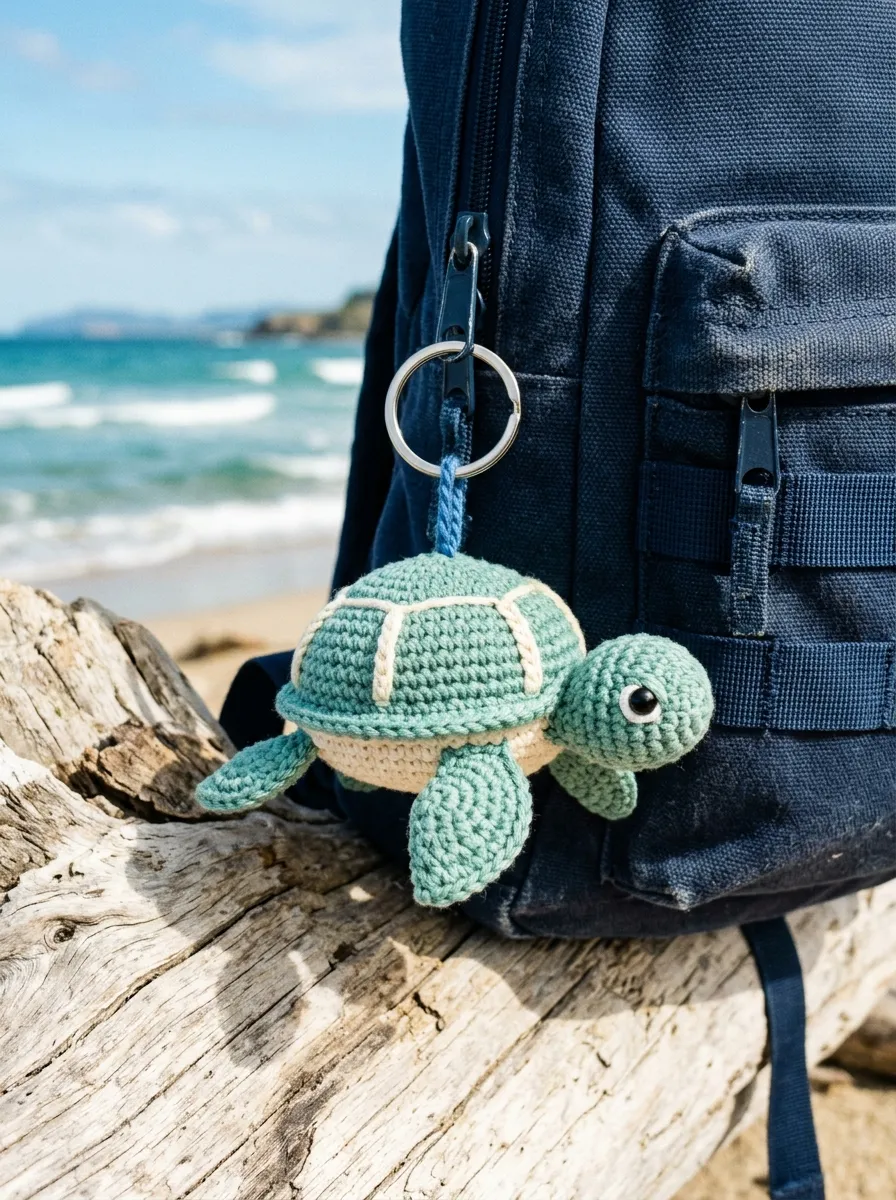
The monochromatic striped mini pouch charm combines visual interest with practical storage utility, functioning as an exterior coin keeper, headphone case, or lip balm pocket for busy totes. Designed as a structured rectangular envelope, this miniature pouch incorporates narrow, alternating horizontal stripes in crisp ivory and charcoal grey. A functional fold-over flap secured with a natural wooden toggle button keeps small personal items safe and organized on the go. The fabric is worked in tight split single crochet stitches, also known as the knit-look waistcoat stitch, which produces a dense, non-stretch wall that holds its shape under weight. This dual-purpose charm helps eliminate bag clutter while serving as a tailored, modern design accent on larger travel bags and briefcases.
Using a two-millimeter hook and durable fingering cotton yarn, chain sixteen stitches in charcoal grey to begin the pouch base. Work in continuous oval rounds around both sides of the foundation chain, placing three single crochets in each corner loop to establish a flat thirty-six-stitch perimeter. Switch to ivory yarn on round three, alternating colors every two rounds using clean tapestry carry techniques to eliminate interior yarn knots. Continue working even rounds in split single crochet until the pouch body measures two and a half inches in height. On the final round, work across the rear eighteen stitches only, continuing back and forth in flat rows for eight rows to form the fold-over flap. Work a centered five-chain button loop into the flap’s final edge, fasten off, and sew a small wooden toggle button to the front wall. Attach a swivel hook directly to the upper left corner seam.
7. Kawaii Citrus Slice Roundel
Execution Process
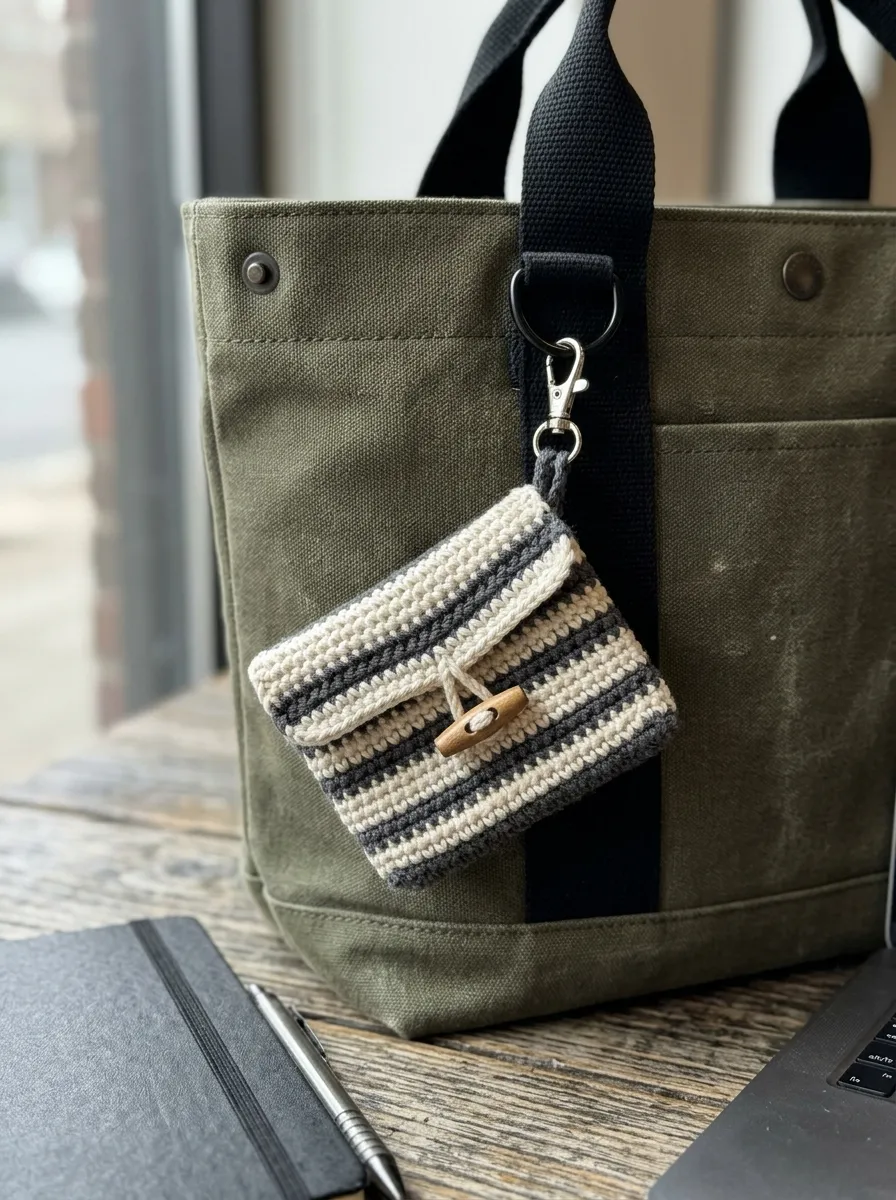
The kawaii citrus slice roundel brings cheerful, sunny color to tote bags, camera straps, and beach bags through vibrant, stylized fruit geometry. The design features a circular disc worked in concentric rings that represent the fruit segments, white pith, and colorful rind of an orange, lime, or pink grapefruit. The inner wheel is divided into eight clean segments using embroidered surface lines, with a minimalist smiling face nestled in the center. The charm is worked as a flat two-sided disc or folded into a semi-circular wedge, giving crafters creative flexibility over the final profile. The clean graphic contrast between white borders and vibrant citrus yarn creates an eye-catching focal point that stands out against neutral linen and dark leather bags. This pattern teaches circle mathematics, clean color transitions, and surface embroidery.
Begin with bright orange mercerized cotton yarn, working eight half double crochet stitches into a magic ring. Increase evenly over three rounds to twenty-four stitches to establish the juicy inner fruit disc, then switch to crisp white yarn for one round of plain single crochet to represent the pith. Change to deep citrus-orange yarn for the final round, working single crochets with intentional increases to reach thirty-two stitches, forming the outer rind. Using a tapestry needle and two strands of white cotton floss, stitch eight straight radiating lines from the center ring out to the white pith border, dividing the circle into uniform triangular fruit segments. Add two tiny black safety eyes between two central segments, and embroider a small curved mouth using fine black thread. Crochet a matching plain backing disc, whipstitch the two rounds together along their outer edges, and attach a jump ring through the rind border.
8. Coastal Sea Turtle Amigurumi Dangle
Read This:
Setup Method
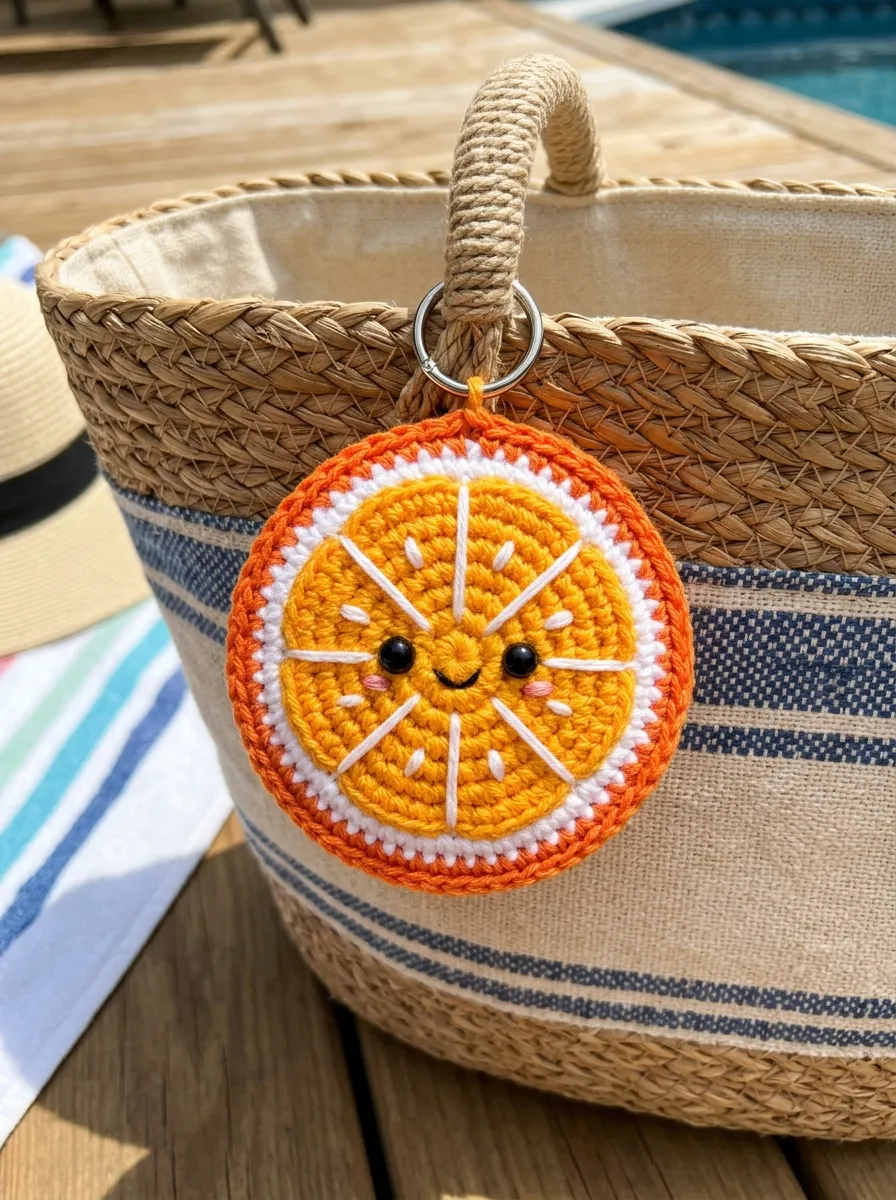
The coastal sea turtle amigurumi dangle captures ocean life within a compact, stylized textile format designed for backpacks, gym bags, and beach accessories. The design features an elevated, domed carapace worked in muted seafoam green, surrounded by a pale cream underbelly and four flat, angled flippers. The shell incorporates a decorative star or spiral pattern worked with subtle front-post stitches, providing authentic tactile relief that mimics natural shell scutes. The head extends forward with an alert, upward angle, balanced by two broad front flippers that hug the curve of the body. This charming marine companion is durable and compact, with securely anchored limbs that withstand daily handling. The project introduces crafters to domed shell construction, flat flipper shaping, and multi-piece marine assembly.
To construct the shell, work six single crochets into a magic ring using seafoam-green yarn, increasing evenly across five rounds to thirty stitches while working front-post half double crochets every fifth stitch to form the raised shell ribs. Work one round even to establish vertical rim depth, then set aside. For the underbelly, crochet a flat circular disc in cream cotton yarn, increasing across four rounds to twenty-four stitches. For the flippers, chain six in olive yarn, working slip stitches, single crochets, and double crochets along the chain to create four curved, flat paddles. Align the four flippers and a tiny spherical head between the shell and underbelly rims, pinning them securely in their anatomical positions. Join the shell and underbelly using single crochet stitches worked through both edge loops, trapping the flipper bases between the layers. Pack the shell lightly with fiberfill before closing, then secure a split ring to the head.
9. Minimalist Beaded I-Cord Wristlet and Tassel
Step-by-Step Guide
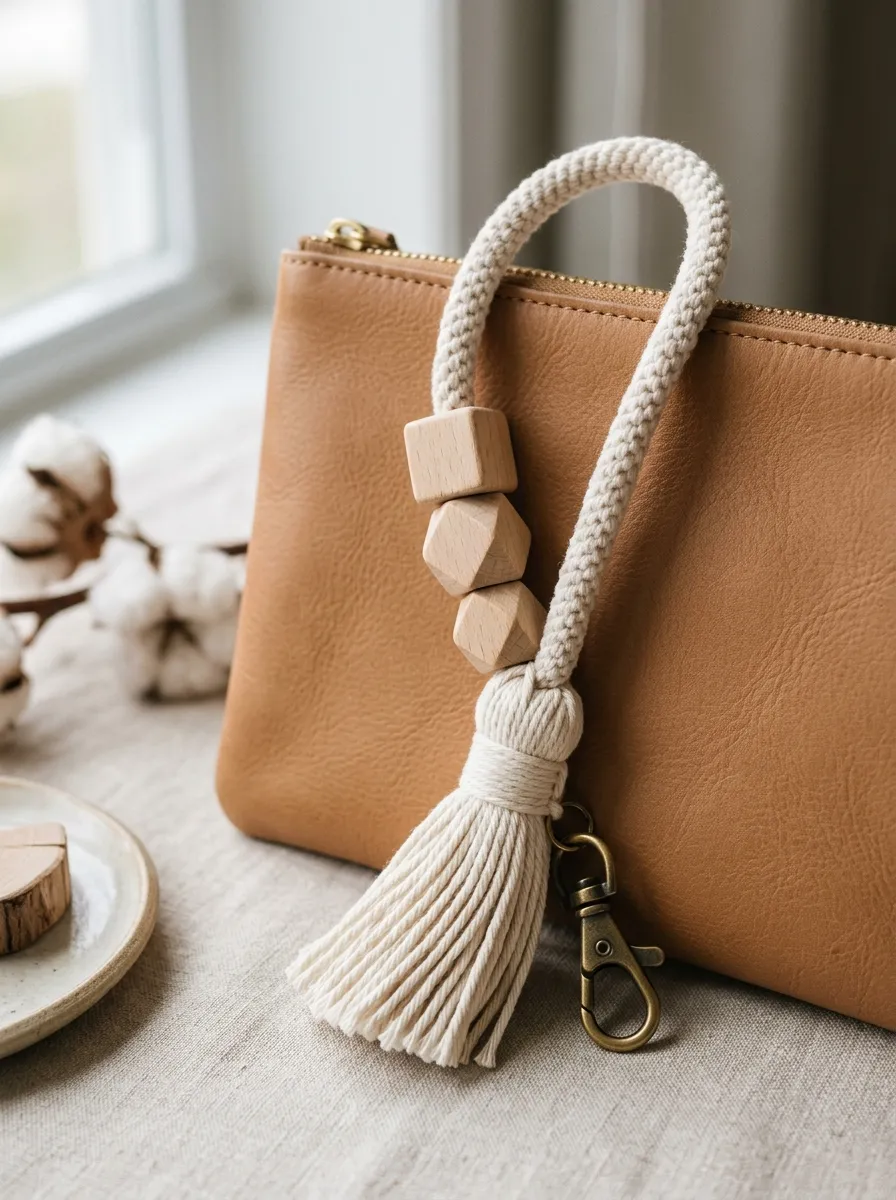
The minimalist beaded I-cord wristlet and tassel combines modern jewelry techniques with traditional crochet hardware, serving as both a decorative bag accent and a practical wrist carrying strap. The design features a dense, tubular crochet I-cord worked in neutral ecru or taupe cotton cord, accented with smooth, unfinished natural beechwood beads strung directly along the strand. The strap terminates in a dense, wrapped yarn tassel that adds linear movement and texture to handbag hardware. This dual-purpose design provides a secure grip for carrying keys and clutch bags while adding an understated Scandinavian touch to everyday accessories. The clean, unembellished cord construction highlights the pure geometry of the stitches, making it a versatile staple for modern minimalist wardrobes.
Begin by stringing three twenty-millimeter natural beechwood beads onto a ball of medium-weight neutral cotton cord using a blunt tapestry needle. Leave an eight-inch starting tail, chain three, insert your hook into the second chain, draw up a loop, insert into the third chain, and draw up a loop, establishing three live loops on the hook. Slide the loops off the hook while holding their bases firmly between your thumb and forefinger, then work each loop individually from right to left to produce a dense three-stitch tubular I-cord. Continue until the cord measures nine inches long, sliding the wooden beads into place along the working strand at chosen intervals. Bring the two cord ends together around the base ring of a heavy-duty swivel snap hook, securing them with tight overhand wraps using the yarn tail. Wrap thirty strands of matching yarn around a four-inch cardboard template to form a full tassel, tying the crown securely over the cord join to conceal all internal knots.
10. Whimsical Woodland Acorn and Leaf Cluster
Read This:

Execution Process
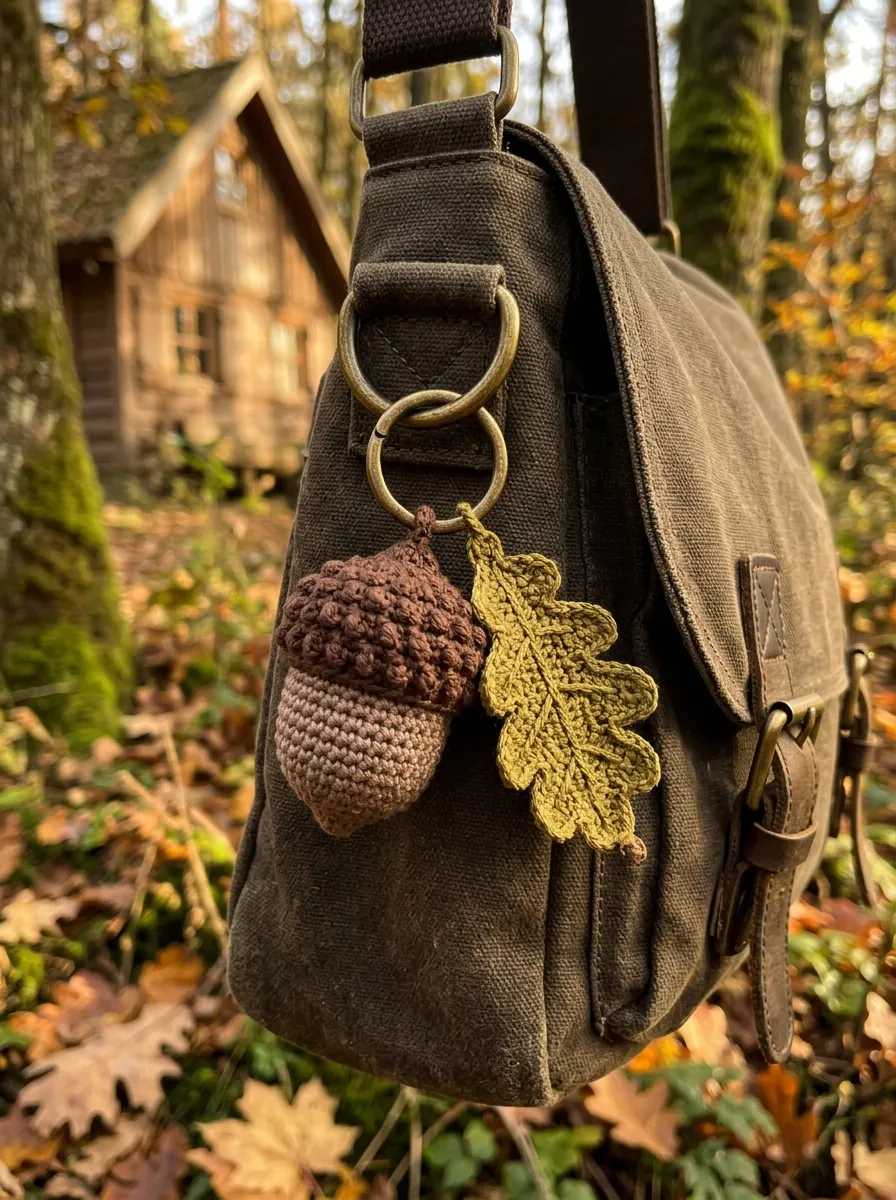
The whimsical woodland acorn and leaf cluster brings rich autumn textures to tote bags, daypacks, and satchels, featuring an assortment of miniature forest elements gathered onto a central clasp. The centerpiece is a small, realistic acorn featuring a smooth taupe nut body topped with a textured cap worked in deep chocolate brown post stitches. Hanging beside the acorn is a delicate oak leaf worked in warm mustard or olive green, finished with rounded lobed borders and a curved stem. The contrast between the smooth nut, rough cap, and flat foliage provides rich visual variety that complements leather, canvas, and knit bags. This design works exceptionally well as a seasonal accent, allowing makers to explore fine relief texturing and organic leaf shaping within a small, accessible format.
Crochet the acorn nut by working six single crochets into a magic ring using warm taupe fingering yarn, increasing over three rounds to fifteen stitches, and working four rounds even to shape the rounded body. Pack the cavity firmly with fiberfill. For the textured cap, switch to deep chocolate brown yarn, working one round of alternating front-post and back-post single crochets to create the rough, bumpy texture of an acorn cup. Decrease over two rounds to six stitches, then chain six directly from the center to create a delicate hanging stem. For the oak leaf, chain twelve in olive yarn, working along both sides of the foundation chain with sequences of single crochet, double crochet, chain two, and slip stitch to form five distinct rounded lobes. Knot the acorn and leaf stems together around a vintage bronze jump ring, attaching the assembly to a purse clip using pliers.
Common Beginner Mistakes and How to Avoid Them
The most widespread mistake when crafting crochet bag charms is using an incorrect hook size relative to the chosen yarn weight. Selecting the hook size listed on commercial yarn labels often produces loose, open stitches that allow white polyester fiberfill to show through or escape during daily handling. To prevent this issue, crafters should use a hook one to two sizes smaller than the manufacturer recommendation, creating a dense, firm fabric that completely conceals the filling. Another common error is insecure hardware attachment; simply sewing a yarn tail around a split ring without reinforced knots can cause the charm to detach and get lost. Always anchor hardware using high-tensile embroidery thread or multiple passes of split-resistant cotton yarn, securing knots inside the stuffed cavities. Beginners also frequently overlook the weight balance of hanging elements, resulting in charms that hang upside down or tilt awkwardly against bag panels. Always test the hanging balance of multi-piece clusters on a flat surface or sample strap before finalizing knots. Finally, avoid using delicate novelty fibers like untwisted roving or loose chenille for high-friction bag charms, as daily contact with bag surfaces will quickly cause pilling, shedding, and fraying.
Practical Tips for Better Results
To achieve clean, professional results in your bag charm projects, focus on mastering the invisible decrease technique for all three-dimensional elements. Unlike standard single crochet decreases that leave raised ridges, the invisible decrease works through the front loops only of two consecutive stitches, producing a smooth surface that blends seamlessly with surrounding stitches. Maintaining firm, uniform yarn tension throughout the project is equally critical; taking short breaks prevents hand fatigue, which can otherwise cause looser stitches as the piece progresses. When attaching metal hardware, use two pairs of smooth flat-nose jewelry pliers to open jump rings sideways with a twisting motion rather than pulling them apart, preserving the circular strength of the metal. For flat elements like daisy petals or leaves, steam blocking the finished shapes with a handheld fabric steamer before final assembly relaxes the fibers and ensures edges lie crisp and flat. Finally, weave in all yarn ends with a sharp tapestry needle, passing through internal stitches in three alternating directions to lock the tails permanently against active friction.
Styling, Presentation, or Organization Ideas
Handmade crochet bag charms offer versatile styling opportunities that enhance personal accessories, wardrobe organization, and creative gifting displays. In personal fashion, pairing a single textured charm—such as a monochrome mini pouch or sleek wooden bead wristlet—with a structured leather work bag adds an artisanal touch without compromising professional elegance. On casual canvas totes, grouping two or three coordinating charms at varying chain lengths creates an eclectic, personalized look that reflects your creative style. For organized storage at home, mount a row of small brass hooks inside a closet or near an entryway to hang your charm collection neatly, keeping accessories untangled and ready to swap between bags. Crafters selling their work or preparing gifts can mount finished charms onto custom kraft cardstock backing cards stamped with botanical patterns, sliding each card into a clear protective sleeve for a clean presentation. Adding small details, such as personalized brass initial tags or colorful satin ribbon accents to the metal clasps, elevates the presentation and turns simple crochet charms into cherished keepsakes.
Budget or Time Planning
Creating custom crochet bag charms is an economical craft that delivers high visual value while making efficient use of crafting time and supplies. A standard small charm typically requires between thirty and ninety minutes of active crochet time, making it an ideal project for quick creative sessions or weekend market preparation. Crafters working on tighter budgets can make the most of their supplies by using leftover yarn scraps from larger home decor or sweater projects, reserving full skeins for coordinated sets. Sourcing metal findings—such as swivel lobster clasps, split rings, and heavy jump rings—in bulk packs from jewelry supply vendors significantly lowers the hardware cost per piece compared to purchasing individual retail kits. Organize your production schedule into focused, assembly-line stages: spend one session crocheting all the base shapes, a second session stuffing and detailing facial features, and a final session mounting hardware with pliers. Working in this organized sequence streamlines production, helping you build a cohesive collection of ten to fifteen unique charms in just a few focused crafting hours.
Creative Expansion and Advanced Inspiration
Once you are comfortable with the foundational charm construction techniques, you can explore advanced customizations to expand your accessory designs. Experiment with micro-crochet using fine lace-weight sewing thread and a 0.75-millimeter hook, producing detailed miniature replicas of fruit, flowers, and animals that function as delicate jewelry-grade charms. Advanced makers can also integrate mixed-media elements—such as natural gemstone beads, leather cord accents, and stamped brass tags—into their yarn assemblies to create textured, high-end accessories. You can also explore custom scent infusion by inserting small natural lava stones or wooden aroma beads inside the stuffed amigurumi cavities, allowing the charm to double as a passive essential oil diffuser for gym bags and car interiors. Another creative direction involves designing seasonal collections, switching your color palettes from bright summer pastels to rich autumnal earth tones and festive winter metallics. By combining strong technical foundations with creative material pairings, you can transform simple yarn loops into distinctive, fashionable accessories that showcase your personal craft aesthetic.