Handmade accessories crafted with needle and yarn represent one of the most rewarding branches of modern textile art. Exploring 10 easy amigurumi keychain patterns provides makers with a practical roadmap for transforming small yarn scraps into durable, functional everyday charms. Within this extensive tutorial, readers will examine clear geometric foundations, structured decrease techniques, and proper hardware attachment methods necessary for resilient daily accessories. Compact crochet patterns serve as an exceptional educational vehicle, allowing crafters to master three-dimensional tension control and precise stitch calculation without committing to extensive multi-week projects. These miniature soft sculptures add a distinct touch of personal identity to tote bags, house keys, school backpacks, and car key fobs. The structured guidance presented throughout this text details the precise physical construction sequences, tension dynamics, and assembly orders required to deliver uniform, firm fabric density. Regardless of your baseline experience with fiber crafts, these straightforward designs supply structured creative ideas that transition smoothly from raw materials to professional results. By establishing firm foundational habits, hobbyists acquire the technical confidence needed to create tight single crochets, seamless spherical decrease rounds, and stable metal attachment joins.
Why Miniature Amigurumi Keychains Dominate Craft Trends
The consistent prominence of miniature crochet keychains across modern creative sharing spaces stems from their distinct combination of speed, portability, and functional design value. Modern enthusiasts gravitate toward purposeful creative projects that fit neatly into tight daily schedules while producing immediately usable, tangible objects. These compact fiber projects offer direct aesthetic relevance, blending modern design principles with the comforting tactile appeal of traditional artisan work. Because these figures rely on simplified spherical, conical, and cylindrical geometries, they provide an exceptionally accessible starting point for newcomers discovering yarn manipulation. The projects utilize tiny portions of fiber, functioning as outstanding stash-busting solutions that maximize material investments and prevent unused crafting waste. From a functional perspective, textured yarn keychains make locating keys within deep bags intuitive and effortless through instant tactile recognition. Their small scale allows crafters to produce multiple complete pieces in a single evening, providing quick momentum and creative satisfaction. Handcrafted keychains also serve as high-utility gifts that express personal consideration without demanding excessive financial expense, demonstrating why miniature fiber art remains permanently popular among modern makers.
Essential Yarn Materials, Hardware, and Planning
Executing durable, long-lasting amigurumi keychains requires proper material selection and careful tool preparation before the initial foundation loop is formed. Mercerized cotton yarn in sport or light worsted weight is the gold standard for portable accessories because its tight structural plies resist pilling, handle moisture, and maintain sharp stitch definition under heavy daily friction. Match your selected yarn with an ergonomic aluminum hook sized one to two full sizes smaller than the manufacturer recommends, typically between 2.0 mm and 2.75 mm. This downsized gauge guarantees dense, impenetrable stitches that completely hide internal polyester fiberfill. Essential auxiliary tools include split-ring metal stitch markers, blunt metal tapestry needles, heavy-duty jewelry pliers, jump rings, split keyrings, and lobster clasps. Preparation also requires testing stitch tension to ensure the resulting textile forms a rigid, firm shell capable of holding its silhouette without collapsing. Planning considerations involve mapping out internal attachment points, as metal chain links must be secured around reinforced fabric loops prior to closing the final round. Maintaining an organized, designated tray for small metal findings prevents lost components and ensures an efficient, uninterrupted assembly flow.
1. Classic Golden Honeycomb Bee Charm
How to Create
Paragraph 1
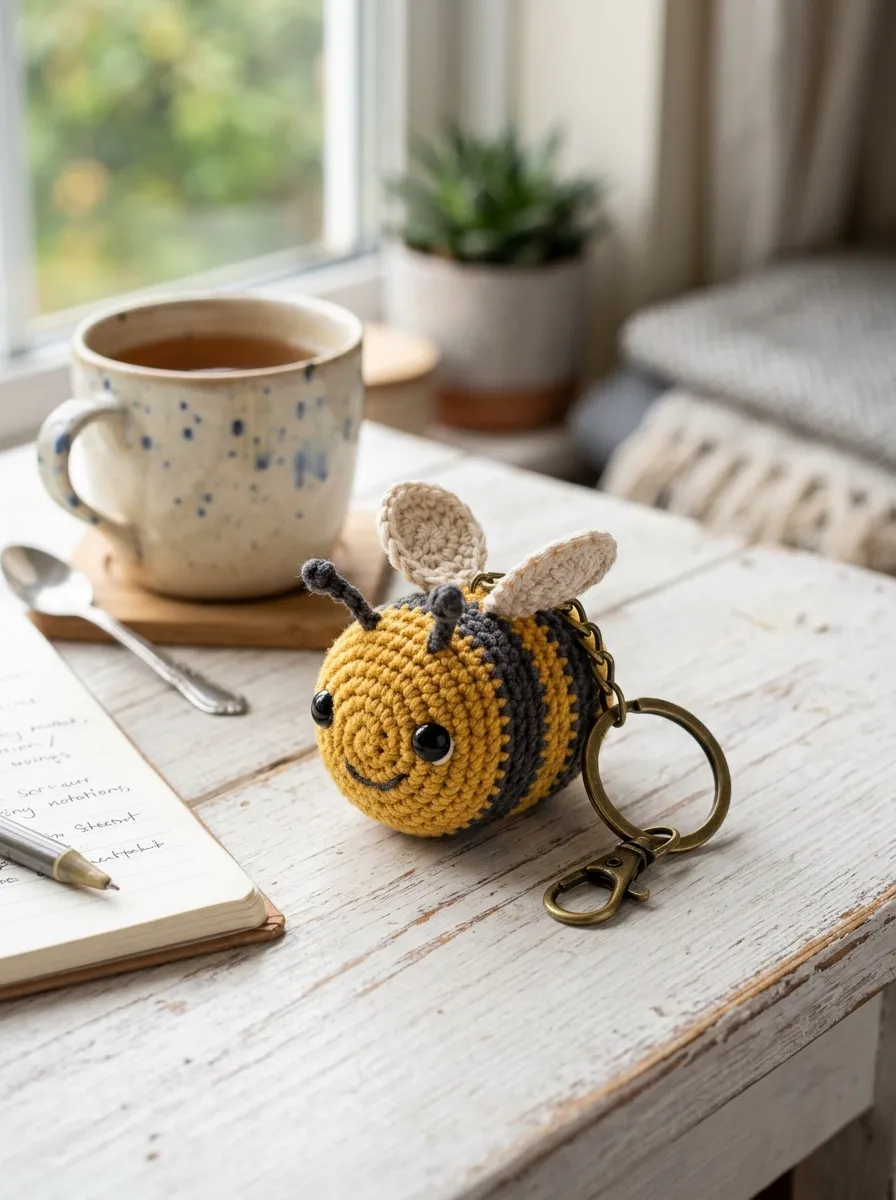
The classic golden honeycomb bee charm utilizes an elongated oval silhouette enhanced by crisp, alternating horizontal stripes of bright mustard yellow and deep charcoal brown. This timeless design relies on high-contrast colorwork to produce an instantly recognizable miniature insect that remains sleek, compact, and structurally sound for daily pocket use. The project emphasizes precise horizontal color changes, teaching crafters how to manage clean transitions without diagonal seam twisting or visible jog lines along the spine. Translucent white or pale ecru wings are stitched directly flat against the upper torso, ensuring the appendages do not snag, bend, or fray inside crowded bags. The simple, rounded symmetry delivers substantial visual impact while keeping the overall surface smooth, compact, and durable. This piece functions exceptionally well as a cheerful accent for everyday keyrings, work lanyards, or child book bags, offering an engaging introduction to continuous spiral striping and flush applique assembly.
Paragraph 2
Begin construction at the rounded head by casting six single crochet stitches into an adjustable magic loop using golden yellow cotton yarn. Expand the circumference systematically across three rounds of balanced increases until reaching twenty-four stitches around the core. Work two continuous rounds in yellow, then complete the final loop of the last stitch with dark charcoal brown yarn to initiate the primary body band. Alternate two rounds of charcoal with two rounds of yellow across eight total rows, maintaining uniform gauge tension to prevent puckering along the carried yarn line. Insert small five-millimeter black safety eyes between rounds four and five, pressing the locking washers firmly into place from the interior. Pack dense polyester fiberfill into the cavity, keeping the head region firm and the tail slightly softer. Crochet two small oval wings by working a single round of single and half-double crochets around a four-chain foundation cord. Fasten off with long tails, using a blunt tapestry needle to anchor the wings securely to the upper back before cinching the base shut.
2. Vibrant Kawaii Strawberry Charm

Read This:

How to Create
Paragraph 1
The vibrant kawaii strawberry charm transforms an inverted cone shape into a bright, summer-inspired accessory complete with textured seed accents and a dimensional green leaf calyx. This pattern celebrates organic tapering, requiring makers to execute regular decreases that narrow the wide upper shoulder smoothly down to a pointed bottom tip. The strawberry aesthetic brings cheerful, saturated color to personal items, pairing rich scarlet or deep ruby fiber with leafy forest-green cotton. The natural contours of the fruit provide an ergonomic grip that rests comfortably in the palm of the hand when opening doors. Embroidered seed details introduce high-contrast surface texture, turning a basic geometric cone into a polished miniature representation of fresh produce. This accessory holds broad appeal across all age groups, functioning equally well as an ornamental car mirror hanger, purse charm, or bright visual marker on key organizers.
Paragraph 2
Start at the broad crown of the berry by working six single crochets into a magic ring using vibrant red sport-weight cotton yarn. Increase steadily across subsequent rounds until thirty stitches encircle the perimeter, then work three even rounds to establish the rounded upper shoulders of the fruit. Systematically decrease two stitches on opposing sides every second round, pulling the fabric inward to generate a natural, sloping conical fruit silhouette. Before reaching the final decrease cluster, thread a sewing needle with pale yellow embroidery floss to scatter tiny vertical seed stitches across the red body, securing the knot ends internally. Fill the interior chamber firmly with clean cluster stuffing, shaping the foam into a firm cone before closing the bottom point through the front loops. Construct the leaf topper separately by chaining six pointed leafy sepals around a small central eyelet, securing the green star atop the berry crown with tonal whipstitches.
3. Minimalist Neutral Acorn Pendant

How to Create
Paragraph 1
The minimalist neutral acorn pendant presents a clean, Scandinavian-inspired woodland theme by contrasting a smooth, pale linen nut against a deeply textured, dark espresso cap. This design relies on subtle earth tones and organic shapes, steering away from bright cartoon expressions in favor of modern, understated handmade homeware design. The acorn body features a rounded, tapered cylinder that fits neatly within the palm, providing an unobtrusive yet tactile presence on minimal brass keyrings. The defining element is the textured cupule cap, which incorporates front-post stitches or delicate bobbles to replicate the rough bark texture of natural oak trees. This refined project serves as an ideal bridge for beginners looking to expand beyond basic flat stitches into three-dimensional raised textures. Its neutral palette coordinates effortlessly with leather goods, canvas rucksacks, and brass EDC utility hardware.
Paragraph 2
Begin by constructing the acorn nut from the base upward using unbleached natural linen cotton yarn on a 2.25 mm hook. Work in continuous spiral rounds, increasing from six stitches to twenty-four, and maintain this uniform diameter for seven rounds to establish the smooth nut profile. Fasten off the linen yarn neatly and switch to dark espresso brown wool or cotton to commence the overlapping cap. Work the first cap round through the front loops only to establish a distinct outer ridge, then introduce repeating sequences of single crochet and miniature popcorn stitches to build natural surface grain. Pause at round twelve to pack dense fiberfill into the lower nut chamber, packing tightly to maintain a smooth exterior surface. Work rapid single crochet decreases along the upper cap dome, inserting an antiqued bronze eyelet pin or direct yarn loop into the top center before drawing the remaining six stitches securely closed.
4. Citrus Slice Wheel Keychain


How to Create
Paragraph 1
The citrus slice wheel keychain employs flat, two-dimensional circular construction techniques that are subsequently folded and seamed into a sturdy, semi-circular wedge. This concept captures the refreshing visual energy of sliced lemons, limes, and grapefruits through geometric concentric color rings. The finished piece produces a flat, pocket-friendly profile that slips into narrow trouser pockets without creating bulky protrusions. Beginners learn how to maintain absolute flatness during circular expansions, balancing increases precisely to prevent edge curling or ruffling. Delicate white surface embroidery subdivides the inner core into realistic segment wedges, contrasting sharply with the saturated fruit pulp tone. This lightweight design offers exceptional utility for warm-weather accessory collections, beach totes, and seasonal housewarming gifts that celebrate clean, mid-century graphic styling.
Paragraph 2
Using a sunny yellow or bright lime green cotton yarn, cast eight half-double crochets into an adjustable center ring to establish the fruit pulp core. Increase by eight stitches evenly across each subsequent round for three full cycles, keeping your tension firm and flat. Switch to bright white yarn for a single round of single crochet to represent the protective inner rind, then finish the outer edge with a final round of deep citrus peel color. Fasten off the circular motif, using a tapestry needle and white thread to backstitch eight radiating segment lines from the outer white ring directly into the central circle. Fold the finished disc precisely in half with the right sides facing outward, creating a thick, semi-circular pocket. Single crochet through both layers along the straight top edge to seal the wedge shut, inserting a pinch of polyester stuffing if subtle three-dimensional body is desired, before securing a sturdy jump ring to the corner.
5. Mini Succulent Pot Keepsake

How to Create
Paragraph 1
The mini succulent pot keepsake translates modern houseplant trends into a charming, miniature fiber sculpture designed for plant lovers and urban gardeners. This two-part construction combines a structured, flat-bottomed terracotta clay pot with an organic cluster of sage green leaves bursting from dark soil. The visual charm comes from the contrast between the rigid, architectural geometry of the flowerpot and the soft, organic curves of the rosette leaves. This design functions as a portable desktop accent or key fob that brings a hint of botanical greenery to everyday personal accessories. Crafters develop specialized skills in maintaining flat, stable bases through back-loop stitching while practicing delicate surface assembly with small botanical components. The resulting piece remains compact, durable, and highly decorative, making it an exceptional craft fair staple or personalized token for friends.
Paragraph 2
Form the terracotta flowerpot using warm rust-colored yarn, beginning with an eight-stitch circle that expands outward over three flat rounds to create a level base. Work one round into the back loops only to establish a sharp, ninety-degree upward turn, then continue working upward for five rounds of standard single crochet. Switch to rich soil-brown yarn and work inward decrease rounds to close the top of the pot over a firm core of fiberfill and a flat circular cardboard disc base. To craft the succulent foliage, use soft sage green yarn to chain small five-petal rosettes, working single crochets, picots, and slip stitches into compact leaf points. Layer two sizes of green rosettes directly over the brown soil surface, pinning them securely in place with glass-headed sewing pins. Sew the leaf clusters down securely with matching thread, finishing the piece by inserting a threaded metal screw-eye bail directly through the central soil core.
6. Geometric Cube Gaming Die
Read This:

How to Create
Paragraph 1
The geometric cube gaming die moves away from traditional rounded amigurumi forms, challenging makers to construct crisp, ninety-degree angles and flat, planar faces. Styled after classic tabletop roleplaying accessories or traditional game dice, this cubic charm features high-contrast embroidered pips or numbers on every face. The structured, linear nature of this design offers clean modern aesthetic value that appeals to gaming communities, students, and lovers of geometric design. Achieving sharp corners in crochet requires deliberate stitch placement and internal structural support, transforming standard yarn into an architectural block. The compact, flat-sided volume rests comfortably in pockets without rolling away, providing unique tactile satisfaction through its sturdy edges. This design provides exceptional practice for spatial coordination, precise corner calculations, and uniform decorative surface embroidery.
Paragraph 2
Crochet six identical square panels using durable, non-mercerized sport cotton yarn, working six rows of six single crochets back and forth with a turning chain. Block each completed square flat using cool water and blocking pins on a foam board to ensure exact square dimensions and crisp borders. Using contrasting black or white embroidery thread, stitch clean satin-stitch circular pips onto the right side of each square, designating values from one to six according to classic die configurations. Join the edges of the six squares together using neat slip-stitch seams worked on the outer perimeter, pausing after joining five faces to form an open box cavity. Insert a precisely cut cube of high-density upholstery foam into the chamber, which provides permanent structural support that will not shift or sag over time. Slip stitch the final square face securely closed around the perimeter, anchoring a heavy steel jump ring firmly into one of the reinforced corner seams.
7. Cozy Bobble Sheep Charm

How to Create
Paragraph 1
The cozy bobble sheep charm features an intensely textured, cloud-like silhouette that pairs rich textural stitches with smooth, contrasting facial features. The body utilizes dense clusters of bobble stitches worked in unbleached cream or ivory yarn, replicating the thick, fluffy wool of a domestic lamb. The face and tiny ears are rendered in smooth charcoal or slate gray single crochet, establishing a balanced visual dialogue between tactile texture and clean minimalist lines. This design provides comforting tactile feedback, making it an engaging stress-relief charm to hold during commutes or busy workdays. Its rounded, buoyant form protects internal stitching, ensuring that the charm maintains its visual appeal even after months of tumbling in bags and pockets. This pattern provides an excellent vehicle for mastering textured bobble tension and securing delicate mini-appliques to uneven crochet surfaces.
Paragraph 2
Start the body using cream-colored wool-blend yarn, working into a magic ring and alternating single crochet anchor stitches with five-loop bobble stitches on every round. Continue increasing until eighteen bobble clusters surround the central spherical core, keeping your loops uniform to ensure balanced cloud-like fluff. Set the body aside temporarily while constructing the smooth faceplate with charcoal fingering yarn, working a miniature flat oval of ten single crochets. Sew two tiny curved ear loops directly to the upper corners of the charcoal face, using a single strand of white thread to embroider two minimalist sleeping eye dashes. Pin the finished faceplate onto the front of the textured sheep body, securing it firmly through the crevices between surrounding bobble clusters. Stuff the interior firmly with polyester pellets contained within a small nylon pouch to give the sheep weighted heft, then decrease and cinch the base shut with a tapestry needle.
8. Woodland Red Fox Silhouette

Read This:

How to Create
Paragraph 1
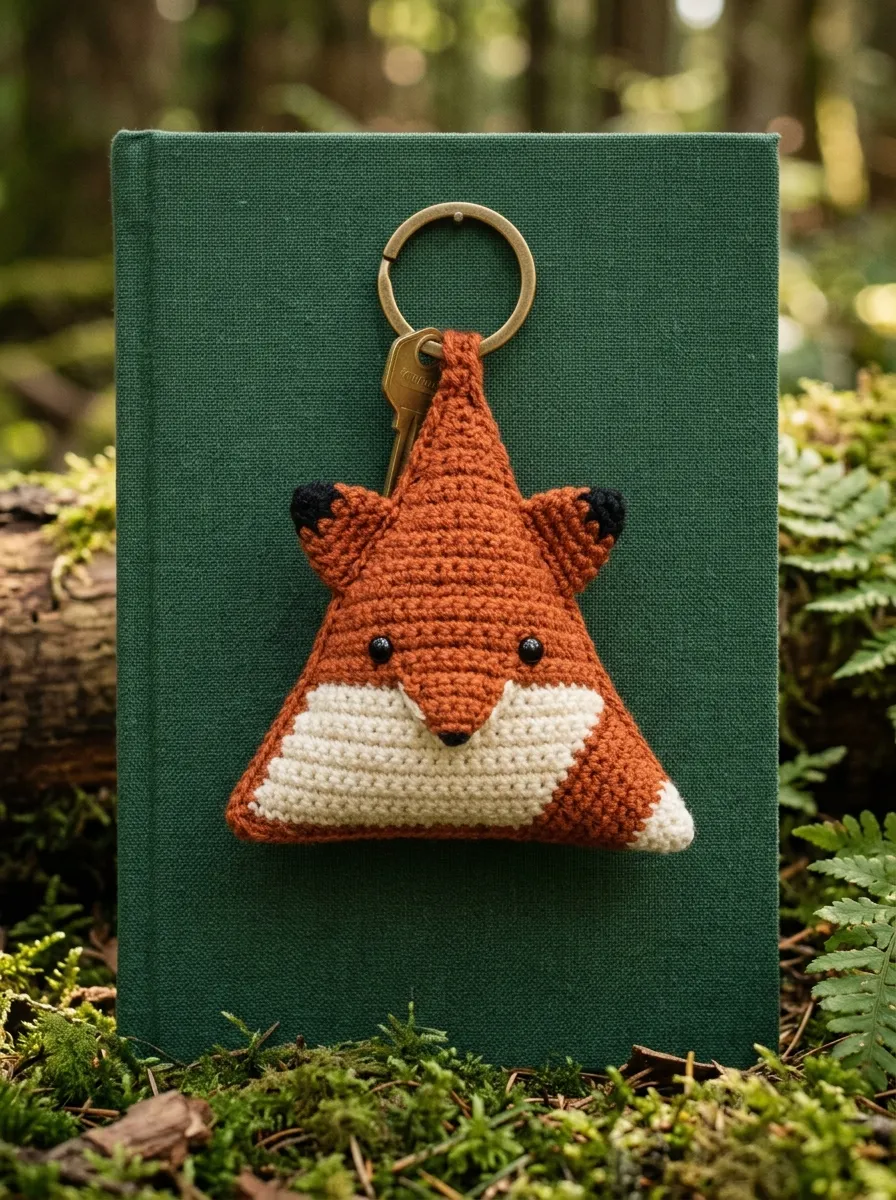
The woodland red fox silhouette captures the spirit of forest wildlife through a compact triangular form detailed with clean white cheek accents and pointed ears. This design relies on a modified cone shape that merges the head and body into a single streamlined piece, minimizing the assembly time required for beginner makers. The color blocking combines warm burnt orange with crisp white and rich jet black, reflecting modern Scandinavian woodland illustration styles. Its tapered profile makes it easy to slide into pockets while offering an expressive, recognizable animal charm for nature enthusiasts and hikers. The absence of protruding limbs makes the piece remarkably durable, preventing accidental snagging on keys and external zipper pulls. Crafters learn to execute sharp angular transitions, balanced color changes, and precise facial embroidery that bring personal character to simple forms.
Paragraph 2
Begin at the top of the fox head using vibrant burnt orange cotton yarn, casting six stitches into a magic circle and expanding outward to eighteen stitches. Work three continuous rounds, then introduce white yarn across the front five stitches of subsequent rows to map out the fox’s cheek ruffs. Insert four-millimeter black glass safety eyes precisely along the color boundary between the orange and white yarn segments, backing them with secure washers. Continue down into the body, tapering the base outward to twenty-four stitches before executing rapid decrease rounds to seal the lower boundary over firm fiberfill. Construct two small triangular ears by working four single crochets into a magic loop using black yarn, switching to orange on the second round. Sew the ears firmly to the top corners of the head, and complete the woodland face by stitching a sharp black satin-stitch nose directly between the white cheeks.
9. Pastel Donut Sweet Charm
How to Create
Paragraph 1
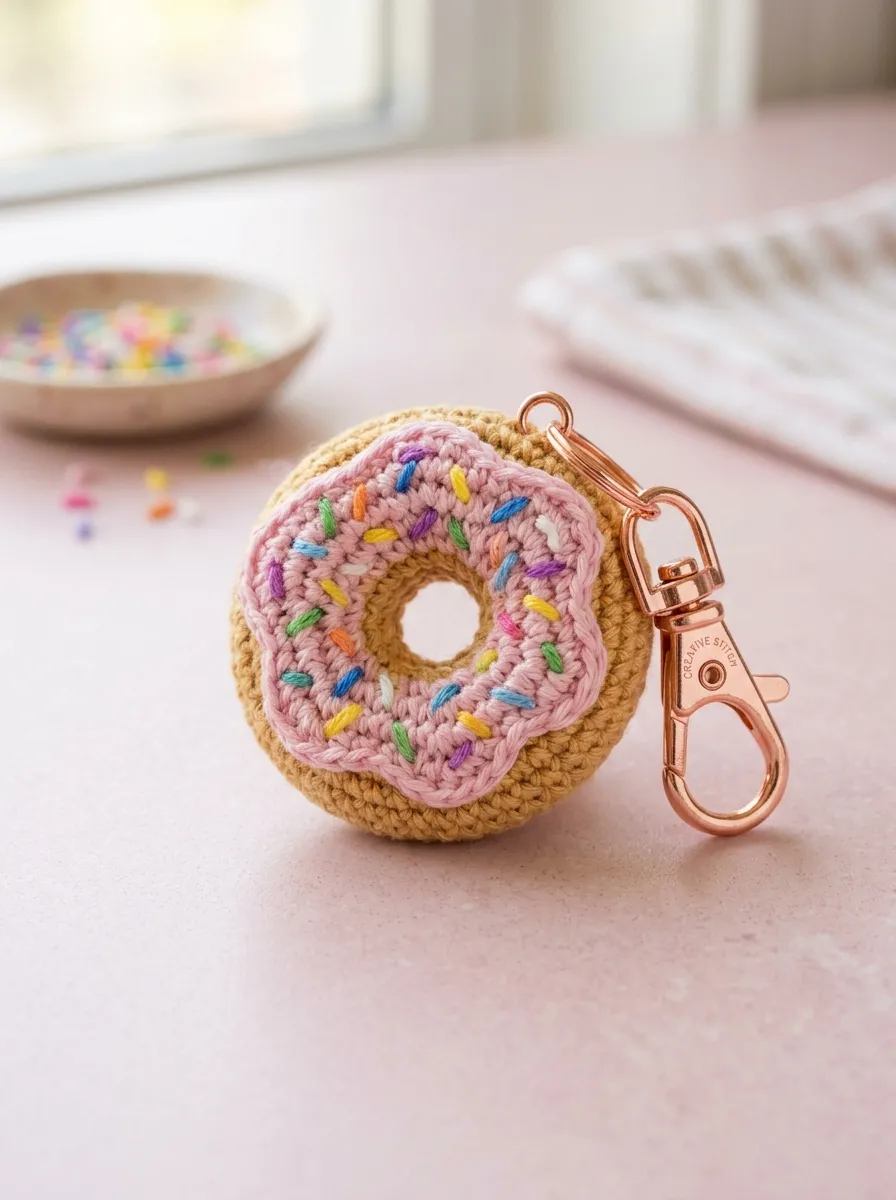
The pastel donut sweet charm embraces modern confectionary aesthetics, translating bakery favorites into a compact, circular torus form with wavy decorative frosting. This design utilizes a hollow center construction technique, challenging crafters to work around an open ring foundation rather than an adjustable solid loop. The design plays with sweet pastel palettes, pairing golden dough tones with mint, lavender, or strawberry glaze finishes. The wavy edge of the frosting layer introduces playful, dynamic lines that sit cleanly atop the smooth rounded dough base. Tiny embroidered sprinkle stitches add bright specks of color, providing endless opportunities to personalize the piece with scrap fiber threads. This charming accessory looks beautiful attached to makeup pouches, pastel key rings, or zipper pulls, offering an accessible, beginner-friendly introduction to toroidal geometric construction.
Paragraph 2
To build the donut foundation, chain twelve stitches using soft golden biscuit yarn, joining the ends with a slip stitch to create an open fabric loop without twisting. Work eighteen single crochets around the ring, increasing regularly over four rounds to build the outer radius of the pastry. Switch to pastel pink yarn to represent the icing, working through the front loops only to create wavy drips using alternating slip stitches, single crochets, and double crochets. Stuff the circular channel gradually with small, wispy tufts of polyfill as you work, shaping the ring evenly to prevent lumpy sections. Fold the icing edge down over the inner dough, using a tapestry needle to stitch the inner seam securely to the original starting chain loops. Thread short strands of turquoise, white, and goldenrod embroidery thread to stitch scattered, angled sprinkle lines across the pink glaze, finishing with a secure top-edge keyring loop.
10. Modern Floating Mountain Peak
Read This:

How to Create
Paragraph 1
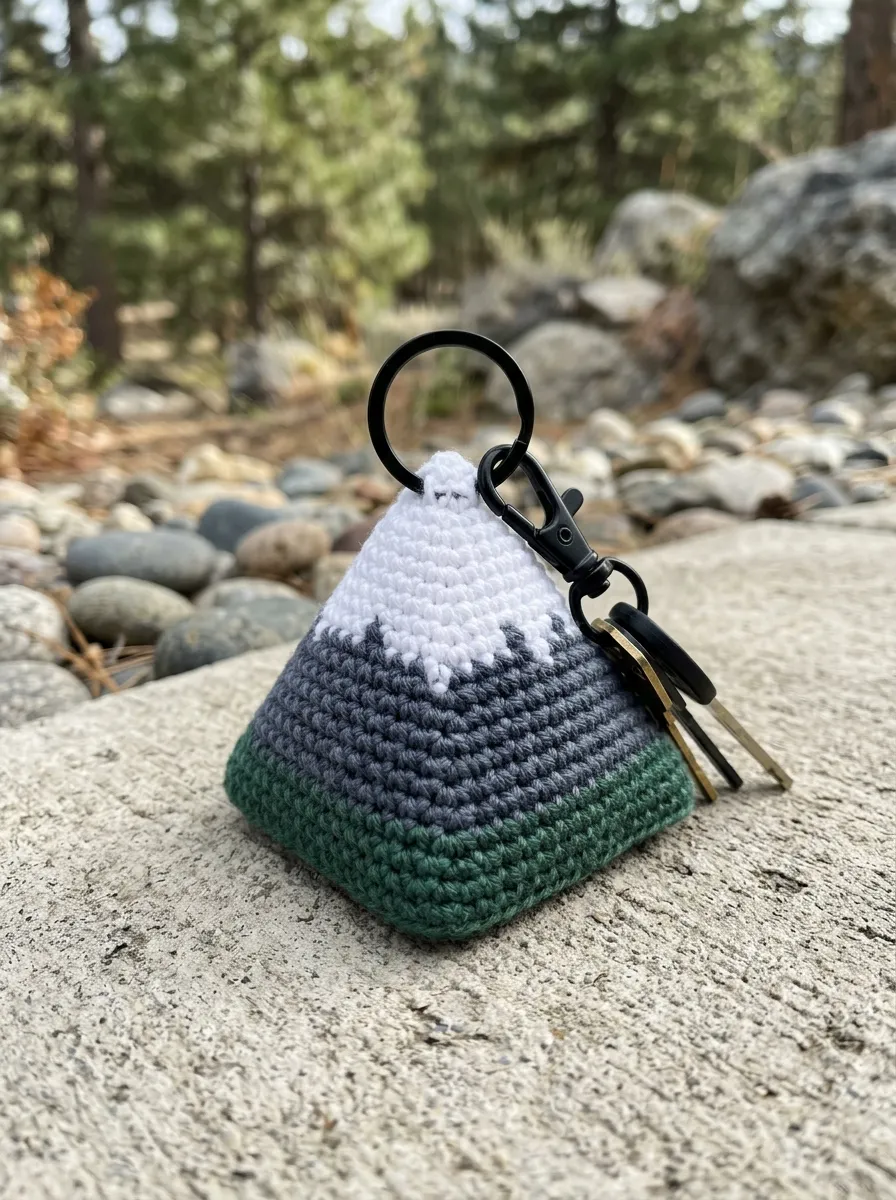
The modern floating mountain peak delivers a minimalist, angular design inspired by alpine landscapes, geometric home decor, and outdoor trail culture. This pattern uses a clean three-sided or four-sided pyramid construction that tapers upward from a broad, flat base to a sharp, snowy summit. The visual impact comes from the sharp diagonal boundary separating the crisp white snowcap from the deep forest green, granite gray, or slate blue mountain face. This modern design avoids decorative cartoon faces, appealing directly to minimalists, outdoor enthusiasts, campers, and lovers of contemporary geometric fiber art. The sharp edges and flat surfaces create a distinctive profile that contrasts with conventional rounded amigurumi dolls. Making this charm refines core technical skills in corner placement, angular decrease alignments, and multi-strand flat tapestry color management.
Paragraph 2
Commence construction at the snowy apex using pure white mercerized cotton yarn, working four single crochets into a magic ring to form a tight, pointed peak. Increase regularly at four designated corner points on every alternate round, transforming the circular spiral into an expanding square pyramid. At round six, execute a jagged, staggered color transition to dark slate gray or alpine green yarn, creating the visual impression of uneven snowbanks. Continue expanding the pyramid until thirty-two stitches encircle the perimeter, then work one round through the back loops only to create a clean, sharp lower baseline. Cut a small square of rigid plastic canvas and insert it against the base to maintain a flat bottom, filling the upper pyramid cavity firmly with fiberfill. Crochet a flat square bottom plate using matching gray yarn, slip-stitching the plate securely around the base perimeter before mounting a steel split ring to the summit peak.
Common Beginner Mistakes and How to Avoid Them
Miniature amigurumi projects demand precise technique, as small-scale errors are magnified on tiny finished accessories. The most frequent error is using an oversized crochet hook, which results in loose, open stitches that allow white polyester fiberfill to show through. Always select a hook size half a millimeter to a full millimeter smaller than indicated on the yarn label to produce dense, rigid stitches. Another common mistake involves inconsistent tension during decrease rounds, which can create puckering and unsightly holes along the lower contours of your piece. Utilizing the invisible decrease technique—working exclusively through the front loops of two consecutive stitches—eliminates fabric distortion and keeps the surface completely smooth. Furthermore, beginners often fail to anchor metal keychain findings securely, resulting in detached charms after only a few days of use. Avoid sewing metal jump rings directly to fragile single yarn strands; instead, anchor hardware through reinforced fabric eyelets or work internal split rings through multiple underlying stitches before cinching the piece closed. Finally, never overstuff miniature accessories, as excessive stuffing stretches the stitches open and distorts the intended geometric proportions of the pattern.
Practical Tips for Long-Lasting Durability
Keychains face significant physical wear, tumbling inside bags, rubbing against abrasive metal keys, and enduring constant daily handling. To ensure your handmade creations survive daily friction, select durable mercerized cotton or tight synthetic-blend yarns that resist fuzzy pilling. When securing yarn tails, weave the loose ends back and forth through the interior fiberfill core in at least three opposing directions before snipping the thread flush. This mechanical friction locks the tails permanently inside the cavity, preventing unraveling even under constant pulling. When attaching small limbs, ears, or appliques, use strong backstitches and sew through both the surface fabric and the internal stuffing layer to establish a sturdy anchor. For safety eyes, add a small dab of non-toxic fabric glue behind the locking washer before snapping it shut, ensuring the plastic hardware remains permanently set within the fabric weave. If you use real metal eyelet bails or jump rings, reinforce the interior attachment point with a small disc of plastic canvas hidden inside the stuffed head. Taking time to establish secure internal construction guarantees that your handmade accessories retain their structure and beauty through years of active use.
Creative Styling, Hardware, and Daily Display
Handmade amigurumi charms offer remarkable decorative versatility, functioning beyond basic keyrings as stylish accents for modern everyday carry collections. Attach your finished creations to brass lobster clasps, allowing you to clip charms effortlessly between tote bags, leather backpacks, and luggage tags. For home organization, hang a curated row of color-coded amigurumi charms along an entryway key rack, assigning unique animal or fruit designs to specific family members. You can also incorporate these miniature creations into modern interior decor by clipping them to indoor plant stands, curtain tiebacks, or desk organizers to add a warm, handmade accent. When preparing keychains as gifts, mount them onto sturdy Kraft paper display cards stamped with care instructions, wrapping the presentation with natural jute twine. Pairing amigurumi charms with complementary hardware accents—such as matching wooden beads, genuine leather tassels, or stamped brass initial discs—elevates the aesthetic quality from a simple craft project to an artisanal boutique accessory. Grouping coordinated sets of three complementary designs across a single metal ring also creates a striking visual statement on larger bags and weekenders.
Efficient Time Management and Budget Planning
Crocheting miniature amigurumi keychains is an exceptionally cost-effective craft, offering an outstanding creative return on investment for hobbyists and small business owners alike. Because an individual keychain charm typically consumes between ten and twenty grams of yarn, a single standard fifty-gram skein yields multiple completed pieces at minimal material cost. To optimize your crafting budget, purchase versatile neutral yarn shades—such as cream, charcoal, soft camel, and sage—in economical bulk packages, using colorful leftover scrap balls for miniature accessories and surface embroidery. Boost production efficiency by batching your workflow: crochet five or six bodies in a single sitting, prepare all small appliques in the next, and dedicate a focused session to final facial embroidery and hardware mounting. Working in systematic batches sharpens physical muscle memory for identical stitch sequences, significantly increasing your crafting speed while reducing frequent tool transitions. A single miniature keychain generally takes between forty-five minutes and two hours to complete from initial magic loop to final hardware assembly. Storing your jewelry pliers, jump rings, split keyrings, and safety eyes in a compartmentalized plastic organizer ensures materials remain sorted and ready for immediate crafting sessions.
Creative Variations and Advanced Modifications
Once you master foundational spheres, cones, and cylinders, you can introduce advanced creative modifications to elevate your amigurumi keychain designs. Experiment with varied yarn weights to transform proportions instantly; using fine embroidery floss on a 0.75 mm steel hook yields delicate micro-amigurumi charms for jewelry, while bulky chenille yarn turns the same pattern into a plush palm-sized stress cushion. Explore surface design techniques by incorporating delicate needle felting, using barbed felting needles to apply raw wool roving directly to the crocheted surface to create soft cheek blush, spots, or complex animal coat markings. For tactile interest, insert small squeakers, rattle inserts, or miniature bell enclosures inside the stuffed core before sealing the final stitches, creating an interactive sensory accessory. You can also integrate interior wire armatures using coated copper craft wire, enabling miniature limbs to bend, pose, and wrap securely around bag straps or charging cables. As your creative confidence expands, combine these varied techniques to design original, heirloom-quality miniature sculptures that reflect your distinct design voice.