Crochet mini stuffed animal keychains represent an engaging union of portable fiber art, functional everyday hardware, and sculptural amigurumi technique. This comprehensive DIY tutorial provides a step by step guide to creating ten distinctive miniature wildlife and domestic animal charms. Readers will learn the essential mechanical principles of miniature crochet, including continuous spiral shaping, balanced single crochet increases, seamless invisible decreases, and durable hardware mounting methods. The featured concepts span diverse animal forms, including rounded honey bears, aquatic turtles, woodland foxes, and graceful marine mammals. Beyond basic stitch formation, this guide addresses critical structural techniques such as stuffing distribution, symmetric facial embroidery, and high-wear seam reinforcement. Creating pocket-sized fiber companions develops foundational dexterity and tension control while producing lightweight, long-lasting accents suitable for keys, backpacks, and personal accessories. The approachable nature of these miniature designs makes them an exceptional creative project for both beginners and seasoned fiber artists looking for new inspiration. By following these practical instructions, crafters can repurpose modest yarn remnants into structured, uniform keepsakes that merge charming character design with clean, modern design sensibilities.
Why Miniature Crochet Animal Charms Are Trending and Useful
The ongoing popularity of miniature crochet animal keychains across modern design platforms reflects a strong appreciation for tactile craftsmanship, nostalgic character design, and personalized everyday accessories. In contemporary DIY culture, enthusiasts continuously seek creative ideas that transform utilitarian objects into playful reflections of personal identity. Miniature animal charms serve as versatile accents that bridge the gap between playful fiber sculpture and practical organization: they function as recognizable bag identifiers, zipper pulls, and desk mascots. From an aesthetic perspective, the compact, rounded geometry favored in modern amigurumi aligns with minimalist style preferences, particularly when rendered in balanced earth tones or soft pastels. For beginners, these compact projects provide an easy project entry point to three-dimensional fiber arts without the heavy time investment required for garments or large blankets. Completing a recognizable, three-dimensional figure in an afternoon offers immediate creative accomplishment while refining foundational stitching habits. Furthermore, their tiny scale requires minimal yarn yardage, offering a practical avenue for using leftover materials and generating budget ideas that remain accessible to all crafters.
Materials, Tools, and Workspace Preparation
Achieving crisp stitch definition and reliable structural integrity in miniature amigurumi requires deliberate material selection, proper tool calibration, and organized workspace setup. Select a smooth, mercerized cotton yarn in sport weight or light fingering weight, as cotton fibers resist pilling under the constant friction of daily pocket or bag use. Pair the yarn with an ergonomic aluminum hook between 2.00 mm and 2.50 mm, intentionally choosing a size smaller than standard yarn guidelines to produce a dense, opaque fabric that conceals polyester stuffing completely. Assemble essential accessories including sharp embroidery snips, curved tapestry needles, locking plastic stitch markers, firm hypoallergenic fiberfill, four-millimeter plastic safety eyes with backings, and black stranded embroidery floss. For mechanical assembly, gather heavy-duty split rings, small lobster clasps, four-millimeter open jump rings, and flat-nose jewelry pliers. Preparation begins by establishing an organized assembly surface with small sorting trays for metal findings and yarn tails. Pre-condition your tension by crocheting a small, flat gauge circle to verify that stitches lie flat without gaps before launching into complex three-dimensional animal profiles.
1. Miniature Honey Bear Pocket Charm
Step-by-Step Guide
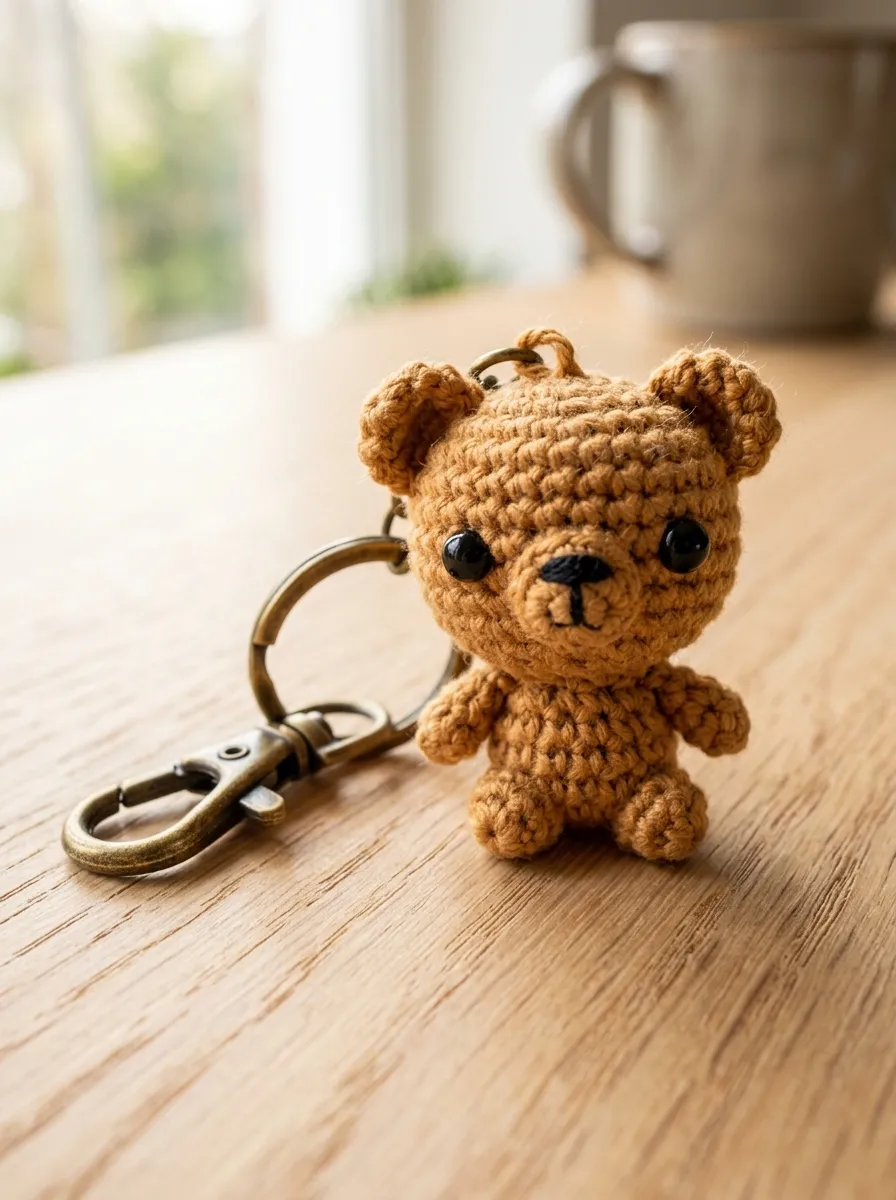
The miniature honey bear pocket charm showcases classic teddy bear architecture scaled down into an ultra-compact, spherical silhouette. This design relies on a continuous single crochet sphere for the head and torso combination, accented by tiny cupped ear flaps and a protruding muzzle. The visual appeal comes from its balanced, rounded proportions, which give the bear a friendly presence while maintaining a dense, snag-free outer shell. The warm golden-caramel or milk-chocolate yarn establishes a traditional woodland feel that contrasts with modern metallic hardware. Because this charm has no long protruding limbs, it is resilient against wear, resisting snagging inside pockets or crowded handbags. The project introduces crafters to foundational amigurumi shaping principles, specifically building a uniform spherical core and attaching curved appliques to continuous round surfaces. The finished bear serves as an approachable companion piece for key rings, nursery zipper pulls, or understated handmade gifts.
Begin by working six single crochet stitches into an adjustable magic ring using warm caramel cotton yarn. Increase by six stitches on each round across three consecutive rounds until reaching twenty-four stitches, placing a stitch marker in the first stitch of each round to maintain alignment. Work five straight rounds of twenty-four single crochet stitches to form the cylindrical body depth, inserting four-millimeter safety eyes between rounds six and seven, spaced four stitches apart. To shape the base, execute a round of six invisible decreases, pack the head cavity firmly with small clusters of polyester stuffing, and complete final decreases until six stitches remain before cinching the base shut. For each ear, work six single crochets into a magic loop, tighten the loop into a half-circle without joining, and fasten off with a long sewing tail. Using a tapestry needle, stitch the ears securely across rounds four and five on opposing sides of the head. Finish by embroidering a tiny horizontal nose and vertical mouth line using black embroidery floss.
2. Slumbrous Sloth Tree Branch Hugger
Read This:

Execution Process
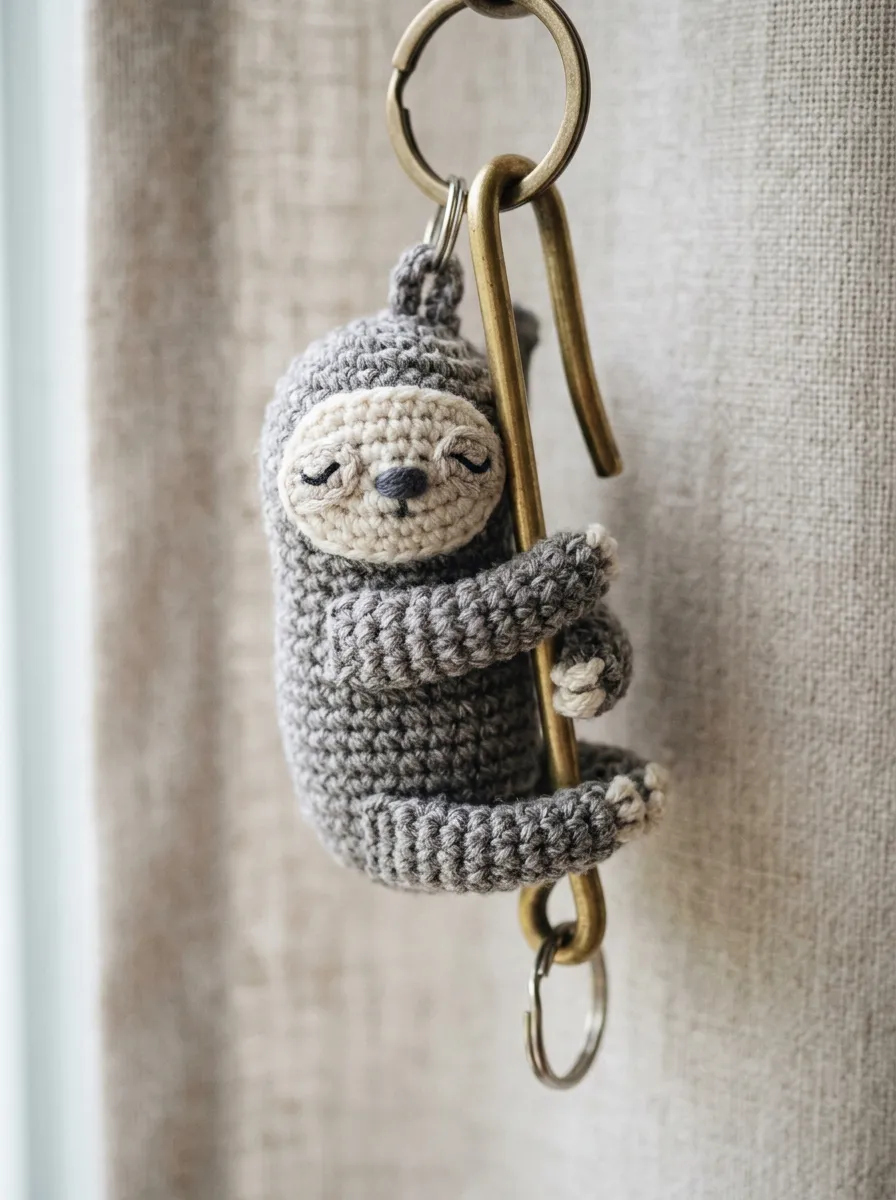
The slumbrous sloth charm translates the tranquil, slow-moving nature of the rain forest canopy into a tactile, hanging accessory. This design features an elongated cylindrical body worked in soft heather-gray or warm taupe yarn, accented by a distinct cream-colored facial mask with dark eye patches. The unique characteristic of this charm is its curved, four-limb posture: long, flexible arms and legs terminate in tiny cream claws that loop together, allowing the sloth to hug keychains, pens, or cord lanyards. The calm facial embroidery, featuring curved downward sleeping lashes, reinforces a restful aesthetic that aligns with contemporary minimalist trends. The elongated silhouette creates an interesting visual rhythm when grouped with traditional spherical charms, providing dynamic movement. This project develops skills in working narrow, tubular limbs and executing detailed surface embroidery on small surfaces, making it a rewarding challenge for makers seeking expressive character design.
Start the sloth body by working six single crochets into a magic loop using heather-gray cotton yarn, increasing evenly to eighteen stitches over three rounds. Work eight rounds of eighteen single crochets to construct the extended cylindrical torso, lightly stuffing the interior as you progress to retain flexibility. Decrease back down to six stitches and weave the final yarn tail through the front loops to close the bottom. For the facial mask, chain five in cream yarn, single crochet around both sides of the foundation chain to form an oval, and sew it onto the upper third of the torso. Using dark brown embroidery floss, stitch two angled eye patches across the cream mask, adding delicate curved lines for closed eyes. To construct the four hugging limbs, chain eight in gray yarn, work seven slip stitches back along the chain, and finish the tip with three small cream French knots to represent claws. Sew two limbs to the upper shoulder line and two to the lower hips, securing opposing paws together with reinforced stitches.
3. Deep Sea Baby Whale Keychain
How to Create
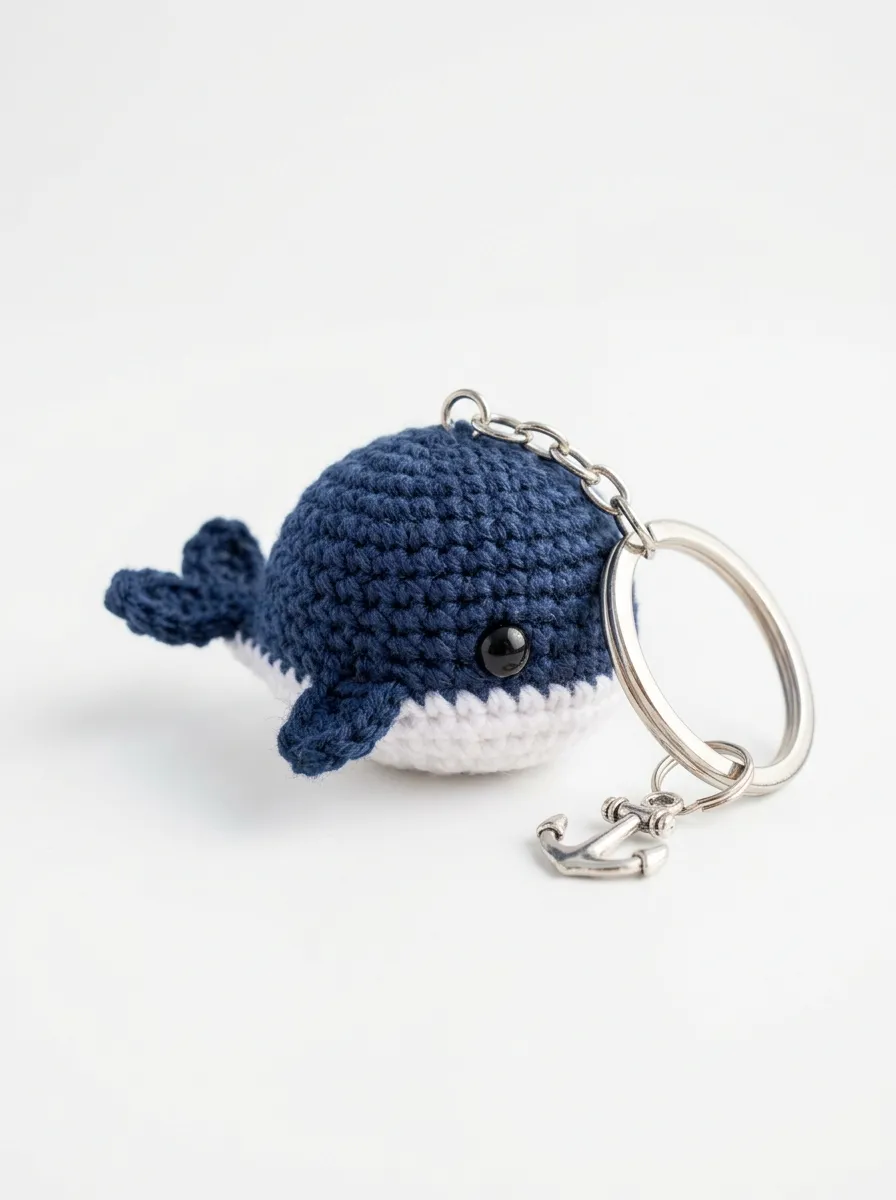
The deep sea baby whale keychain captures oceanic wonder through a streamlined teardrop shape and continuous, flowing contours. This design features a split-tone body, combining a deep navy or slate-blue dorsal surface with a crisp white underbelly that mirrors authentic marine countershading. The defining features of this charm are its tiny lateral flippers and a horizontal split tail fin that provides authentic biological detail. Its tapered, aerodynamic shape slides into pockets smoothly, preventing edge wear and keeping the charm looking neat over extended use. Crafters can adapt the pattern across varying oceanic palettes, swapping navy for muted seafoam green or pastel lavender. The smooth surface highlights consistent tension, making it an excellent showcase for clean single-crochet fabric. The marine theme brings an airy, coastal presence to everyday key rings and canvas totes.
Begin at the blunt head using ocean-blue cotton yarn, working six single crochet stitches into an adjustable magic ring. Expand systematically to eighteen stitches across three rounds, then transition to two-tone construction: work nine stitches in blue, switch to white yarn on the final yarn-over, and work the remaining nine stitches in white. Maintain this color-blocked ratio for four straight rounds, carrying the inactive yarn loosely through the interior cavity. Insert safety eyes into the blue section just above the color transition line. Begin tapering the body toward the tail by decreasing two stitches on each subsequent round until six stitches remain, stuffing the head and body firmly with fiberfill before the opening becomes too narrow. To form the flukes, do not fasten off; chain four, work three double crochets back into the base, chain four, slip stitch into the center, and repeat on the opposite side to form the twin tail fins. Work two miniature triangular pectoral flippers in blue and stitch them along the horizontal color seam.
4. Playful Calico Kitten Bobble Charm
Step-by-Step Guide
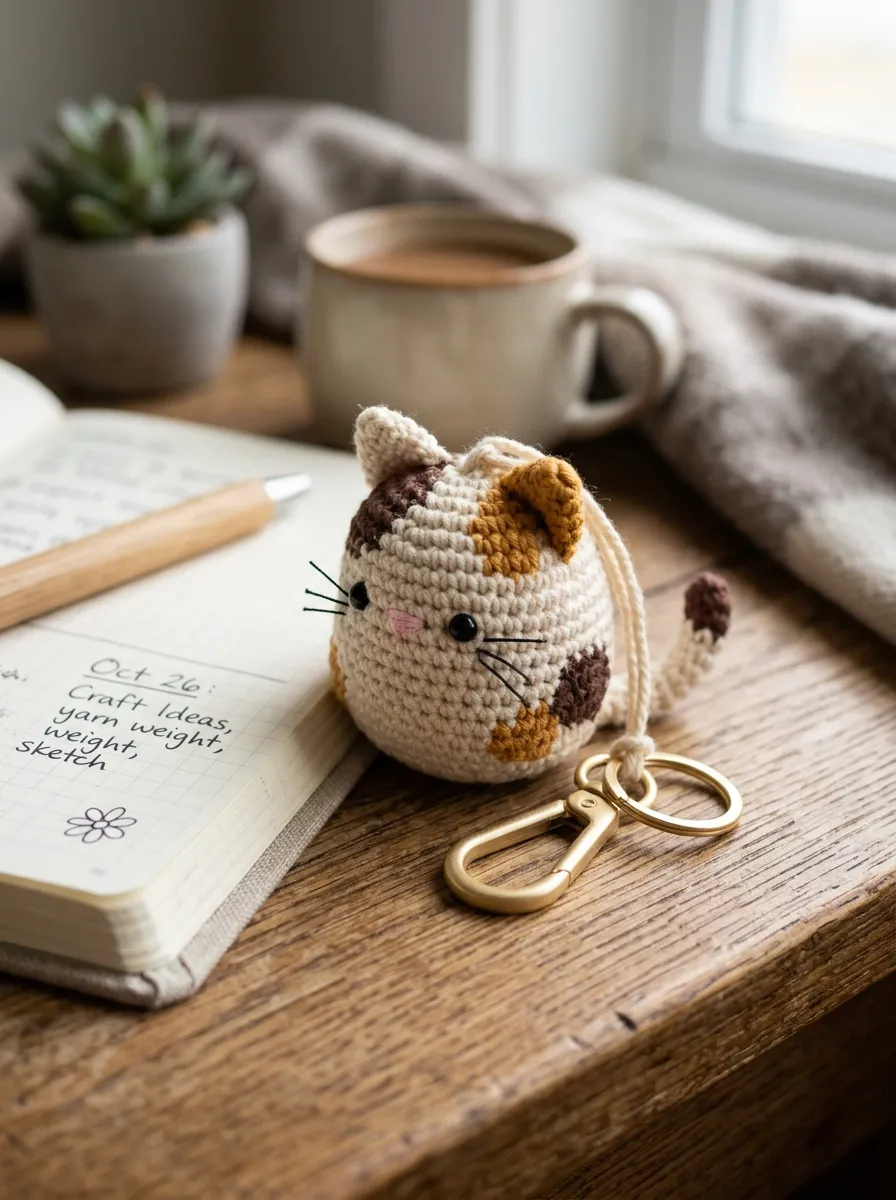
The playful calico kitten bobble charm delivers classic domestic charm through expressive, asymmetric color-blocking and sharp architectural lines. This design features a compact, rounded body displaying random patches of chocolate brown and warm amber set against a creamy white foundation. Pointed triangular ears perch atop the head, while a slender, curved tail extends from the lower spine to add balance. The visual interest relies on the spontaneous placement of the calico patches, ensuring that no two finished kittens look identical. Crafters practice intentional yarn-changing mechanics and flat-edge ear shaping to keep the kitten’s silhouette distinct. This project appeals to pet lovers and fans of whimsical, cozy aesthetics. The small footprint makes it a functional zipper pull for school backpacks, laptop sleeves, or everyday key rings, bringing handcrafted warmth to utilitarian everyday carry items.
To craft the calico kitten, begin with cream cotton yarn by working six single crochets into a magic ring. Expand the circle to twenty-four stitches over four rounds, introducing an amber or brown color patch by working four consecutive stitches in the contrast hue during round three. Continue working straight rounds of twenty-four stitches for five rounds, randomly alternating four-stitch blocks of brown and amber along the sides to mimic organic fur patterns. Secure four-millimeter black safety eyes between rounds six and seven, and pack the body firmly with resilient fiberfill. Work six invisible decreases on round eleven, followed by continuous decreases to cinch the bottom opening shut. To make the pointed ears, chain four in cream yarn, work three single crochets back, turn, and decrease by one stitch on each subsequent row until a single sharp peak remains. Whipstitch two ears firmly to the top of the head. Crochet an eight-chain foundation for the tail, slip stitch along its length, and anchor it securely to the lower rear seam.
5. Petite Desert Tortoise Shell Charm
Execution Process
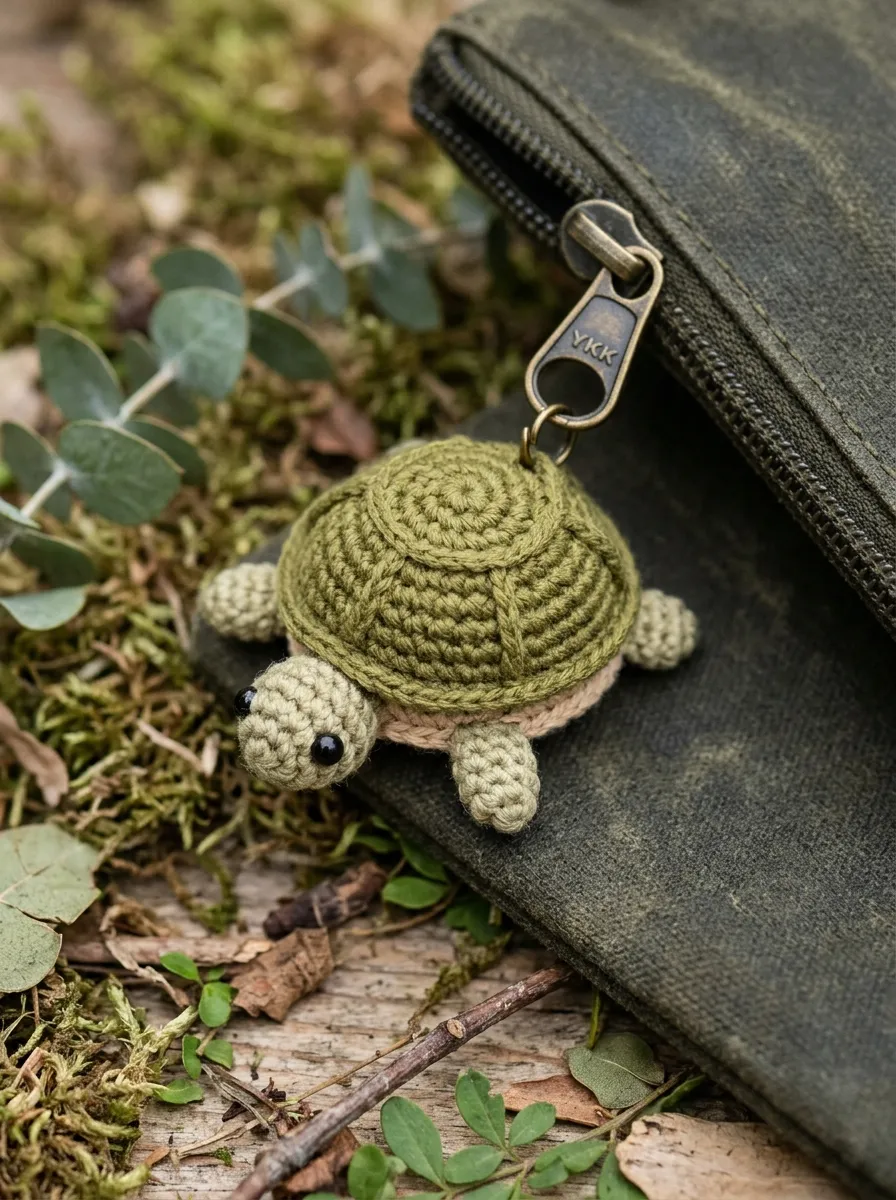
The petite desert tortoise shell charm explores domed architectural shaping and multi-layered textural assembly. This design pairs an elevated, curved carapace with a flat plastron underbelly, framed by four rounded stumpy flippers, a tapered tail, and an extended head. The upper shell uses textured stitches—such as front-post single crochet or delicate surface slip-stitch ridges—to simulate natural scute plates. Working in earthy tones like olive green, sage, or muted sand creates a calm, botanical presence that suits modern outdoor aesthetics. Because the shell is wide and relatively flat, it rests comfortably against the side of a bag or inside a pocket without creating awkward bulk. This project provides practical practice in joining two distinct flat-edged planar pieces into an enclosed, three-dimensional volume, broadening a crafter’s technical repertoire beyond basic single-piece spheres.
Start the upper carapace using deep olive-green yarn by working six single crochet stitches into a magic ring. Increase by six stitches each round until reaching twenty-four stitches, working the fourth round through the back loops only to create a pronounced outer shell ridge. Work two straight rounds of twenty-four single crochets to build vertical depth, fasten off, and set the dome aside. To construct the flat plastron base, work twenty-four single crochet stitches over four flat increase rounds using pale tan yarn, leaving a long seaming tail. To craft the head, work six single crochets into a magic loop, work two straight rounds, and lightly stuff the cylinder. Crochet four identical paddle feet by working four single crochets into a ring and pressing them flat. Align the olive carapace and tan plastron together, sandwiching the head, feet, and a tiny pointed tail between the edges. Single crochet through both shell rims simultaneously, inserting a light disc of fiberfill into the central core before sealing the final seam.
6. Woodland Rust Fox Bag Pendant
Read This:
Setup Method
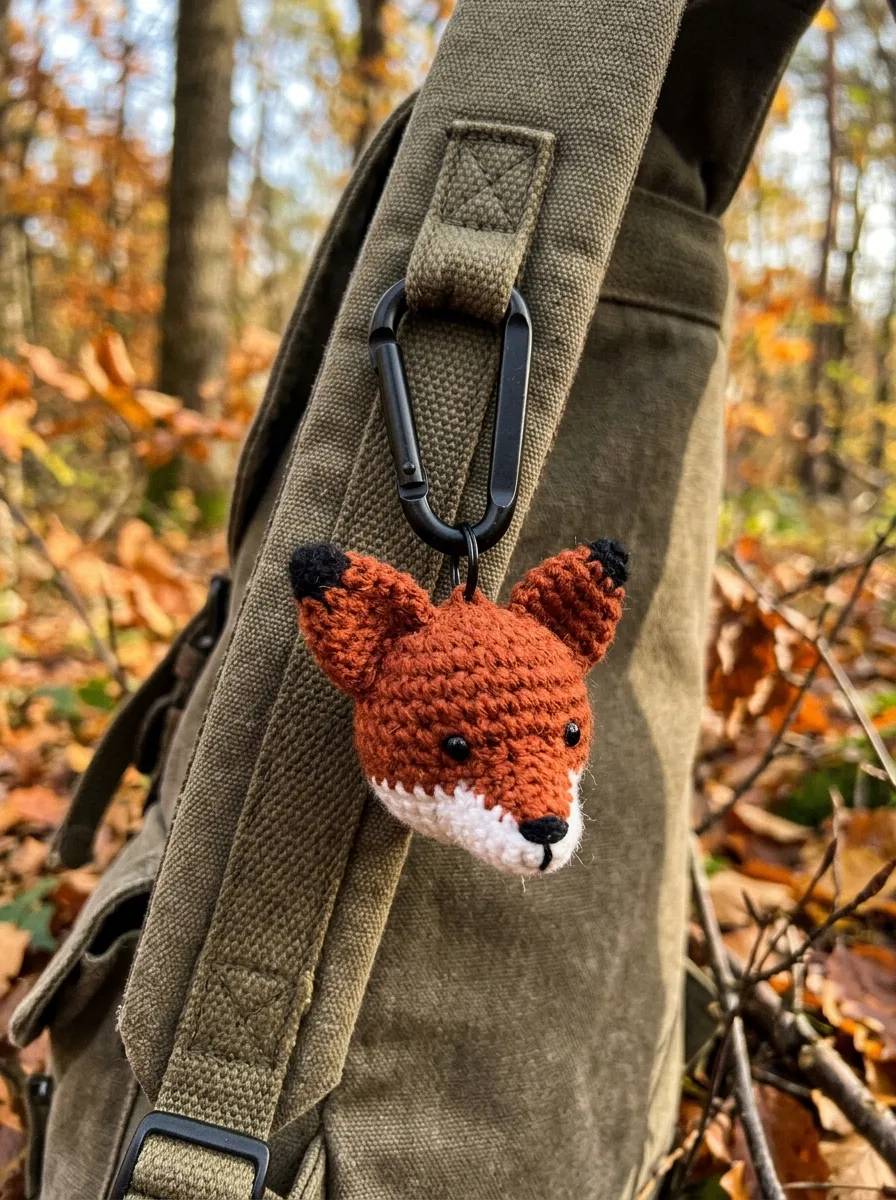
The woodland rust fox charm brings rich autumnal character and sharp, geometric lines to miniature amigurumi collections. This design features a conical head that transitions from a slender white muzzle up into a broad, rich terracotta-orange brow, crowned by oversized triangular ears with dark charcoal tips. The visual appeal comes from high-contrast color zones: the bright white cheeks highlight the dark embroidered nose and eyes, while the deep rust hue provides warm saturation. The fox can be constructed as a seated character or a simplified stylized head pendant, both offering a sleek, modern look. The pointed geometry balances soft yarn textures, creating a polished piece suitable for modern backpacks, camera straps, or jacket pulls. This project helps crafters practice steep conical increase sequences and precision two-tone facial shaping, building skills that transfer directly to other woodland animal designs.
Begin at the tip of the nose using crisp white cotton yarn by working four single crochets into an adjustable magic loop. Increase by two stitches on alternate rounds for four rounds to form a slender, tapered muzzle. Switch to rich terracotta yarn across the top half of the stitches while maintaining white yarn across the lower half for two rounds, creating distinct cheek boundaries. Expand the upper terracotta section to twenty stitches, work three straight rounds to build forehead depth, and install small safety eyes at the junction where the white cheeks meet the orange brow. Decrease the remaining stitches systematically, packing fiberfill firmly into the pointed muzzle before cinching the back of the head closed. To build the ears, begin with charcoal yarn, working four single crochets in a ring, expanding to six stitches, then switching to terracotta yarn for two expanded rounds of eight stitches. Flatten the ears into sharp triangles and sew them securely across the crown, embroidering a tiny black nose at the muzzle tip.
7. Arctic Waddling Penguin Keychain
How to Create
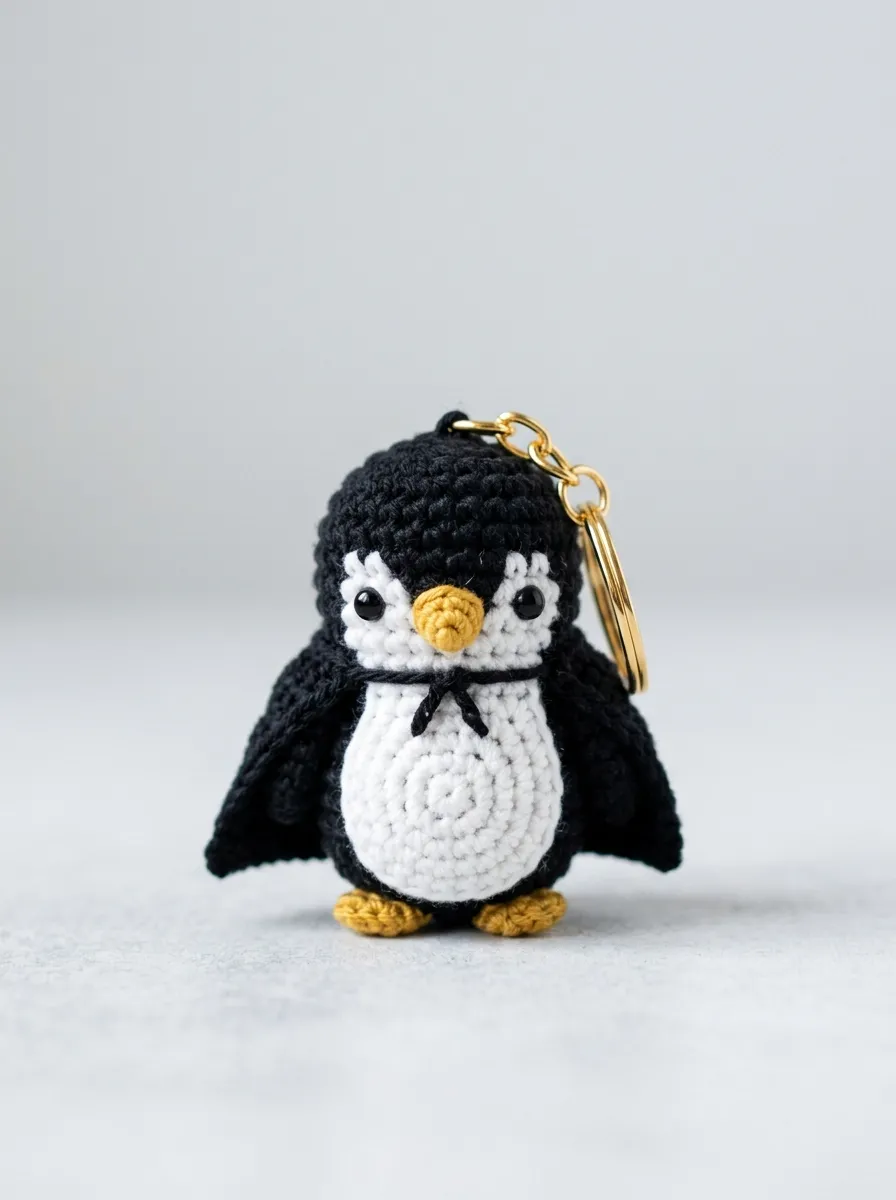
The arctic waddling penguin charm combines clean, graphic color-blocking with an endearing teardrop profile. This design features an unbroken black or charcoal outer cape that wraps around a clean white belly patch, finished with a bright golden-yellow beak and tiny paddle feet. The charm captures the charming proportions of a young penguin, using a low center of gravity and wide, flat base that allows it to stand independently on a desk when detached from keys. The contrast between deep black and pure white yarn produces crisp visual definition that makes the character easily recognizable even from a distance. Its smooth, rounded contours slide effortlessly in and out of pockets without catching on fabric linings. This project is ideal for practicing clean color-changing boundaries in the round, helping beginners master tension consistency across contrasting yarn strands.
Start at the crown of the head using deep black cotton yarn, working six single crochets into a magic ring. Expand to eighteen stitches over three increase rounds, then begin two-tone integration: work five stitches in black, transition to white yarn for eight stitches across the chest, and complete the round with five stitches in black. Continue this dual-tone sequence for six rounds, ensuring the white chest panel stays centered by shifting the yarn-over transition slightly if stitches begin to slant. Install safety eyes along the black borders flanking the white belly patch. Complete a series of uniform decreases using black yarn only, inserting a flat plastic circular disc and a firm layer of fiberfill into the base to ensure the penguin stands flat when rested on surfaces. For the beak, work a tiny two-round cone in sunny yellow yarn and sew it centrally between the eyes. Craft two flat black flippers and two miniature yellow feet, whipstitching them along the body flanks and base respectively.
8. Sunny Garden Frog Bobble Charm
Read This:
Step-by-Step Guide
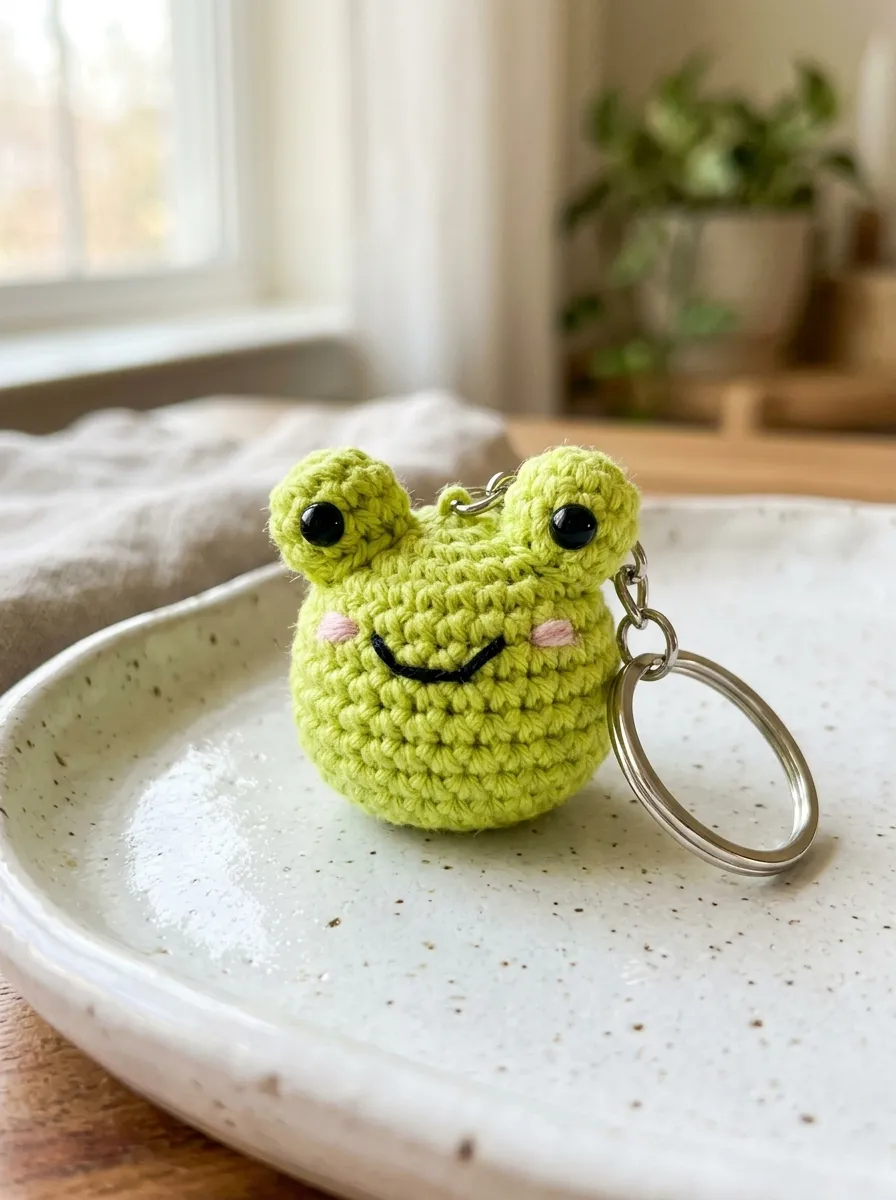
The sunny garden frog bobble charm brings lively, cheerful color and expressive biological contours to your accessory collection. This design features a wide, slightly flattened oval body worked in vibrant lime or apple-green yarn, dominated by two large, elevated spherical eye globes positioned on top of the head. The wide, smiling mouth is embroidered with black thread and accented by soft blush cheeks, giving the amphibian a playful, friendly personality. The charm’s smooth, rounded silhouette avoids delicate dangling limbs, making it sturdy enough to withstand rough handling inside gym bags or school lockers. The vibrant green hue makes keys easy to locate in deep bags, providing practical organization alongside its handcrafted appeal. This project develops techniques for shaping protruding three-dimensional facial features, such as working independent spheres and seaming them seamlessly into an underlying contoured amigurumi base.
Begin the frog body with bright lime-green cotton yarn by working six single crochets into a magic ring. Increase across four rounds to twenty-four stitches, work two straight rounds, then work four increases along one hemisphere to create a wide, protruding mouth line, reaching twenty-eight stitches. Work three straight rounds to build vertical height, then work matching decreases to bring the count back to twenty-four stitches. Insert safety eyes into separate eye globes: for each eye, work six single crochets in a ring, expand to nine stitches, work one straight round, insert a safety eye through the center, lightly stuff, and sew the cups to the top edge of the head. Pack the main body firmly with fiberfill, then work regular decrease rounds until six stitches remain, cinching the base shut with a needle. Thread black embroidery floss to stitch a wide, smiling mouth across the front curve, and use soft pink yarn to embroider two horizontal blush marks beneath the eyes.
9. Little Barnyard Chick Key Ring
Execution Process
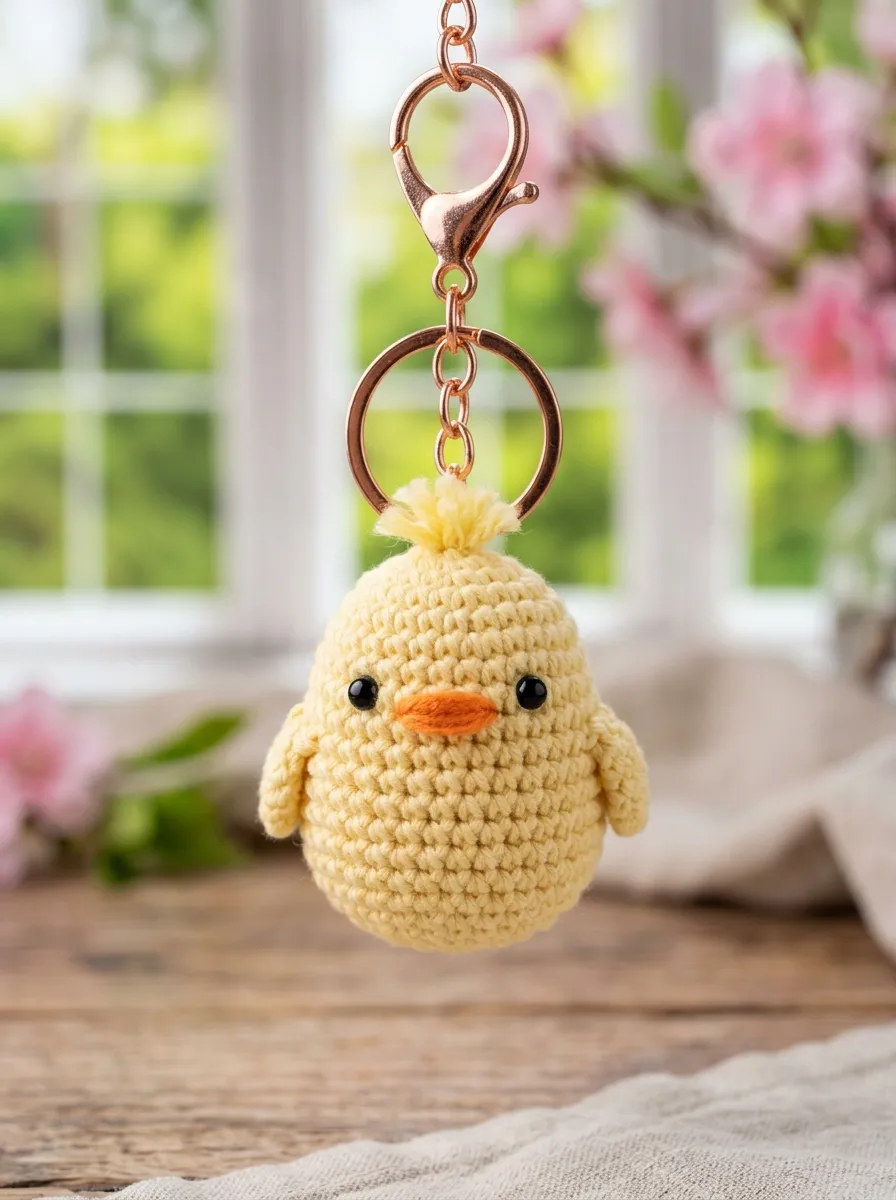
The little barnyard chick charm is an approachable, cheerful project that delivers instant visual warmth through sunny monochromatic colorways. This design features an egg-shaped body worked in soft pastel-yellow yarn, accented by tiny triangular wings, a tuft of crown feathers, and a miniature orange beak. The tapered egg silhouette introduces beginners to varied increase pacing, moving from a narrow upper head down into a plumper, rounded belly. Its compact size requires very little yarn, making it one of the most efficient scrap-busting projects in a crafter’s repertoire. The cheerful yellow hue makes it easy to spot inside dark backpacks or deep tote pockets, serving as an effective visual locator for house or vehicle keys. This design is also well-suited for seasonal spring decorations, backpack charms, or welcoming handmade party favors.
Start the chick by working five single crochets into a magic ring using pale yellow cotton yarn. Increase by five stitches on round two to reach ten stitches, work one straight round, and increase by five stitches again on round four to reach fifteen stitches, forming the tapered crest of the head. Work two straight rounds, then place five increases evenly across round seven to expand the lower body to twenty stitches. Install small four-millimeter safety eyes between rounds five and six, spaced three stitches apart. Work three straight rounds to establish body volume, then complete two decrease rounds, packing fiberfill firmly into the core before cinching the remaining stitches shut. To craft the wings, chain four in yellow yarn, work a slip stitch, single crochet, and half double crochet back along the chain, and fasten off; make two wings and sew them to the body flanks. Embroider a small triangle of orange yarn between the eyes for the beak, and knot three two-inch strands of yellow yarn to the crown, trimming them into a neat feathered tuft.
10. Gentle Oceanic Manatee Keychain
Read This:
Setup Method
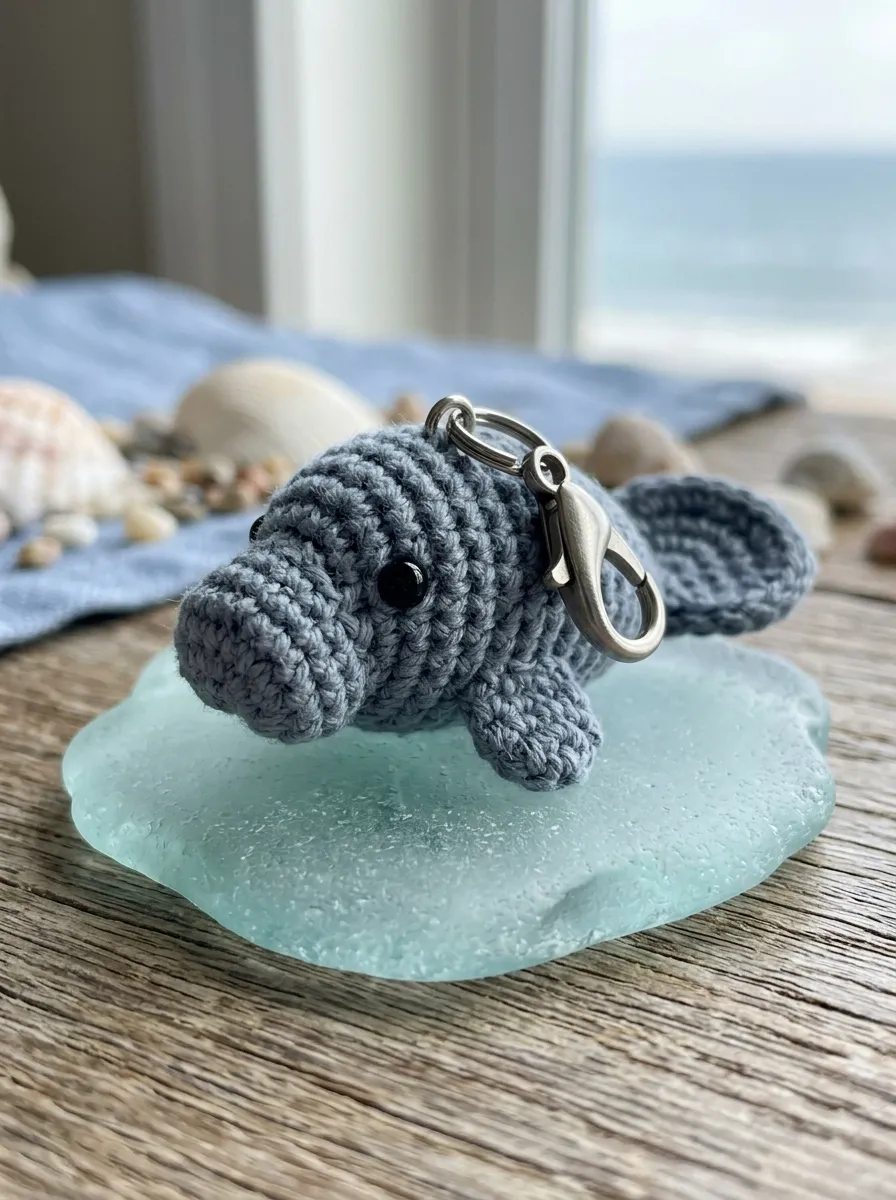
The gentle oceanic manatee charm introduces subtle anatomical sculpting through its distinctive downturned snout and broad, paddle-shaped tail. This design uses soft slate-gray or heathered stone yarn to mimic the wrinkled, peaceful appearance of wild sea cows. The focal feature is the padded, rounded muzzle, created through dense cluster stitches or an overlapping stuffed snout piece that projects past the face. The body flows into a broad, horizontal tail paddle, providing an accurate marine silhouette that stands out from standard spherical animal charms. Its calm gray palette suits understated minimalist style preferences, offering a mature, sophisticated alternative to high-contrast novelty accessories. The design maintains a streamlined, snag-resistant form that holds up well to daily friction against metal keys, making it a reliable, functional charm for vehicle keychains and travel bags.
Begin the manatee by working six single crochets into a magic loop using slate-gray cotton yarn. Increase over three rounds to eighteen stitches, then work one round of eighteen stitches through the back loops only to create a subtle contour for the forehead. On round five, work four single crochets, four puff stitches in the next four stitches to create a bulbous, fleshy snout, and complete the round in standard single crochet. Work four straight rounds of eighteen stitches, inserting small safety eyes just behind and above the snout bumps. Begin tapering the body toward the rear by decreasing two stitches on each round until ten stitches remain, stuffing the body firmly while keeping the lower tail zone relatively flat. To form the paddle tail, do not fasten off; flatten the open tube horizontally, work single crochets through both layers simultaneously, turn, and work two double crochets into every stitch across the edge to produce a wide, fan-shaped paddle. Weave all tails neatly into the body core.
Common Beginner Mistakes and How to Avoid Them
The most frequent challenge beginners face when crocheting miniature stuffed animal charms is loose stitch tension, which allows white fiberfill to show through the stitches. Working with the hook size printed on the yarn label is usually the culprit; crafters should select a hook that is one or two sizes smaller than recommended to produce a tight, dense fabric. Another common mistake is uneven facial feature placement. Inserting safety eyes or embroidering noses even one stitch off-center can distort the character’s expression; always mark intended eye and muzzle placements with contrasting yarn pins before securing backings or making final stitches. Additionally, beginners often overstuff small components, which stretches the single crochet loops and causes visible warping. Add stuffing gradually in small, pea-sized amounts, pushing the fibers toward the outer walls with the back of a crochet hook to create smooth, firm curves without stretching the stitches. Finally, avoid using weak sewing threads to attach hardware; always secure keychains using durable split rings anchored through multiple structural yarn strands to prevent the charm from tearing free during daily use.
Practical Tips for Professional Results
Attention to subtle finishing details elevates miniature amigurumi from simple crafts to polished, durable accessories. Choosing mercerized cotton yarn instead of acrylic makes an immediate difference: cotton provides sharp stitch definition, resists pilling when rubbing against pocket fabrics, and holds its structural shape over long periods of wear. When shaping decreases around curved animal bodies, consistently use the invisible decrease method—inserting the hook through the front loops only of two consecutive stitches before completing the single crochet—to eliminate unsightly ridges and surface gaps. When embroidering facial features like muzzles, mouths, or sleeping eyes, split multi-strand embroidery floss into individual strands to maintain delicate scale; heavy yarn lines can easily overwhelm tiny three-dimensional faces. For hardware installation, open jump rings with a lateral twisting motion using two pairs of pliers rather than pulling the ends apart, which preserves the structural temper of the metal. Thread jump rings through at least two yarn strands in the amigurumi fabric to distribute tension evenly and protect individual fibers from tearing.
Styling, Presentation, and Hardware Mounting Ideas
Thoughtful hardware selection and creative presentation enhance the visual appeal and functional versatility of miniature crochet animal charms. For modern everyday styling, pair your charms with matte black, brushed brass, or rose gold key hardware rather than plain, shiny silver rings to give the finished accessories a curated, designer feel. Consider clustering two complementary elements together—such as a miniature honey bear paired with a tiny crochet acorn, or a baby whale accompanied by a small nautical cord knot—to create a dynamic, multi-layered bag pendant. When gifting or packaging charms for craft showcases, mount the keychains on heavy cardstock backers debossed with subtle botanical patterns or custom hand-stamped labels, providing clean structure that frames the fiber art. In the home, these miniature animals can be displayed on magnetic entryway key hooks, hung along tiered desktop accessory organizers, or used as distinctive zipper pulls on cosmetic bags, backpacks, and luggage tags, adding a warm, handmade accent to everyday routines.
Budget Planning and Time Management
Miniature crochet keychains are exceptionally economical and time-efficient projects, making them ideal for both gift production and mindful scrap-busting. Because each mini animal requires only fifteen to thirty yards of yarn, an entire ten-piece collection can easily be produced from residual yarn remnants and half-skeins from previous projects, keeping material investments minimal. Primary expenses can be focused on purchasing bulk hardware multipacks containing split keyrings, lobster clasps, and jump rings, which are widely available at affordable prices online and at craft retailers. In terms of workflow, an individual charm typically requires between forty-five and ninety minutes from initial magic ring to final hardware assembly, making them rewarding, single-sitting projects. To maximize crafting efficiency, batch similar production stages across multiple charms: crochet all baseline spherical bodies in one session, craft small limbs and ears in the next, and complete facial embroidery and hardware assembly in a final focused pass. This assembly-line approach minimizes tool switching and ensures uniform tension and consistent scale across your finished collection.
Creative Expansion and Advanced Inspiration
Once you master foundational amigurumi shaping and hardware assembly, endless possibilities open for personalizing and expanding your mini animal designs. Crafters can easily scale the finished size of any piece by adjusting yarn weight and hook dimensions; using fine lace-weight thread and a 0.75 mm micro hook transforms these patterns into delicate jewelry charms suitable for drop earrings and charm bracelets. Conversely, working the identical patterns in chunky chenille yarn with a 6.0 mm hook yields palm-sized plush toys that work well as nursery shelf decor. You can also explore subtle surface shading by applying dry cosmetic blush or powdered soft pastels with a fine brush to add realistic blushing along animal cheeks and inner ears. Additionally, small functional elements can be incorporated inside the stuffed core, such as miniature rattle balls or natural dried lavender buds, adding pleasant sensory features to your charms. By combining consistent stitch mechanics with playful design choices, makers can continually evolve their miniature animal collections, transforming modest fiber scraps into charming, functional keepsakes that bring everyday delight.