Handcrafted nursery decor continues to dominate modern design boards, with crochet mobiles standing out as a central focus for welcoming spaces. This comprehensive guide explores ten functional, balanced concepts for constructing an amigurumi baby mobile using standard crochet hooks, durable cotton yarns, and solid suspension hoops. Readers will discover essential assembly mechanics, practical tension tips, secure knotting methods, and visual arrangement formulas required to create heirloom-quality overhead displays without needing advanced pattern expertise. Constructing your own mobile simplifies nursery styling because every single suspended element can be customized to match your chosen nursery palette, nursery scale, and ceiling height. You will learn how to crochet three-dimensional charms, distribute weight symmetrically across wooden crossbars, maintain consistent tension across tiny rounds, and safely secure suspended pieces above the crib. Beyond serving as a calming focal point during quiet nursery routines, these handmade elements transition gracefully into standalone toys, tactile garland accents, or keepsake displays as your child grows. Whether your aesthetic aligns with an earthy forest theme, a celestial night sky, or a sleek minimalist style, this tutorial delivers the foundational skills and creative ideas needed to execute reliable, photo-worthy nursery decoration.
Why This Idea Is Trending or Useful
Crochet nursery mobiles maintain significant momentum across online design boards because they merge tactile warmth with functional developmental benefits for growing infants. Unlike mass-manufactured plastic alternatives that rely on synthetic finishes, handmade crochet charms offer a soft, organic texture that enhances modern nursery decoration. From a sensory perspective, high-contrast shapes gently turning overhead capture an infant’s developing visual tracking skills while fostering a calm, peaceful atmosphere during naptime routines. This DIY appeal is further enhanced by accessibility, as the repetitive single crochet stitches make each individual suspended figure a completely beginner friendly creative project. Crafting each piece yourself allows for complete creative control over materials, ensuring only chemical-free, natural cotton fibers and smooth wooden suspension rings enter the nursery space. Working through these small-scale figures also serves as an exceptional stash-busting opportunity, transforming leftover yarn into cohesive budget ideas that eliminate unnecessary expenditures. The enduring structural durability of crocheted stitches guarantees that these suspended charms hold their three-dimensional profiles over years of use, turning everyday nursery organization into an intentional artistic statement that effortlessly outlasts temporary nursery trends.
Materials and Preparation
Thorough preparation forms the cornerstone of every durable crochet mobile, requiring the right balance of yarn weights, structural suspension hardware, and precision crafting tools. Select light worsted or sport-weight mercerized cotton yarns, which provide clean stitch definition and resist pilling over time, paired with an ergonomic hook size ranging from 2.25 mm to 2.75 mm to ensure stitches remain tight enough to conceal the inner stuffing. Gather your hardware elements, including a smooth, untreated circular wooden embroidery hoop or a cross-bar mobile frame, high-tensile clear nylon illusion cord or waxed cotton thread, a wide metal tapestry needle, and an abundant supply of hypoallergenic polyester cluster stuffing. Before stitching the first piece, clear an organized work surface and plan your color scheme by winding contrasting yarn skeins into compact center-pull balls to maintain smooth yarn flow. Establish an accurate assembly blueprint by sketching the weight distribution across each branch of your frame, accounting for primary central drops and secondary perimeter accents. Inspect every wooden ring for rough splinters by sanding edges smooth with fine-grit sandpaper, ensuring a safe, snag-free foundation for all delicate suspended cords.
1. Minimalist Woodland Forest Creatures Overhead Display
Step-by-Step Guide
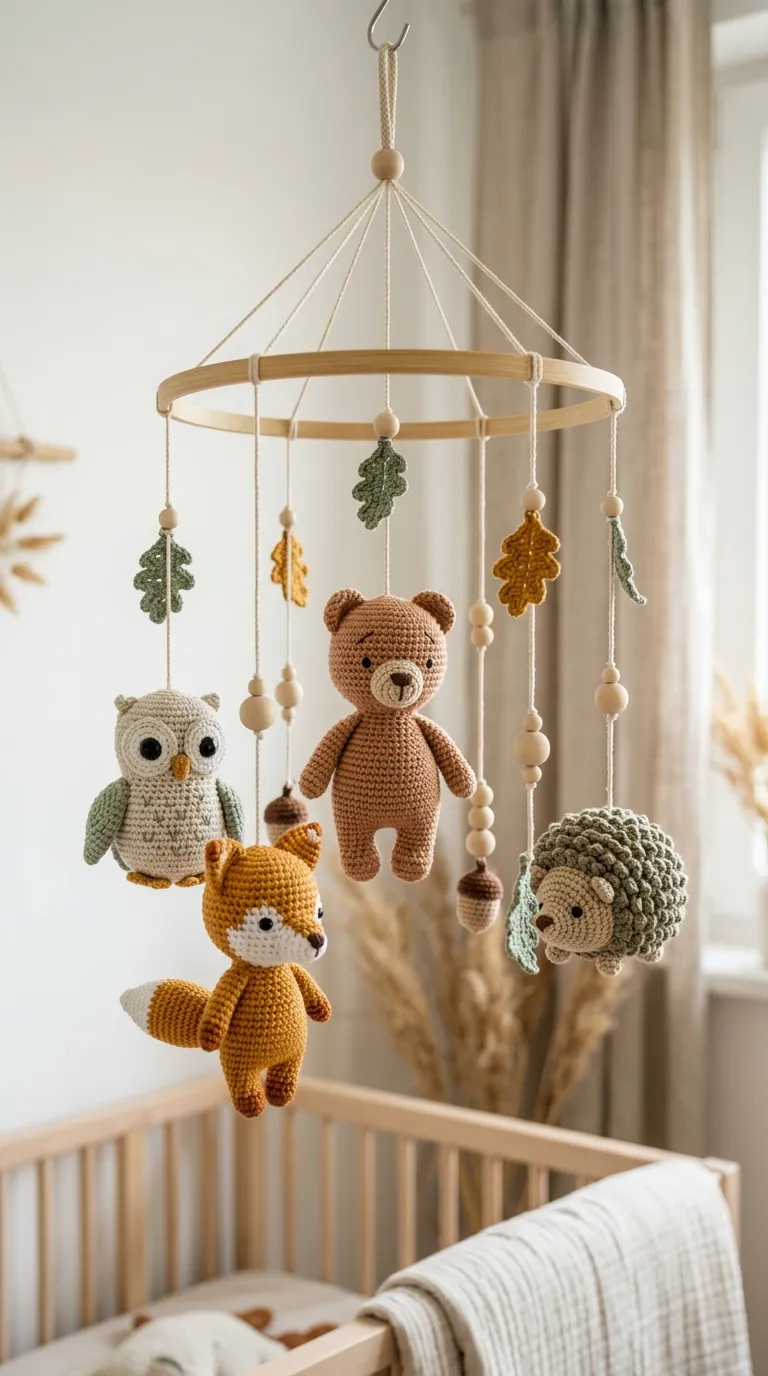
The minimalist woodland mobile combines simplified forest animal silhouettes with natural botanical accents to create a calm, earthy visual identity directly above the crib. This concept focuses on streamlined amigurumi figures, featuring a small brown bear, a wide-eyed owl, a round hedgehog, and a slender red fox suspended alongside miniature stuffed acorns and oak leaves. By utilizing muted forest tones such as sage green, deep cedar, warm ochre, and soft taupe, the design brings the organic charm of the outdoors indoors without overwhelming the room with visual noise. The figures are kept small, measuring between two and three inches in height, ensuring they remain lightweight when suspended from a simple circular ring. The negative space between the creatures allows natural air currents in the nursery to gently turn each figure, creating subtle, continuous movement that holds an infant’s attention. This design bridges traditional woodcraft with modern design sensibilities, making it an enduring centerpiece for neutral, nature-inspired nursery themes.
To construct this forest mobile, crochet each animal body using continuous rounds of tight single crochet, starting with an adjustable magic ring to prevent any stuffing from showing. Stuff each piece firmly with dense clusters of hypoallergenic fiberfill before working the final decrease rounds, maintaining a uniform, rounded shape across all four forest animal charms. Next, crochet four miniature oak leaves using basic chain loops and treble stitches, pairing them with tiny crocheted acorn caps worked in textured slip stitches. Cut four equal lengths of durable waxed cotton cord, threading each through a heavy-gauge yarn needle to pierce through the top center of each completed animal body. Knot the lower end securely inside the animal’s upper seam with an invisible anchoring stitch, then run the cord upward through an accent wooden bead and acorn. Tie the free end of each cord at four equidistant points around a nine-inch sanded bamboo embroidery hoop, adjusting individual drops so the creatures hang symmetrically between eight and twelve inches below the frame.
2. Dreamy Celestial Star and Crescent Moon Canopy
How to Make
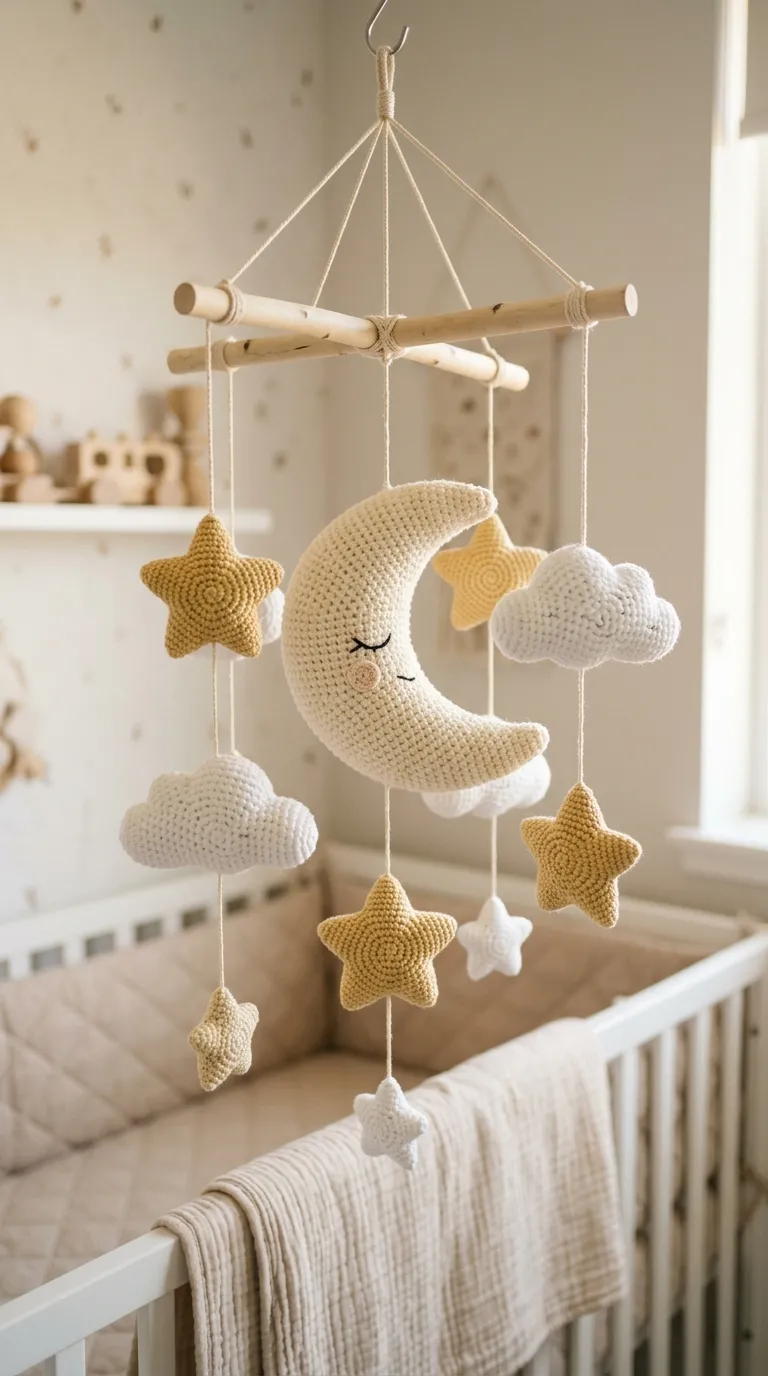
A celestial night sky mobile establishes a peaceful, dreamy ambiance in the nursery by featuring glowing crescent moons, dimensional stars, and soft pillowy clouds. This concept prioritizes serene, cool-toned palettes consisting of buttermilk ivory, pale slate grey, soft dove, and shimmering pale gold yarn to foster restfulness. The primary visual anchor is a prominent six-inch amigurumi crescent moon suspended dead-center, surrounded by a tiered constellation of five-pointed stars and miniature cumulus clouds hanging along the perimeter. Because each star features crisp geometric points and rounded center domes, it catches directional light from nearby lamps, casting subtle, comforting shadows against the adjacent wall. The smooth, flowing curves of the central crescent create a gentle focal anchor that infants can easily track as the unit drifts in the nursery airflow. This classic aesthetic fits seamlessly into both mid-century modern and contemporary bohemian nurseries, offering a versatile accent that complements varying wall tones.
Begin the assembly process by working the central crescent moon in spiraling rounds of single crochet, increasing along the outer curve while maintaining rapid decreases along the inner crescent to form an arched horn shape. Stuff the moon evenly as you work, paying close attention to keeping the tapered points slender and firm before closing the final stitch with an invisible decrease. Next, crochet five miniature three-dimensional stars by joining two flat five-point star motifs together with a neat border of single crochet, slipping a pinch of fiberfill inside just before fastening off. Craft three small clouds by working overlapping clusters of double crochet shells across a foundation chain, folding the edges inward to yield puffy, rounded shapes. Securely stitch high-strength nylon thread into the top curve of the large central moon, suspending it directly from the center intersection of a crossed wooden dowel mobile hanger. Attach the smaller stars and clouds around the outer arms at alternating drop lengths, balancing the opposite sides carefully to ensure the mobile frame remains perfectly parallel to the floor.
3. High-Contrast Monochrome Safari Animal Caravan
Execution Process
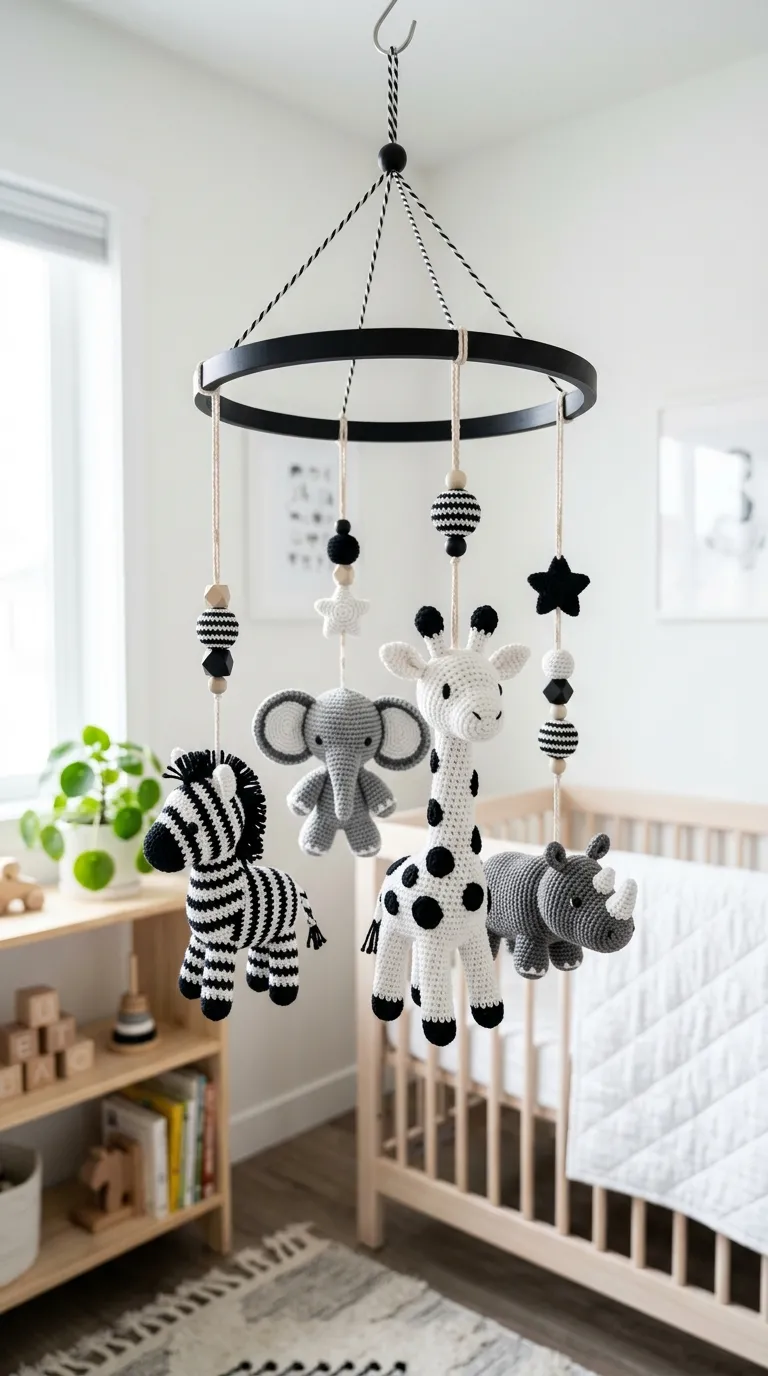
A monochrome safari caravan mobile utilizes bold black, crisp white, and deep charcoal yarn to stimulate an infant’s visual development through deliberate, high-contrast imagery. Scientific developmental research confirms that newborns perceive bold, stark contrasts far more readily than subtle pastel tones, making this functional concept both visually striking and developmentally valuable. The mobile features iconic savanna creatures including a striped zebra, a spotted giraffe, a compact rhino, and an elephant with wide, fan-shaped ears. The stark juxtaposition between the dense black yarn and the bright white fibers creates sharp visual boundaries that help young eyes practice focus and depth perception during waking crib sessions. The animal bodies are designed with clean, geometric proportions rather than intricate realistic details, maintaining a polished, uncluttered appearance that appeals to modern design enthusiasts. Suspended from a sleek matte-black wooden ring, this mobile introduces an elevated, graphic presence that coordinates effortlessly with Scandinavian or industrial decor schemes.
Construct the safari animals by following simplified amigurumi patterns worked in durable worsted cotton, alternating between black and white yarn yarns to create distinct visual markings. For the zebra, carry the contrasting yarn color loosely along the inside of the fabric, ensuring your float tension remains relaxed so the stripes do not warp or pull the fabric. Assemble the animal limbs, snouts, and ears using a blunt tapestry needle, anchoring every small piece with multiple reinforced whipstitches to ensure parts stay permanently affixed. Cut eight pieces of lightweight braided nylon cord into varied lengths ranging from ten to fourteen inches, pairing each animal with a high-contrast striped crochet bead along the suspension line. Thread each cord securely through the animal’s biological center of gravity so that the creatures hang horizontally as if walking across the savanna. Knot the cords firmly around the circumference of a ten-inch wooden ring coated with non-toxic matte water-based paint, spacing them evenly to balance the weight across the entire circular frame.
4. Vibrant Botanical Meadow and Fluttering Pollinators
Read This:
Step-by-Step Guide
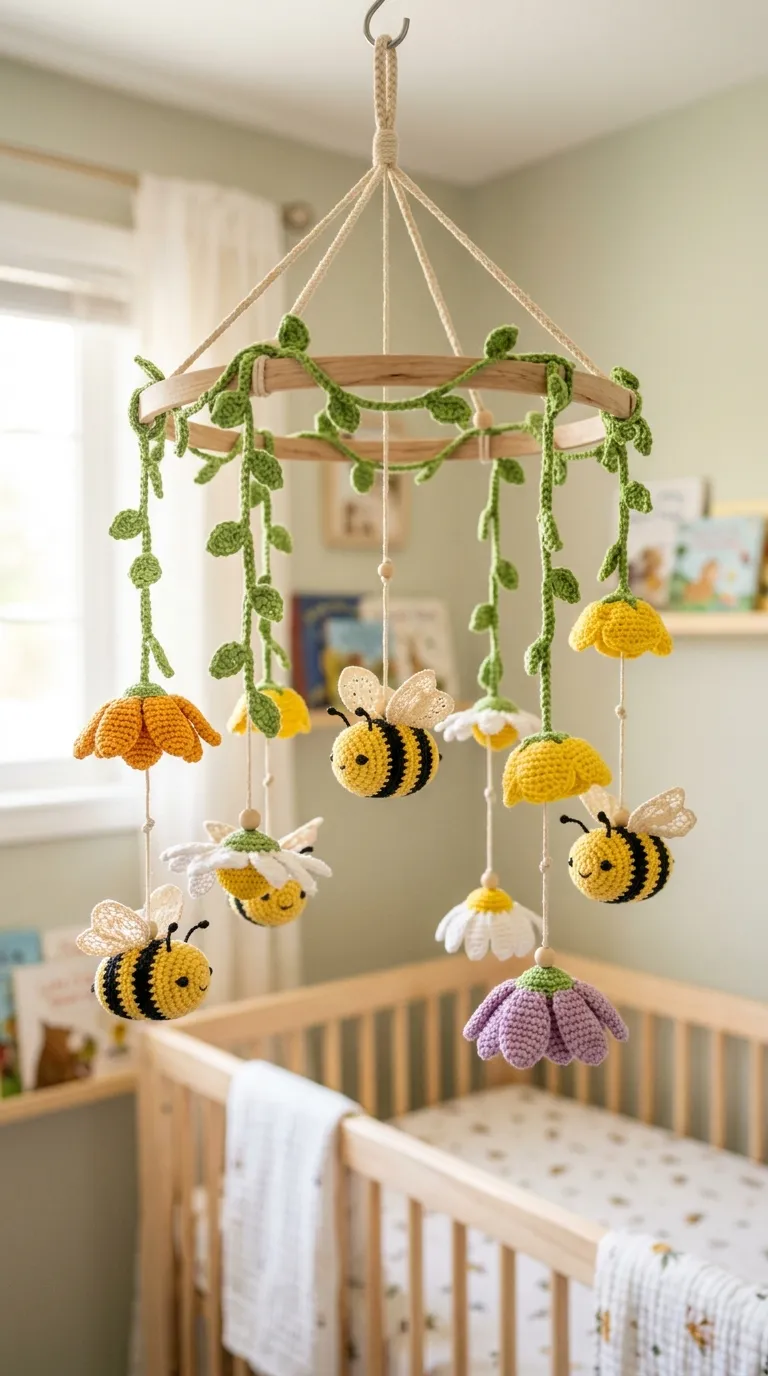
The botanical meadow mobile brings the vibrant energy of an outdoor garden into the nursery using colorful wild blossoms, soft leaves, and cheerful buzzing pollinators. This design concept unites three-dimensional amigurumi bumblebees with yellow and black bands alongside fluttering butterflies, trailing ivy vines, and varied wildflowers like daisies and buttercups. The color scheme incorporates warm marigold, soft lilac, spring green, and creamy white, offering an uplifting sensory landscape for your infant to study from below. The flat, petal-dense flower heads hang horizontally so their bright faces look downward toward the crib, providing optimal visual stimulation for a reclined baby rather than only showing their edges. The rounded bumblebees feature delicate, translucent wings crocheted with fine lace-weight yarn, adding a varied textural layer to the chunky bodies. This colorful arrangement brings cheerfulness into sunlit nurseries, functioning as an inspiring focal point that brightens neutral walls and minimalist crib furniture.
To create this garden mobile, crochet four rounded bumblebees, alternating between yellow and charcoal worsted yarn every two rounds before securing white oval lace wings to the back with small anchor stitches. Next, crochet six multi-petaled wildflower heads by working tall treble-crochet petals into an initial magic ring of vibrant golden yarn, fastening off each petal firmly to prevent unraveling. Form two long, delicate vine garlands by working thirty foundation chain stitches, adding tiny three-chain picot loops every fourth stitch to simulate emerging foliage. Attach the completed flower faces to the underside of a circular wooden hoop using clear monofilament, orienting the blooms so the petal faces hang downward toward the mattress below. Suspend the bumblebees between the floral pendants at varying heights using thin green cotton yarn, weaving the vine garlands around the outer wooden ring to conceal all structural knots. Calibrate the weight balance by sliding the suspension cords along the perimeter until the hoop rests level without tilting to one side.
5. Serene Deep Sea Ocean Life Aquatic Formation
Setup Method
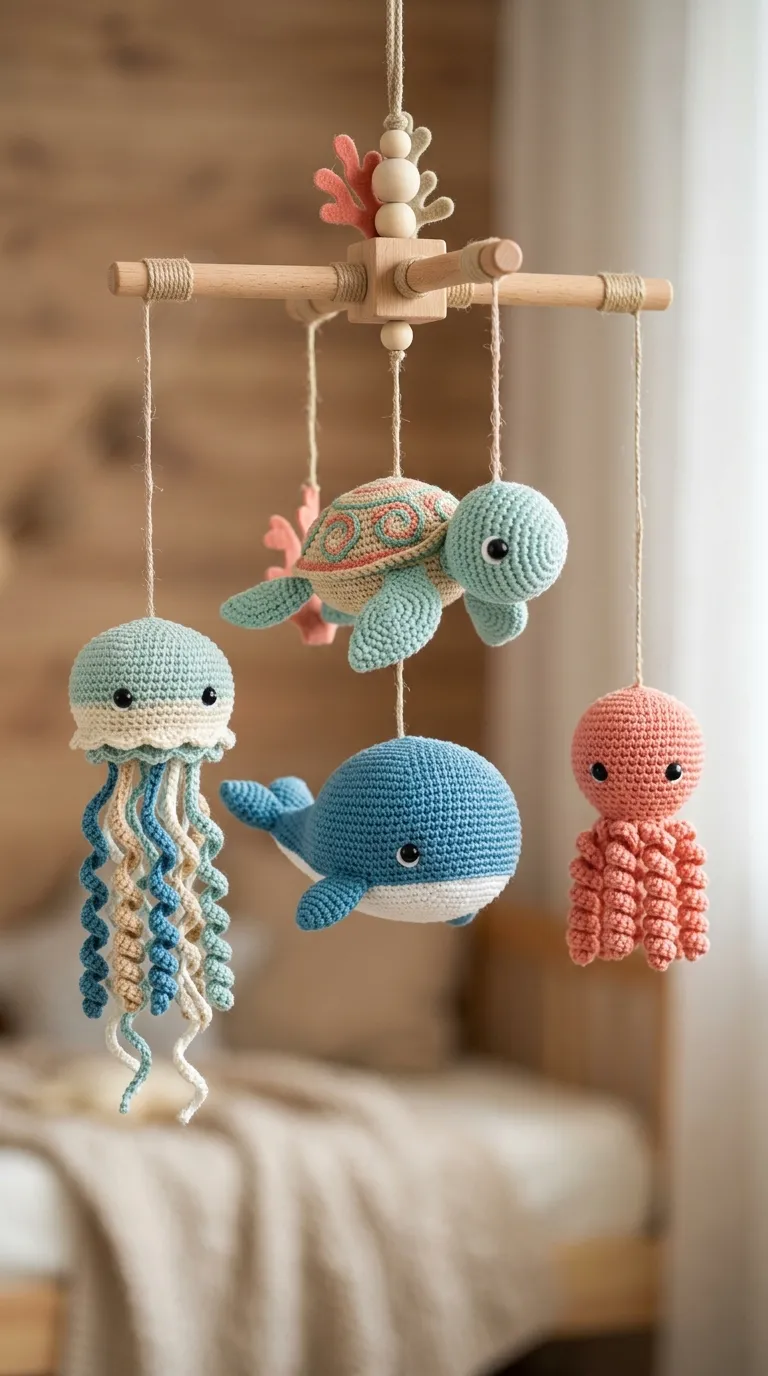
An aquatic deep-sea mobile establishes an atmospheric underwater environment within the nursery through tranquil shades of coastal blue, seafoam green, sand beige, and soft coral. This concept features a charming whale with a curved tail, a friendly sea turtle with a textured shell, a miniature octopus with coiled tentacles, and a floating translucent jellyfish. The gentle sway of the suspended marine elements mimics the undulating movement of ocean currents, creating a soothing, hypnotic rhythm that comforts a restless infant. The octopus and jellyfish introduce rich, spiraling textures, as their long, crocheted tentacles twist downward beneath their rounded heads to create linear variety. Using mercerized cotton gives the marine creatures a subtle sheen that resembles water reflections, elevating the overall design of the nursery. This nautical style bridges whimsical storytelling with refined handcrafted decor, making it a natural fit for coastal, beachside, or gender-neutral modern nurseries.
Start by working the primary sea creature bodies in spiraling single crochet rounds, taking care to shape the smooth hydrodynamic curves of the whale and the ridged contours of the turtle’s shell. For the jellyfish, work a wide, hollow bell dome, then create six trailing spiral tentacles by chaining thirty stitches and working three single crochets into every single chain link to force a tight, springy twist. Assemble the turtle by whipstitching the patterned hexagonal top shell onto a flat oval underbelly, inserting a modest layer of polyfill between the layers before securing the head and flippers. Cut lengths of braided seafoam cotton cord, securing one to the dorsal apex of each sea creature using a double knot sealed with clear craft adhesive inside the stuffing. Fasten the hanging cords to a cross-arm wooden mobile frame, positioning the heavier whale in the center while arranging the octopus, turtle, and jellyfish along the four outer dowels. Test the overall suspension balance by lifting the mobile by its central top loop, shifting the cords incrementally until the display floats level.
6. Whimsical Pastel Hot Air Balloon and Cloudscape
Read This:
How to Create
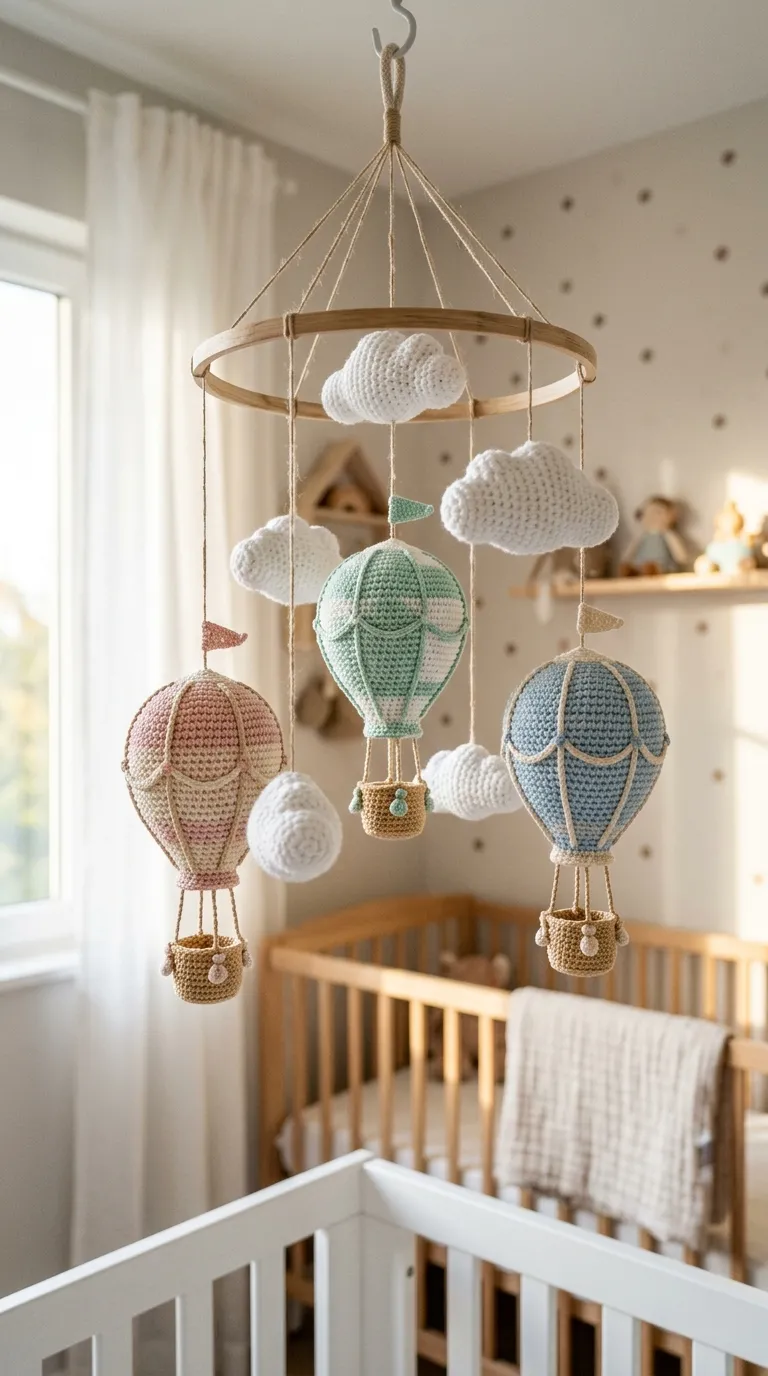
A hot air balloon mobile evokes a sense of wonder and gentle travel through elevated heights, bringing uplifting dimensional shapes into the nursery. This aesthetic concept highlights three-dimensional, teardrop-shaped amigurumi hot air balloons paired with tiny square passenger baskets and floating white clouds. The color story incorporates muted pastel shades such as powder blue, pale blush, mint green, and pale butter yellow, paired with soft tan wicker basket accents. The vertical teardrop shape of the balloons naturally draws the eye upward, accentuating ceiling height and adding vertical interest to standard nursery layouts. The small open-topped baskets suspended beneath each balloon provide charming micro-scale detail that delights parents and visiting guests alike. This mobile design pairs beautifully with vintage travel, whimsical storybook, or soft retro-inspired nursery decor, serving as a bright, hopeful centerpiece that anchors the surrounding furniture.
To assemble the hot air balloons, begin at the narrow base of each balloon with an adjustable ring, expanding outward with regular increases until you achieve a wide bulbous upper sphere. Introduce vertical color stripes by switching between two contrasting pastel yarns every four stitches, carrying the unused strand loosely along the interior of the piece without snagging the fiberfill. Once the balloon shell is firmly stuffed and closed, crochet a tiny open basket using stiff linen-colored yarn worked in rigid back-loop-only single crochet. Connect the basket to the lower neck of the balloon using four equal lengths of fine metallic embroidery floss, securing each corner with a sturdy knot. Crochet several flat, multi-lobed white clouds to act as spacer elements between the floating balloons along the suspension line. Suspend three completed hot air balloon units from an eight-inch round embroidery hoop using invisible thread, staggering the clouds above and below the baskets to construct a layered, multi-dimensional aerial landscape.
7. Cozy Autumn Harvest Orchard and Golden Leaves
Execution Process
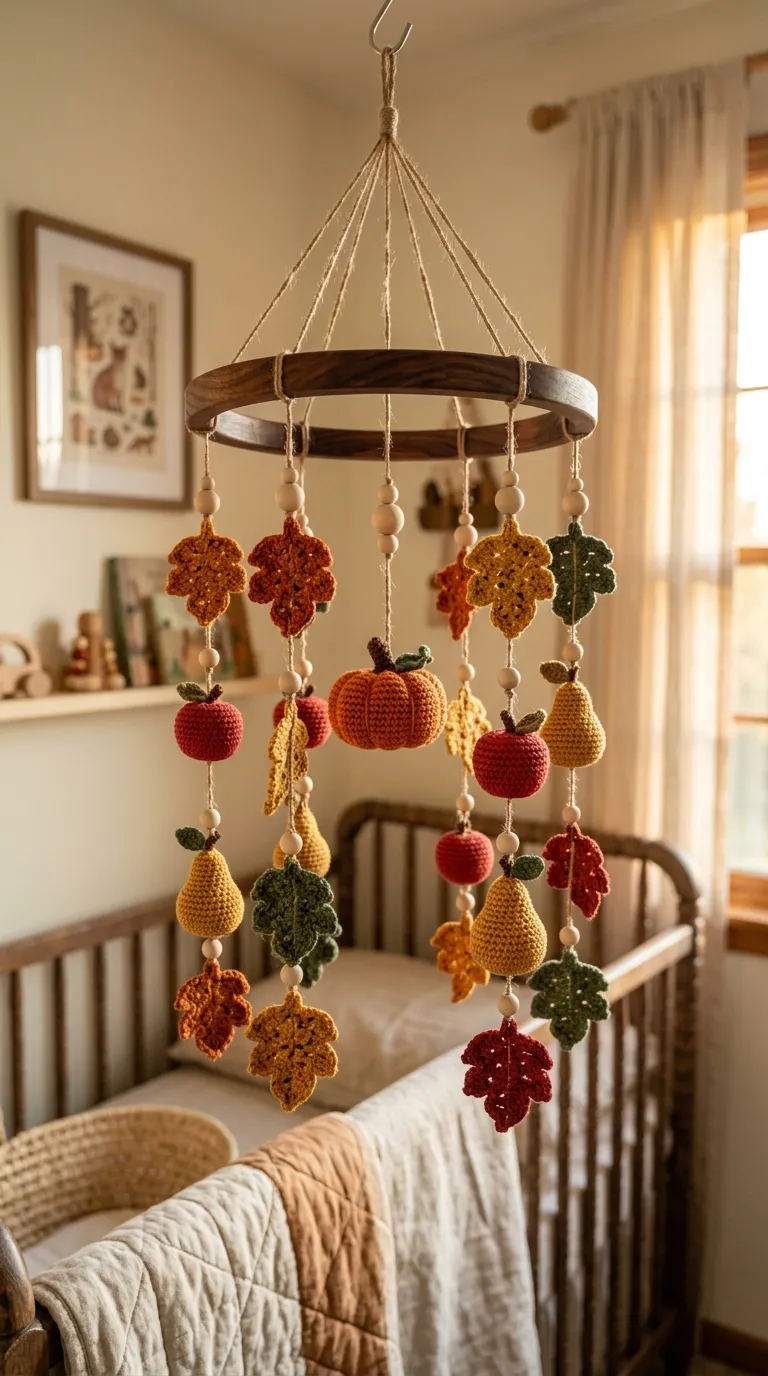
The autumn harvest mobile celebrates the rich textures, warm tones, and cozy nostalgia of fall orchards through charming seasonal amigurumi produce. This design integrates plump little pumpkins with textured ribbing, bright crisp apples with tiny stems, golden pears, and a cascade of speckled autumn leaves. The seasonal color palette relies on deep terracotta, warm burnt orange, vintage mustard, forest russet, and soft olive green, creating a grounded, comforting ambiance inside the nursery. The varied spherical and oblong shapes of the harvest elements provide varied sensory tracking profiles that support an infant’s visual development during quiet awake intervals. The ribbed grooves along the amigurumi pumpkins add tactile depth that catches warm room lighting, transforming the ceiling space into an inviting seasonal retreat. This design appeals to decorators who appreciate vintage harvest motifs, cottagecore styling, and warm, tactile interior layers that feel timeless and comforting.
Begin by crocheting the mini pumpkins in continuous spiral rounds of orange worsted yarn, leaving a twelve-inch yarn tail after cinching the top opening closed around a dense core of fiberfill. Use the long yarn tail and a sturdy tapestry needle to wrap the thread vertically around the outside of the sphere, pulling tightly toward the center hole six times to sculpt deep, distinctive pumpkin segments. Crochet the apples and pears using smooth increases, adding a tiny brown stem and an emerald leaf motif to the top indentation of each fruit. Cut matching lengths of natural jute twine or rustic tan cotton thread to serve as durable suspension lines for each harvest element. Tie the twine securely around the base of each fruit stem, sliding a small natural maple wood bead down the cord to cover the knot. Fasten the harvest elements at staggered distances around a rich walnut-stained circular wooden hoop, counterbalancing the heavier pumpkin weights with the lighter leaf clusters to keep the display hanging level.
8. Retro Desert Terrarium with Blooming Cacti and Succulents
Read This:
Step-by-Step Guide
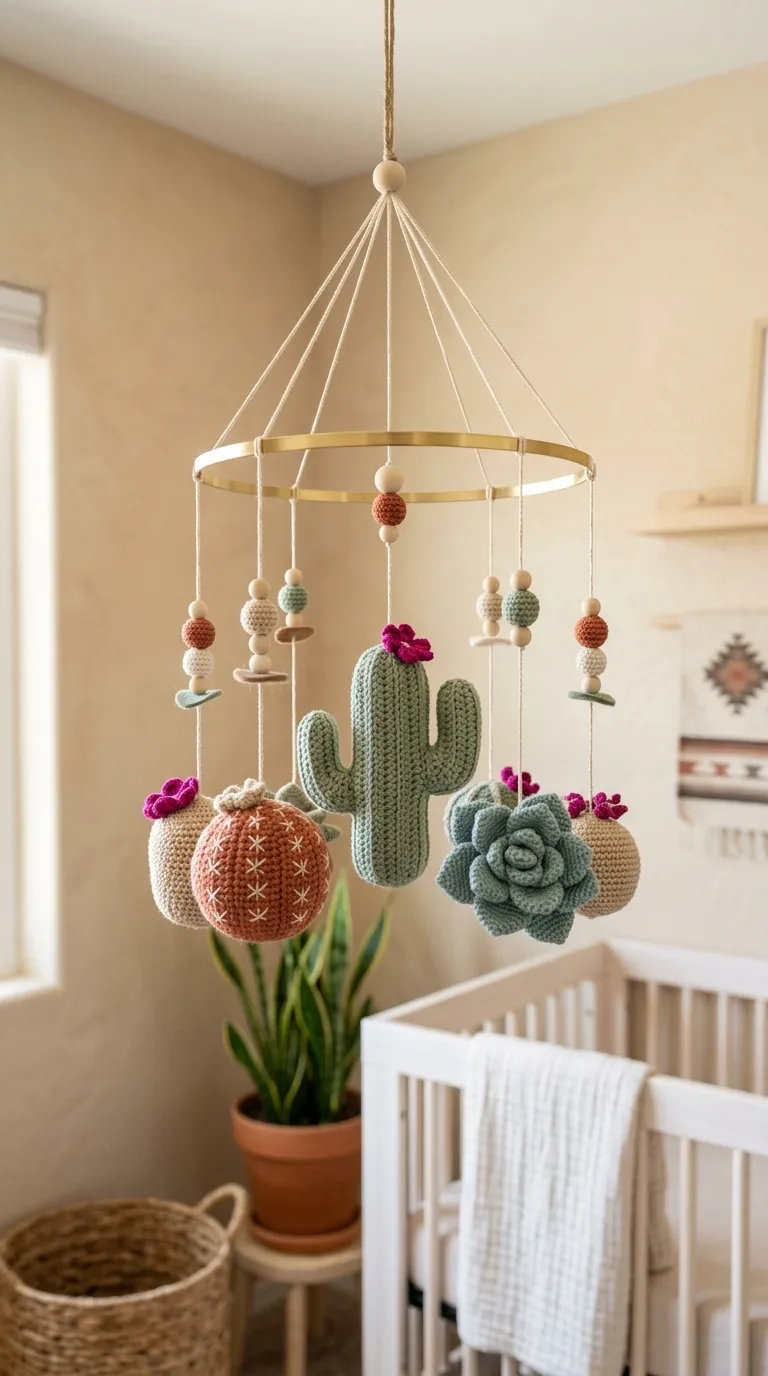
A desert terrarium mobile introduces a modern, southwestern design sensibility to the nursery, pairing architectural botanical shapes with fresh geometric structures. This concept features a playful collection of petite amigurumi cacti, including a ribbed saguaro with branching arms, a round pincushion cactus, and a layered rosette succulent. The visual palette blends rich desert tones, such as pale sage, deep jade, dusty terracotta, muted sand, and bright magenta floral accents. The clean, spiky silhouettes of the cacti provide distinct shapes that stand out sharply against pale nursery walls, catching an infant’s attention. Adding tiny crocheted pink and orange blossoms to the tops of the desert flora introduces lovely pops of color that soften the angular stems. This design is an ideal match for bohemian nursery spaces, desert-themed bedrooms, and modern earth-toned interiors seeking fresh, plant-inspired decoration without the upkeep of living plants.
Construct the saguaro cactus by crocheting a tall ribbed cylinder using back-loop-only single crochet stitches, joining two smaller curved arm cylinders to the sides with neat, invisible seams. For the pincushion cactus, work a standard sphere in muted jade yarn, embroidering tiny white accent stitches randomly across the exterior to simulate desert spines without sharp points. Assemble the rosette succulent by crocheting five separate tiers of pointed petals, nesting them concentrically and sewing them together through the center base using a long strand of matching yarn. Top each finished cactus with a bright fuchsia star-shaped blossom, sewing it firmly to the crown of the plant. Attach durable lengths of tan waxed thread to the upper center of each botanical piece, running the cord upward through a raw wooden geometric bead. Tie the cords securely to a clean-lined modern brass ring or natural bamboo hoop, spacing each plant at alternating elevations to construct a cascading, desert canopy.
9. Nordic Polar Habitat with Floating Icebergs and Friends
Setup Method
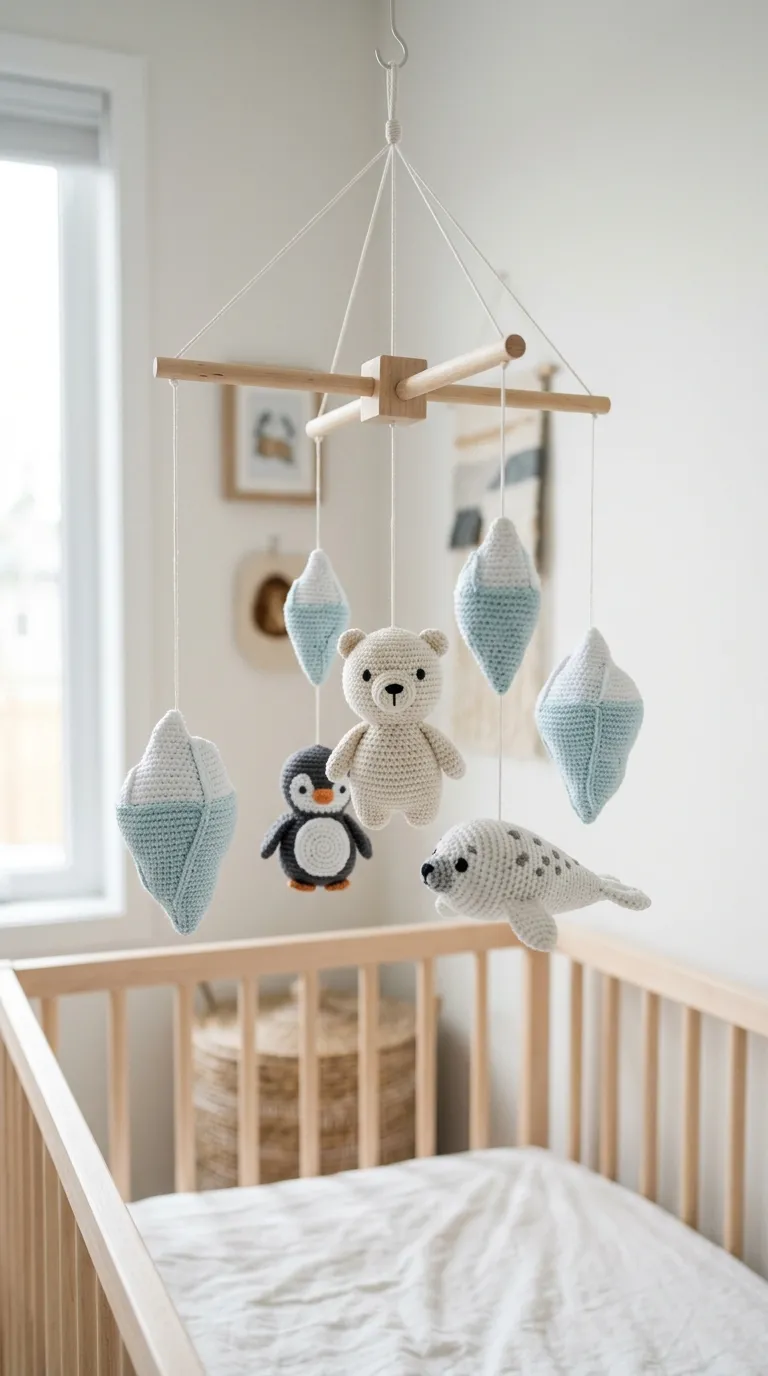
The Nordic polar mobile brings a calm, Arctic-inspired serenity to nursery spaces through clean lines, cool tones, and gentle wildlife figures. This design showcases a round polar bear, a little penguin with yellow cheek accents, a resting harp seal, and stylized geometric icebergs. The color palette focuses on crisp winter tones, featuring glacial blues, frosty mint, icy white, soft slate, and deep charcoal. The minimalist Scandinavian approach emphasizes simple geometric shapes and expressive silhouettes rather than intricate surface detailing, yielding an uncluttered, modern display. The geometric icebergs add sharp angular contrast that balances the soft, rounded bodies of the polar animals, creating a visually dynamic mobile that captures subtle breezes. This serene theme coordinates naturally with light birch nursery furniture, white walls, and modern minimalist decor, offering a fresh, sophisticated styling choice that suits contemporary homes.
Work the polar bear and seal bodies using dense, continuous rounds of pure white and heather grey cotton yarn, ensuring stitches remain firm to maintain crisp bodily outlines. For the baby penguin, crochet a rounded teardrop body in charcoal yarn, stitching an oval white belly plate and tiny yellow beak securely to the face with small, hidden whipstitches. Construct the floating icebergs by crocheting sharp three-dimensional polyhedrons, working distinct edge decreases that produce clean facet lines across the white and pale blue surfaces. Pierce a long tapestry needle threaded with clear monofilament upward through the bottom center of each polar element, anchoring the lower end inside the body using a flat wooden washer. Suspend the components from a clean, unfinished natural beechwood crossbar frame, positioning the polar bear on one axis and counterbalancing it with the seal on the opposite arm. Adjust the hanging lengths so the icebergs drift slightly higher than the animals, creating an expansive sense of open Arctic sky overhead.
10. Sweet Bakery Confections and Whimsical Pastry Carousel

How to Create
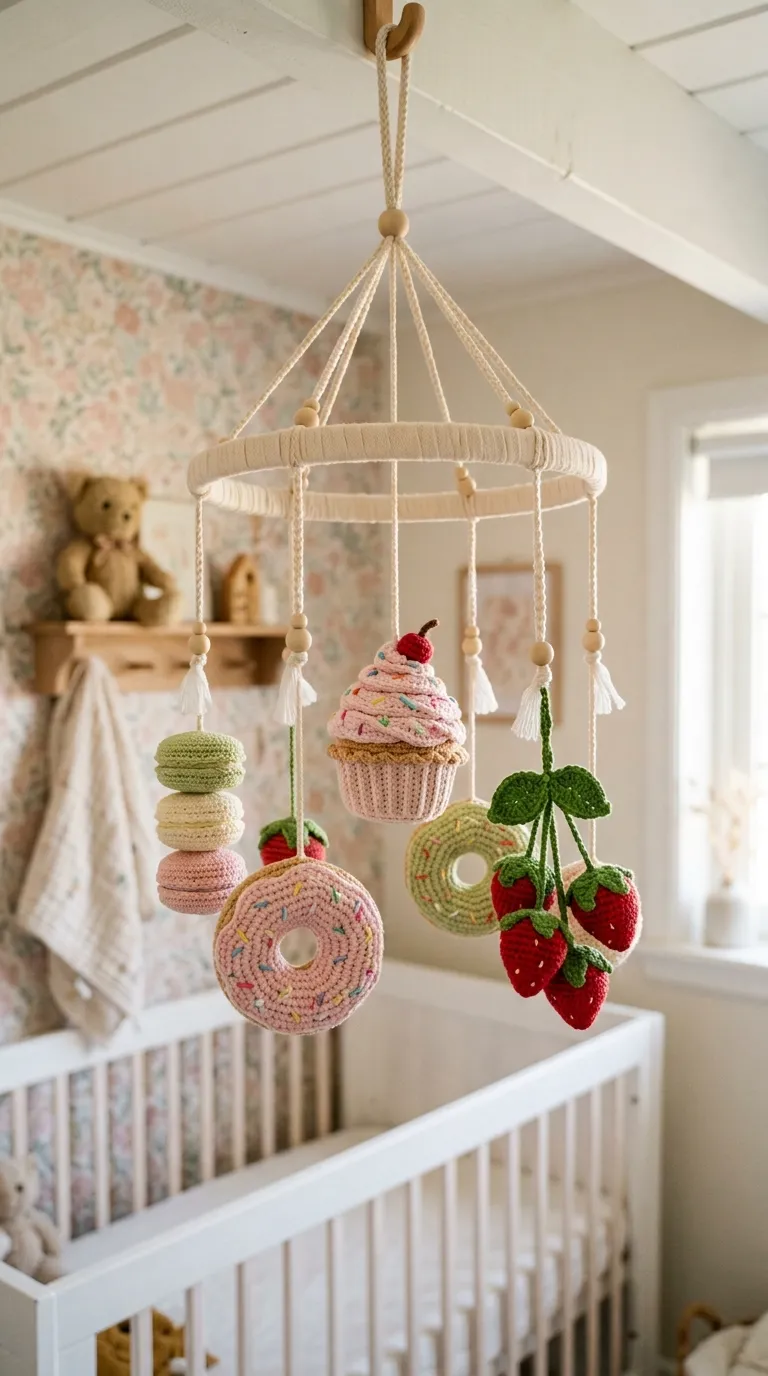
A whimsical bakery mobile transforms the overhead nursery view into a delightful, storybook pastry shop filled with miniature amigurumi confections. This joyful design showcases a carousel of colorful pastries, including layered French macarons, spiral-frosted cupcakes, glazed ring donuts with embroidered sprinkles, and tiny strawberries. The palette highlights sweet pastel tones, combining strawberry pink, pistachio green, creamy vanilla, warm caramel, and chocolate brown. The rounded, familiar shapes of the pastries create an approachable, cheerful environment that brings warm whimsy into baby spaces. Each pastry offers unique decorative details, from textured waffle stitches to colorful seed-stitch sprinkles, creating a rich sensory experience for the infant below. This playful theme is well-suited for eclectic, retro, or vintage nursery aesthetics, delivering an eye-catching display that transitions easily into play food for a toddler’s toy kitchen later on.
Begin by crocheting three pairs of round macaron cookies using smooth continuous rounds of pastel yarn, sandwiching a thick ring of textured white frosting between each pair with flat whipstitches. For the cupcakes, work a sturdy ribbed base in tan yarn, transitioning to a soft, swirling dome of cream-colored stitches that tapers to an elegant top point. Create the donuts by crocheting a long, hollow tube in dough-colored yarn, joining the ends into a continuous ring before stitching an undulating layer of pink icing across the upper surface. Embroider tiny, bright seed stitches across the icing using colorful embroidery floss to simulate sprinkles, knotting the threads securely inside the donut interior. Attach pastel satin ribbons or braided white cotton cords to the center of each treat, threading the lines through light pink accent beads. Fasten the confections around a wide, fabric-wrapped circular frame, spacing them evenly to keep the whimsical pastry display balanced and turning smoothly.
Common Beginner Mistakes and How to Avoid Them
Creating an amigurumi baby mobile requires attention to mechanical balance, stitch tension, and baby-safe construction methods. The most frequent mistake beginners encounter is crocheting with loose tension or choosing an oversized hook, which stretches the fabric and allows the inner polyester stuffing to show through. Always use a hook that is one or two sizes smaller than the yarn label recommends, ensuring tight, solid single crochet stitches that conceal the stuffing completely. Another common issue is uneven weight distribution, which causes the entire mobile frame to tilt awkwardly to one side. Prevent this by weighing your completed charms on a kitchen scale before assembling the mobile, pairing heavier figures directly opposite each other across the hoop. Beginners also tend to secure suspended figures with simple single knots that can loosen over time with natural nursery airflow. Prevent slipping by anchoring each cord with double square knots, reinforcing the closures with a dot of non-toxic fabric glue or hiding the tails inside adjacent wooden beads. Finally, always maintain safe clearance: hang the base of the mobile well out of the infant’s reach, adjusting the hanging cords upward as your baby learns to push up on hands and knees.
Practical Tips for Better Results
Achieving professional results with handmade crochet mobiles comes down to material selection, neat internal finishing, and careful suspension tuning. Choose high-twist, mercerized cotton yarns over fuzzy acrylics or delicate wools; smooth cotton provides crisp stitch definition, repels dust, and will not shed loose fibers over your baby’s crib. When stuffing your amigurumi charms, tear the polyester fiberfill into small, golf-ball-sized tufts and pack them in gradually rather than shoving large clumps inside all at once. This method prevents lumpy, uneven surfaces and keeps your figures smooth and symmetrical across all viewing angles. Use high-strength clear nylon thread or smooth, tightly braided waxed cotton cord for hanging lines, as twisting fibers can cause the mobile to spin erratically rather than drift gently. When attaching small limbs, ears, or decorative appliques, leave long yarn tails on your pieces and use a sharp tapestry needle to take deep, reinforcing anchor stitches through the inner stuffing. Before hanging the mobile in the nursery, suspend it from an adjustable floor lamp or tall door hook for twenty-four hours; this lets the cords settle completely so you can make final level adjustments before mounting the piece above the crib.
Styling, Presentation, or Organization Ideas
The visual impact of a handmade amigurumi mobile depends on how thoughtfully it integrates with surrounding nursery elements, including wall colors, lighting, and nearby textiles. Hang the mobile over the lower third of the crib rather than directly above the infant’s face, providing a comfortable, natural sightline that does not strain developing neck muscles. Pair the warm, textured crochet charms with natural materials throughout the room, such as a sanded birch crib rail, floating oak wall shelves, or a soft linen crib skirt. If your nursery features a solid, minimalist accent wall, choose high-contrast or brightly colored figures that stand out crisply against the paint. Conversely, if your space features patterned wallpaper, balance the look with a minimalist monochromatic mobile in soft cream, taupe, or dove grey tones. For families who enjoy seasonal decorating, design your mobile with detachable lobster clasps or neat wooden toggle loops on each pendant; this allows you to swap out charms throughout the year, cycling from spring botanicals to cozy autumn leaves without remounting the main ceiling hardware.
Budget or Time Planning
Crafting your own amigurumi mobile yields significant cost savings compared to boutique handmade decor, but completing the project smoothly requires an organized timeline and smart material choices. Plan an overall production window of three to four weeks, dedicating small thirty-minute stitching sessions to individual pieces to avoid hand fatigue from tight amigurumi tension. Organize your work by completing all central three-dimensional charms during the first two weeks, saving the smaller leaf accents, spacer beads, and frame wrapping for the third week. Save money by purchasing cotton yarn in multi-skein value packs, or use your existing stash since small mobile figures rarely require more than twenty to thirty yards of any single color. Purchase multi-packs of natural wooden embroidery hoops and beads in bulk, which lowers the hardware cost per project and leaves you with extra materials for future nursery gifts. Dedicate the final week exclusively to knotting, weight balancing, and mounting the ceiling anchors. This staged timeline ensures you finish this meaningful creative project well ahead of your nursery due date without any last-minute assembly stress.
Creative Expansion and Advanced Inspiration
Once you master basic amigurumi mobile assembly, you can expand these core construction skills into larger nursery decor collections and coordinating keepsakes throughout the room. Take the primary animal or botanical motif from your mobile and enlarge the pattern to crochet a matching nursery bookend, a soft handheld rattle with an enclosed plastic bell, or an animal-shaped doorstop. String secondary elements like stars, clouds, or leaves onto a long braided cord to create a matching wall garland across nearby floating bookshelves or the closet perimeter. As your child grows past the crib-mobile stage, you can carefully detach the amigurumi figures from their suspension lines and repurpose them as tactile toys, durable backpack charms, or sensory play elements for a toddler activity basket. You can also integrate small musical wind-up mechanisms or battery-operated rotating motors into the central ceiling mount, adding gentle lullaby melodies and steady movement to soothe your baby. This adaptability turns your handcrafted mobile into a lasting family keepsake that evolves alongside your child, serving as a cherished reminder of their earliest days for years to come.