Handcrafted crochet animal keychains provide an accessible way to combine functional utility, portable charm, and tactile fiber art in compact accessories. Designing miniature animal figures allows fiber artists and casual crafters to transform modest scraps of yarn into durable everyday items that secure car keys, decorate handbags, or personalize school backpacks. This complete tutorial covers ten unique crochet animal keychain concepts, ranging from sleeping red foxes and hooded baby penguins to textured highland cows, minimal honeybees, and playful otters. Readers will discover the foundational techniques of continuous spiral stitching, seamless color changes, secure hardware attachment, and compact fiberfill stuffing. Making your own accessories eliminates the need for mass-produced plastic novelties, granting complete control over yarn composition, structural density, and facial expressions. In addition to creating portable trinkets, mastering these three-dimensional textile construction methods builds essential shaping skills that transition smoothly into nursery home decor, nursery mobile designs, and seasonal handmade gifts. By applying fundamental mechanics such as the adjustable magic ring, invisible decreases, and balanced tension, makers of all skill levels can produce high-quality, long-lasting fiber art. The following sections outline key preparation steps, material inventories, two-paragraph instructional breakdowns for ten complete ideas, and practical planning frameworks.
Why This Idea Is Trending or Useful
Miniature amigurumi accessories continue to dominate modern digital platforms and Pinterest ideas due to their high visual appeal, manageable scale, and versatile daily function. Modern lifestyle trends increasingly emphasize personalized bag charms and organized key rings, making small crochet characters an ideal medium for personal expression. From a design perspective, compact animal figures introduce tactile softness and organic shapes that balance the hard metallic finishes of hardware, keys, and mobile devices. As an engaging DIY creative project, assembling a miniature keychain requires minimal workspace, allowing makers to complete satisfying pieces during daily commutes or brief evening crafting sessions. Because basic amigurumi construction relies primarily on standard single crochet stitches worked in continuous rounds, the technique serves as an exceptionally beginner friendly entry point into fiber crafting. Furthermore, making small animal keychains provides smart budget ideas, enabling crafters to repurpose leftover cotton yarn from larger projects into charming handmade gifts. These completed figures also adapt easily into domestic settings, functioning as zipper pulls, closet organizers, or decorative curtain tieback accents that retain their structural integrity through months of daily handling.
Materials and Preparation
Thorough planning and careful supply selection are essential to ensure that miniature crochet keychains withstand the friction and tension of daily use. The primary fiber selection should focus on sport-weight or fingering-weight mercerized cotton yarn, which provides superior stitch definition, resists pilling, and prevents fuzzy fiber migration. Match this yarn with a steel or aluminum crochet hook sized between 2.0 mm and 2.5 mm to create a dense, rigid fabric that fully contains internal stuffing. Essential assembly hardware includes heavy-duty split key rings, swivel lobster clasps, four-millimeter jump rings, blunt tapestry needles, sharp thread snips, and small jewelry pliers. For safety and durability, use colorfast cotton embroidery floss to embroider facial details rather than plastic safety eyes that might detach under pocket pressure. Preparation begins by testing your stitch gauge on a small sample sphere to confirm that the fabric remains opaque when stretched. Pre-wind your yarn into tidy center-pull cakes to prevent knotting, and establish a well-lit, organized workspace equipped with locking stitch markers to track your round counts accurately throughout construction.
1. Woodland Red Fox Keychain with Fluffy Tail

Step-by-Step Guide
The woodland red fox keychain combines geometric shaping with striking color blocking, producing an iconic forest creature scaled to fit comfortably inside a pocket. This design features a seated, triangular fox head and torso worked in warm rust orange, balanced by an unbleached cream chest patch and dark charcoal ear tips. The defining visual element is the plump, tapered brush tail that hangs gracefully alongside the body, offering tactile comfort when retrieving keys from a bag. By working tight single crochet stitches, the angular contours of the muzzle and ears maintain their sharp definition under daily handling. The warm earth tones coordinate effortlessly with leather accessories, brass hardware, and neutral canvas bags, delivering a classic aesthetic that avoids looking juvenile. The compact posture minimizes protruding parts, preventing snagging while providing a sturdy anchor point for the metal split ring.
To begin assembly, crochet the fox head and body in continuous rounds using rust-orange cotton yarn, starting with a six-stitch magic ring and increasing to twenty-four stitches. Work six rounds even to establish the head depth, then switch to white cotton along the front lower quadrant to form the muzzle before executing gradual decreases down to twelve stitches. Pack the cavity firmly with dense polyester stuffing, centering the fill toward the snout to support embroidered sleeping eyes and a black nose. For the ears, crochet two small orange triangles, finishing the top two rounds in charcoal black, and sew them symmetrically across the head crown. Construct the tail by beginning with white yarn in a six-stitch ring, expanding to twelve stitches, and transitioning to rust orange for ten rounds before tapering to four stitches. Anchor the tail securely to the lower rear seam using double-threaded cotton, attaching a swivel lobster clasp through the top head stitches with a reinforced jump ring.
2. Minimalist Honeybee Keychain with Translucent Wings
Read This:

Execution Process
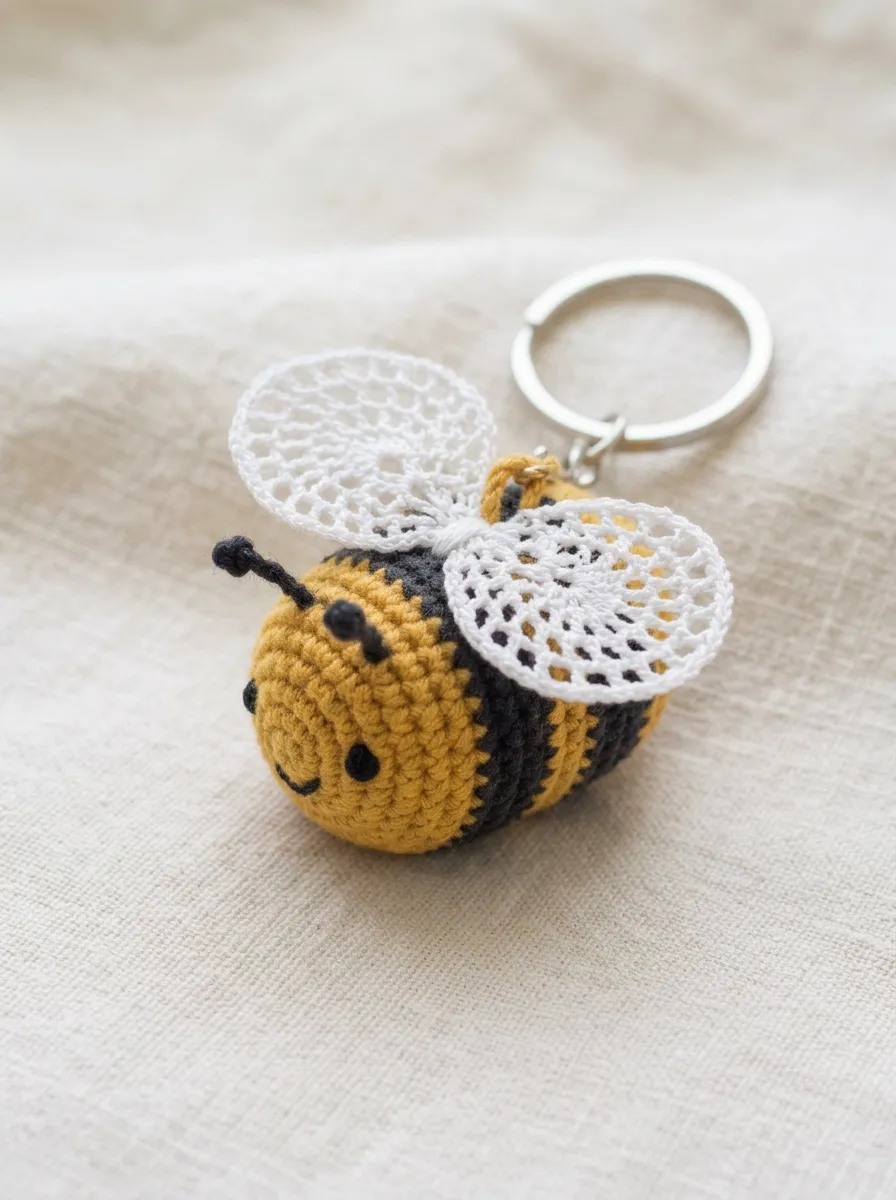
The miniature honeybee keychain features clean horizontal lines, high-contrast striping, and tactile wing textures within a rounded oval silhouette. This project utilizes alternating bands of bright golden yellow and deep charcoal black cotton, creating an eye-catching graphic contrast that makes keys easy to locate in deep compartments. The wings are worked in fine-gauge white cotton using open treble crochet clusters, providing a delicate, semi-translucent appearance that contrasts with the solid, dense body fabric. Two small hand-embroidered French knots create minimal, friendly eyes that remain secure against everyday friction. The rounded, oblong body fits naturally in the palm, serving as a functional stress-relief grip during transit. This project serves as an ideal scrap-yarn activity, requiring minimal yardage of yellow, black, and white thread to produce a finished, boutique-grade accessory.
Start by working the bee body from the front face using golden-yellow cotton yarn, placing six single crochets into an adjustable loop and increasing across three rounds to eighteen stitches. Work two rounds even in yellow, then execute a seamless color change to charcoal black for two rounds, maintaining tight tension to keep the color boundary sharp and level. Continue this alternating sequence until you have completed three yellow bands and two black bands, stuffing the body firmly with fiberfill as the form develops. Close the posterior end with continuous invisible decreases using black yarn, pulling the final yarn tail through the remaining front loops to cinch the opening shut. To craft the wings, join white cotton at the top seam along the first black stripe, chaining three and working three treble crochets and a slip stitch into a single base loop to form an oval wing, repeating the process for the opposite side. Fasten a durable silver key ring to the front center seam using a secure slip-stitch loop.
3. Coastal Sea Otter Keychain Holding a Felt Clam
How to Create
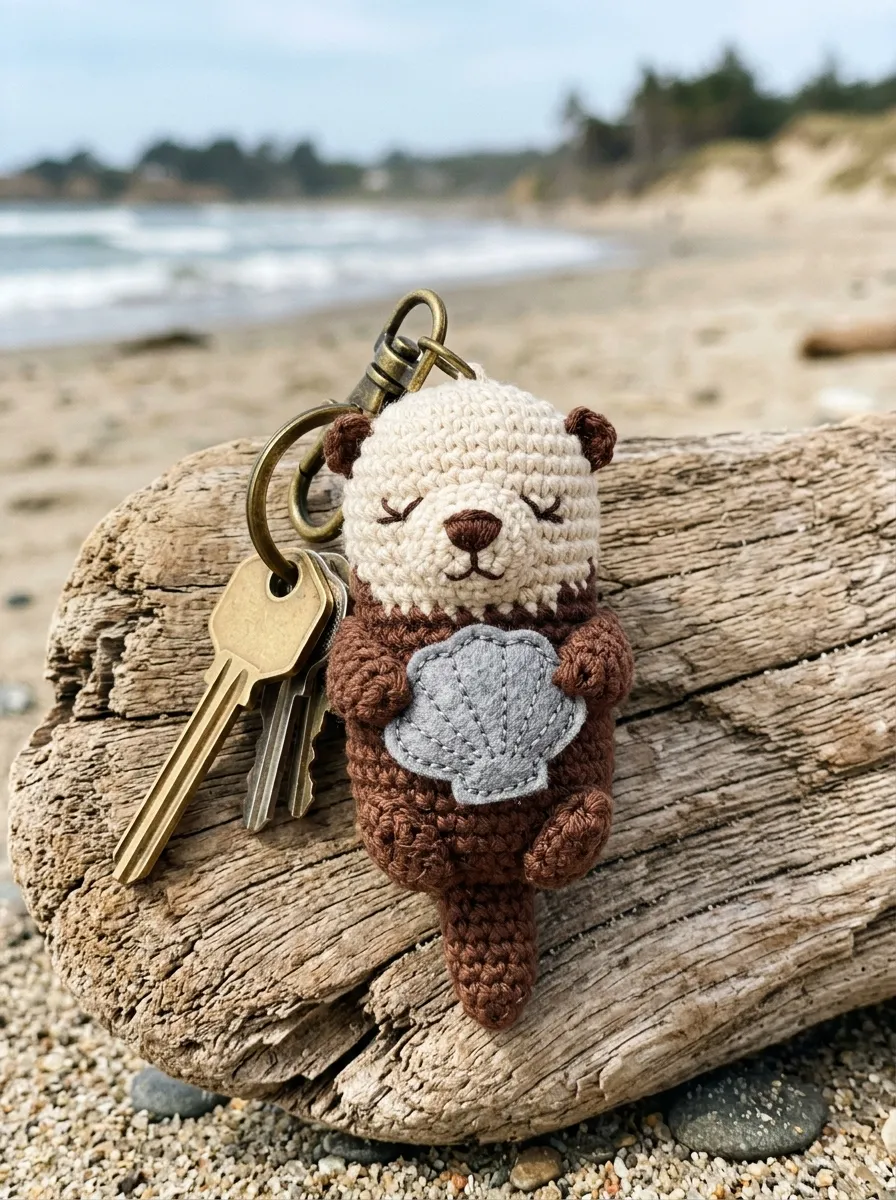
Marine mammal designs introduce relaxed postures, friendly expressions, and narrative charm to everyday carry items. This sea otter keychain features an elongated, floating body worked in rich chocolate brown, topped with a rounded cream head and subtle neck definition. The defining feature is the pair of curved front paws that wrap securely around a miniature felt or crocheted clam shell positioned on the otter’s chest. This small secondary prop adds storytelling charm while providing a reinforced physical structure that protects the delicate facial embroidery. The smooth, cylindrical profile prevents the keychain from tangling with loose items inside pockets or purses. Rendered in natural, earthy brown tones, the design complements casual canvas totes, nautical backpacks, and brass hardware, capturing a timeless coastal aesthetic that appeals to ocean lovers.
Begin construction by shaping the otter head and body as a continuous piece, starting at the top crown with unbleached cream cotton yarn. Expand a six-stitch magic ring to twenty stitches, working five rounds even before transitioning to rich chocolate brown yarn to build the chest and elongated torso over fifteen rounds. Firmly stuff the body core with hypoallergenic fiberfill, ensuring the lower abdomen remains dense to maintain its streamlined shape, then decrease to close the bottom base. Crochet two small half-circle ears in cream, sewing them flat to the sides of the head, and embroider a triangular dark brown nose and sleeping eyes. For the arms, crochet two short cylinders of six stitches, attaching them to the upper shoulders so they fold inward over the belly. Craft a tiny gray clam shell using two ribbed half-circles, stitching it securely between the paws, and anchor a heavy-duty brass split ring to the center top of the head using waxed thread.
4. Sloth Keychain Hanging from a Paracord Strap
Read This:

Step-by-Step Guide
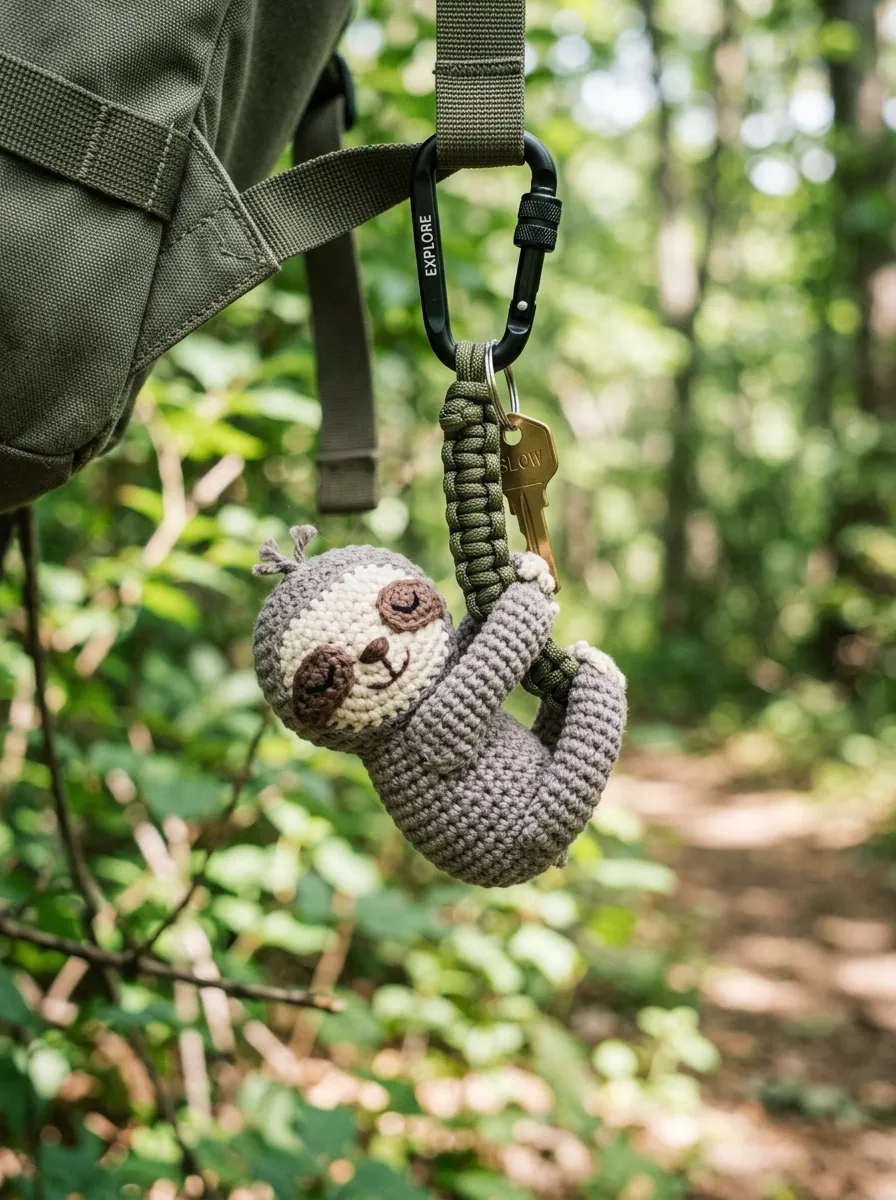
The slow-moving sloth is loved for its relaxed nature, making it a playful theme for keychains that hang from bags or utility straps. This design features a curved, heather-gray sloth body sculpted with a rounded back, a light cream facial mask, and long curved limbs designed to clasp around a durable cord. Instead of hanging from a conventional metal chain, the sloth is suspended from a textured paracord loop, creating an intentional contrast between soft artisanal crochet and rugged outdoor materials. The face features distinctive dark brown eye patches and embroidered smiling features, establishing a calm, friendly expression. The elongated limbs wrap tightly around the mounting cord, distributing structural stress evenly across the arms rather than concentrating weight on a single seam. This sturdy assembly makes the sloth keychain well-suited for outdoor gear, backpacks, and gym duffels.
To construct the sloth, begin by crocheting the body in continuous rounds using heather-gray cotton yarn, expanding a magic ring to eighteen stitches and working ten rounds even before tapering closed. Pack the cavity moderately with polyfill, curving the cylinder slightly during stuffing to give the sloth a natural hunched posture. Crochet an oval facial patch in cream cotton by working around a four-stitch foundation chain, embroidering two horizontal brown eye patches and curved black eyelids before stitching the patch onto the head. Create four identical limbs by crocheting six single crochets in continuous rounds for eight rows, leaving long yarn tails for assembly. Thread a six-inch length of durable olive or navy paracord through a heavy metal key ring, knotting the cord ends securely. Position the sloth body against the cord, wrapping the front and rear limbs around the paracord and stitching the opposing paws together with double-threaded yarn to lock the sloth onto the strap.
5. Petite Spotted Fawn Keychain with Curved Ears
Execution Process
Woodland fawns evoke natural serenity, gentle elegance, and storybook charm through delicate proportions and contrasting spotted markings. This design features an upright, slender fawn head and neck worked in warm chestnut or fawn brown cotton, detailed with a soft cream muzzle and white embroidered back spots. Two upright, curved ears frame the crown, lined with pale pink centers to add subtle color depth. The slender, tapered neck naturally transitions into the head, creating a streamlined form that slides smoothly into tight pockets without catching. Hand-embroidered closed eyelashes and a delicate brown nose give the fawn a peaceful, dignified expression suitable for mature accessories. The rich brown and cream palette coordinates effortlessly with leather wallets, trench coats, and neutral shoulder bags, delivering understated elegance through refined fiber art.
Begin by rolling out the fawn head using chestnut brown cotton yarn, creating a magic ring of six single crochets and increasing evenly over four rounds to twenty stitches. Work four rounds even, then execute an off-center increase sequence across the front stitches to form a gentle muzzle profile, stuffing the head firmly with polyester batting. For the ears, crochet two flat leaf-shaped panels in brown, surface-stitching a pale pink inner ear line down each center before pinching the bottom bases and sewing them to the upper crown. Embroider five or six miniature white spots across the back of the head using single-strand embroidery floss, finishing the face with curved charcoal eyelashes and a tiny satin-stitched nose. Attach a four-millimeter stainless steel jump ring directly through the reinforced fabric between the ears, connecting it to a classic silver split ring using jewelry pliers to complete the assembly.
6. Monochromatic Panda Bear Keychain with Round Paws

Read This:

How to Create
High-contrast monochrome designs provide strong visual clarity, graphic appeal, and timeless charm, making the giant panda an enduring favorite for everyday accessories. This project features a spherical white head framed by prominent black ears, teardrop eye patches, and a compact black body with small, rounded paws. The sharp contrast between deep black and crisp white yarn captures attention across busy bags, making it easy to identify keys at a glance. The dense, rounded geometry distributes mechanical pressure evenly, protecting the character from distortion when carried in pockets or backpacks. Hand-embroidered white catchlights inside the black eye patches give the panda an alert, friendly expression without requiring hard plastic components. The clean, modern look pairs naturally with urban streetwear, canvas backpacks, and minimalist tech accessories.
To construct the panda, begin with the head using pure white cotton yarn, expanding a six-stitch magic ring across five rounds to thirty stitches before working six rounds even to establish spherical volume. Insert generous polyester fiberfill, compressing the material into the lower cheeks before closing the base with continuous invisible decreases. Next, crochet two flat oval eye patches using black cotton, positioning them diagonally across the lower third of the face and securing them with whip stitches. Embroider a small white dot in the center of each patch to create expressive catchlights, adding a tiny black nose between them. Crochet two curved black ears and four small rounded paws, sewing the ears to the upper head and anchoring the paws to a short, four-round black body base. Join the completed head and body using heavy-duty ladder stitches, finishing by securing a sturdy black metal key clasp through the top center crown.
7. Chubby Highland Cow Keychain with Fringe Bangs
Step-by-Step Guide
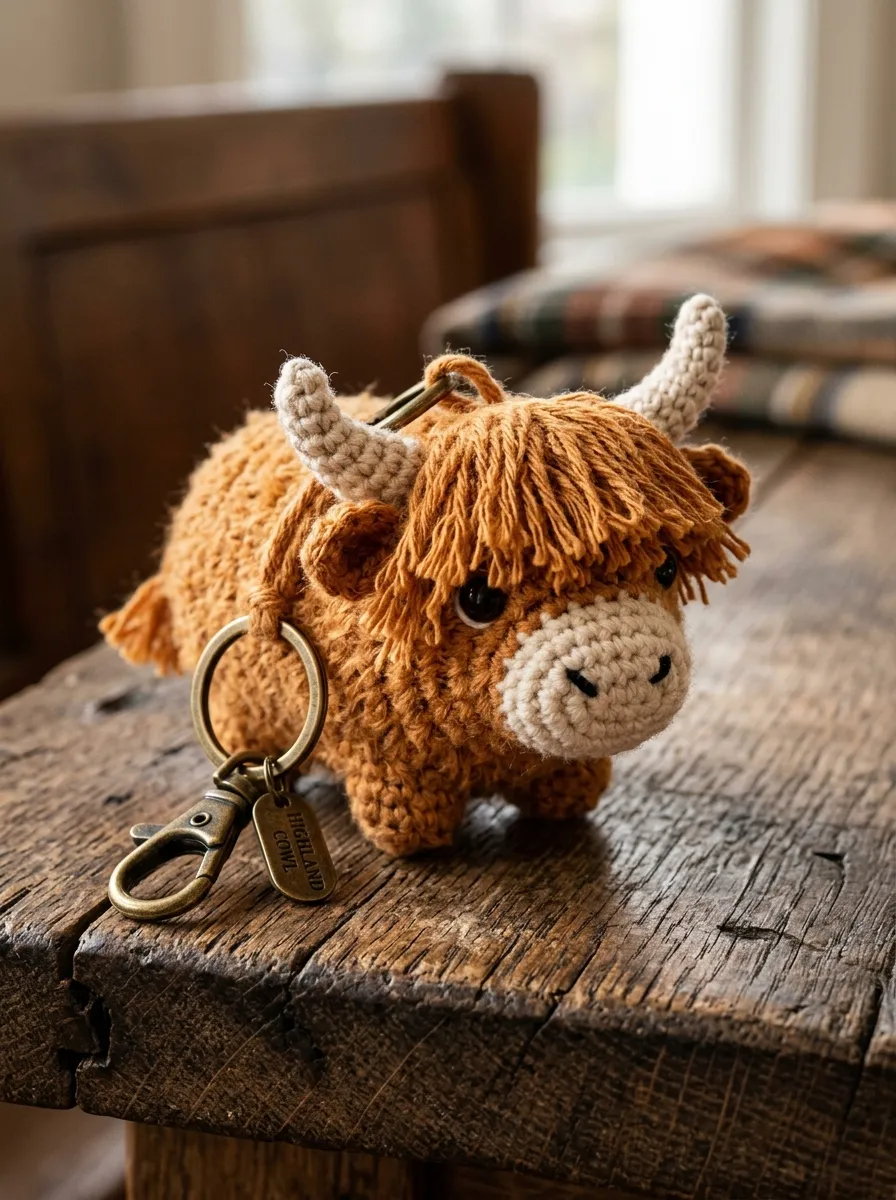
The Scottish highland cow has become a popular design motif, celebrated for its wide horns, stocky proportions, and textured fringe coat. This keychain adaptation features a rounded head worked in warm ginger, caramel, or butterscotch cotton, distinguished by a dense mop of layered yarn fringe covering the forehead. Two gently curved cream horns emerge from the sides of the head, framed by small, outward-pointing ears. The textured fringe front provides rich tactile variety, contrasting with the smooth single-crochet fabric of the muzzle and cheeks. The broad, sturdy shape gives the piece substantial durability, with the horns crocheted tightly to prevent bending under pressure. The warm ginger and cream palette complements denim jackets, rugged canvas backpacks, and leather travel gear, making it a reliable companion for outdoor adventures.
Start by assembling the cow head with ginger-colored cotton yarn, placing six single crochets into a magic ring and increasing to twenty-four stitches over four rounds. Work five rounds even, placing an oval cream muzzle across the lower face and stuffing the head cavity firmly with fiberfill before closing the base with decreases. To create the iconic horns, join cream cotton and work an eight-round tapered tube of four stitches, curving the piece into a gentle crescent before sewing it securely to the upper side of the head. Add two small ginger ears directly beneath the horns. For the signature fringe, cut twelve two-inch strands of ginger yarn, looping them through the front crown stitches using a small crochet hook to create a dense latch-hook fringe, then trim the ends across the muzzle line. Fasten an antique bronze swivel clasp securely behind the horns using reinforced matching thread.
8. Hooded Baby Penguin Keychain with Scarf Accent


Execution Process
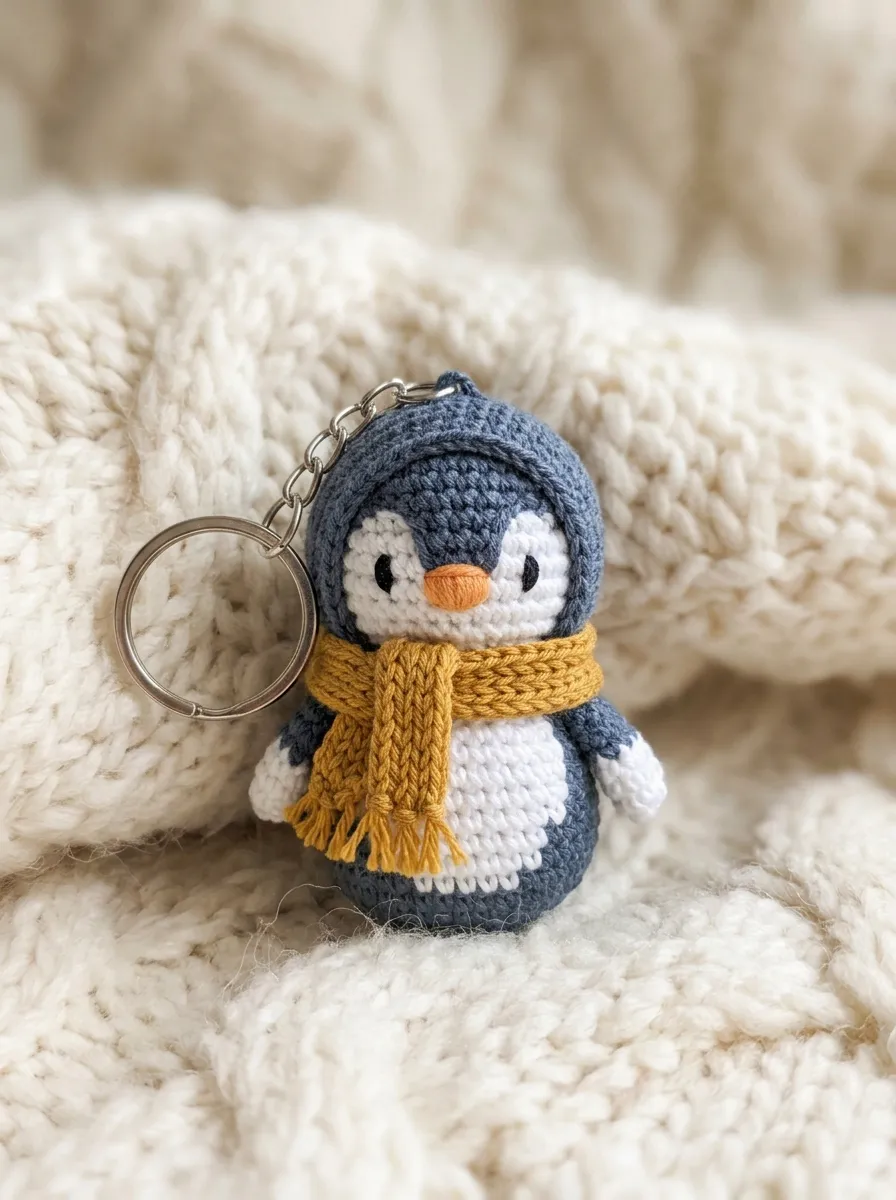
Winter bird designs introduce cozy character, charming silhouettes, and bright color pops to personal accessory collections. This baby penguin keychain features an egg-shaped body worked in deep slate blue or charcoal, paired with a bright white belly panel and a miniature mustard-yellow scarf wrapped snugly around the neck. The seamless hood-like transition around the face frames two small embroidered eyes and an upturned orange beak, creating a sweet, inquisitive expression. The wrapped scarf introduces a secondary color and tactile layer, elevating the simple bird body into an intentional, seasonal design. Its streamlined, flipperless profile keeps the toy compact, preventing accidental snagging on pocket seams. The cool slate and bright mustard palette coordinates well with winter coats, knit beanies, and commuter backpacks, serving as a bright, functional accent during cold-weather routines.
Begin by working the penguin body from the base upward using deep slate cotton yarn, expanding a six-stitch magic ring to twenty-four stitches and working upward for twelve rounds. Integrate an eight-stitch white front panel across the central rows to establish the belly and face window, keeping yarn floats loose on the inside to avoid puckering. Pack the body firmly with fiberfill, shaping it into a gentle tapered egg before closing the crown with invisible decreases. Embroider two tiny charcoal eye stitches and a small satin-stitched orange beak within the white face area. For the scarf, chain thirty stitches using mustard-yellow fingering yarn, working one row of half-double crochet to produce a narrow, flexible fabric strip. Wrap the scarf twice around the neck transition, stitching the overlapping ends flat against the chest to keep the accessory secure during daily movement. Fasten a silver key ring through the top crown using a double-anchored jump ring.
9. Sleeping Tabby Cat Keychain with Curled Tail
How to Create
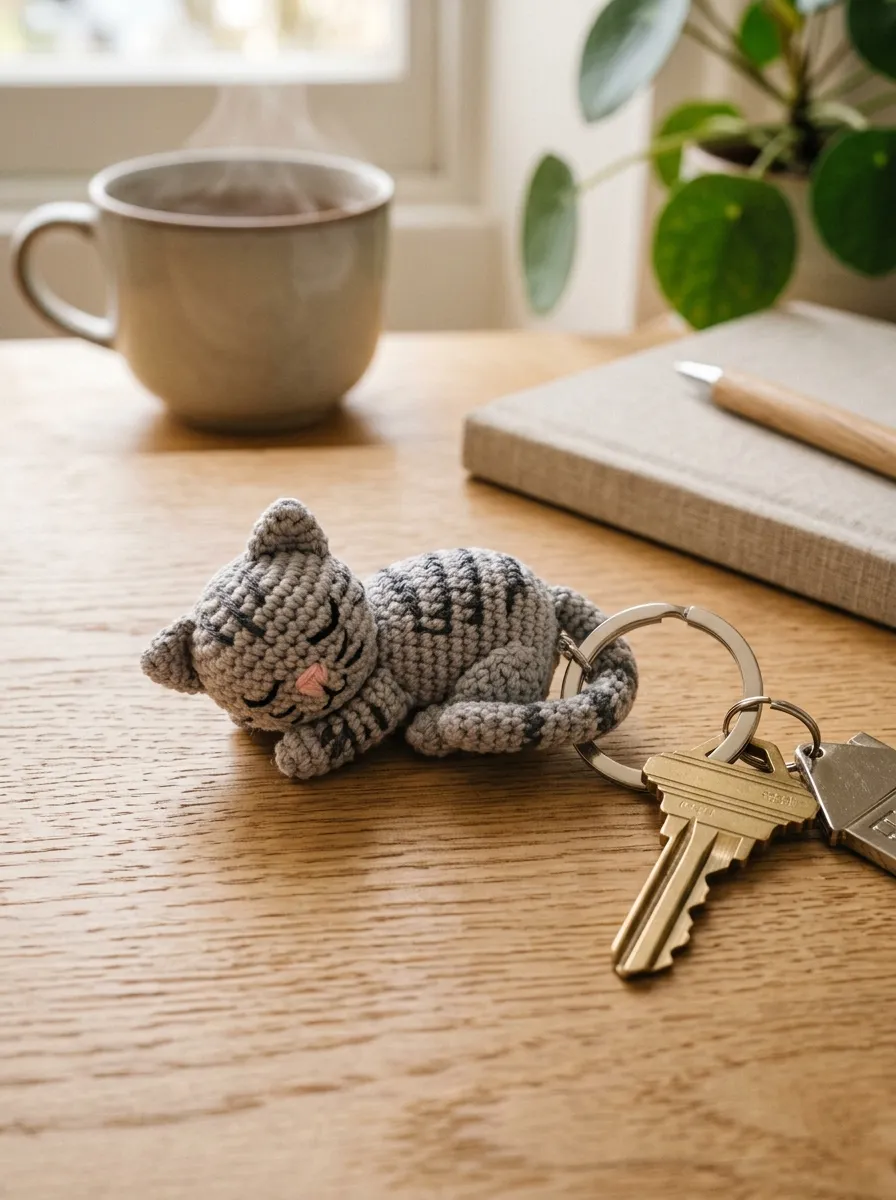
Feline designs capture the peaceful, contented nature of sleeping pets, providing comfort through gentle curves and expressive embroidery. This keychain features a rounded cat head and arched back worked in soft stone-gray cotton, detailed with subtle darker gray tabby stripes across the forehead and flanks. The peaceful, sleeping expression is hand-embroidered with curved black thread, giving the piece a tranquil, restful appearance. A long, flexible tail curls upward along the side of the body, creating an ergonomic loop that makes it easy to slide fingers through when pulling keys from deep pockets. The balanced, compact body has no fragile limbs, allowing it to withstand long-term friction inside bags and pockets. The neutral gray tones complement office lanyards, tote bags, and key organizers, offering understated elegance through simple, continuous lines.
To create the sleeping cat, start at the snout with stone-gray cotton yarn, working six single crochets into a magic ring and expanding to twenty-two stitches over four rounds. Work six rounds even to form the head, then begin shaping the arched back by working selective increases along the spine while keeping the underside flat across eight rounds. Stuff the body with fiberfill to a medium density, allowing the form to retain its natural resting curve before closing the rear opening. Embroider two downward-curving arcs for sleeping eyes and a small pink triangular nose onto the face, adding horizontal charcoal surface lines along the back for tabby stripes. Crochet two small triangular ears, sewing them flat to the head, and craft a narrow fifteen-round tail that curves along the hip. Attach a flat split ring to the back of the neck using a reinforced fabric loop, ensuring the keychain hangs comfortably in balance.
10. Playful River Otter Keychain with Textured Paws

Read This:

Step-by-Step Guide
The river otter is admired for its playful energy and streamlined form, making it an engaging design for portable accessories. This keychain features an active otter figure worked in soft taupe cotton, complete with a pale cream throat patch, rounded ears, and four miniature textured paws. The slender, arched torso captures the fluid movement of swimming otters, bringing kinetic energy to your everyday carry. A tapered tail extends backward, balancing the figure’s proportions and serving as a comfortable grip when holding keys. Hand-embroidered dark brown whiskers and bright bead eyes give the otter an alert, curious personality that brightens daily routines. The neutral taupe palette pairs seamlessly with canvas totes, gym bags, and car key fobs, offering durable craftsmanship built for everyday use.
Begin by crocheting the otter head and body as a unified piece using taupe cotton yarn, expanding a six-stitch magic ring to twenty-four stitches and working eighteen continuous rounds to build an elongated torso. Firmly stuff the body cavity with clean fiberfill, using a blunt stylus to distribute the material evenly along the tapered form before closing the tail end. Add a flat cream oval to the throat using delicate overcast stitches, embroidering two dark brown French knot eyes and a small satin-stitched nose. Crochet four miniature paws by working four single crochets into a loop, attaching them symmetrically along the lower flanks to suggest a swimming posture. Complete the figure by crocheting an eight-round tapered tail, stitching it securely to the rear base. Attach a polished brass key clip to the back of the neck with an eight-millimeter jump ring, confirming all seams are locked with internal knots before daily use.
Common Beginner Mistakes and How to Avoid Them
The most critical technical error in miniature crochet keychain construction is maintaining loose stitch tension, which causes the fabric to stretch and allows internal stuffing to show through. Prevent this by selecting a crochet hook that is a full millimeter smaller than the yarn manufacturer recommends, maintaining firm, consistent yarn wraps around your fingers throughout every round. Another frequent challenge is the appearance of jagged, stepped color shifts when working continuous spirals; resolve this by completing the final yarn-over of the previous stitch using the new color strand. Beginners also frequently understuff or overstuff small figures, resulting in either collapsing toys or distorted stitches that pull apart under stress. Stuff your figures progressively using small pinches of fiberfill, pushing the material toward the outer contours to establish a smooth, resilient shape. Additionally, never rely on delicate jewelry jump rings alone to anchor heavy key rings; always pass your hardware through reinforced crochet fabric or use heavy-duty split rings to prevent detachment. Finally, avoid using plastic safety eyes on accessories subject to pocket friction, opting instead for secure, hand-embroidered features using colorfast cotton embroidery floss.
Practical Tips for Better Results
Achieving professional, boutique-grade finishes on crochet keychains relies on disciplined assembly habits and precise finishing techniques. Always utilize the invisible decrease method instead of standard decreases when shaping three-dimensional curves; inserting your hook exclusively through the front loops of two adjacent stitches produces an uninterrupted, smooth surface that mirrors a standard single crochet. Secure locking plastic stitch markers at the start of every round to avoid losing your stitch count during complex shaping sequences. When attaching limbs or decorative ears, pin all elements in place first using pearl-headed pins to evaluate symmetry and proportions from multiple angles before stitching. Use high-strength nylon thread or double-stranded cotton yarn when securing metal split rings and lobster clasps, anchoring the thread ends with internal square knots buried deep within the polyfill core. To give your finished figures a polished, professional look, lightly steam the completed cotton fabric using an iron held two inches away; this relaxes the fibers, sets the stitch tension, and creates a clean surface without flattening the three-dimensional volume.
Styling, Presentation, or Organization Ideas
Integrating handmade animal keychains into your daily lifestyle enhances personal accessories while keeping keys tidy, accessible, and organized. Attach matching animal figures to gym duffels, work totes, and school backpacks using durable swivel clasps, turning everyday carry items into playful, personalized statements. For home storage, install a row of minimalist wooden pegs or a magnetic key bar in your entryway, hanging your collection of animal keychains by their metal rings to create an organized decorative display. If presenting these handmade creations as thoughtful gifts, place each figure inside an unbleached kraft paper jewelry box lined with shredded crinkle paper, tying the exterior with natural baker’s twine and a stamped wooden gift tag. You can also color-code your household keys using different animal characters—such as a fox for house keys, a bee for office keys, and an otter for vehicle keys—streamlining daily organization with handmade charm. When photographing your creations for digital portfolios or inspiration boards, use soft morning daylight, neutral linen backdrops, and raw wood surfaces to highlight the fine stitch definition and natural cotton textures.
Budget or Time Planning
Executing a collection of crochet animal keychains requires minimal financial investment and structured time management to maximize creative efficiency. Save on supply costs by purchasing multi-color value packs of sport-weight cotton yarn or using leftover remnants from larger projects, as a single two-ounce skein can yield up to ten individual keychains. Organize your production schedule using a modular assembly-line workflow: dedicate an initial session to winding yarn and prepping hardware; use a second session to crochet all foundational heads and bodies; and reserve a final block for embroidery, stuffing, and hardware attachment. Simple, single-piece designs like the honeybee or sleeping cat require approximately forty-five minutes of active stitching, making them ideal high-efficiency weekend projects. Keep your active materials organized by storing hooks, stitch markers, safety pins, and matching yarn tails together inside clear, zippered project pouches. Planning your handmade holiday gifts and craft fair inventories several weeks in advance ensures a calm, enjoyable crafting experience, yielding beautifully detailed miniature sculptures without the pressure of rushed assembly sessions.
Creative Expansion and Advanced Inspiration
Once you have mastered foundational keychain shaping and assembly techniques, explore creative variations to expand your fiber art designs across wider applications. Adapt your favorite animal figures into charming nursery mobiles by suspending four or five modified figures from an untreated wooden embroidery hoop using natural waxed cotton cords. You can also translate these patterns into functional home decor by omitting the metal key hardware and inserting strong neodymium magnets inside the stuffing, turning the animals into decorative refrigerator accents or magnetic memo holders. Experiment with botanical, hand-dyed cotton yarns to achieve subtle, variegated color transitions across animal coats, introducing earthy regional authenticity to your collection. Consider designing themed seasonal variations—such as adding tiny winter scarves, spring flower crowns, or holiday wreaths—using the exact same base animal patterns. Document your custom color combinations, stitch counts, and hardware measurements in a dedicated studio journal, creating a personal design archive that streamlines future creative projects and ensures consistent, professional results across every handmade collection.