Crochet charms have become a prominent creative focus across craft inspiration boards, offering makers an accessible medium for personal accessories and fiber art decoration. Learning how to construct miniature crochet projects provides a straightforward path for beginners seeking immediate results without committing to expansive blankets or fitted garments. This comprehensive guide details ten beginner friendly crochet charm concepts that range from petite botanical motifs and miniature fruit shapes to geometric tokens and whimsical celestial pendants. By following these structured projects, readers will master fundamental loop manipulation, circular shaping, single crochet stabilization, and secure hardware attachment techniques. Understanding the mechanics of small-scale yarn work delivers practical value, as it teaches precise tension control and stitch anatomy on an approachable scale. These miniature creations serve multiple functional purposes, acting as personalized keychain accents, bag pendants, zipper pulls, and decorative gift embellishments. Each section breaks down the essential foundational steps, fiber recommendations, and structural techniques necessary to achieve polished results. Crafting these small tokens allows hobbyists to explore color theory and three-dimensional construction with modest effort, building confidence through repeatable and rewarding handmade projects.
Why This Idea Is Trending or Useful
Handmade crochet charms maintain high visibility across digital platforms because they combine retro textile charm with practical daily utility. Modern lifestyle aesthetics heavily favor personalized everyday carry items, encouraging individuals to customize backpacks, tote bags, phone cases, and key rings with unique handmade pieces. For novices, miniature charms eliminate the intimidation often associated with large yarn projects, making them exceptionally beginner friendly while delivering rapid creative satisfaction. From an economic perspective, these tiny patterns provide dependable budget ideas by transforming leftover yarn scraps into functional accessories that cost almost nothing to produce. The compact scale makes them ideal travel crafts that require minimal supplies, fitting easily into small pouches for crafting during commutes or casual breaks. Beyond personal use, small crochet charms have become popular choices for handmade gift exchanges, craft market inventory, and event party favors. Their adaptable nature allows crafters to experiment with various fibers, from rustic natural cottons to soft plush chenille, matching any modern design or aesthetic preference. Developing proficiency with these miniature forms builds a versatile skill foundation that transfers smoothly into larger amigurumi and complex home decor designs.
Materials and Preparation
Proper preparation and intentional material selection are essential for producing crisp, durable crochet charms that retain their structural shape during daily handling. Mercerized sport-weight or DK-weight cotton yarn is the preferred fiber for miniature projects because its smooth, tightly spun plies resist fraying while providing crisp stitch definition. Pair this yarn with an ergonomic hook sized between 2.0 mm and 2.75 mm, selecting a gauge slightly smaller than the yarn band suggests to ensure dense, gap-free fabric. Essential assembly tools include locking metal or plastic stitch markers, sharp thread snips, a blunt tapestry needle for weaving ends, and fine-point jewelry pliers for opening hardware rings. Prepare durable metal findings, such as split key rings, swivel lobster clasps, jump rings, and phone strap cords made of stainless steel or brass. Before picking up the hook, lay out your materials on a clear work mat to prevent losing small metal components or tiny notions. Planning color palettes in advance ensures that multi-tone charms maintain balanced visual contrast without muddying delicate stitch details. Testing your manual tension on a small test circle verifies that your stitches remain tight enough to conceal internal fiberfill when stuffing three-dimensional forms.
1. Sunburst Miniature Citrus Slice
How to Create
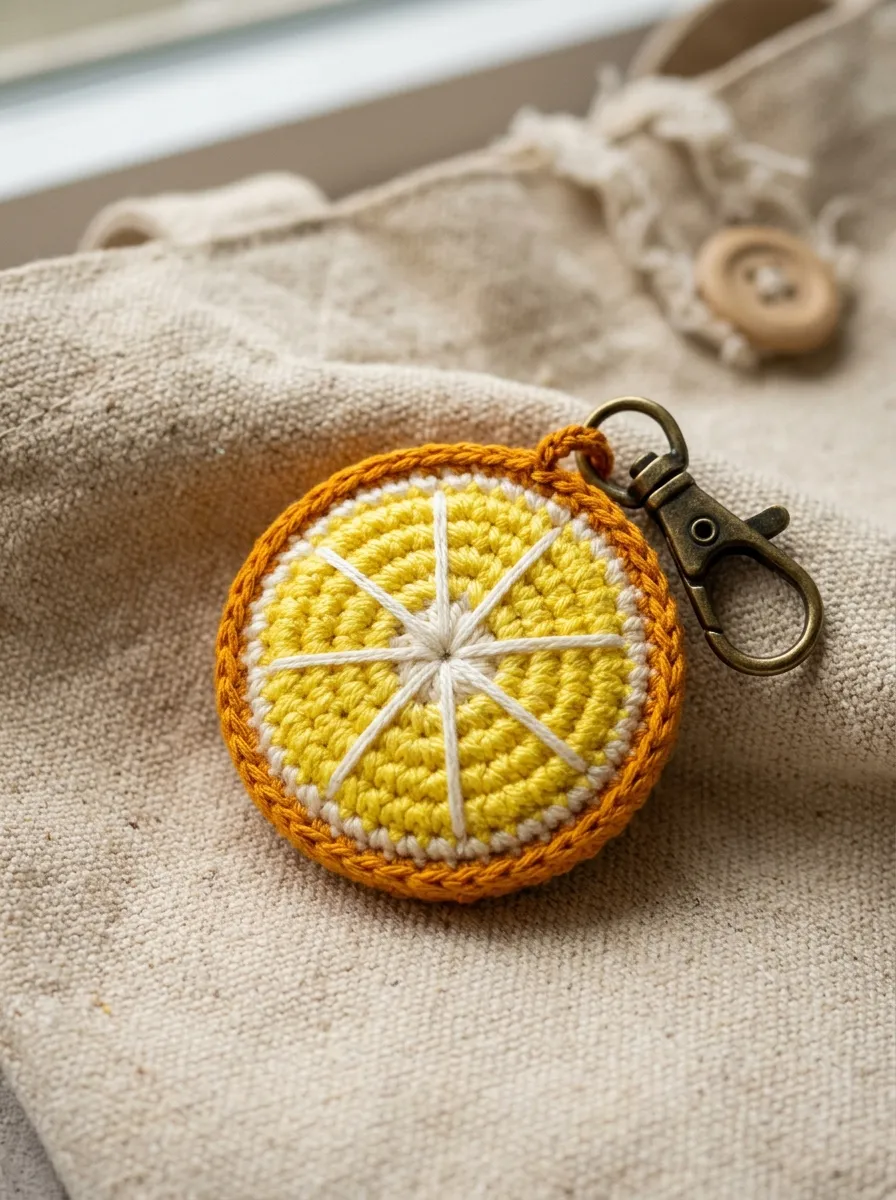
The sunburst miniature citrus slice charm captures bright summer vitality through concentric circular color changes and clean surface embroidery. This flat, semi-circular or fully circular design emulates sliced lemons, limes, grapefruits, or oranges by arranging contrasting yarn rings around a central neutral wheel. A pale cream or white foundation ring separates the inner fruit pulp segments from the outer colored rind, establishing a crisp graphic boundary reminiscent of mid-century Scandinavian kitchen textiles. The flat geometric silhouette remains streamlined and lightweight, making it an ideal companion for busy keyrings or luggage zipper pulls where bulky items might catch. By working exclusively with standard single crochet and double crochet variations, beginners develop a solid feel for radial stitch increases that lie completely flat without cupping. The graphic appeal of this citrus motif brings a playful, refreshing pop of color to neutral canvas tote bags, backpacks, and casual accessories without demanding complex construction.
To begin this citrus charm, take your bright yellow or orange cotton yarn and crochet six single crochets directly into an adjustable magic ring, pulling the tail firmly to close the center hole. In the next round, work two single crochets into every stitch to expand the circle to twelve stitches, switching to off-white yarn on the final pull-through. In round three, alternate one single crochet and one increase stitch around, then switch to a vibrant rind color to complete round four with a pattern of two single crochets followed by an increase. Fasten off the yarn with an invisible join, using a blunt tapestry needle threaded with white embroidery floss to sew eight straight radial lines from the center outward to create distinct fruit segments. Fold the completed circle in half if a wedge silhouette is preferred, slip-stitching the curved rim closed with a matching border. Insert a sturdy five-millimeter jump ring through the outer rind stitch, clamping a miniature swivel clasp firmly into position using flat-nose jewelry pliers.
2. Sculpted Forest Acorn Pendant
Step-by-Step Guide
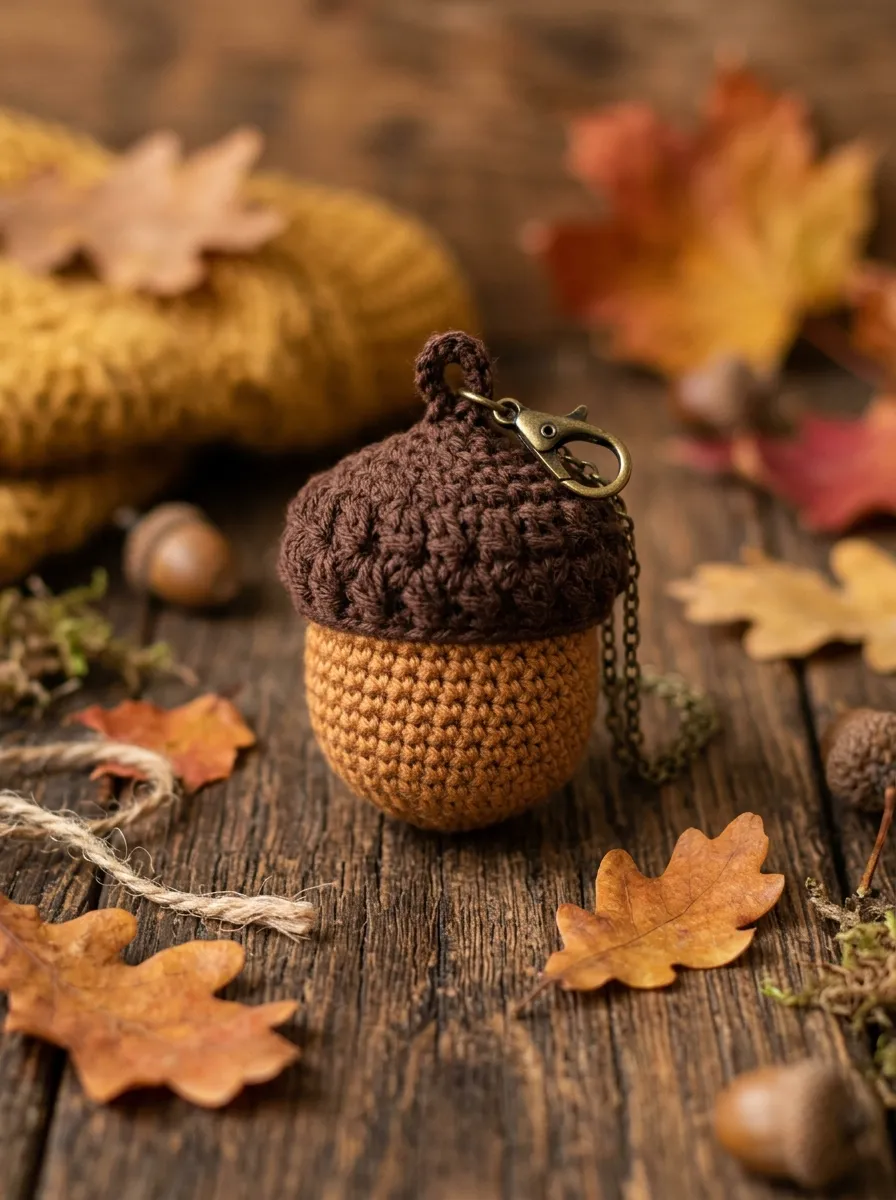
The sculpted forest acorn pendant pairs rich earthy tones with contrasting surface textures to evoke an understated woodland aesthetic. This two-part charm combines a smooth, bulbous lower nut crocheted in warm caramel or oatmeal yarn with an overlapping, textured cap worked in deep bark brown. The textural contrast between the flat single-crochet lower body and the raised ridges or puff stitches of the upper cap gives this diminutive piece tactile appeal and structural depth. Its natural color palette coordinates effortlessly with leather tote bags, utility jackets, and autumn accessories, offering an organic alternative to brightly colored novelty charms. Because the acorn requires firm internal stuffing in a tiny cavity, it teaches novices how to maintain consistent gauge on curved amigurumi shaping without allowing fiberfill to peek through the stitches. The finished piece hangs neatly as a balanced teardrop silhouette, projecting handcrafted warmth and rustic simplicity suitable for fall seasonal displays or nature-inspired backpacks.
Commence by crafting the lower nut section using warm caramel cotton yarn, working six single crochet stitches into a magic circle to form the pointed base. Increase symmetrically over four rounds until reaching eighteen stitches, then work three straight rounds without increases to build the rounded body cavity. Lightly pack the interior with a dense pinch of polyester fiberfill, tapering the upper rim inward with a round of paired single crochet decreases before fastening off cleanly. For the textured cap, switch to deep chocolate brown yarn and create an eight-stitch magic ring, expanding outward to eighteen stitches while working exclusively in the back loops only to create defined circular ridges. Work two level rounds of half-double crochet cluster stitches to build the down-turned brim of the cap, slipping a short twisted cord loop through the center crown to serve as a realistic stem hanger. Slip the brown cap snugly over the upper half of the stuffed caramel nut, securing the two pieces together using neat whip stitches around the rim with a matching yarn tail.
3. Delicate Dimensional Blossom Cluster
How to Make
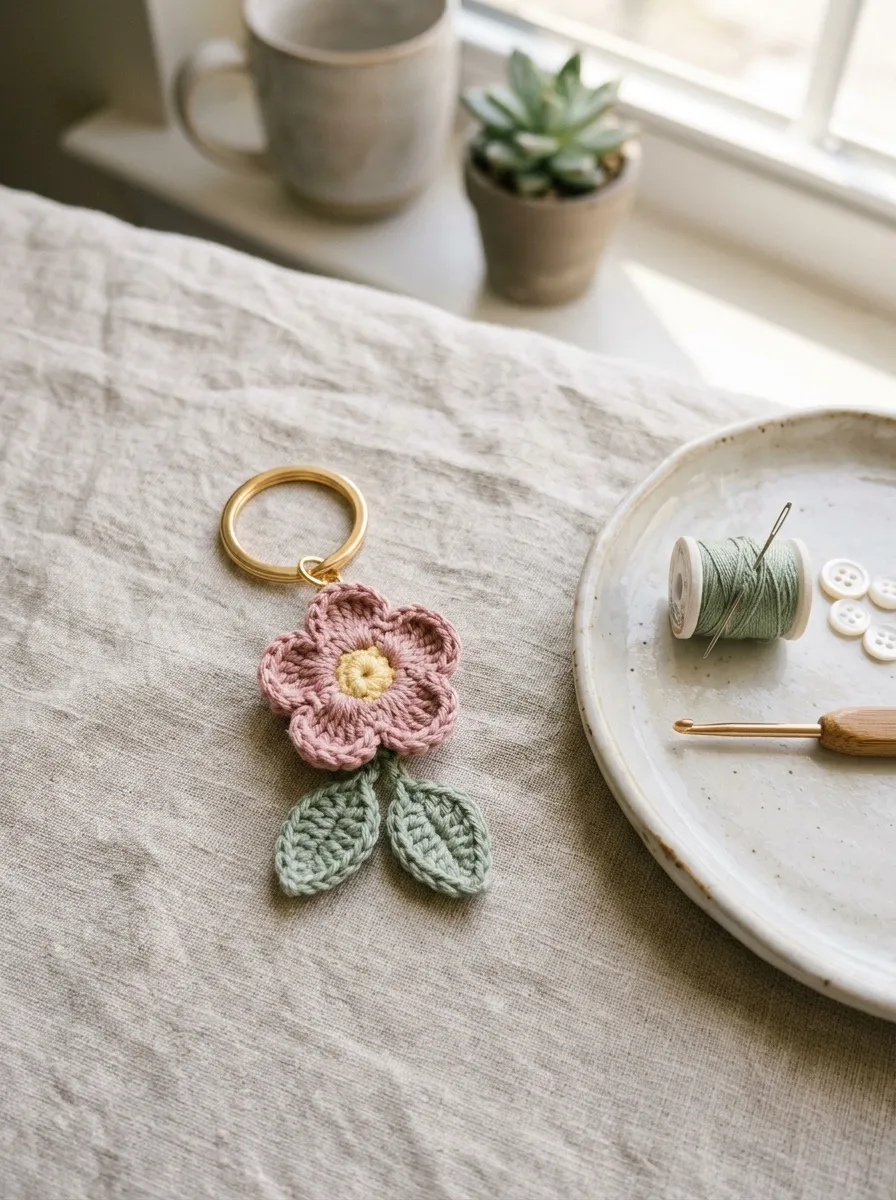
The delicate dimensional blossom cluster translates botanical beauty into an adaptable fiber accessory, combining layered petals with miniature leaf accents. This design features a central five-petal flower crocheted with gently ruffled edges, accented by a small contrasting center and two dangling sage green leaves. The layered petal construction produces depth without excessive bulk, allowing the blossom to lay comfortably against flat surfaces like denim jackets or purse pockets. Utilizing pastel shades like dusty rose, lavender, or buttercup yellow paired with muted olive greenery creates a soft, modern garden aesthetic. Beginners benefit greatly from this project, as it introduces varied stitch heights—transitioning smoothly from slip stitches to half-double, double, and treble crochets within a single foundation loop to create curved petal contours. The resulting floral charm functions beautifully as a cheerful bag pendant, decorative planner bookmark, or sweet handmade addition to gift wrapping.
Start by working into a magic ring using soft yellow yarn, chaining one and placing five single crochet stitches inside before tightening the loop and fastening off. Join your chosen petal color—such as dusty rose—into the front loop of any single crochet stitch, chaining two to establish the initial height. Into the same stitch, work one half-double crochet, two double crochets, and another half-double crochet, chaining two and slip-stitching back down into the foundation base to finish the first curved petal. Repeat this sequence into each of the remaining four foundation stitches around the perimeter, creating a full five-petaled flower before fastening off securely on the reverse side. To construct the accompanying foliage, join sage green yarn to the back of the flower base, chaining eight stitches, working back down the chain with slip stitches, single crochets, and picots to shape two pointed oval leaves. Anchor a brass eyelet pin through the floral center, using pliers to form a secure loop that links directly to a split key ring or lanyard clasp.
4. Minimalist Monochrome Geo Cube
Read This:

Execution Process
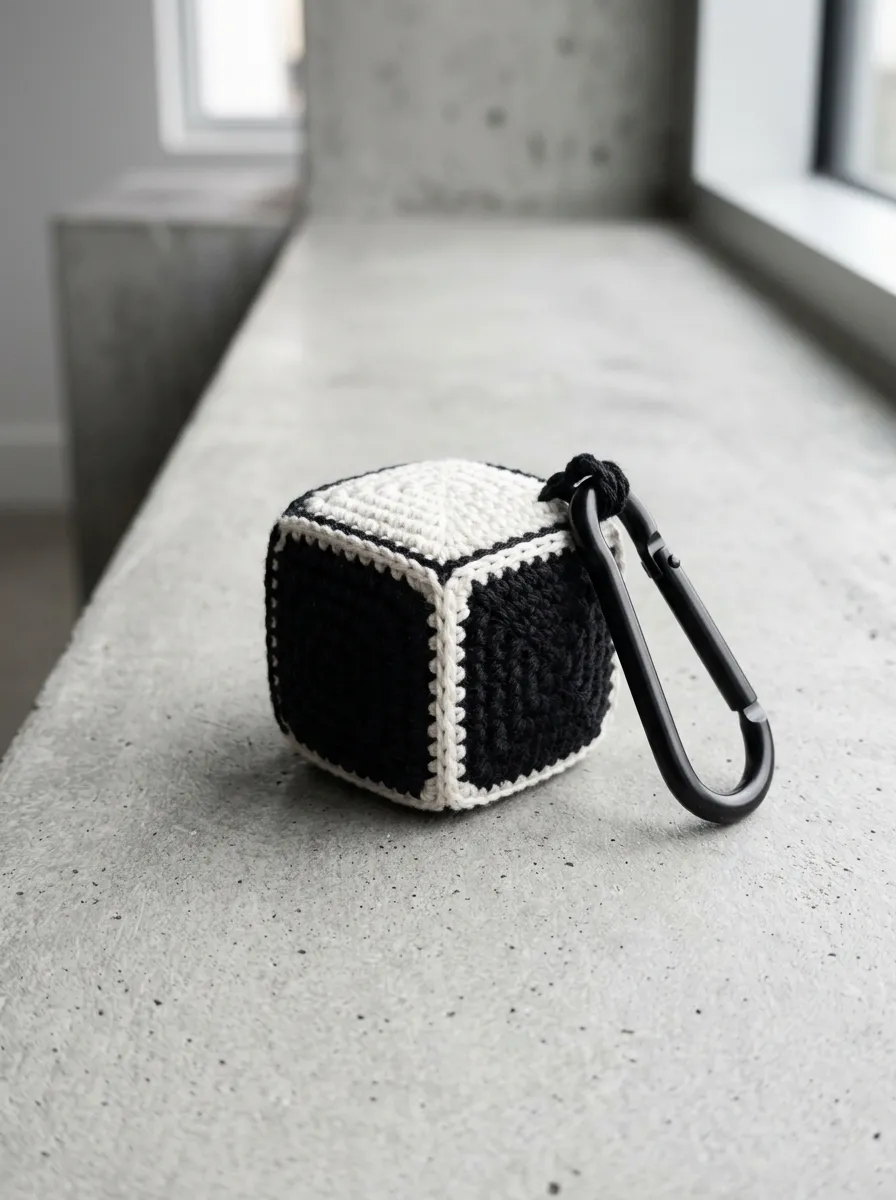
The minimalist monochrome geo cube embraces contemporary geometric design, offering a structured, modern alternative to organic animal and floral forms. Built from six small, identical square panels crocheted in dense single crochet and joined with crisp slip-stitch seams, this piece celebrates clean lines and architectural simplicity. The color palette focuses on high-contrast neutrals, such as slate gray, chalk white, and matte black, arranged in solid planes or subtle color-blocked quadrants. The cubic structure provides a firm, tactile object that feels substantial in the hand while remaining completely lightweight on a key set. Crafting this charm reinforces edge tension control and square corner shaping, helping beginners master row-by-row consistency without accidental width variations. Its crisp, understated appearance suits modern tech accessories, laptop sleeve zippers, and urban commuter backpacks, appealing directly to those who favor industrial design and clean visual organization over whimsical patterns.
Begin by rolling out smooth DK-weight black cotton yarn, chaining six stitches on a 2.25 mm hook to establish the base foundation for the first square face. Work five rows of five single crochet stitches back and forth, turning with a single chain at the end of each row to maintain straight, even borders. Complete six identical five-by-five square swatches, lightly steam-blocking the individual pieces between damp cotton towels to set the square edges flat. Using an off-white contrasting thread or matching black yarn, align the edges of two squares and join them using surface slip stitches worked through the outer loops only, forming a neat corner seam. Continue joining the squares to assemble an open-topped cubic box, inserting a dense one-inch foam cube or firm polyester batting inside to ensure the edges remain crisp and rigid. Seam the final square top panel closed along all four edges, weaving the remaining yarn ends deep into the interior core before attaching a minimalist matte black carabiner ring through one reinforced corner.
5. Petite Pastel Bobble Heart
Setup Method
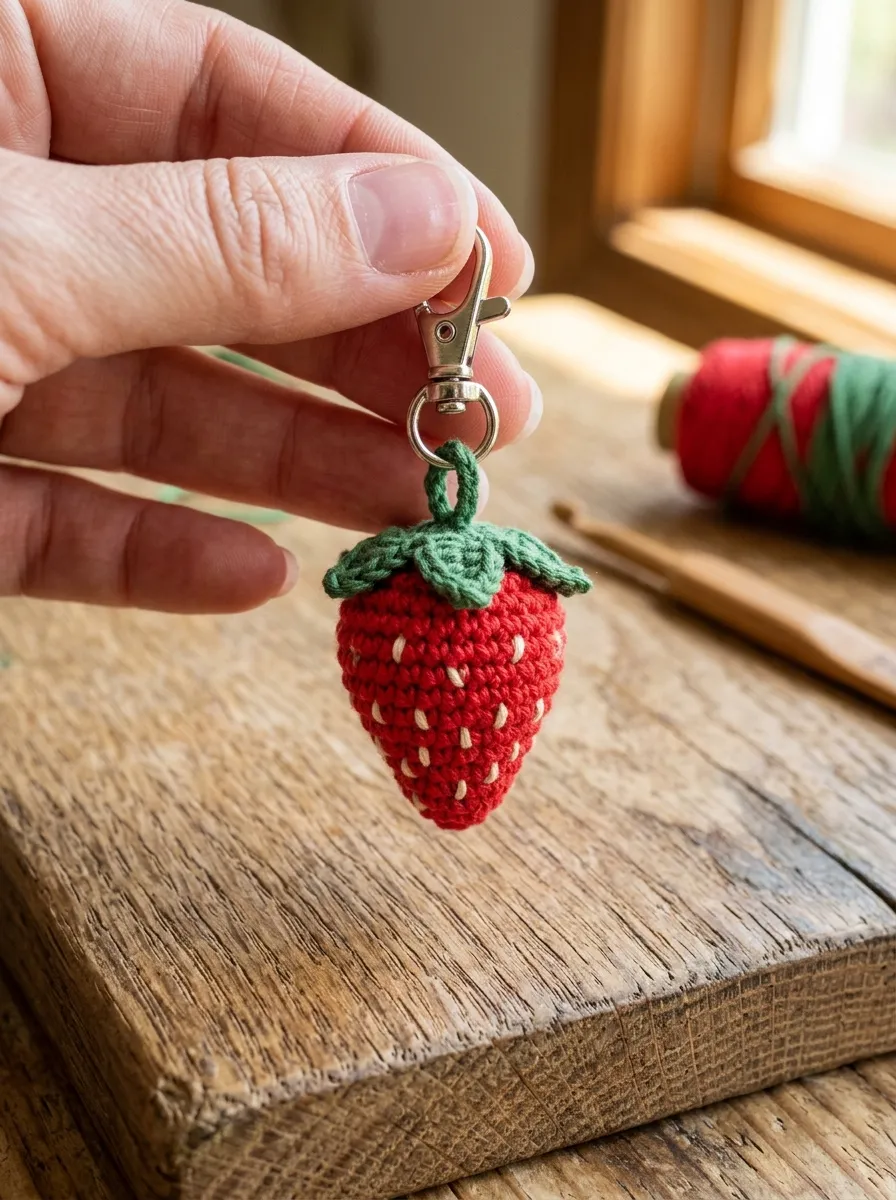
The petite pastel bobble heart combines classic romantic symbolism with rich surface texture, utilizing dense popcorn or bobble stitches across a symmetrical heart profile. The raised bumps catch the light softly, transforming a flat heart shape into an engaging three-dimensional accessory that feels soft and squishy to the touch. Rendered in muted pastel hues like pale peach, powder blue, or mint cream, this charm avoids overly sweet novelty styling in favor of an understated, artisanal look. The rounded upper lobes taper cleanly into a sharp bottom point, maintaining clear anatomical balance through precise side decreases. This project serves as an ideal training exercise for novices learning to compress multiple unfinished double crochets into a single anchor loop without warping neighboring stitches. The finished heart charm works wonderfully as a zipper pull on makeup bags, a thoughtful Valentine favor, or a gentle tactile accent attached to a child’s school satchel.
To construct the textured heart, begin at the bottom tip using soft pastel pink cotton yarn, chaining two and placing three single crochets into the second chain from the hook. In round two, expand the width by working an increase, one three-loop bobble stitch, and another increase to establish the textured front surface. Continue working upward in turning rows, alternating smooth single crochet rows with textured bobble rows while expanding the stitch count evenly until reaching nine stitches across. To separate the upper lobes, work across the first four stitches for two short rows to shape the left curved lobe, decreasing at the outer edge before fastening off cleanly. Reattach yarn to the remaining stitches on the opposite side to mirror the right lobe, repeating the decrease sequence to ensure balanced symmetry. Crochet an identical second heart panel, place them wrong-sides together, and single-crochet the outer rims together while tucking a light wisp of fiberfill into the center. Fasten off with an invisible join at the top indentation, securing a polished silver heart-shaped lobster clasp through the central dip.
6. Golden Celestial Crescent Moon
Read This:
How to Make
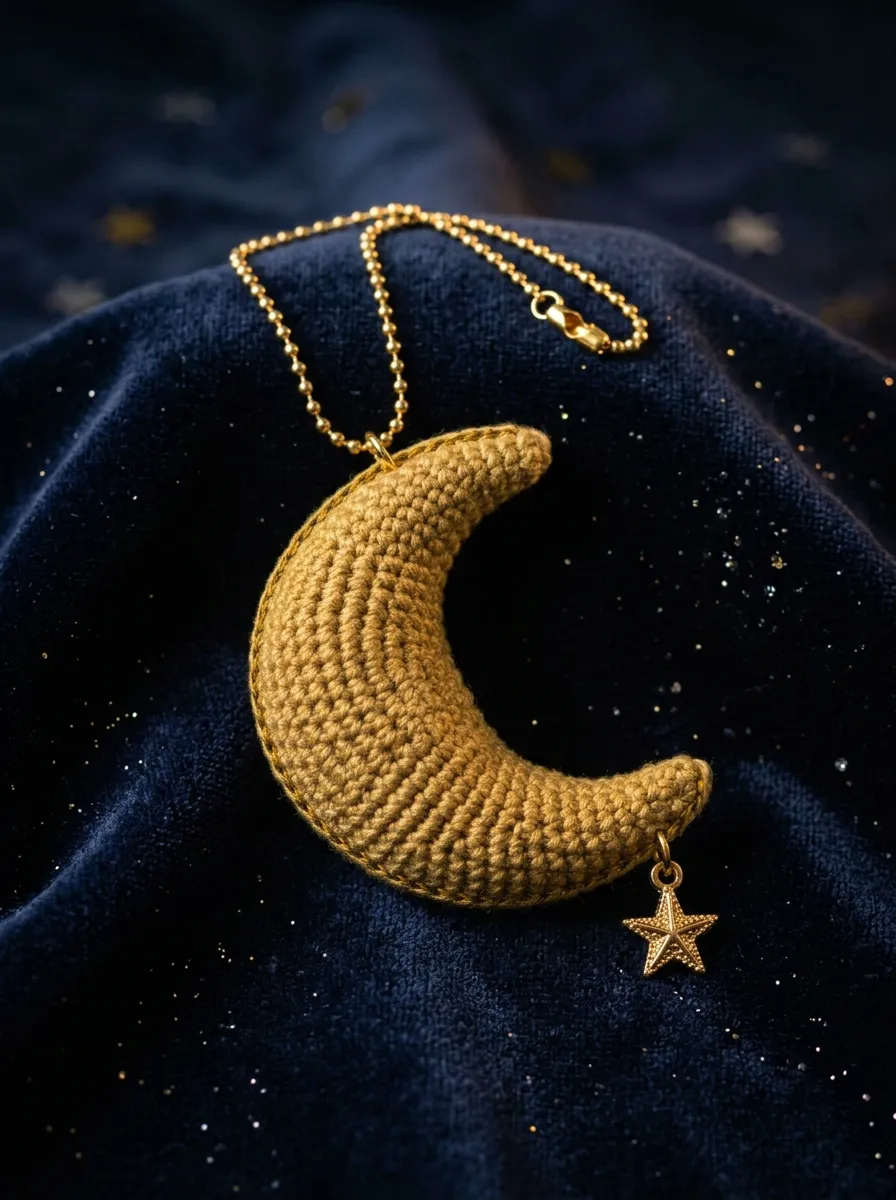
The golden celestial crescent moon charm introduces elegant curved shaping through sequential stitch graduation, creating an astronomical motif suitable for modern bohemian styling. The silhouette features a sweeping, slender crescent that curves smoothly from a sharp upper horn down to a matching lower point, capturing the graceful lines of a waxing moon. Worked in warm mustard, antique gold, or pale metallic thread, this design has an elevated, mystical presence that pairs naturally with dark canvas, velvet pouches, or nightstand journals. The visual intrigue relies entirely on the progression of stitch heights, demonstrating how combinations of slip stitches, single crochets, half-doubles, and extended trebles can force a flat line into an arching curve without gathered seams. Novices will find this charm an empowering introduction to non-linear crochet, discovering how tension and stitch height work together to sculpt dynamic shapes. The completed piece hangs with a natural diagonal tilt, adding a sophisticated, celestial touch to bags and accessory collections.
To create the crescent moon, begin by chaining fifteen stitches using vibrant mustard cotton yarn on a 2.5 mm hook, ensuring the foundation chain remains moderately loose. Turn the work and slip stitch into the second chain from the hook, placing a single crochet into the next stitch, followed by a half-double crochet in the subsequent chain. Work two double crochets into each of the next three chain loops, then place two treble crochets into each of the following two stitches to form the wide, sweeping belly of the crescent. Gradually taper the curve back down by working two double crochets in the next loop, a single half-double crochet, a standard single crochet, and finally two slip stitches into the remaining end loops. For added durability and crispness, work a secondary pass of surface slip stitches along the inner concave edge of the moon, pulling each stitch firmly to lock the crescent curvature in place. Fasten off the yarn tail with an invisible needle finish, sewing a tiny metallic star charm to the lower horn before securing a gold-plated jump ring and ball-chain connector to the top tip.
7. Sweet Kawaii Strawberry Dangle
Step-by-Step Guide
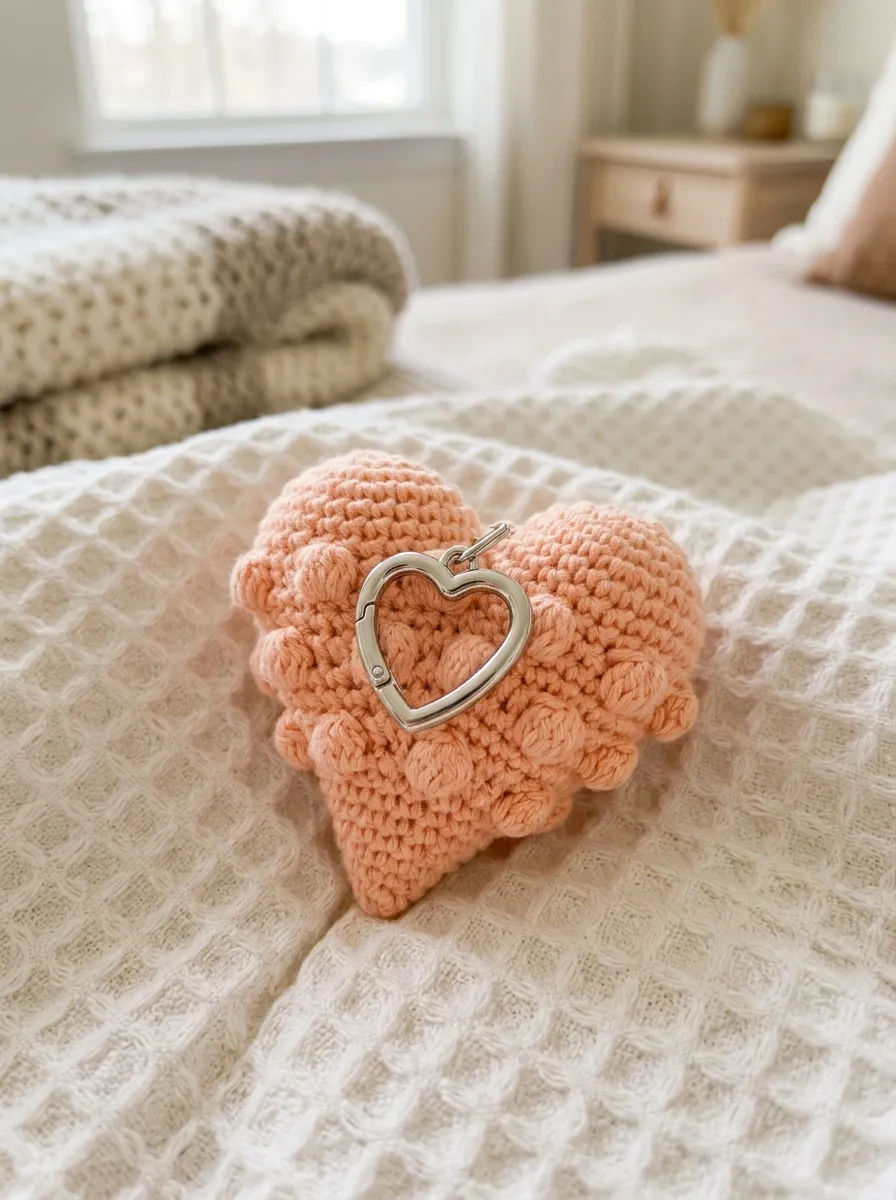
The sweet kawaii strawberry dangle brings playful character design to functional accessories through vibrant fruit styling, seed embroidery, and a leafy green calyx topper. The body of the berry is worked in continuous rounds of bright crimson or strawberry pink, tapering downward into a gently rounded cone that feels substantial and charming. Contrasting white or pale yellow seed stitches are scattered across the red surface, adding surface texture that breaks up the solid color field. Atop the berry sits a star-shaped green leafy cap, providing an organic frame that anchors the hanging hardware securely. This project is ideal for beginners practicing continuous spiral amigurumi, teaching them how to execute invisible single crochet decreases without leaving loose gaps where stuffing might show. The finished strawberry makes an adorable companion for key sets, pencil cases, or personal craft baskets, infusing everyday accessories with bright, handmade energy.
Begin shaping the strawberry from the bottom tip by placing six single crochets into a magic loop using bright red cotton yarn, leaving the first round unjoined. Increase systematically by three stitches every other round, working in a spiral until reaching eighteen stitches around to establish the gently flaring cone shape. Work three level rounds of eighteen stitches, then use a tapestry needle threaded with cream embroidery floss to stitch small vertical seed dashes randomly across the exterior fabric. Insert polyester fiberfill firmly into the berry cavity, ensuring the pointed lower tip remains packed and defined before working rapid decrease rounds to close the top opening. Switch to bright forest green yarn to create the calyx, chaining five stitches, slip-stitching down the chain to form a pointed leaf, and repeating the process four times around a tiny center ring to yield a five-pointed star topper. Stitch the green leafy cap firmly over the top gathered opening of the red strawberry, attaching a braided green yarn hanging loop or a silver lobster claw finding to the center stem.
8. Coastal Sea Shell Pocket Token
Read This:
How to Create
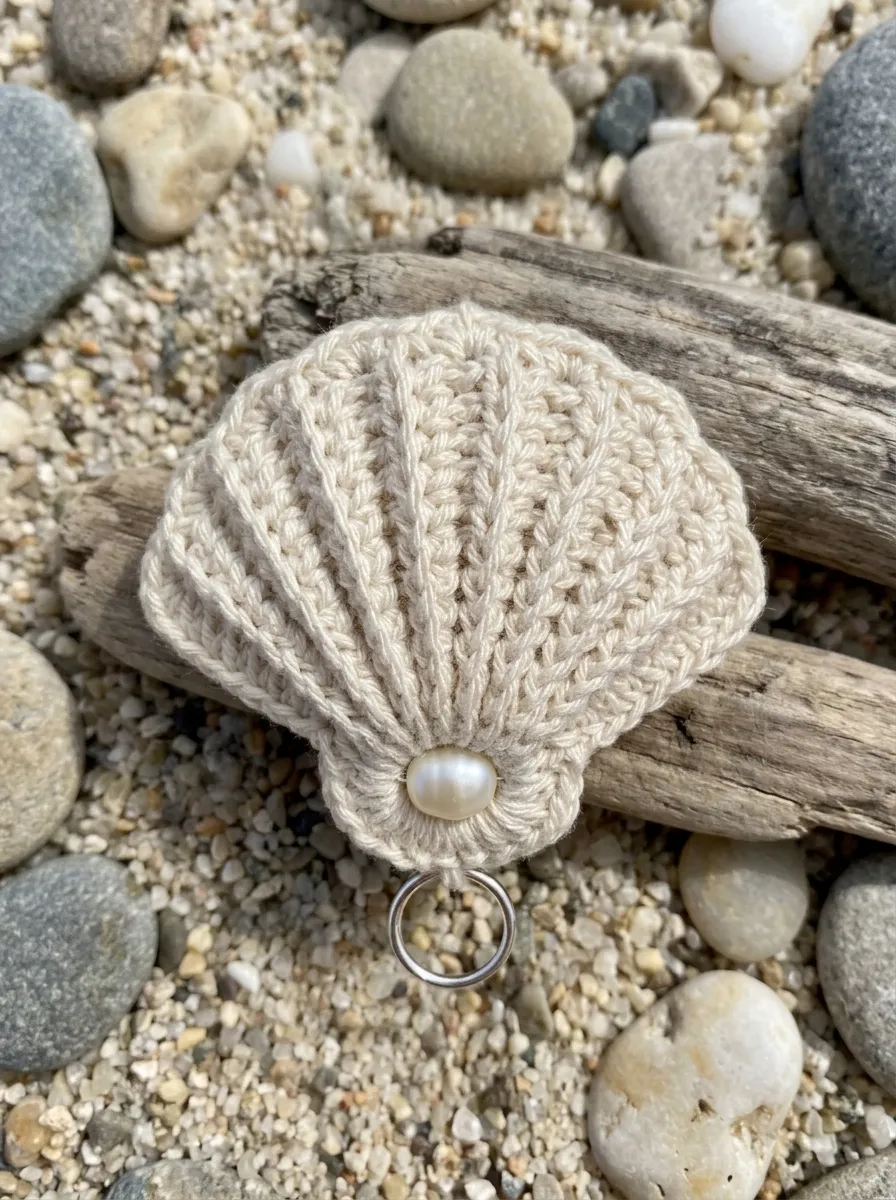
The coastal sea shell pocket token channels calming beachcombing memories into a textured, palm-sized talisman, utilizing vertical ribbed stitches that fan outward from a narrow base. The shell design mimics an authentic bivalve or scallop silhouette through back-loop-only single crochet rows, which generate dynamic ridges that expand into a curved, scalloped rim. Rendered in soothing coastal neutrals—such as bleached ecru, pale seafoam, sandy beige, or soft coral—this charm carries a relaxed, ocean-inspired aesthetic. Its flat, ribbed profile makes it exceptionally tactile and soothing to hold, doubling as a grounding pocket stone or a subtle accent for summer straw totes and beach bags. Working this pattern teaches beginners how back-loop ribbing creates natural elasticity and dimensional folds from simple, flat rows. The resulting shell charm feels thoughtful and artisanal, offering an approachable path to crafting nature-inspired accessories that evoke warm coastal shores.
Begin the shell by chaining nine stitches using unbleached ecru cotton yarn, working a single crochet into the second chain from the hook and across the remaining seven chains. For row two, chain one, turn, and work single crochets across the row in the back loops only, working two stitches into the final loop to initiate the fan-shaped expansion. Continue this back-loop-only ribbed pattern across twelve short rows, increasing by one stitch at the outer rim every other row while keeping the lower pivot point narrow and gathered. To close the fan into a cohesive shell form, thread the starting yarn tail through the lower edges of all twelve rows, pulling the thread tightly to draw the bottom corners together into a gathered base hinge. Fasten off the gathering thread securely on the wrong side, smoothing the upper scalloped rim flat with your fingers to emphasize the fluted fan texture. Affix a natural freshwater pearl or a tiny mother-of-pearl bead right at the gathered base joint, finishing the charm with a silver wire loop threaded through the top center ridge.
9. Modern Minimalist Monstera Leaf
Execution Process
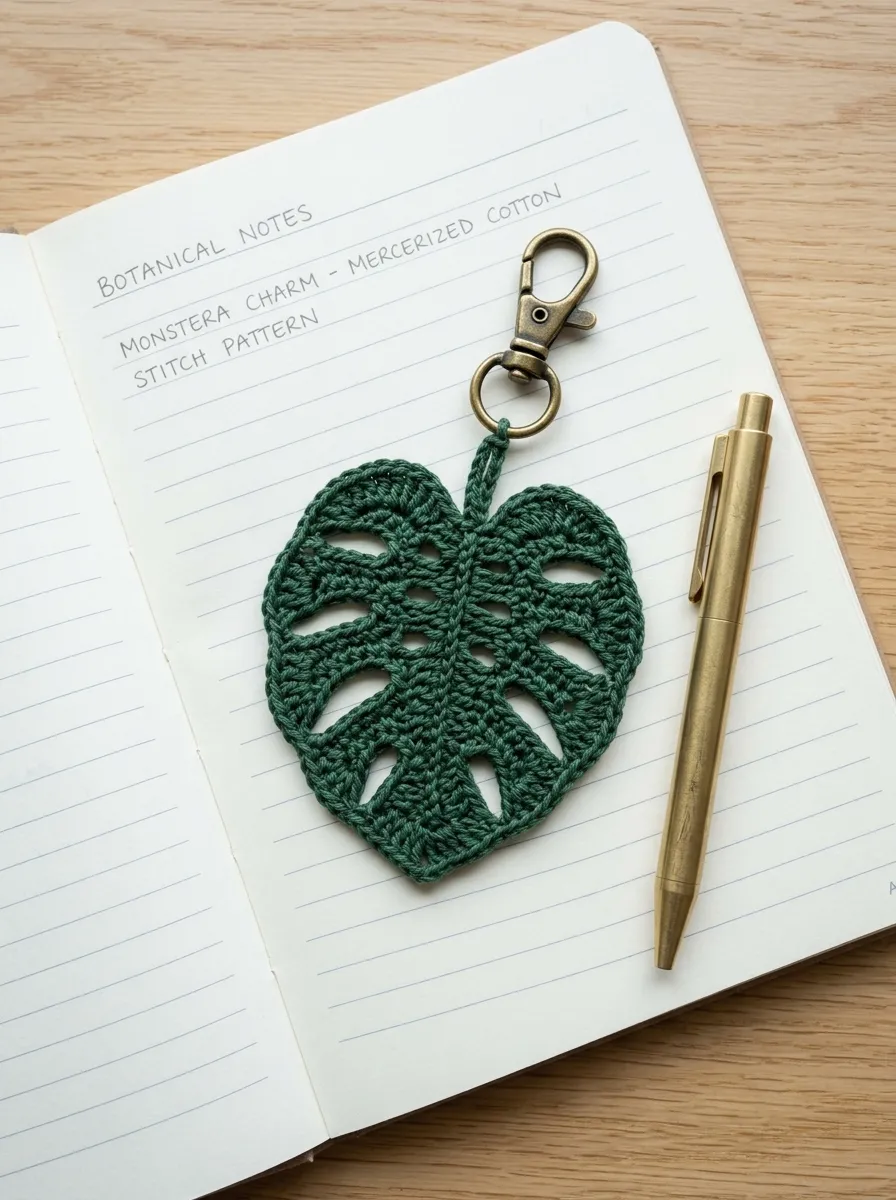
The modern minimalist monstera leaf charm brings botanical houseplant trends into wearable fiber accessories, capturing the recognizable fenestrated silhouette of tropical foliage. Crocheted as a single flat piece using rich botanical greens—such as deep forest, vibrant jade, or soft eucalyptus—this charm relies on deliberate chain spaces to emulate natural leaf cutouts. The design features a pronounced central stem line flanked by alternating lobes, creating a striking graphic presence without adding physical weight. This flat botanical charm lays smooth against fabric surfaces, making it a great addition to laptop backpacks, garden tote handles, or car rearview mirrors. Crocheting this leaf helps novices master chain-space navigation, showing how intentional open holes can be integrated into solid crochet fabric without destabilizing structural integrity. Its crisp, modern lines reflect contemporary plant-parent culture, delivering an on-trend accessory that celebrates indoor botanical greenery.
To craft the monstera leaf, chain twelve stitches using deep emerald green DK cotton, slip-stitching into the second chain from the hook and working down the center chain to establish the central leaf stem. Begin working around the outer perimeter of the stem chain, placing two single crochets, a chain of four, and skipping two foundation stitches to form the first open fenestration cutout. Work along the opposite side of the stem with matching single crochets and chain spaces, mirroring the leaf lobes to establish balanced bilateral symmetry across the profile. In the final outer round, work a border of slip stitches and half-double crochets around every lobe, placing three stitches into each tip to create a pointed, natural leaf contour. Lightly steam-block the finished leaf between clean linen cloths with a warm iron to relax the cotton fibers and ensure the leaf lays completely flat without curling edges. Thread a split jump ring through the sturdy base of the central stem, attaching a durable brass snap hook to complete this modern botanical accessory.
10. Cozy Autumn Mushroom Shaker
Setup Method
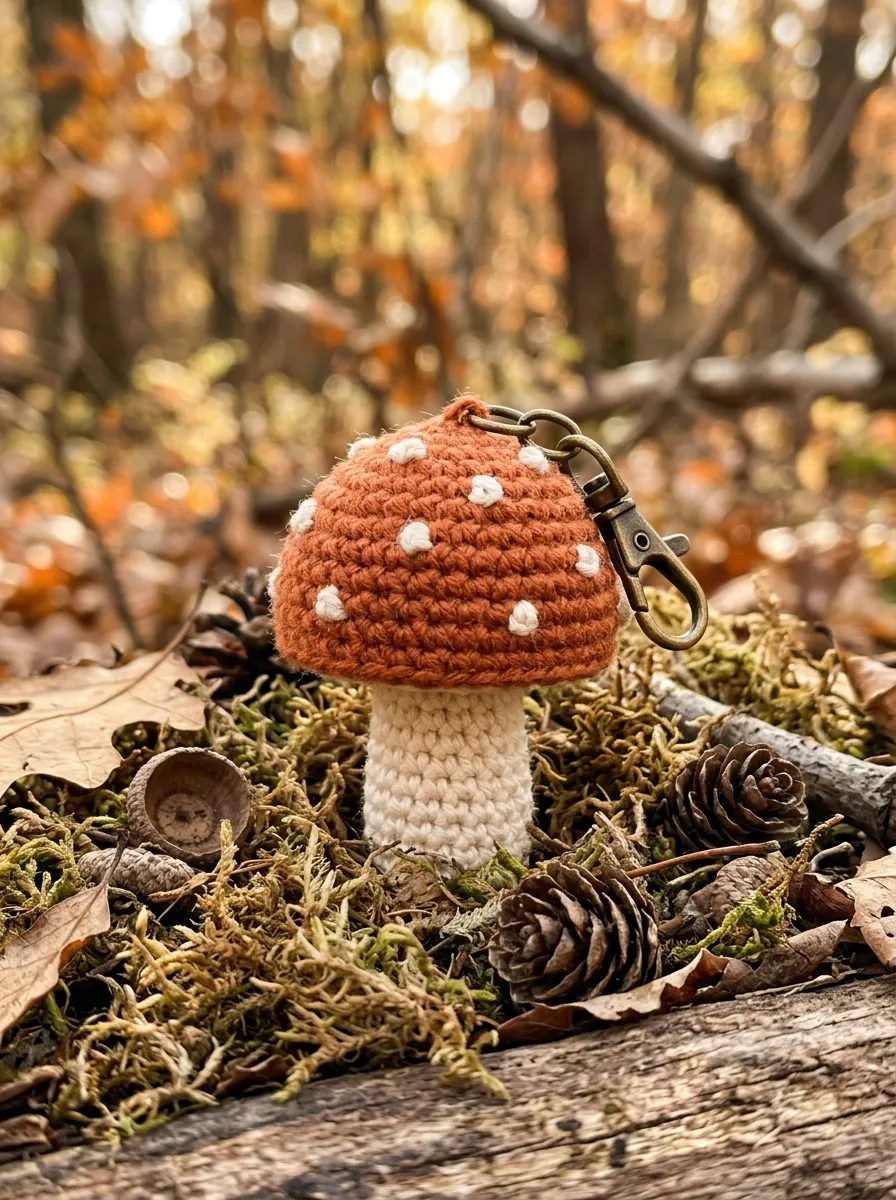
The cozy autumn mushroom shaker introduces whimsical woodland charm combined with interactive sensory sound, featuring an internal jingle bell hidden inside a plump toadstool cap. The visual composition pairs a smooth cream-colored cylindrical stem with a rounded, bell-shaped cap in vibrant scarlet, burnt copper, or warm mustard. Delicate French knots or straight stitches in white embroidery floss dot the cap, creating the classic look of a fairytale forest toadstool. The inclusion of a small metal bell or rattle insert inside the stuffed cap adds a gentle auditory element whenever keys or bags move, giving the charm playful utility. Crafting this three-dimensional forest fungus provides beginner practice in joining separate structural components and embedding hard hardware safely within fiberfill. The finished mushroom stands out as an imaginative, cozy accessory that complements knit sweaters, casual backpacks, and nature-themed keyrings, bringing handcrafted character to everyday accessories.
To construct the toadstool stem, start with unbleached cream cotton yarn, placing six single crochets into a magic ring and increasing over two rounds to twelve stitches. Work five straight rounds of single crochet in a continuous spiral to build the cylindrical stalk, packing the lower half with polyester stuffing before fastening off with a long assembly tail. For the mushroom cap, take rich burnt-orange yarn and work six single crochets into a magic circle, increasing systematically each round until twenty-four stitches encircle the brim. Work two level rounds to create a down-turned dome, using white embroidery thread to sew small French knots scattered across the outer dome surface before closing the piece. Place a small half-inch craft jingle bell wrapped in a wisp of batting into the center of the cap, then align the open rim of the cream stem against the underside of the orange cap. Whip-stitch the stem firmly to the cap using the yarn tail, checking that the bell remains centered and muffled inside, then fasten a sturdy antique brass swivel clip through the top crown.
Common Beginner Mistakes and How to Avoid Them
Crafting miniature crochet charms involves unique mechanical challenges that can distort shapes, loosen hardware, or reveal internal stuffing if not monitored carefully. The most frequent beginner error is using loose stitch tension, which creates open gaps in the fabric where white polyester batting peeks through. To resolve this, always use a hook that is one or two sizes smaller than the yarn label recommends, ensuring the stitches lock together into a dense, opaque fabric wall. Another common issue is misplacing the beginning of continuous spiral rounds, leading to crooked increases and asymmetrical shapes. Avoid guessing your position; always insert a locking stitch marker into the very first stitch of every round, moving it upward as you progress. Insecure hardware attachment is another widespread pitfall, often resulting in lost charms when simple yarn loops wear through under everyday friction. Always mount keyrings and lobster clasps onto solid metal jump rings, closing the metal gap flush with flat-nose pliers rather than tying hardware directly to yarn tails. Finally, avoid overstuffing small amigurumi forms, as excess fiberfill stretches out single crochet loops, distorting your intended silhouette and weakening structural seam lines.
Practical Tips for Better Results
Achieving clean, professional finishes on miniature crochet charms relies on subtle technical habits that elevate simple stitches into polished accessories. Always use the invisible decrease method when shaping small spheres and cones; inserting your hook through the front loops only of two adjacent stitches produces a seamless taper without the bumpy ridges of standard decreases. When fastening off circular motifs, replace the traditional knotting slip stitch with an invisible needle join, creating a faux stitch that makes the final rim completely smooth and round. If your flat charms, such as citrus slices or monstera leaves, tend to curl around the edges, steam-block them gently by hovering a steam iron an inch above the pieces and pinning them flat to dry on a foam board. For charms with embroidered details, split your multi-ply embroidery floss into two or three thin strands rather than using the full thickness, ensuring delicate French knots and seed dashes that will not overpower the miniature crochet scale. Finally, add a drop of clear fabric glue or jewelry adhesive to the knots inside your charm before closing it, locking your woven ends in place permanently through months of daily handling.
Styling, Presentation, or Organization Ideas
Crochet charms offer versatile styling potential across personal wardrobe collections, home spaces, and handcrafted gifting presentations. Attach a curated cluster of complementary charms—such as a monstera leaf, a citrus slice, and a mini acorn—to the brass hardware of a plain canvas tote bag to create an eclectic, personalized everyday look. In personal study or creative spaces, clip these miniature fiber tokens to the zippers of pencil cases, laptop sleeves, or bullet journal divider loops to add cheerful handmade personality to desk setups. If you are preparing charms for craft markets or boutique sales, mount individual pieces onto heavy-weight kraft paper presentation cards stamped with minimalist botanical logos and fiber care instructions. For home organization, use color-coded charms as visual markers on storage baskets, luggage tags, or identical family key sets, helping household members identify personal belongings quickly. When packaging charms as thoughtful handmade gifts, tuck the finished piece into a small reusable muslin drawstring pouch, tying a dried sprig of lavender or a handwritten tag to the jute cord to highlight the care poured into every single loop.
Budget or Time Planning
Crocheting miniature charms represents one of the most cost-effective and time-efficient branches of fiber crafts, fitting easily into tight budgets and busy daily schedules. A single fifty-gram ball of quality mercerized cotton yarn yields six to eight completed charm figures, making this an ideal way to transform forgotten yarn remnants into beautiful, gift-worthy creations without purchasing new materials. Most beginner charm patterns take between thirty and sixty minutes from the starting magic circle to final hardware attachment, offering a quick weekend creative project that provides immediate satisfaction. To optimize your crafting budget, purchase key rings, jump rings, and lobster clasps in multi-piece bulk packs online rather than buying expensive individual craft store sets. You can streamline your assembly process by batching tasks: crochet four or five body bases in an initial sitting, reserving a separate session for facial embroidery, stuffing, and hardware assembly. Keeping a dedicated, compact project pouch stocked with a single yarn cake, travel scissors, an ergonomic hook, and a small tin of metal notions ensures your craft tools remain organized, ready for creative sessions whenever spare minutes arise.
Creative Expansion and Advanced Inspiration
Once you feel comfortable with basic charm construction, numerous advanced techniques open up for personalizing and expanding your miniature fiber craft practice. Experiment with blending diverse fiber textures, pairing smooth mercerized cotton bodies with fluffy mohair accents, or substituting fine embroidery thread and a 1.0 mm steel hook to produce micro-crochet jewelry pieces. Intermediate crafters can explore mixed-media additions, integrating polished wooden beads, natural gemstone chips, or hand-stamped metal tags directly onto charm suspension cords to introduce rich textural contrast. You can also scale your charm designs into larger, coordinated home decor installations, stringing a dozen botanical leaves and citrus slices along natural hemp twine to form an organic summer mantle garland. Another inspiring avenue is turning simple charms into seasonal holiday ornaments, replacing key rings with velvet hanging ribbons and incorporating metallic lurex threads into celestial stars and crescent moons. These creative variations demonstrate the remarkable versatility of miniature crochet, proving that even the simplest loop foundations can evolve into expressive, timeless works of portable fiber art.