Personalizing everyday accessories through handcrafted textile accents has become a staple in modern personal styling. A crochet bag charm serves as an expressive, portable handmade decoration that transforms standard totes, backpacks, and cross-body purses into distinctive artistic pieces. This comprehensive guide provides step by step directions, structural assembly methods, and reliable crochet techniques to build durable, boutique-quality purse charms. Readers will explore ten unique thematic designs, proper fiber selection, hardware attachment strategies, and color coordination methods tailored to various handbag styles. Unlike rigid store-bought keychains, crocheted accessories deliver tactile warmth, lightweight durability, and washable flexibility without scratching expensive bag leather or fabric. The craft utilizes accessible single crochet rounds, simple decorative chains, and sturdy metal clasps that any fiber artist can easily master. By understanding every stage of production—from choosing dense, non-pilling yarns to reinforcing stress points around metal swivel hooks—you will develop the foundational skills necessary to design, assemble, and style long-lasting purse charms with absolute confidence.
Why This Idea Is Trending or Useful
Handcrafted accessory enhancements dominate current Pinterest ideas because fashion enthusiasts actively seek out sustainable, individualistic details that break away from mass manufacturing. The crochet bag charm addresses this modern design movement by offering a playful yet refined aesthetic that complements both casual canvas bags and minimalist luxury leather accessories. From a functional standpoint, these charms add valuable practical utility by making bag zippers easier to locate, providing quick sensory identification, and doubling as reliable key organizers. For crafters, this easy project represents an ideal stash-busting endeavor that requires only small yardages of yarn, minimal specialty tools, and very little time commitment, making it remarkably beginner friendly. The portable scale of bag charms allows creators to experiment with complex stitch patterns, three-dimensional sculpting, and diverse color harmonies without committing to large garment projects. These versatile pieces also function as high-value handmade gifts, personalized backpack tags, and charming home decor accents when hung on vanity hooks or decorative wall peg rails.
Materials and Preparation
Assembling a professional-grade crochet bag charm requires specific materials chosen to ensure mechanical durability, aesthetic balance, and resistance to everyday friction. Select sport or DK weight mercerized cotton yarn; mercerization imparts a subtle sheen, eliminates fiber shedding, and ensures that the finished charm maintains crisp stitch definition even with constant contact against bag fabrics. Pair this yarn with an ergonomic aluminum hook sized roughly half a millimeter smaller than the yarn band advises, generally between 2.0 mm and 2.5 mm, to produce dense, tight stitches that securely conceal internal stuffing. Procure heavy-duty hardware including 360-degree swivel lobster clasps, flat brass split rings, sturdy jump rings, and high-tensile waxed cotton cord or durable metal jewelry chains. Additional essential tools include a sharp yarn snip, blunt-ended steel tapestry needles, small jewelry flat-nose pliers, and compact polyester fiberfill or natural wool stuffing. Before crocheting, clean your workspace, lay out your hardware, pre-cut your attachment cords, and determine your intended drop length to maintain clean vertical proportions on your target bag.
Idea 1: Minimalist Citrus Slice Ring

How to Make
The minimalist citrus slice charm offers a bright, refreshing splash of color that brings sunny vitality to neutral tote bags and woven summer baskets. This design features a flat, semicircular wedge resembling a lemon, lime, or blood orange, framed by a clean white pith line and an outer textured rind. By focusing on crisp circular geometry and precise color striping, the piece captures a clean, contemporary aesthetic without appearing cluttered. The flat, double-layered construction keeps the charm lightweight and prevents it from curling or flopping against the exterior pocket of a purse. Pairing the fruit wedge with a polished brass clasp creates a refined contrast between soft organic fibers and smooth industrial metals. This piece looks particularly striking when clipped onto unbleached canvas totes, light denim jackets, or natural raffia beach bags.
Begin by crocheting a flat circular disc in continuous rounds, starting with a bright yellow or orange yarn worked into a magic ring using single crochet stitches. Alternate single crochets with regular increase rounds until the disc reaches three inches in diameter, switching cleanly to ecru yarn for the penultimate round to establish the inner pith, and finishing with a vibrant rind color along the perimeter. Using white embroidery floss and a tapestry needle, stitch delicate radiating spoke lines across the colored center to define the individual fruit segments. Fold the completed disc in half to form a thick, sturdy semicircle, aligning the outer edges perfectly. Join the folded curved perimeter by working a tidy round of slip stitches through both layers, lightly inserting a tiny pinch of fiberfill before closing the final stitch to add dimensional body. Fasten off with a reinforced knot, weave the tail inward, and attach a heavy-duty brass jump ring through the corner point, linking it securely to a swivel lobster clasp with jewelry pliers.
Idea 2: Sculpted Monstera Leaf Tag
Read This:
Execution Process
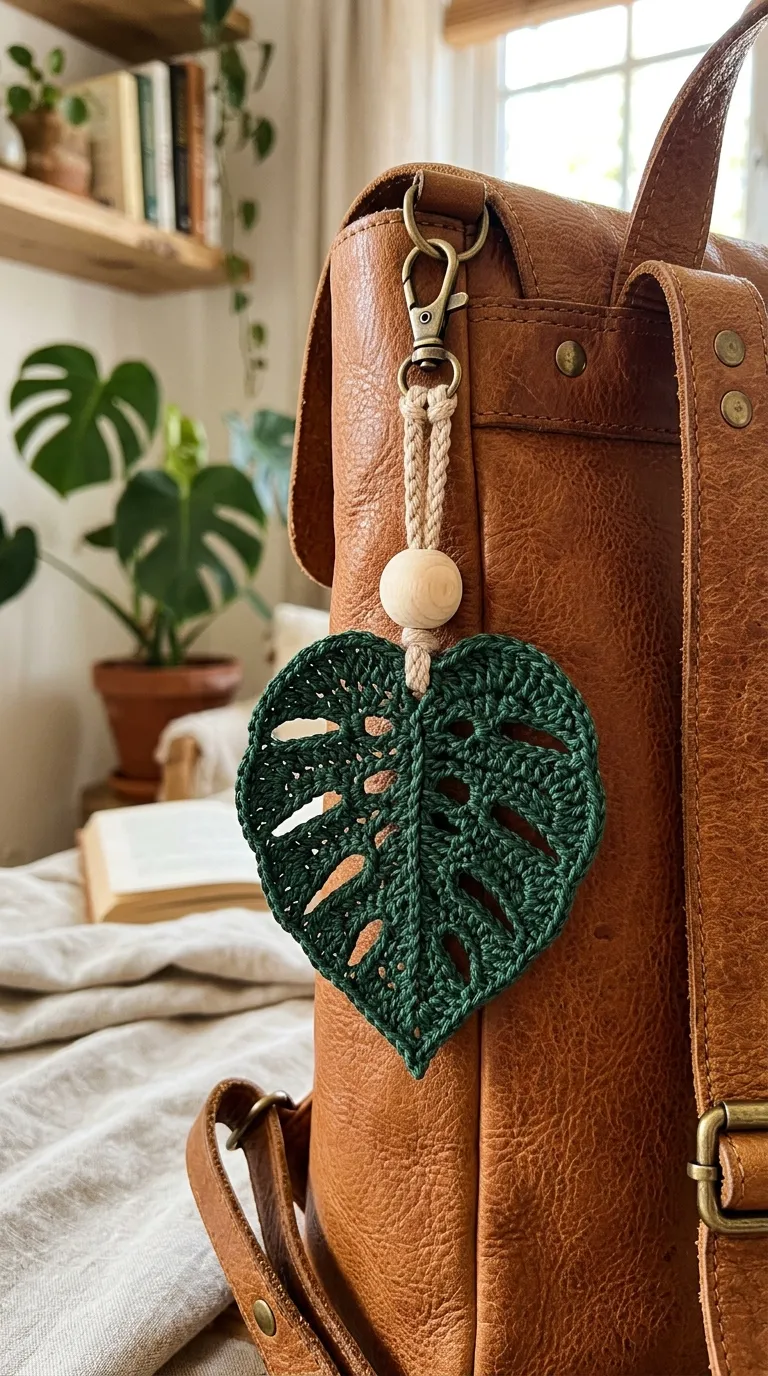
The sculpted monstera leaf charm introduces botanical sophistication to daily accessories through its iconic split-leaf silhouette and rich, deep foliage tones. Worked in forest green, sage, or muted olive mercerized yarn, this design relies on precise negative-space cutouts formed by chain bridges and skipped stitches to replicate the look of tropical foliage. The flat, elongated profile lays smooth against bag surfaces, minimizing bulk while creating an eye-catching, nature-inspired focal point. Its organic shape softens the rigid lines of structured leather backpacks, work satchels, and geometric satchel bags. The natural leaf structure provides a grounded, timeless look that transitions easily across all seasons, functioning equally well as an autumn purse accent or a vibrant summer travel accessory.
To construct the monstera leaf, begin with a central foundation chain that serves as the leaf’s primary vertical vein, working graduated slip stitches, single crochets, and half double crochets along one side to build the foundational lobe. Create the iconic fenestrations by chaining outward from the central rib, skipping several foundation stitches, and anchoring back into the core with secure treble crochets to frame crisp, open windows. Repeat this graduated shaping along the opposite side to achieve symmetrical foliage width, tapering the top down to an elegant pointed leaf apex using a delicate picot stitch. Once the crochet portion is finished, block the leaf aggressively by soaking it in cool water, pinning it completely flat onto a foam blocking board, and applying a light spray of fabric stiffener to ensure the cuts retain their crisp definition during regular use. Thread a sturdy braided cord through the base stem, slip a raw wooden bead down the cord to anchor the leaf, and tie the cord onto a secure swivel clasp.
Idea 3: Sunburst Daisy Chain Cluster
Step-by-Step Guide
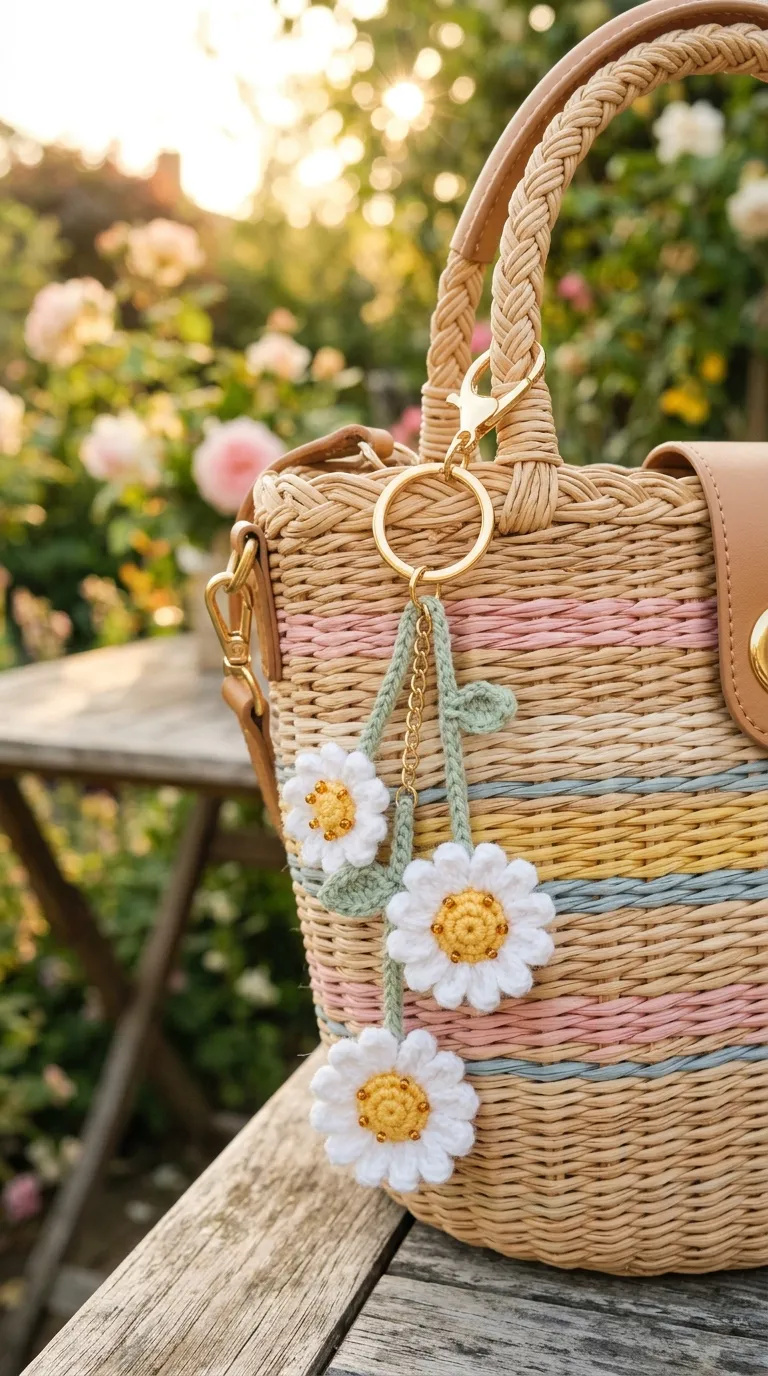
The sunburst daisy chain cluster brings vintage-inspired floral charm to modern handbags through a tiered arrangement of miniature blooming flowers. This design combines creamy white petals, sunny gold centers, and soft sage green stems, producing a playful yet delicate aesthetic that brightens everyday carryalls. Rather than featuring a single blossom, this charm arranges three small daisies at staggered vertical drop heights, creating a dynamic, cascading cluster that moves naturally as you walk. The dimensional petals catch light and cast soft shadows, adding tactile depth to smooth canvas or pebbled leather bags. This feminine accessory pairs wonderfully with pastel bucket bags, woven wicker purses, and casual cotton backpacks, adding a handcrafted touch to warm-weather outfits.
To make the individual daisies, crochet a flat circular core by working six single crochets into an adjustable loop using golden yellow cotton yarn, closing the round with a smooth slip stitch. Join crisp white yarn directly into the front loop of any center stitch, then build the petals by working a repeating sequence of three chains, two double crochets, and a slip stitch back into the same base stitch all the way around the ring. Repeat this simple pattern across each center stitch until you have completed twelve compact, overlapping petals, fastening off the yarn tail tightly at the back. Produce three identical daisy blossoms, along with two small flat oval leaves worked in soft sage green yarn. Crochet three independent green chain cords measuring four, six, and eight inches in length, and sew a flower head securely to the bottom end of each cord with strong whipstitches. Gather the top ends of all three cords together, slide on a decorative gold bead, and tie the grouped strands directly to a rotating swivel trigger clasp.
Idea 4: Cozy Textured Coffee Cup

Read This:
Setup Method
The cozy textured coffee cup charm celebrates coffee culture by translating a beloved morning ritual into a compact, three-dimensional miniature accessory. Designed in warm latte tan, crisp white, and deep mocha, this miniature cup features a ribbed sleeve texture that resembles a real corrugated cardboard cup jacket. Its cylindrical profile provides satisfying tactile substance, making it an engaging piece that holds its shape well when jostled inside a large purse or backpack. The contrast between the creamy, frothy top and the warm earth-toned cup body gives the charm an inviting, playful character. This charming piece makes a fun statement on casual daypacks, campus book bags, and canvas lunch totes, serving as an instant conversation starter for everyday coffee lovers.
Begin by crocheting the cup base in rich tan yarn, working in continuous spiral rounds of single crochet to build a flat two-inch circular disc. Shift to working exclusively in the back loops for a single round to create a sharp ninety-degree perimeter edge, then continue working upward in standard single crochet rounds for twelve rows to build the slightly flared walls of the cup. Switch to dark brown yarn for two rounds to represent the rich coffee surface, and firmly pack the hollow cup with dense polyester fiberfill. Crochet a separate flat white disc to represent the plastic cup lid, incorporating a raised outer lip by working a final round of half double crochet stitches, and whipstitch this lid firmly over the top rim. Crochet a separate four-row band in rust or kraft-paper brown using back-loop-only stitches to create vertical ridges, wrap this band around the cup waist, and seam the ends shut. Secure a strong split ring to the center top of the lid, linking it to a swivel clasp with a short length of metal curb chain.
Idea 5: Modern Graphic Checkerboard Heart

How to Create
The modern graphic checkerboard heart charm pairs classic romantic imagery with bold, contemporary street-style patterns. Utilizing high-contrast shades—such as jet black and chalk white, or vibrant cobalt blue and cream—this design uses tapestry crochet techniques to generate a pixelated checkerboard grid across a curved heart silhouette. The bold geometric pattern elevates the sweet heart shape, resulting in an eye-catching, modern accessory that feels stylish rather than overly traditional. Its flat, compact profile rests flush against handbag side panels, avoiding bulk while providing an instant visual pop. This graphic charm looks especially striking when clipped onto monochrome leather bags, minimalist black backpacks, or sporty nylon belt bags.
To construct this graphic piece, work from a simple color-chart grid, carrying both yarn strands along your work using standard two-color tapestry crochet methods. Begin at the bottom point of the heart by chaining two, working single crochets while alternating two stitches of black with two stitches of white, carrying the unused yarn color inside the core of the active stitches to prevent loose threads on the reverse side. Expand the fabric outward by adding increases at both outer edges until the piece measures three inches wide, keeping the two-by-two block grid neat, square, and aligned. Divide the upper edge into two separate lobes, working short decrease rows across each side independently to round out the top arches of the heart. Crochet a matching heart panel for the back, either repeating the checkerboard grid or using a solid contrasting color. Place the two panels back-to-back, join the edges with a tight round of slip stitches worked in black yarn, and attach a sturdy metal eyelet to the central cleavage dip to secure a flat split ring and swivel clip.
Idea 6: Bohemian Macrame-Style Tassel Wand

Read This:
How to Make
The bohemian macrame-style tassel wand merges the structured look of crochet with the flowing, relaxed drape of long-fringed tassels. Styled in neutral tones like ecru, bleached linen, and warm desert taupe, this design showcases a tightly crocheted bead cap supporting a thick, flowing fiber skirt. The combination of dense crochet stitches, natural unfinished wood elements, and loose yarn strands produces a rich, tactile piece inspired by classic artisanal fiber arts. The extended vertical fringe sways gracefully with every step, creating a fluid accessory that adds character to relaxed bags. It pairs naturally with slouchy suede hobo bags, woven jute market totes, and vintage leather satchels, enhancing casual daytime looks with effortless bohemian texture.
Begin by crocheting the top decorative bead cap, starting with a magic ring worked in single crochet and increasing over three rounds to form a small, structured half-sphere bowl that measures one inch across. Work three straight rounds to establish vertical depth, then fasten off, leaving a twelve-inch yarn tail for final assembly. To construct the tassel body, wrap matching cotton yarn around a six-inch piece of sturdy cardboard roughly fifty times, sliding a strong ten-inch tie cord underneath the top loops and knotting it tightly to secure the bundle. Cut the bottom loops open with sharp scissors to release the fringe, then pull the top tied knot upward into the hollow crochet cap so the skirt hangs neatly from beneath the finished rim. Thread the tie cord through an unfinished twenty-millimeter natural wooden bead placed above the crochet cap. Secure the top of the cord around the base of a brass swivel snap hook using a reinforced double knot, securing the knot with a dab of clear fabric cement before trimming the bottom fringe to an even, clean edge.
Idea 7: Whimsical Woodland Mushroom Trio

Execution Process
The whimsical woodland mushroom trio brings charming fairytale forest elements to modern accessories through a cluster of three miniature toadstools. Designed in rich terracotta, deep forest green, and unbleached cream, this piece features varying sizes of dome-capped mushrooms hanging from knotted cord stems. The classic rounded caps, accented with delicate hand-embroidered French knots, provide an inviting, tactile surface that crafters love to hold. Grouping three different sizes creates vertical variety, giving the charm an organic, dynamic look that moves freely against your bag. This earthy accessory adds a playful, artisanal touch to canvas rucksacks, olive utility jackets, and casual everyday cross-body bags.
To make the mushroom caps, start with terracotta yarn and work continuous rounds of single crochet, increasing gradually to shape smooth, curved bells in small, medium, and large dimensions. Embroider tiny white specks across the upper surface of each cap using cotton floss, packing the interior with fiberfill to hold the rounded shape under daily wear. Crochet a flat circular disc in cream yarn to close the bottom of each cap, working through the front loops only to leave the outer edge clean and distinct. To form the mushroom stems, crochet narrow hollow tubes in cream yarn, stuffing them lightly and stitching them securely to the centers of the bottom discs. Cut three lengths of twisted hemp cord, thread them through the interior cores of the completed mushrooms, and knot the cords at staggered lengths between two and five inches. Gather the cord ends together, slide on a small raw wooden ring, and tie the group to a matte black lobster clasp.
Idea 8: Coastal Seashell and Pearl Ribbon

Read This:

Step-by-Step Guide
The coastal seashell and pearl ribbon charm brings breezy seaside inspiration to handbags through a combination of fan-shaped shells and soft pastel textures. Rendered in delicate tones like seafoam green, soft sky blue, warm sand, and pearlescent ivory, this design captures the relaxed, calming beauty of quiet shorelines. The shell features raised, radiating ridges made with back-post crochet stitches, giving it a realistic, sculptural feel. The combination of soft cotton yarn, smooth beads, and a slender hanging ribbon creates a light, graceful charm that swings freely. This piece looks beautiful clipped onto summer straw clutches, light canvas boat bags, and pastel weekend travel totes.
To create the seashell, start with an adjustable magic loop and work eight single crochets into the center, turning your work at the end of each row rather than joining in the round. Work back and forth across the semicircle, alternating rows of front-post and back-post double crochets while placing regular increases along the outer edges to build a flared fan shape with pronounced vertical ridges. Finish the outer curve by working a scalloped rim made of five-double-crochet shells separated by small slip stitches, creating a classic fluted seashell edge. Block the finished shell with a gentle burst of steam to keep the edges flat and prevent curling. Cut an eight-inch length of narrow ivory cotton ribbon, fold it in half, and thread it through the bottom point of the shell, securing it with an overhand knot. Thread three smooth acrylic faux pearls along the ribbon above the shell, then tie the remaining ribbon ends directly onto a polished silver key ring and spring-gate clasp.
Idea 9: Celestial Moon and Stardust Tassel

Setup Method
The celestial moon and stardust charm brings quiet nighttime inspiration to daily accessories through a pairing of a crescent moon and delicate hanging stars. Styled in deep indigo, soft cream, and metallic gold-threaded yarn, this design evokes a peaceful, starry sky. The smooth, sweeping curve of the crescent moon acts as the primary visual anchor, while tiny dimensional stars hang below to provide subtle kinetic movement. The deep color palette offers a striking contrast against light-colored handbags while blending effortlessly with darker leather pieces. This celestial accessory brings an imaginative, dreamy touch to everyday carryall bags, camera cases, and evening wristlets.
Crochet the crescent moon by working continuous spiral rounds of single crochet, increasing along the outer curve while placing matching decreases along the inner edge to shape a natural, tapered arch. Lightly stuff the crescent with fiberfill as you work to keep the curve smooth and plump, then slip-stitch the pointed ends closed using a tapestry needle. Next, craft two tiny five-point stars by working a simple magic ring of five single crochets, followed by working a sequence of two chains, a slip stitch, and a single crochet into each space around the ring. Attach thin metallic gold threads to each finished star, letting them hang two and three inches below the lower tip of the moon. Secure an eight-inch cord to the top curve of the crescent moon, string two small gold spacer beads onto the cord, and attach the top loop firmly to a sturdy jewelry swivel clasp using a secure hitch knot.
Idea 10: Geometric Color-Block Triangle Drop
Read This:
How to Make
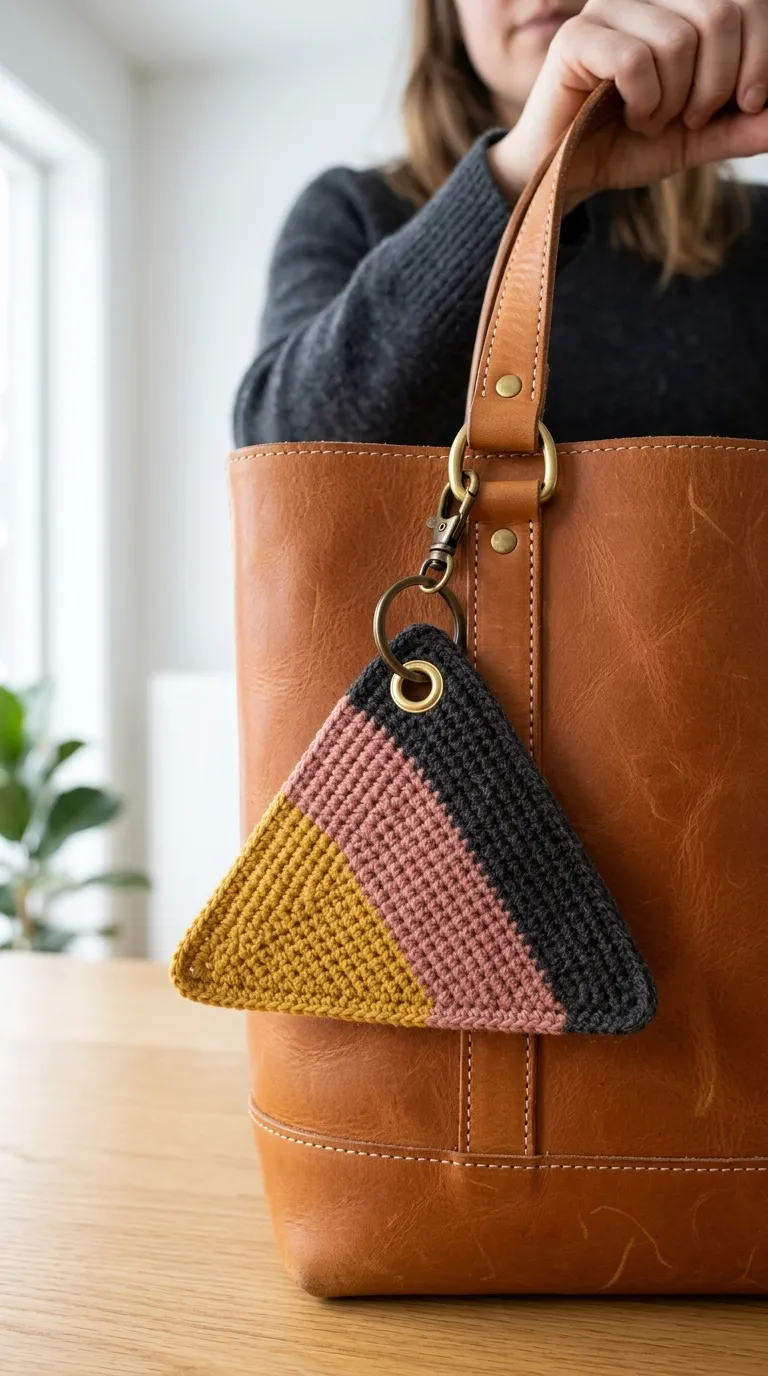
The geometric color-block triangle drop charm emphasizes modern architectural design through crisp angles, clean lines, and intentional color divisions. Using three complementary contemporary tones—such as ochre yellow, dusty rose, and dark charcoal—this piece presents an equilateral triangle divided into distinct diagonal color blocks. The sharp lines and flat silhouette produce an understated accessory that feels curated and gallery-ready. Its low profile ensures it hangs cleanly without swinging wildly or catching on clothing during your daily commute. This clean geometric charm pairs naturally with structured leather work totes, laptop sleeves, and modern minimalist handbags.
To make the triangle, begin at the bottom base by chaining twenty-four stitches in charcoal yarn, then work upward in flat rows of single crochet while decreasing by one stitch at each end of every row to form a straight, tapered triangular wedge. Switch smoothly to dusty rose yarn on row eight, and finish the final six rows in ochre yellow, carrying the yarn ends neatly along the edge to ensure a sharp, clean diagonal color transition. Work a second matching triangle panel for the back, or make a solid-color panel in dark charcoal to create a modern, reversible design. Place the two panels together and join the outer perimeter with a clean round of slip stitches worked in matching yarn, inserting a triangular piece of craft foam between the layers to keep the shape rigid and flat. Pierce a tiny hole through the top point, insert a sturdy brass eyelet, and attach a matching brass split ring and swivel clip to finish the clean geometric piece.
Idea 2 Alternate: Sculpted Monstera Leaf Tag
Execution Process
The sculpted monstera leaf charm introduces botanical elegance to daily accessories through an organic silhouette and rich, deep foliage tones. Worked in forest green, sage, or muted olive mercerized yarn, this design relies on precise negative-space cutouts formed by chain bridges and skipped stitches to replicate the look of tropical foliage. The flat, elongated profile lays smooth against bag surfaces, minimizing bulk while creating an eye-catching, nature-inspired focal point. Its organic shape softens the rigid lines of structured leather backpacks, work satchels, and geometric bags. The natural leaf structure provides a grounded, timeless look that transitions easily across all seasons, functioning equally well as an autumn purse accent or a vibrant summer travel accessory.
To construct the monstera leaf, begin with a central foundation chain that serves as the leaf’s primary vertical vein, working graduated slip stitches, single crochets, and half double crochets along one side to build the foundational lobe. Create the iconic fenestrations by chaining outward from the central rib, skipping several foundation stitches, and anchoring back into the core with secure treble crochets to frame crisp, open windows. Repeat this graduated shaping along the opposite side to achieve symmetrical foliage width, tapering the top down to an elegant pointed leaf apex using a delicate picot stitch. Once the crochet portion is finished, block the leaf aggressively by soaking it in cool water, pinning it completely flat onto a foam blocking board, and applying a light spray of fabric stiffener to ensure the cuts retain their crisp definition during regular use. Thread a sturdy braided cord through the base stem, slip a raw wooden bead down the cord to anchor the leaf, and tie the cord onto a secure swivel clasp.
Common Beginner Mistakes and How to Avoid Them
Creating a crochet bag charm requires careful attention to durability and structural integrity that casual indoor projects rarely demand. The most frequent beginner mistake involves using soft, loosely twisted acrylic yarns that fuzz, pill, or stretch out of shape when rubbed repeatedly against coarse bag fabrics. Prevent this issue by using high-twist mercerized cotton or durable linen blends; these fibers withstand constant handling and resist abrasion without losing their clean finish. Another common problem is loose crochet tension, which creates large gaps between stitches that allow white polyester stuffing to show through. Avoid this by sizing your hook down by a full millimeter compared to the yarn band’s suggestion, pulling working loops snug to produce tight, opaque rounds. Finally, crafters often attach metal clasps directly with single, unreinforced yarn strands, which wear down and snap quickly from the friction of moving metal. Always reinforce hardware connections by using metal jump rings, double-stranded cords, or dedicated jewelry eyelets to protect the yarn from metal wear.
Practical Tips for Better Results
Achieving a refined, boutique-quality finish on your handmade bag charms comes down to consistent stitch tension, sharp joinery, and quality hardware prep. When working three-dimensional amigurumi elements like miniature fruit or coffee cups, use the invisible decrease method across all shaping rounds to prevent surface bumps and unsightly gaps. When sewing small parts together, use the mattress stitch or whipstitch through the back loops only to keep attachment seams hidden from the outside. To give flat items like leaves, hearts, and geometric shapes a crisp, professional finish, block your finished crochet panels using a light mist of water and fabric stiffener pinned to a foam blocking board before final assembly. Invest in quality metal findings made from solid brass or stainless steel; durable, well-weighted clasps elevate the perceived quality of your work and ensure the charm stays securely attached during daily commutes. Finally, use a drop of clear fabric glue or jewelry cement on interior cord knots to lock them permanently against shifting, keeping your accessories sturdy and secure over months of use.
Styling, Presentation, or Organization Ideas
A thoughtful presentation enhances the visual appeal of handmade bag charms, whether you are styling them for social media, staging a craft display, or organizing your personal collection. When clipping charms to your bags, pay close attention to proportion and color balance; pair large, sculptural charms with unstructured canvas totes, while reserving smaller, minimalist charms for structured leather cross-body bags to avoid overwhelming the silhouette. Coordinate the hardware color of your charm with the metallic accents on your bag—such as brass zippers, silver buckles, or gunmetal studs—to create a unified, intentional look. For social media photography, lay your charms flat against textured backgrounds like natural unbleached linen, light travertine stone tiles, or warm oak boards, using soft morning sunlight to highlight the intricate stitch definition. For craft markets or retail displays, mount each charm on thick kraft cardstock cards printed with clean typography, hanging them from a tabletop wooden peg rack to let the cords and tassels dangle freely for shoppers to admire.
Budget or Time Planning
Careful planning helps you keep your materials affordable while organizing your crafting time efficiently, making bag charm construction an enjoyable, low-stress endeavor. Because these compact projects require only ten to thirty yards of yarn, they are an ideal way to use up leftover cotton yarn from larger home decor projects without spending extra money. You can purchase swivel clasps, split rings, and jump rings in bulk multi-packs online to lower your hardware cost to just a few cents per piece. Organize your crafting into structured batches to make the most of your studio time. Dedicate one focused session to crocheting all your small parts—such as flower petals, fruit discs, and miniature stems—storing them together in a divided craft tray. Use a second session to weave in ends, steam-block flat shapes, and stuff small dimensional pieces. Reserve a final hour exclusively for jewelry assembly with pliers, securing clasps, jump rings, and beads across all pieces at once. This organized workflow allows you to complete three to four boutique-ready charms in an afternoon.
Creative Expansion and Advanced Inspiration
Once you feel comfortable with basic charm construction, you can explore creative variations that expand the functionality and style of your designs. Try integrating natural elements like raw wooden rings, polished sea glass, or hand-carved bone beads along your hanging cords to create a richer, mixed-media feel. You can also turn decorative charms into functional purse essentials by crocheting a hidden, secure pocket into the back of flat designs to hold a digital tracker tag, spare house key, or emergency bill. Another creative avenue involves experimenting with scented charms; insert a small wooden bead infused with pure essential oils into the stuffed amigurumi center to keep the inside of your tote bag smelling fresh. As seasons change, design coordinated charm collections featuring seasonal motifs—like pastel florals for spring, bright fruit slices for summer, cozy coffee cups for autumn, and celestial stars for winter. These thoughtful expansions keep your crafting fresh, versatile, and endlessly rewarding.