Handmade yarn creations consistently capture the attention of modern fiber craft enthusiasts, offering an engaging gateway into three-dimensional soft sculpture. Amigurumi, the Japanese art of constructing stuffed figures using single crochet spirals, provides endless versatility for makers exploring pastoral themes. This comprehensive guide examines ten original farm-themed animal designs, equipping readers with reliable technical instruction to complete each character with precision. Throughout this article, makers will discover fundamental shaping methods, fiber selection strategies, proportional planning, and clean assembly mechanics. From spotted miniature dairy cows to textured sheep and pocket-sized chicks, every project breaks down the structural design alongside direct step-by-step construction processes. Working through these farm animal patterns allows artisans to develop practical crochet skills, such as invisible decreases, color changing in the round, and tension management. The agricultural theme serves as an exceptional foundation for practicing varied geometric shapes, including spheres, teardrops, and cylinders. By learning how small adjustments in muzzle size, ear placement, and facial embroidery influence the finished character, crafters of all experience levels can produce durable, visually balanced keepsakes suitable for personal collections, nursery display, or customized handmade gifting.
The Growing Popularity of Farmhouse Soft Crafts
Pastoral motifs have become a staple across modern creative inspiration feeds, connecting rustic charm with contemporary minimalist style. Modern crafters gravitate toward handcrafted farm animals because these characters evoke nostalgia while fitting seamlessly into neutral home decor and cozy nursery layouts. The accessibility of compact yarn work makes these projects especially appealing; they demand very little storage space, require minimal initial tooling, and can be completed in short crafting sessions. As an easy project format, miniature animals provide quick satisfaction compared to large-scale blankets or garments. Handcrafted pieces also hold distinct decorative and sentimental value, serving as heirloom playthings, desk accessories, and accent decorations. Working with earthy color palettes, such as buttermilk cream, soft fawn, warm terracotta, and slate gray, allows these figures to complement rustic farmhouse interiors without visual clutter. Because the core shaping relies on standard single crochet increases and decreases, the learning curve remains accessible for novices. This straightforward entry point, paired with the enduring warmth of agricultural animal motifs, explains why handmade farm miniatures remain trending ideas across global craft platforms.
Materials, Equipment, and Workspace Preparation
Starting an amigurumi venture requires gathering specific materials to ensure tight stitch architecture and balanced final forms. Choose medium worsted or sport-weight cotton yarn or high-definition acrylic blends; smooth yarns show stitch clarity and prevent fiberfill from escaping through working loops. Pair your selected fiber with an ergonomic crochet hook measuring 2.5 mm to 3.5 mm, dropping down one to two sizes below the manufacturer’s recommendation on the skein label. Essential auxiliary notions include rust-proof locking stitch markers, blunt-ended tapestry needles, sharp thread snips, smooth polyester stuffing, and plastic safety eyes with secure locking washers. Workspace planning ensures a smoother workflow; measure and group your materials beforehand to prevent interruptions during continuous spiral rounds. Swatch a basic spherical dome before commencing the main project to confirm that your tension produces an opaque fabric without visible daylight between stitches. Keep a small dish nearby to organize small components like horn tips, tails, and ears prior to final attachment, ensuring your creative project progresses smoothly from the opening magic circle to the final hidden knot.
Idea 1: Classic Spotted Dairy Calf
How to Create
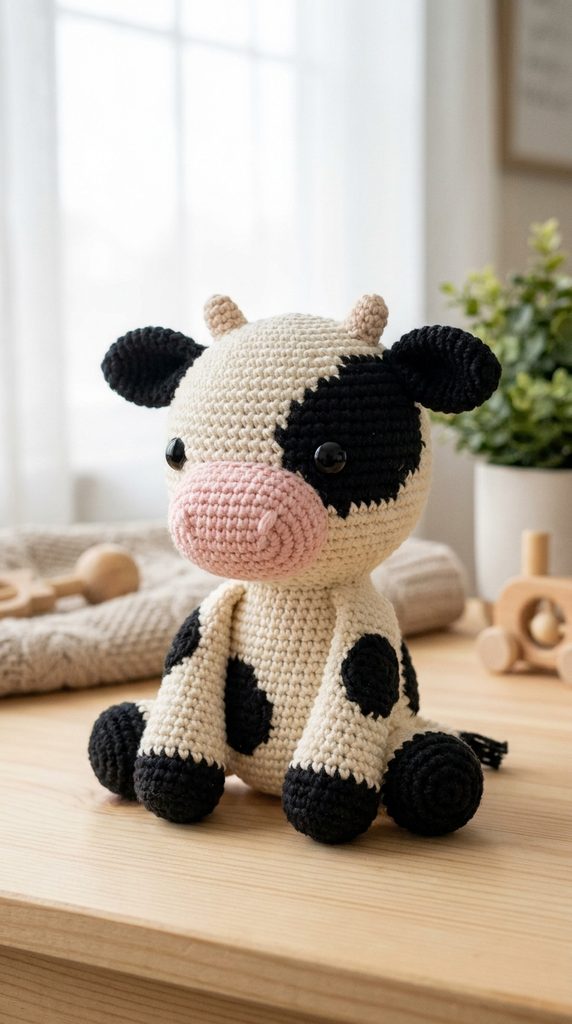
The classic spotted dairy calf combines clean geometric shaping with high-contrast color blocking to create an iconic pastoral centerpiece. This design relies on a crisp buttermilk white body accented with irregular, smooth black markings worked directly into the rounds or appliqued flat. The calf features a squat, seated profile with forward-facing hooves, wide-set ears, and a soft petal-pink muzzle. To establish a modern design balance, the head maintains a slightly larger ratio relative to the torso, producing an endearing, stylized silhouette. The horn buds are deliberately understated, worked in pale beige or soft gray, giving the figure an approachable, youthful character. This design serves as an ideal canvas for learning surface color transitions and practicing symmetrical facial alignment. The resulting plush piece integrates smoothly into modern nursery shelves, rustic tabletop vignettes, or themed seasonal displays, offering a balanced mix of traditional folk charm and clean design principles.
Begin by establishing the head in buttermilk white yarn, using a six-stitch adjustable loop and expanding outward over five rounds to reach a thirty-six stitch circumference. Crochet the muzzle separately using petal-pink yarn in a foundation oval of six chains, working three straight single crochet rounds before lightly stuffing the piece and centering it across rounds ten through fourteen of the face. Insert ten-millimeter safety eyes precisely along the upper boundary of the pink muzzle, securing the back washers firmly against the inside fabric. Introduce irregular black patches along the crown and lower torso either through tapestry crochet color changes or by crocheting separate flat discs sewn securely into the white base fabric. Form two small horn buds by working four single crochets across three short rounds, stitching them alongside two horizontal teardrop ears between rounds four and six of the skull. Stuff the cylindrical torso and hooves densely with fiberfill, joining all limbs using hidden mattress stitches to complete the assembly.
Idea 2: Textured Bubble-Stitch Lamb
Step-by-Step Guide
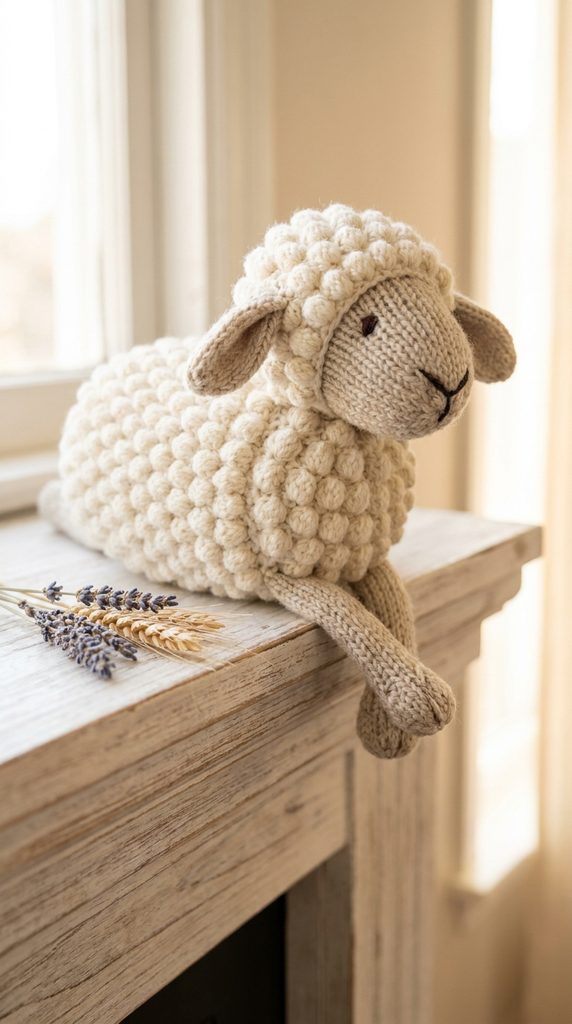
The textured bubble-stitch lamb explores physical surface relief, replacing flat single crochet fabric with dimensional cluster stitches to emulate dense wool. The body and crown of the head feature uniform bobble or puff stitches, contrasted against a completely smooth, matte gray or oatmeal face and slender legs. This structural variation creates an engaging tactile finish that sets the lamb apart from standard smooth yarn animals. The drooping ears hang softly against the textured fleece, enhancing the gentle, resting posture of the sheep. Designed with a wide, stable base, this piece sits reliably on flat wooden mantels or nursery dressers without tipping over. The neutral stone, cream, and soft charcoal colorway aligns with minimalist style principles, allowing the complex stitch work to take center stage without requiring bright colors. This project provides a practical introduction to managing yarn tension across heavy, yarn-consuming decorative stitches.

Work the facial section first using smooth oatmeal yarn, beginning with an adjustable ring and expanding to twenty-four stitches before transitioning into the wool cap. To create the wool texture, switch to soft cream yarn and alternate one four-loop bobble stitch with one single crochet across subsequent rows, staggering the clusters to produce an offset pebbled pattern. Form the main torso independently using the identical alternating bobble sequence, maintaining even tension so the cluster stitches expand outward rather than collapsing inward. Crochet four narrow tubular legs in matching oatmeal yarn, stuffing only the lower hoof thirds so the limbs fold neatly under the weighted, textured body. Fashion two flat teardrop ears using basic single crochet rows, leaving a long thread tail to sew them along the seam dividing the smooth face from the textured crown. Pack the torso firmly with polyester fiberfill, ensuring the inner clusters do not deform the outer silhouette, and join the pieces using reinforced backstitches.
Idea 3: Rustic Pink Snouted Piglet
Execution Process
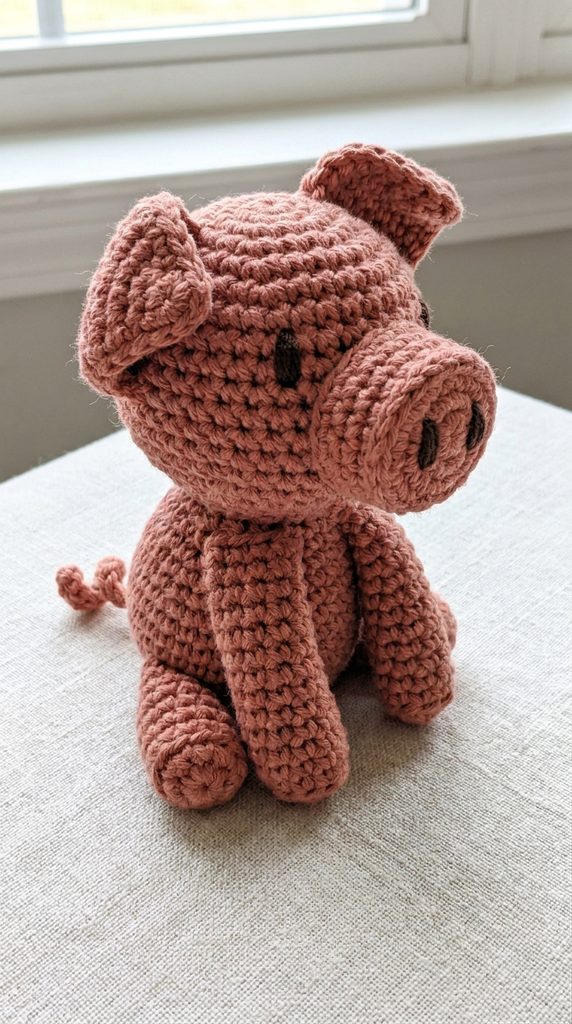
The rustic pink snouted piglet features a clean, teardrop-shaped body line that flows from a compact head down into a stout, rounded belly. Using a palette of muted terracotta pink, dusty rose, or pale peach, this design avoids harsh synthetic tones in favor of an organic, farmhouse-inspired aesthetic. The prominent snout forms the defining focal point, constructed as an elongated, flat-topped cylinder decorated with two vertical embroidered nostrils in charcoal thread. Pointed triangular ears sit forward atop the skull, folded slightly downward at the tips to suggest playful curiosity. A tightly coiled corkscrew tail adds a dynamic sculptural touch to the rear of the figure. This project emphasizes seamless transitions, using continuous spiral decreases to form an upright seated posture that displays well on bookshelves or study desks, functioning as an approachable DIY decoration with understated character.
Construct the snout base using dusty rose yarn, working eight single crochets into a magic ring and expanding to sixteen stitches before working two rounds exclusively in the back loops to create a sharp, distinct perpendicular rim. Continue building the head directly from the snout base, expanding outward to thirty-two stitches to establish the rounded cheeks and forehead. Place eight-millimeter safety eyes two rounds above the rim of the snout, spaced five stitches apart to maintain a wide, curious expression. Assemble the ears as small flat triangles, pinching the lower edges together with a whipstitch before anchoring them between rounds five and seven of the upper cranium. For the corkscrew tail, crochet a chain of twelve stitches and work two single crochets into every chain loop, allowing the natural yarn twist to form a tight spiral. Pack the body cavity uniformly with polyester stuffing, sewing the front trotters forward along the chest to provide stable three-point balance when resting on flat surfaces.
Idea 4: Golden Harvest Hen
Setup Method
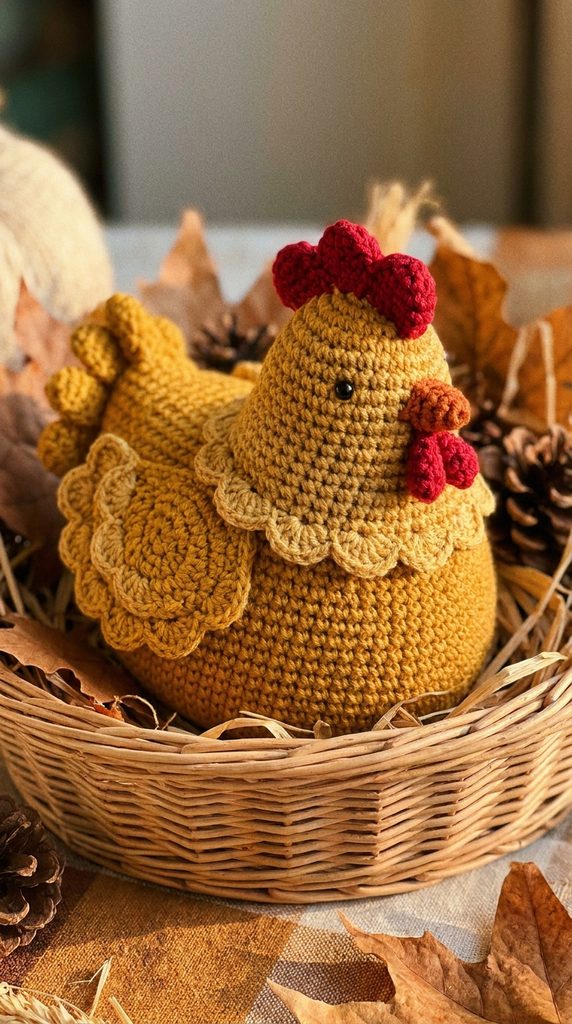
The golden harvest hen incorporates layered flat components over a structured teardrop body to mimic feathered plumage without excessive assembly steps. Warm golden wheat, mustard yellow, and linen cream yarns evoke autumn barnyards and traditional rural life. The hen features a broad, flattened base that transitions upward into a rounded chest, topped by an upright head adorned with a bright crimson comb and wattle. Flared side wings are crocheted as separate layered scallops, providing subtle relief against the body walls without adding unnecessary weight. An embroidered or crocheted burnt-orange beak completes the avian profile, positioned symmetrically between small dark eyes. This project serves as an ideal platform for practicing short-row edge detailing and continuous circular increases. The finished bird functions effectively as a seasonal table centerpiece, nesting in a woven basket or resting alongside natural wooden accents.

Initiate the hen base using warm mustard yarn, crocheting an adjustable ring of eight stitches and expanding outward to forty stitches to establish an expansive, stable circular foundation. Build the vertical body walls upward for twelve straight rounds, then introduce directional decreases concentrated exclusively along the back slope to raise the front chest while tapering the tail feathers into an upward point. Construct two side wings by working concentric flat semicircles, finishing the curved bottom perimeter with alternating slip stitches and half-double crochets to resemble layered feather tips. Create the crimson head comb by chaining eight stitches and working three high-relief picot clusters directly along the foundation chain, sewing the piece securely along the cranial center seam. Attach a diminutive triangular beak and a droplet-shaped red wattle below the eye line using firm whipstitches. Fill the lower half of the hen with poly-pellets enclosed in a mesh pouch to weight the base, finishing the upper cavity with fiberfill before closing the tail seam.
Idea 5: Playful Long-Eared Donkey Foal
How to Create
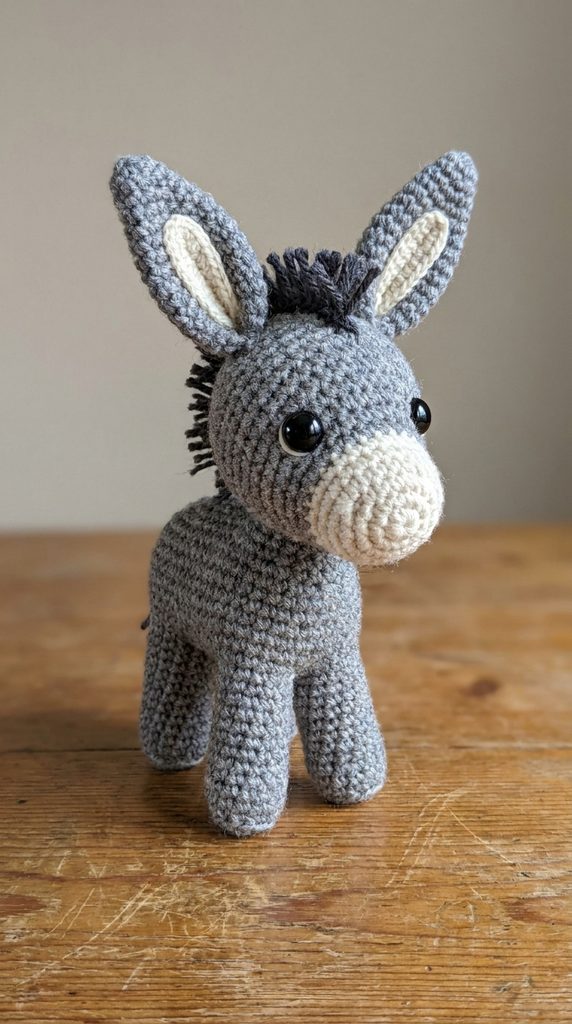
The playful long-eared donkey foal highlights vertical proportions through tall, alert ears, a slender neck, and an elongated muzzle. Soft heather gray, slate, or stone-colored yarn establishes a realistic base, accented with a creamy white snout panel and a dark charcoal mane. The oversized ears represent the signature structural feature of this design; they are crocheted as long, hollow cones that cup naturally inward without requiring internal wire framing. A small brushed-yarn mane runs from the crown down the back of the neck, introducing tactile fringe that contrasts with the smooth single crochet body fabric. The foal adopts an upright standing or gentle seated stance, requiring balanced limb placement to maintain stability. This design offers intermediate-level practice in assembling multiple small components, teaching crafters how minor adjustments to neck angle and ear tilt can alter the overall expression.
Begin the head construction by working an eight-stitch oval foundation in off-white yarn, building the rounded snout over four rows before introducing heather gray fiber across the bridge of the nose. Expand the cranial cavity upward to thirty stitches, inserting safety eyes along the boundary where the gray and off-white yarns intersect. Crochet two elongated ears spanning twenty-two continuous rounds, tapering the tips with gradual single decreases and pinching the base flat to form a curved, leaf-like cup before sewing them to the skull crown. For the mane, latch four-inch strands of charcoal yarn along the dorsal ridge of the neck using a basic slip-knot fringe technique, trimming the fibers to a uniform one-inch height and brushing them with a wire comb to separate the strands. Stuff the long neck firmly with dense batting to prevent wobbling, and secure the straight front legs perpendicular to the chest floor with heavy-duty internal backstitches.
Idea 6: Miniature Farmhouse Duckling
Step-by-Step Guide
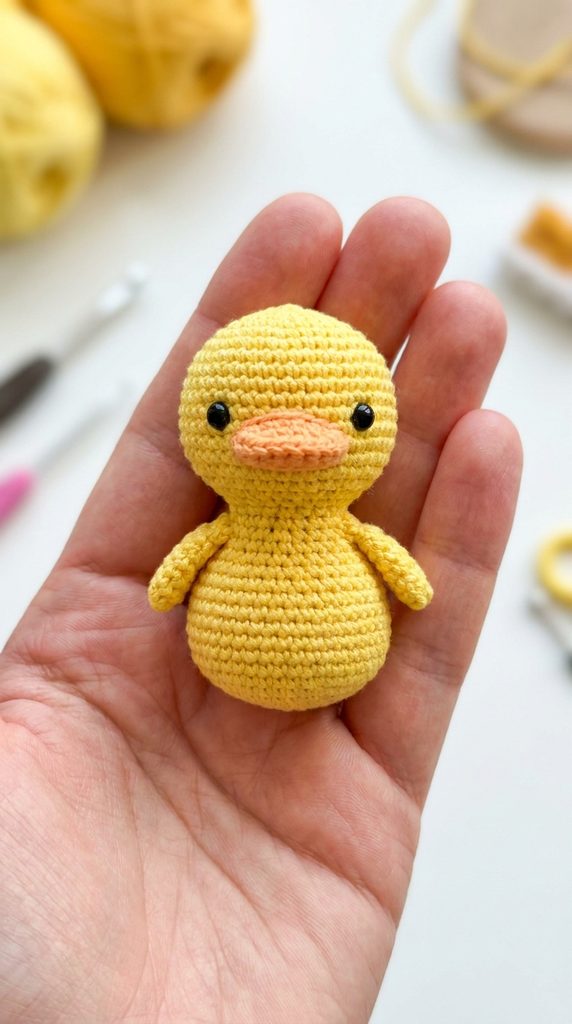
The miniature farmhouse duckling simplifies avian geometry into an accessible, pocket-sized project using bright buttercup yellow and soft apricot yarns. Designed as an easy project for novices, the head and body are worked as a single unified hourglass shape, eliminating the need to sew the neck seam entirely. The duckling features a broad, flattened bill, miniature cupped paddle wings, and tiny webbed feet that fold neatly underneath the body. Because of its petite scale, measuring roughly three inches in height, this project uses minimal yarn yardage and can easily be completed in a single afternoon. The clean, unembellished profile fits naturally into modern design aesthetics, functioning as a playful backpack charm, a spring tiered-tray decoration, or a lightweight desktop accent. Working on this compact scale provides excellent practice in manipulating small stitch rings and executing precise, tight stitches.
Begin at the crown using soft buttercup yellow yarn, forming an initial circle of six single crochets and expanding over four concentric rounds to reach twenty-four stitches. Work four rows even, then execute six rapid invisible decreases around row nine to form an indented neck ring containing eighteen stitches. Immediately expand the stitch count outward on row ten back to twenty-four stitches to build the chest and lower body, filling the head with fiberfill before the waist narrows significantly. Crochet the bill using apricot yarn by working four chains and crocheting around both sides of the foundation thread to produce a flat oval, attaching it horizontally along rows seven and eight of the head. Form two paddle wings with small teardrop shells sewn flush to the torso walls, directing the curved points toward the tail. Complete the base with two flat webbed flippers sewn to the underside, anchoring the thread tails deeply into the internal stuffing to hide the ends.
Idea 7: Dappled Farmyard Billy Goat
Execution Process
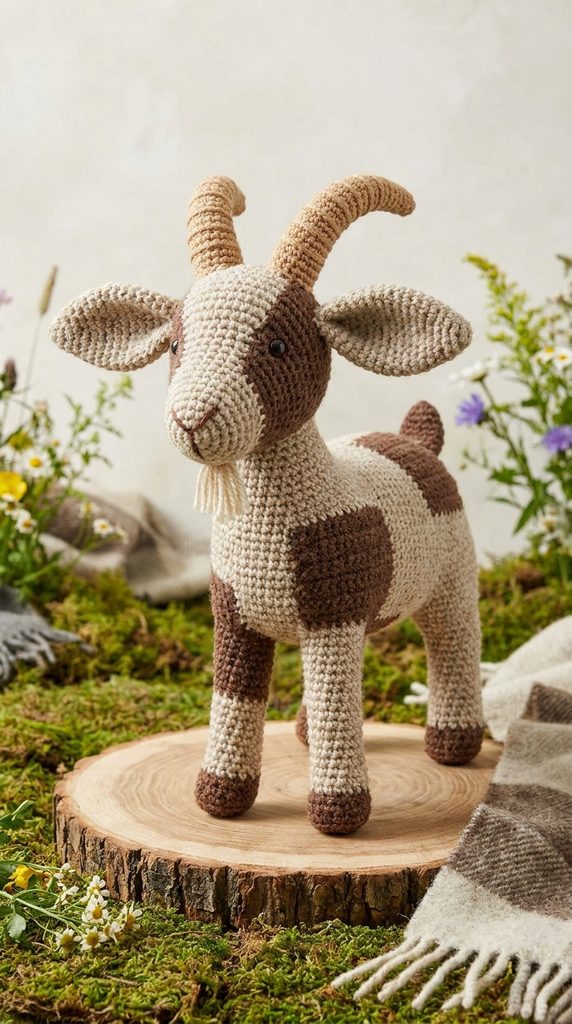
The dappled farmyard goat introduces distinctive structural elements through curved ribbed horns, a miniature tufted chin beard, and a dynamic two-tone color pattern. Utilizing warm oatmeal, sand, or toasted biscuit yarn paired with dark chocolate brown accents, this pattern captures the rustic appeal of heritage livestock breeds. The head features a straight, wedge-like profile with horizontally positioned oval pupils or simple embroidered eyes that replicate natural caprine features. The horns are worked in dense continuous spirals using ribbed back-loop stitches, curving slightly backward over the crown to achieve an authentic silhouette. A small tuft of natural raw fiber or combed acrylic wool forms the signature chin beard, anchored beneath an angled lower jaw. This design demonstrates how to balance multiple distinct appendages on a compact head without overcrowding the facial structure.
Crochet the wedge-shaped head by starting at the narrow muzzle in cream yarn, expanding gradually through twelve rounds to reach twenty-eight stitches at the back crown. Switch to chocolate brown yarn along one side of the forehead to form an asymmetrical color patch, ensuring the color transition is made during the final loop of the previous stitch for clean line definition. Work the two horns using tan yarn, crocheting six single crochets in the back loops only for eight rounds while working decreases on the inner edge and increases on the outer edge to create a natural backward arch. Sew the horns firmly between rounds ten and twelve of the cranium, flanking them with horizontal leaf-shaped ears positioned directly below the horn bases. Attach a one-inch tassel of combed cream yarn to the underside of the chin, trimming the end with fabric shears to a neat wedge point. Assemble the body with a straight backline and four cylindrical legs, checking that the stance remains balanced on level surfaces.
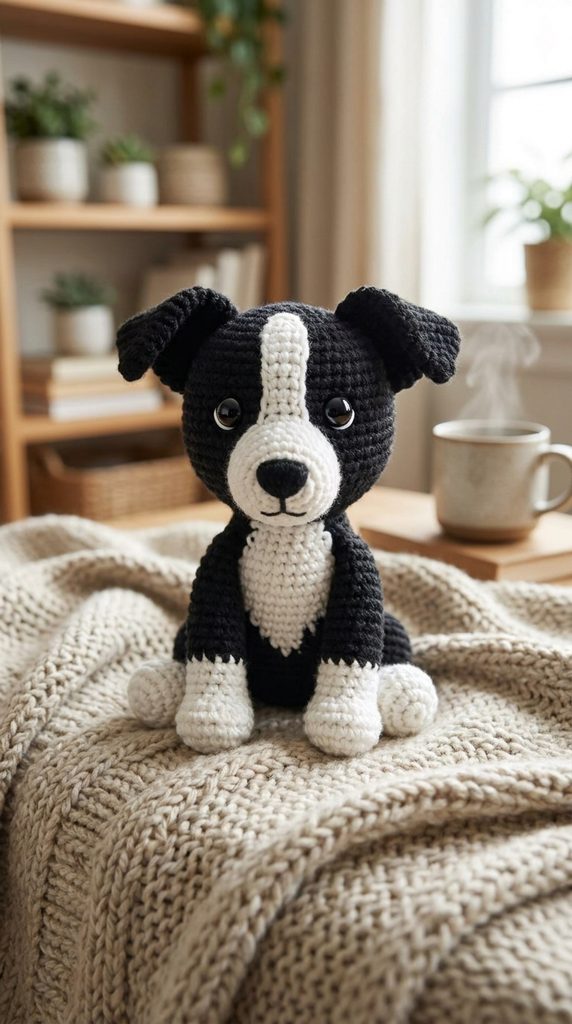
Idea 8: Black and White Border Collie Pup
Setup Method
The black and white border collie pup translates the classic working farm dog into a charming yarn companion through precise, symmetrical color work. Featuring a deep charcoal or jet-black coat accented with a clean white chest blaze, white front stockings, and a white facial stripe, this design rewards careful stitch counting. The head incorporates semi-folded ears, where the upper tips flop gently forward over the brow, mimicking the alert posture of a young herding dog. The tail features a white tip that curves upward, adding movement and visual energy to the back of the figure. This project provides an approachable challenge for makers looking to refine their color-changing skills across narrow rows without carrying yarn loosely across the back of the fabric. The completed puppy brings dynamic life to pastoral groupings, displaying well on rustic wooden shelves or within country-style living rooms.
Map out the facial blaze by establishing an off-white foundation strip four stitches wide, surrounding it symmetrically with black stitches as the head rounds expand outward to thirty-two stitches. Maintain clean vertical color margins by twisting the non-working yarn around the active yarn at each color junction, keeping internal yarn floats flat against the wrong side of the work. Insert small black safety eyes directly along the outer borders of the white facial strip, embedding them between rows eight and nine. Construct the ears using black yarn, crocheting two flat pointed triangles; fold the top third of each ear forward and tack the tip down with a single hidden stitch before securing the bases to the upper skull. Assemble the body starting from the white chest base and transitioning into solid black along the upper shoulders. Attach four small paws with white foot cuffs to the lower torso, securing all limbs with heavy-duty mattress seams to produce a steady, seated pose.
Idea 9: Patchwork Barnyard Horse
How to Create
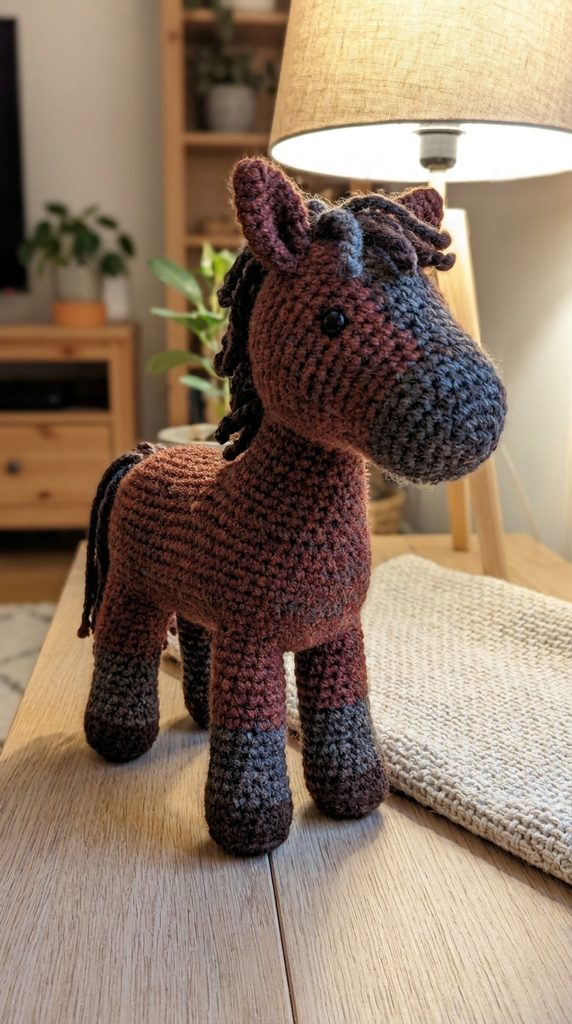
The patchwork barnyard horse features an athletic, stylized silhouette characterized by an arching neck, slender muzzled head, and long, fluid mane fibers. Worked in rich chestnut brown, caramel, or deep bay tones, this design balances clean line work with tactile fiber embellishment. The hooves utilize charcoal or slate gray yarn, separated from the main legs by a distinct structural ridge worked in the back loops. The mane and tail incorporate multiple strands of textured fringe, which can be brushed, braided, or left natural to suit various decorative preferences. The elongated head attaches to the torso at an intentional eighty-degree angle, giving the figure an alert, proud demeanor suitable for standalone display. This project guides crafters through shaping angled tubular parts and attaching dense fringe along curved surface seams.
Construct the horse head by expanding from a narrow twelve-stitch muzzle in soft tan out to twenty-six stitches across the cheek area, tapering inward slightly at the cranial crest. Create the arching neck as a separate flared cylinder, working four short rows along the dorsal edge to produce a curved forward lean before attaching it to the shoulder joint. Thread twelve-inch lengths of dark chocolate yarn through the central neck seam from the poll down to the withers using a latch hook, knotting each loop securely against the fabric before trimming the mane into a tidy, slanting crest. Crochet four elongated, firm legs, starting each hoof with five rounds of charcoal yarn worked in the back loops only before transitioning into the main chestnut body color. Pack the legs and neck with dense fiberfill to ensure the horse stands upright without sagging. Join the head to the angled neck using reinforced whipstitches, anchoring all loose ends inside the central body cavity.
Idea 10: Woolly Barn Owl Companion
Step-by-Step Guide
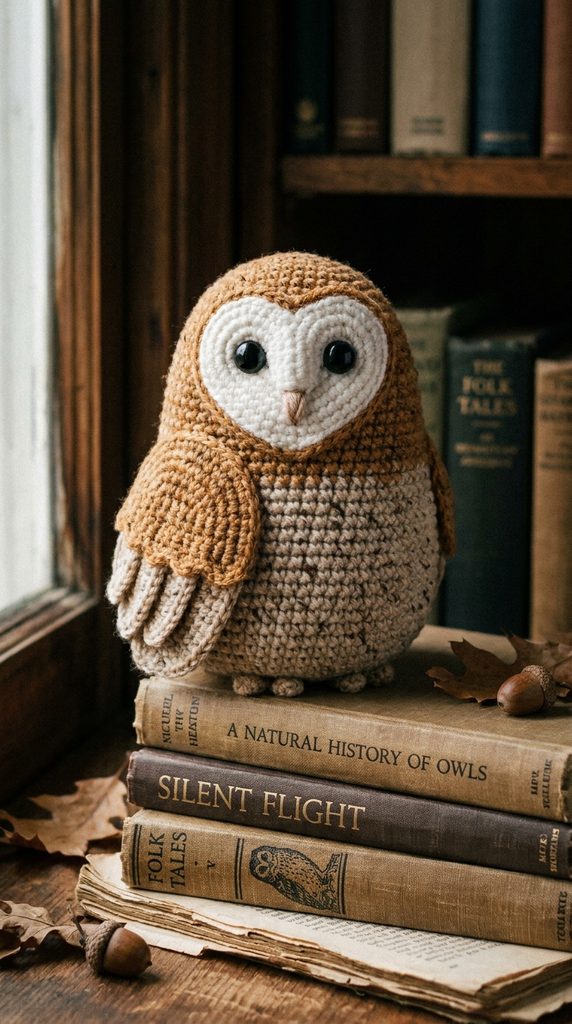
The woolly barn owl companion complements the agricultural theme by introducing a classic farmstead nocturnal guardian worked in soft neutral tones. The design features a heart-shaped facial disc framed in crisp white, encircled by soft almond, caramel, and speckled gray-brown plumage. The compact, egg-shaped body keeps assembly requirements minimal, relying on subtle surface detailing and wing appliqués to establish character. Large, dark safety eyes embedded within the heart disc provide a wide, attentive gaze that anchors the entire piece. Short, fringed wing panels are sewn flat against the body flanks, while tiny, clawed feet anchor the bird to flat surfaces or perches. This project serves as an easy project for practicing flat-edge shaping, oval rounds, and color blocking on a single unified canvas. The resulting soft sculpture brings a warm, woodland touch to farmhouse book collections and rustic mantel arrangements.
Begin by crocheting the signature heart-shaped facial disc in off-white yarn, working two intersecting semicircular lobes that taper down into a sharp bottom point over eight flat rows. Anchor two ten-millimeter dark safety eyes within the central lobes, framing each washer with a small circular felt backing before pressing the posts through the crochet fabric. Construct the main egg-shaped torso using mottled almond or caramel yarn, expanding from an eight-stitch ring to thirty-six stitches before tapering gradually toward the base. Stitch the white facial disc flush against the front upper slope of the body, adding a tiny embroidered beige beak directly between the eye margins. Form two flat teardrop wings using speckled gray-brown yarn, detailing the outer lower edge with alternating single and half-double crochets to suggest flight feathers. Sew the wings flat against the sides of the torso, packing the body firmly with fiberfill and attaching two small, three-toed feet along the bottom rim to complete the figure.
Common Beginner Mistakes and How to Avoid Them
Novice amigurumi crafters frequently encounter common technical hurdles that can impact the durability and shape of their finished farm animal projects. One widespread error is using a crochet hook that is too large for the chosen yarn weight, which creates loose, open stitches that allow polyester stuffing to show through. Always drop down one or two hook sizes below the label recommendation to produce an opaque, tight fabric. Another common challenge is uneven stuffing distribution, which can create lumpy contours or distorted limbs; avoid this by adding fiberfill in small, fluffed layers rather than packing large clumps all at once. Crafters also frequently struggle with visible steps when working traditional decreases; using the invisible decrease method—inserting the hook only into the front loops of two consecutive stitches—creates smooth, seamless reductions. Misplaced or crooked facial features are another common frustration; use pearl-headed dressmaker pins to test eye and ear positions from multiple angles before committing to permanent assembly. Finally, neglecting to mark the beginning of continuous spiral rounds often leads to incorrect stitch counts, a problem that is easily prevented by keeping a locking stitch marker in the final loop of every row.
Practical Finishing Tips for Professional Results
Refining a few core techniques can elevate basic amigurumi animals into polished, heirloom-quality soft crafts. When transitioning between colors, always complete the final yarn-over of the preceding stitch with the new color strand; this produces a clean, sharp color boundary without uneven staggered loops. When fastening off components, leave an ample tail of yarn—roughly twelve to sixteen inches—to provide enough length for secure, stress-free seam stitching. Use the mattress stitch technique when joining limbs to the body, running the blunt tapestry needle back and forth between the open loops of the limb and the corresponding body fabric to produce hidden seams. To give seated figures a stable base, consider adding a sealed fabric bag of non-toxic plastic poly-pellets to the lower body cavity before topping it off with soft fiberfill. Finally, give finished pieces a light steam with a handheld garment steamer, keeping the nozzle several inches away from the surface; this relaxes the yarn fibers and evens out small surface tension irregularities without flattening the three-dimensional stuffing inside.
Styling, Presentation, and Display Ideas
Thoughtful staging and display choices can transform individual amigurumi farm animals into cohesive decor statements throughout the home. For rustic seasonal displays, group several completed animals—such as the spotted calf, textured lamb, and golden hen—inside a shallow woven ash basket lined with neutral linen. Elevate living room shelves or children’s study desks by placing individual figures atop vintage wooden thread spools, natural timber slices, or antique butter molds to highlight their handcrafted character. These soft yarn sculptures also integrate smoothly into contemporary nursery decor; display a series of animals along open picture ledges paired with framed pastoral sketches or botanical art prints. When photographing your projects for online craft communities, take advantage of soft, indirect morning daylight angled across the pieces to accentuate stitch texture and dimension. Stage your finished animals against neutral backdrops like raw linen, weathered shiplap, or matte painted surfaces, including a vintage pair of thread snips or a wooden hook in the frame to celebrate the authentic handmade process behind each character.
Budget Allocation and Time Management
Organizing your material purchases and work sessions ensures that amigurumi crafting remains an affordable, relaxing, and sustainable hobby. Save on yarn costs by investing in larger skeins of foundational neutral shades—such as warm buttermilk, soft cream, and slate gray—while reserving smaller scrap skeins for contrasting hooves, snouts, and horn buds. Purchasing safety eyes, locking stitch markers, and polyester stuffing in bulk online significantly reduces the per-unit cost compared to buying individual retail packs. From a time management perspective, breaking the project into structured assembly phases prevents fatigue and keeps production moving forward efficiently. Dedicate one crafting session exclusively to crocheting all core spheres and limb cylinders, storing them together in a project basket before moving on to assembly. Reserve a separate, uninterrupted work window for facial embroidery, ear pinning, and limb joining, as rushed final assembly often leads to misaligned features. Setting aside three focused hours across a weekend provides a realistic, manageable timeline for completing a detailed miniature farm animal without compromising stitch tension or finishing quality.
Creative Expansions and Advanced Variations
Once you have mastered the foundational shaping techniques for these farm animal designs, you can explore creative variations that take your soft sculptures to the next level. Experiment with fiber substitutions, such as fine-weight alpaca yarn for a fuzzy, rustic finish or thick blanket chenille yarn paired with a large hook to turn miniature figures into oversized accent pillows. Skilled crafters can incorporate wire armatures, inserting coated copper wire wrapped in floral tape into the legs to create fully articulated, posable limbs. You can also craft custom accessories to add storytelling appeal; crochet miniature feed sacks, tiny removable halters, woven flower crowns, or miniature winter scarves to dress your animals for different seasons. Exploring mixed-media accents—such as wooden button joints for movable legs, leather cord collars, or needle-felted fleece patches—further enriches the surface texture of each piece. By combining these advanced methods with the core single crochet patterns, makers can continuously expand their fiber art portfolios and develop their own signature amigurumi collections.