Repurposing vintage and modern bird cages into outdoor garden art provides a creative, structurally captivating method to elevate landscape design, accent floral beds, and introduce vertical focal points to patios. A bird cage serves as an open architectural framework, allowing air, light, and climbing vegetation to interact with wrought iron, galvanized wire, or wood components. Readers exploring this comprehensive guide will gain actionable knowledge regarding weatherproofing techniques, plant selection strategies, floral foam placement, and secure hanging mechanics across ten distinct garden art designs. Understanding how architectural ironwork, trailing foliage, solar illumination, and seasonal accents integrate enables gardeners to craft durable, three-dimensional decorative displays. This guide provides structured step-by-step assembly workflows, essential materials checklists, and structural planning advice to help you transform discarded cages into thriving garden centerpieces. Mastering these foundational DIY garden decor principles eliminates plant maintenance difficulties, protects metal enclosures from seasonal rust, and delivers an inspiring, nature-centric aesthetic suitable for porches, garden beds, pergolas, and landscape walkways.
Why This Idea Is Trending or Useful
Bird cage garden art continues to dominate modern Pinterest inspiration boards because it seamlessly bridges the gap between classic botanical charm, sustainable upcycling, and modern design relevance. Standard flat garden beds often lack vertical dimension, leaving outdoor spaces feeling visually grounded and monotonous. An artfully styled bird cage resolves this limitation by introducing elevated structural lines that draw the eye upward, highlighting climbing vines, trailing succulents, and delicate floral arrangements. The DIY appeal and accessibility for beginners stem from the forgiving nature of mixed-media assembly, where reclaimed wire cages can be transformed using simple hand tools, moss liners, and basic potting soil. Furthermore, these designs embrace a sustainable minimalist style that emphasizes repurposing antique finds rather than purchasing mass-produced plastic ornaments. By offering an adaptable, weather-resistant framework that accommodates both living plants and illuminated decor, bird cage garden art provides a budget-friendly project that enriches outdoor living areas throughout the year.

Materials and Preparation
Constructing long-lasting bird cage garden art begins with gathering durable hardware, specialized horticultural liners, and proper weatherproofing compounds before assembling individual displays. Essential hardware includes wire bird cages made from wrought iron or powder-coated steel, heavy-duty hanging chains, shepherd hooks, sheet metal snips, carbon steel wire cutters, and cordless drills equipped with masonry or metal bits. For plant installations, gather preserved sphagnum sheet moss, pre-formed coco coir liners, moisture-retentive potting soil, slow-release organic fertilizer granules, and flexible floral wire. Preparation begins by thoroughly cleaning reclaimed cages with a stiff wire brush to remove flaking paint, dirt, and residual scale. Apply an outdoor-rated rust-inhibiting metal primer, followed by two coats of exterior satin enamel spray paint to seal the wire framework against environmental moisture. Line the bottom tray or interior wire basin with porous landscape fabric or thick sphagnum moss to retain soil while ensuring adequate water drainage during heavy rainfall.
10 Bird Cage Decor Outdoor Garden Art Ideas
Idea 1: Cascading Succulent Sphere in a Hanging Domed Cage
Step-by-Step Guide
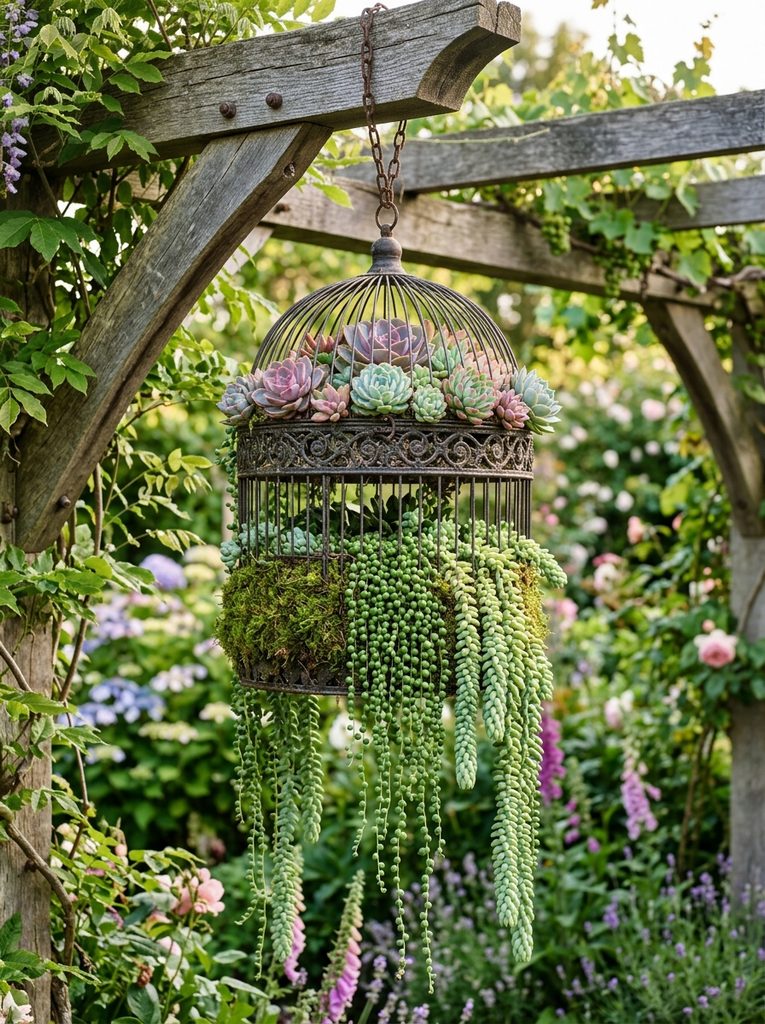
The cascading succulent sphere design transforms a round, domed bird cage into a living botanical terrarium filled with drought-tolerant succulents, sedums, and trailing string vines. The circular wire framework provides 360-degree support for trailing species like string of pearls, burro’s tail, and creeping thyme, allowing them to spill through the metal bars organically. The interior core contains a dense moss-lined soil mound that holds moisture efficiently without waterlogging the shallow root systems of the succulents. This living sculpture creates a striking textural focal point when suspended from a porch beam, pergola rafter, or sturdy garden tree branch.
To construct this hanging succulent cage, begin by opening the top dome or side door of a cleaned, rust-primed metal bird cage. Line the bottom basin and lower interior walls with damp sphagnum sheet moss, pressing the moss firmly against the metal bars with the green side facing outward. Fill the interior center of the moss shell with a fast-draining cactus and succulent potting soil mix amended with perlite. Plant upright echeveria and rosette succulents in the upper center, then use your fingers or a wooden dowel to create small perforations through the side moss between the wire bars. Insert the root plugs of trailing sedums and string of pearls into these side openings, securing them with U-shaped floral pins. Water the entire assembly gently using a fine-mist spray bottle and hang it using a heavy-duty steel swivel hook in an area receiving bright, indirect sunlight.
+-------------------------------------------------------------+
|            SUCCULENT BIRD CAGE CROSS-SECTION MAP            |
+-------------------------------------------------------------+
|  [ Top Dome: Upright Echeveria & Rosette Succulents ]       |
|               |                                             |
|  [ Interior Core: Fast-Draining Perlite Potting Soil ]      |
|               |                                             |
|  [ Outer Shell: Preserved Sphagnum Sheet Moss Lining ]      |
|               |                                             |
|  [ Wire Bars: Side-Planted Trailing Sedums & String Vines ] |
|               |                                             |
|  [ Base: Perforated Drainage Tray with Metal Swivel Hook ]  |
+-------------------------------------------------------------+
Idea 2: Solar Fairy Light Lantern with Preserved Botanical Accents
How to Create
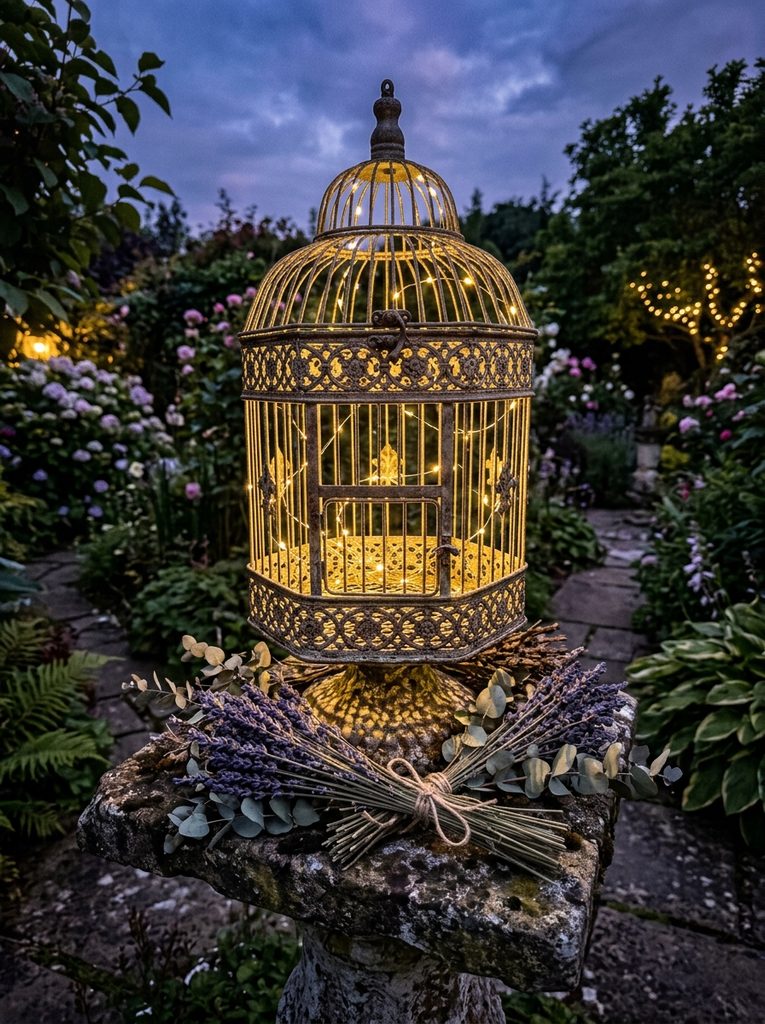
The solar fairy light bird cage lantern merges decorative ironwork with eco-friendly landscape illumination to produce an enchanting outdoor light fixture. This design features a cluster of water-resistant micro-LED copper fairy lights wound around an interior solar collector, complemented by dried eucalyptus, faux lavender sprigs, and preserved botanicals. During daylight hours, the cage serves as a sculptural garden accent; at dusk, the internal lights activate automatically, casting intricate geometric shadows through the wire bars across patios, garden paths, or porch floors. This illumination project offers a functional, cord-free lighting solution that enhances evening garden ambiances without increasing electrical utility costs.
Begin by selecting an ornate vintage-style metal bird cage with a flat base or top suspension ring. Position a weatherproof solar power puck or solar-panel lid securely inside the upper dome, ensuring the solar collection panel faces upward toward direct sunlight. Take a thirty-foot strand of warm-white, outdoor-rated micro-LED copper wire fairy lights and weave the strand loosely through the interior cavity, wrapping portions around the internal perch and central frame bars. Arrange bundles of preserved seed pods, faux greenery, and dried eucalyptus stems around the base tray, securing the botanical stems with thin green floral wire to prevent shifting during breezy weather. Seal the cage latch with a small length of wire to prevent the door from swinging open, and mount the completed lantern atop a decorative stone pedestal or hang it from a metal shepherd hook along a garden walkway.
Idea 3: Tiered Potted Herb Garden in an Open-Door Vintage Cage
Execution Process
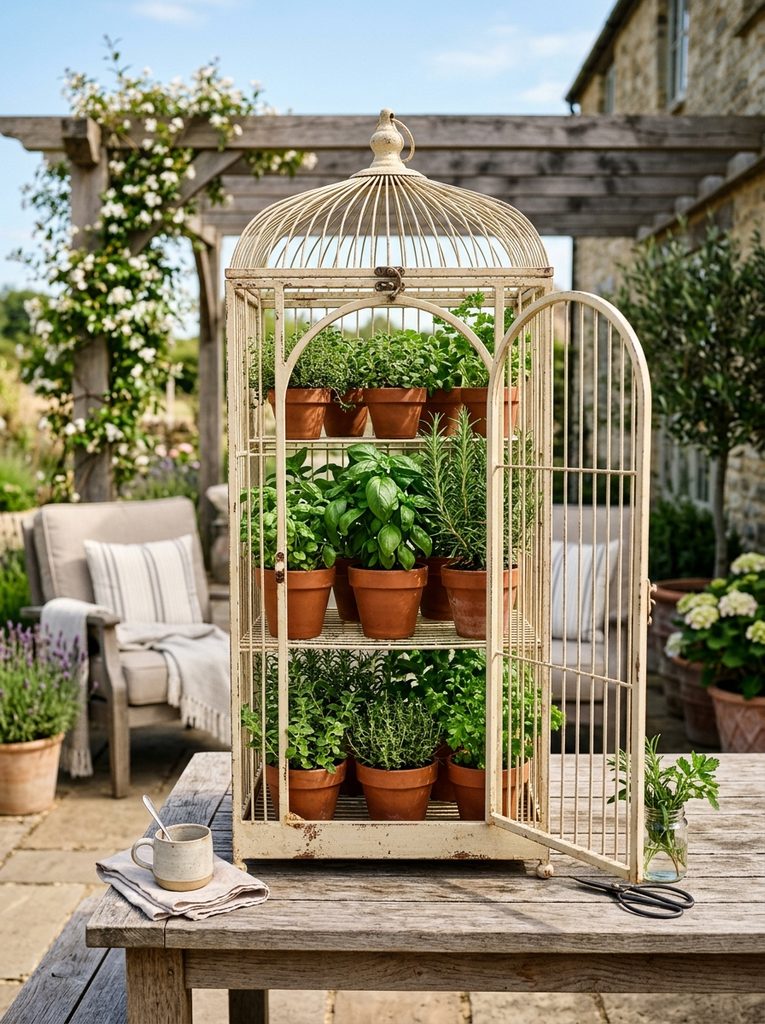
The tiered potted herb garden utilizes an open-door rectangular or tall pagoda-style bird cage to house culinary herbs in an organized vertical configuration. By securing the cage door permanently open, the display provides unhindered airflow and sunlight to small potted herbs arranged across multiple internal levels. This layout keeps delicate culinary greens—such as basil, rosemary, thyme, and oregano—elevated off the ground, effectively protecting them from crawling garden pests and snails. The vintage metal framework adds farmhouse garden appeal while functioning as a mobile, compact culinary station right next to an outdoor kitchen, patio dining set, or barbecue area.
Select a tall, rectangular metal bird cage featuring a removable base tray and wide access doors. Fasten the main access door in an open ninety-degree position using copper safety wire or decorative metal clips. Cut two rectangular plywood or galvanized sheet metal shelves to fit the internal width of the cage, resting them securely on the existing wire perches or attaching them with small metal pipe clamps. Place three-inch to four-inch terracotta pots containing fresh culinary herbs—such as dwarf rosemary, sweet basil, flat-leaf parsley, and variegated thyme—onto the tiered shelves and bottom tray. Ensure each terracotta pot possesses a drainage saucer to catch excess moisture during daily watering. Position the entire herb tower in a location that receives at least six hours of direct sunlight daily.
Idea 4: Wildflower Centerpiece with Concealed Floral Water Wells
Setup Method
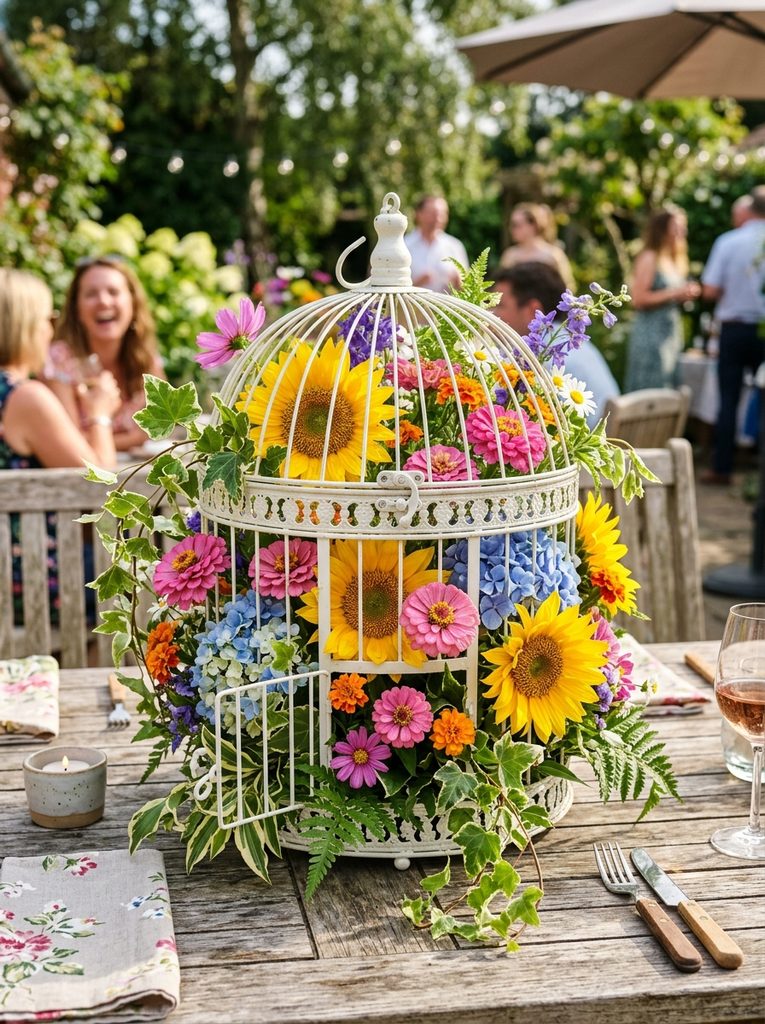
The wildflower bird cage centerpiece features a vibrant arrangement of fresh-cut garden flowers bursting through the open bars of a tabletop bird cage. Hidden within the base of the cage are moisture-retaining floral foam blocks or concealed glass water reservoirs that sustain fresh blooms for days. Colorful garden favorites like sunflowers, zinnias, hydrangeas, snapdragons, and cosmos weave through the vertical bars, softening the rigid metal structure with lush seasonal color. This table centerpiece creates an eye-catching focal point for outdoor garden parties, patio dinners, wedding receptions, and seasonal family gatherings.
Begin with a clean, low-profile decorative bird cage that opens from the top or base. Place a shallow, leakproof plastic tray inside the bottom of the cage to catch water drips and protect outdoor tabletop surfaces. Soak a block of professional floral foam in water enriched with commercial floral preservative until completely saturated, then carve the foam to fit tightly within the plastic tray. Insert fresh-cut flower stems—such as hydrangeas, lisianthus, garden roses, and trailing ivy—into the foam block, angling the outer stems so they emerge naturally through the wire bars. Fill in gaps with broad foliage like salal leaves and fern fronds to conceal the internal foam base entirely. Close and latch the top cage dome, spritzing the floral arrangement daily with cool water to prolong bloom freshness.
Idea 5: Cascading Ivy and Fern Pedestal Planter
Step-by-Step Guide
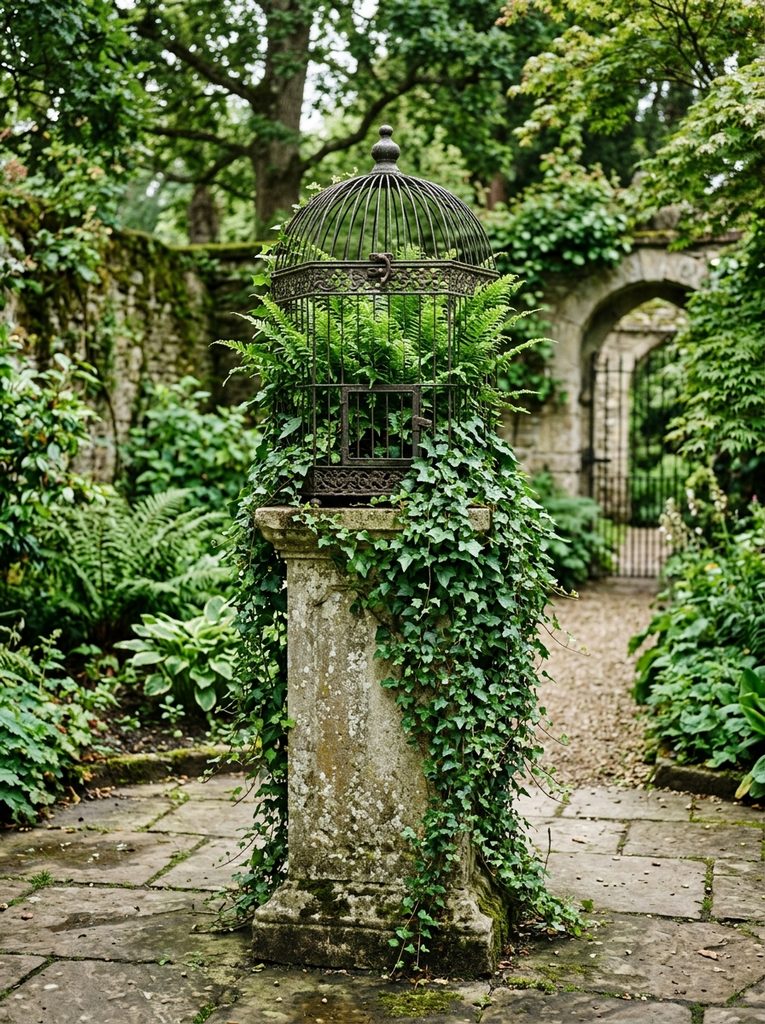
The cascading ivy and fern pedestal planter mounts a heavy-gauge wire bird cage atop a concrete, stone, or wrought iron garden pedestal to create an architectural botanical pillar. The interior of the cage is densely planted with shade-loving perennials, such as English ivy, Boston ferns, and creeping fig, which gradually envelope the metal framework over time. As the vines mature, they weave in and out of the wire slats before trailing downward toward the garden floor, softening the rigid pedestal lines. This permanent garden installation adds classical European elegance to shaded courtyard corners, woodland garden paths, and formal landscape alcoves.
Begin by bolting or securing the base of a weather-treated metal bird cage onto the top plate of an outdoor stone or iron garden pedestal using masonry anchors or heavy-duty outdoor construction adhesive. Line the interior bottom half of the cage with a pre-formed coco coir basket liner, cutting drainage slits into the bottom base. Fill the liner with a rich, moisture-retentive potting soil blend enriched with compost and slow-release fertilizer pellets. Plant a central Boston fern or maidenhair fern in the middle for vertical height, and surround the base with four to six small trailing English ivy or creeping fig root plugs. Guide the young ivy vines through the lower metal bars using soft plant ties, encouraging them to climb the exterior frame and cascade down the pedestal base. Place the pedestal in a shaded or partially shaded garden location, watering thoroughly whenever the top inch of soil feels dry.
Idea 6: Moss-Covered Topiary Frame with Creeping Groundcover
How to Make
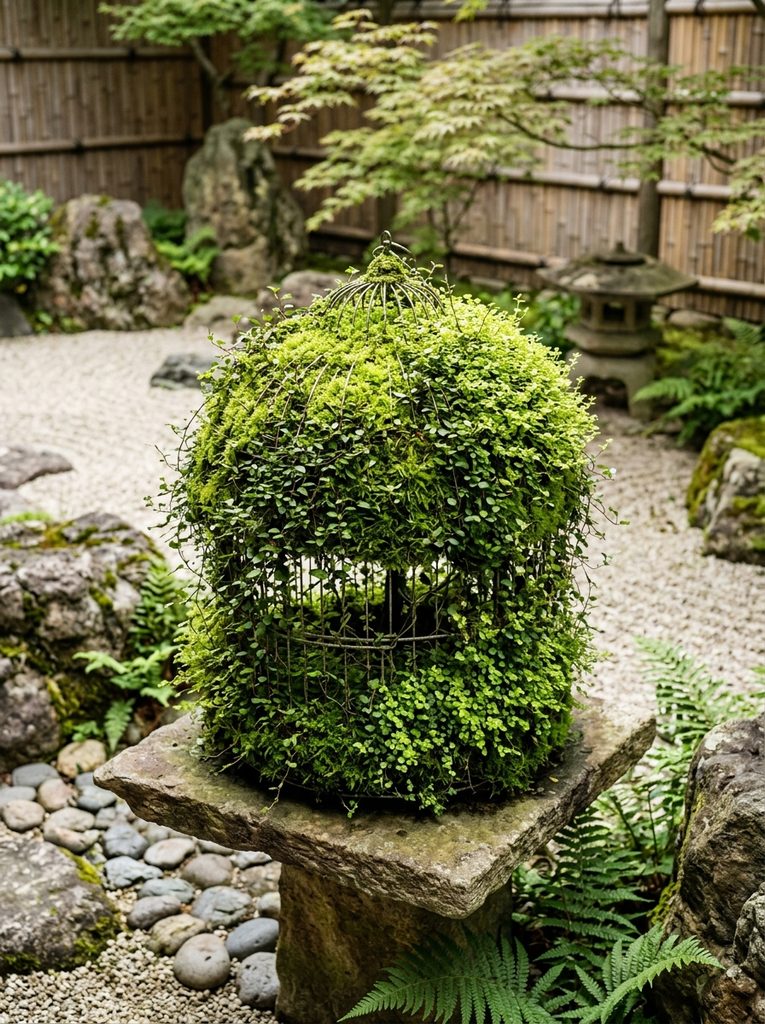
The moss-covered topiary bird cage functions as a living architectural sculpture where creeping botanical groundcovers grow directly over an exterior moss skin. By packing the entire interior cavity with nutrient-rich growing medium bound in sphagnum moss, the cage becomes a continuous three-dimensional planting canvas. Plants like creeping wire vine, baby’s tears, or miniature creeping fig root directly into the outer moss walls, transforming the cold iron silhouette into a lush green botanical sculpture. This living topiary serves as an artistic design element in formal knot gardens, Zen rock arrangements, and contemporary garden beds.
Start by preparing a sturdy wire bird cage, opening the main access hatch to access the internal volume. Pack the entire interior of the cage tightly with moist long-fiber sphagnum moss, building a dense, solid core from the base tray up to the top dome. Wrap fine green monofilament fishing line or flexible galvanized wire horizontally and vertically around the exterior bars to hold the packed moss core securely in place. Using a pair of scissors or a narrow dibber, puncture small planting pockets every three inches across the moss surface. Insert rooted cuttings of creeping wire vine or baby’s tears into each pocket, pressing the moss firmly around the stems to ensure solid root contact. Hang or position the topiary in a sheltered, humid garden area with filtered light, misting the exterior moss surface daily to maintain uniform moisture levels.
Idea 7: Upcycled Mosaic-Base Bird Bath and Pollinator Oasis
Execution Process
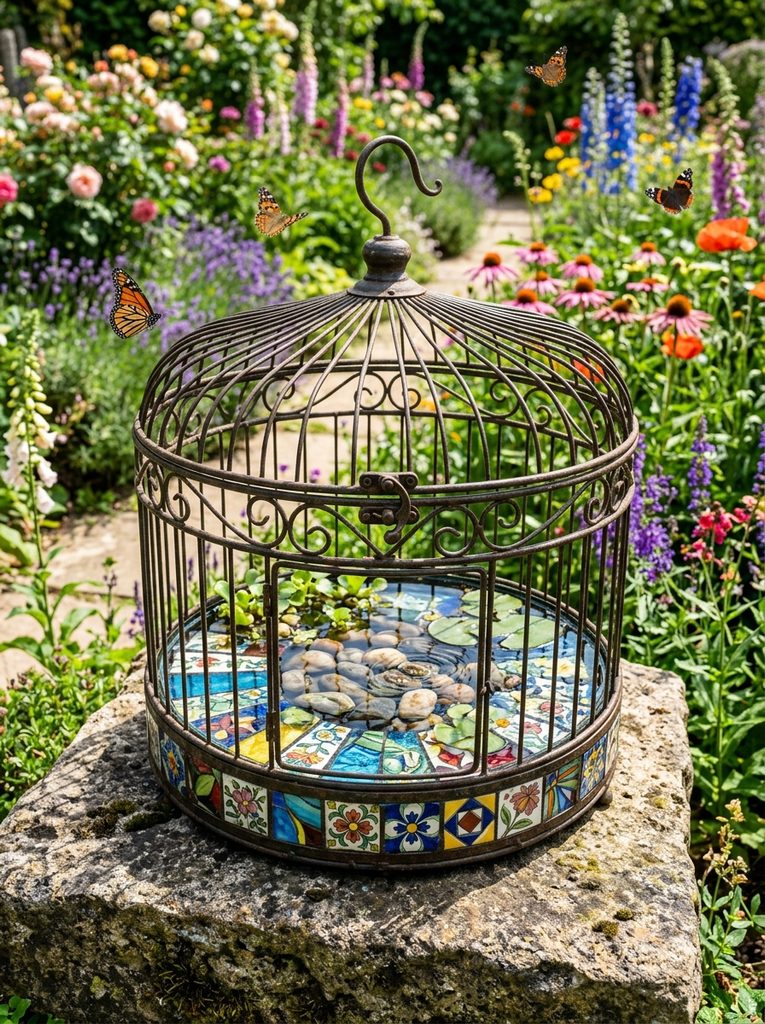
The upcycled mosaic bird cage bath repurposes a wide-bottomed cage into a decorative water basin and pollinator resting station. The base tray of the cage is lined with a handcrafted mosaic of recycled glass tiles, river stones, and ceramic pottery fragments set in waterproof mortar. The open upper cage bars provide safe perching perimeters for visiting songbirds, while flat landing stones protruding above the shallow water line offer hydration spots for honeybees and butterflies. This multi-functional garden art installation provides vital water resources for local wildlife while adding colorful artisan mosaic textures to sunny landscape borders.
Begin by removing the base tray of a wide, shallow metal bird cage. Sand the surface of the metal tray to create mechanical adhesion, then apply a layer of exterior-grade waterproof tile thin-set mortar across the base. Press colorful stained glass tiles, glazed ceramic shards, and flat smooth river pebbles into the mortar, creating an artistic geometric or floral mosaic pattern with varying depths. Allow the mortar to cure for twenty-four hours, then apply an outdoor-rated acrylic grout, sealing the surface with a non-toxic, pet-safe clear silicone water sealant. Reattach the mosaic tray to the wire cage framework, securing it tightly with stainless steel fasteners. Place the finished bath atop a flat garden boulder or patio table in partial shade, filling the base with one inch of fresh water and adding a floating solar fountain pump to keep water moving.
Idea 8: Air Plant and Driftwood Botanical Aviary
Setup Method
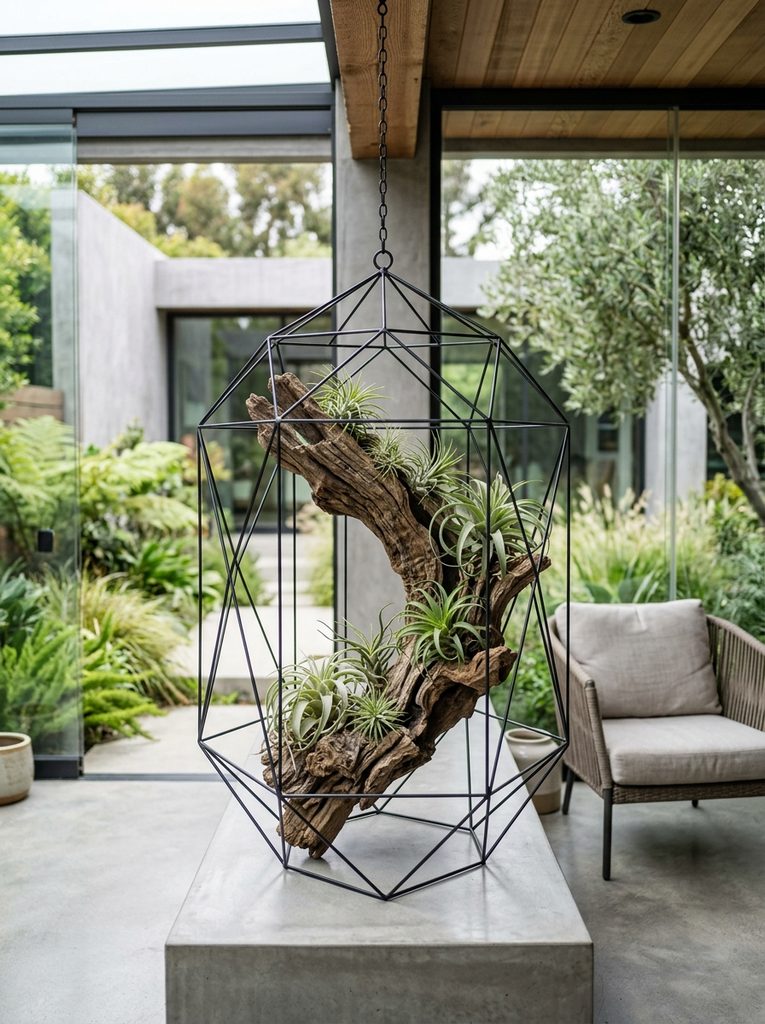
The air plant and driftwood botanical aviary creates a low-maintenance, soil-free garden art installation using diverse tillandsia species attached to natural weathered driftwood. Because air plants absorb water and nutrients directly through their leaves, they do not require soil basins or heavy coco coir liners. Suspending sculptured branches inside the open cage framework allows various tillandsia varieties—such as Tillandsia xerographica, ionantha, and bulbosa—to sit securely at different heights, creating the visual impression of exotic geometric birds resting on perches. This minimalist aesthetic is ideal for covered patios, outdoor sunrooms, and modern urban balconies.
Select a clean, contemporary bird cage with minimalist lines and a wide-spaced wire grid. Source an artfully contoured piece of natural cedar driftwood, manzanita branch, or grapevine root that fits securely inside the cage cavity. Anchor the driftwood branch horizontally and diagonally across the cage using heavy-gauge copper craft wire wrapped securely around the main frame bars. Attach diverse air plants to the wood branches using small dots of non-toxic, waterproof plant glue or by gently binding the root bases with clear monofilament line. Position larger rosette tillandsias near the base of the branch and disperse smaller varieties along the upper twigs. Mount the aviary in an outdoor area that receives bright, filtered daylight and gentle breezes, misting the air plants thoroughly three times per week with rainwater or dechlorinated tap water.
Idea 9: Seasonal Harvest Display with Gourds, Pinecones, and Burlap
Step-by-Step Guide
The seasonal harvest bird cage display provides an adaptable, rotating decorative piece that celebrates autumn and winter garden transitions through natural organic textures. The interior of the cage is styled with an assortment of miniature pumpkins, ornamental gourds, dried corn husks, pinecones, and warm burlap accents that withstand chilly outdoor temperatures. As the seasons progress, the autumn gourds can easily be swapped for evergreen boughs, holly berries, and birch logs for winter holidays. This low-maintenance display requires zero watering, making it an exceptional outdoor accent for front porches, garden steps, and patio console tables.
Start with a rustic or distressed antique metal bird cage featuring an easy-opening top lid. Line the bottom metal tray with a piece of natural woven jute burlap, fraying the edges slightly so they spill out through the bottom wire slats for organic texture. Place two large, colorful ornamental gourds or mini heirloom pumpkins in the center of the tray to act as structural anchors. Fill the surrounding spaces with assorted dried pinecones, dried seed pods, acorns, and faux berry branches, layering the smaller elements toward the top of the cage. Weave a strand of battery-operated, weatherproof warm-white mini lights through the pinecone layers, concealing the waterproof battery box beneath the burlap base. Latch the cage shut and display the finished piece on front entryway stairs or a covered porch bench.
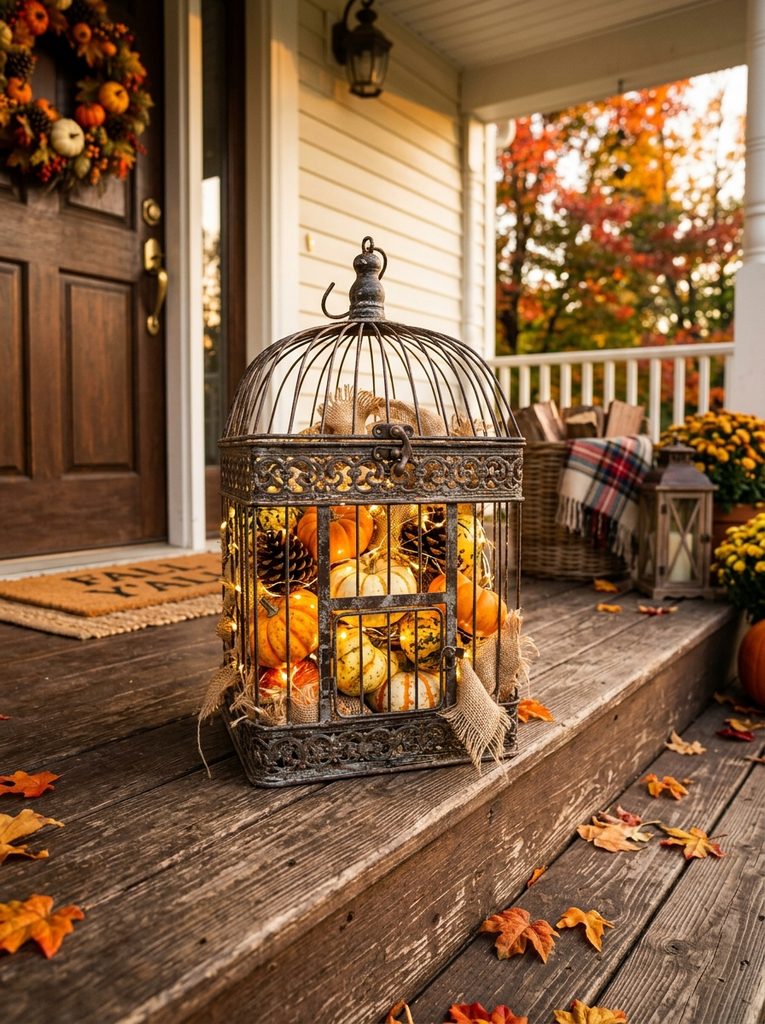
Idea 10: Rustic Candle Lantern with Weathered Pillar Accents
How to Make
The rustic candle lantern transforms a heavy cast iron or wrought iron bird cage into an atmospheric outdoor lighting feature using oversized, battery-powered LED pillar candles. By utilizing flameless candles with built-in daily timers, the display delivers warm, flickering candlelight every evening without fire hazards or messy melting wax. Surrounding the base of the candles with natural river pebbles, faux boxwood sprigs, and dried moss adds rich organic layers that ground the vertical candle shapes. This sturdy installation provides reliable, wind-resistant ambient lighting for outdoor dining tables, patio fire pit zones, and stone garden walls.
Choose a sturdy, flat-bottomed wrought iron bird cage with a secure latching front door. Place three battery-operated, outdoor-rated resin pillar candles of varying heights—such as four-inch, six-inch, and eight-inch pillars—in the center of the base tray, securing their bases with small pieces of adhesive mounting putty. Surround the candle bases with a layer of smooth decorative river stones or polished river pebbles, which adds ballast weight to keep the cage stable during windy conditions. Tuck preserved reindeer moss, faux greenery sprigs, or dried botanical cuttings into the crevices between the stones, ensuring the greenery remains clear of the candle sensors. Set the candle timers to activate automatically at your desired evening hour, close the cage latch, and position the lantern in the center of an outdoor dining table or along a stone patio border.

Common Beginner Mistakes and How to Avoid Them
When designing and executing bird cage outdoor garden art, several common technical mistakes can compromise the longevity, safety, and visual appeal of the installation. One frequent error is neglecting proper rust prevention on metal cages before planting; unsealed iron wire exposed to damp potting soil and regular watering will corrode rapidly, staining patio stones and causing structural failure within a single season. To avoid this, always coat both interior and exterior metal surfaces with a rust-inhibiting primer and exterior-grade enamel spray before adding plants. Another common mistake is failing to provide adequate drainage in the base tray; solid metal or plastic trays hold stagnant water, leading to root rot in succulents, ferns, and herbs. Always drill multiple quarter-inch drainage holes in solid base trays, or use porous coco coir and sphagnum moss liners that allow water to filter through freely. Beginners also tend to use lightweight hanging hardware that cannot support the significant weight of wet soil and mature plants; always utilize heavy-duty galvanized steel chains and load-bearing ceiling hooks anchored directly into solid wood studs or masonry.
Practical Tips for Better Results
Achieving professional, long-lasting results with bird cage garden decor relies on disciplined material selection, plant zoning, and routine structural maintenance. When selecting living plants for enclosed cages, always group species with identical light and moisture requirements together; never mix high-drainage succulents with moisture-loving ferns in the same container. Incorporate lightweight soil amendments—such as perlite, pumice, and vermiculite—into your potting mixes to reduce the overall hanging weight while improving aeration for plant root systems. When styling with artificial lights, always choose fixtures rated specifically for outdoor wet locations with copper wiring to prevent moisture short-circuits during rainstorms. To refresh the appearance of living succulent and ivy cages throughout the growing season, prune back leggy vines regularly and use a diluted liquid organic fertilizer once a month. Inspect suspension chains, swivel hooks, and cage hinges every spring, tightening loose hardware and replacing worn components to keep your garden art hanging safely.
+--------------------------------------------------------------------+
|               BIRD CAGE GARDEN ART MAINTENANCE PROTOCOL            |
+--------------------------------------------------------------------+
|  1. Apply rust-inhibiting metal primer before initial planting.   |
|  2. Drill 1/4-inch drainage holes in solid base trays.             |
|  3. Group plants by shared sunlight and watering requirements.     |
|  4. Use outdoor-rated, waterproof battery packs & LED lighting.    |
|  5. Inspect hanging chains and ceiling hooks annually for wear.    |
+--------------------------------------------------------------------+
Styling, Presentation, or Organization Ideas
Styling bird cage garden art effectively requires thoughtful integration with surrounding landscape architecture, floral color palettes, and functional patio layouts. For visual impact, cluster three bird cages of varying heights and geometric shapes together in a garden corner, creating a multi-tiered focal display that guides the eye through different vertical levels. Mount hanging cages at staggered heights along a covered porch beam using black powder-coated steel chains, alternating between illuminated solar lanterns and lush living fern planters for rhythmic balance. When presenting tabletop centerpieces, pair rustic wire cages with natural linen runners, wooden chargers, and terracotta accent pots to establish a cohesive botanical dining aesthetic. In small garden beds, position a single large pagoda-style cage atop an antique stone plinth or weathered timber post to serve as a visual anchor among low-growing flowering perennials. Store seasonal filler materials—such as spare moss liners, floral wire, and extra LED fairy lights—in labeled, moisture-proof plastic storage bins in your garden shed for streamlined seasonal decor swaps.
Budget or Time Planning
Creating custom bird cage garden art is an economical, time-efficient DIY project that delivers high-end landscape appeal on a modest budget. Sourcing pre-owned bird cages from thrift stores, flea markets, garage sales, or online community marketplaces typically costs between ten and twenty-five dollars, significantly reducing upfront expenses compared to purchasing new decorative garden sculptures. A basic botanical or illuminated bird cage transformation requires approximately two to three hours of hands-on labor, which includes metal cleaning, spray painting, moss lining, soil filling, and plant installation. Budgeting an additional twenty to thirty-five dollars for rust-preventative spray paint, sphagnum moss, potting soil, and beginner-friendly starter plants allows you to complete a stunning, durable installation for under sixty dollars total. By spreading project tasks across a single weekend—prepping and painting metal frames on Saturday morning and planting or wiring lights on Sunday afternoon—you ensure adequate drying times and a smooth, enjoyable DIY experience.
Creative Expansion and Advanced Inspiration
Once you have mastered foundational bird cage garden art techniques, several creative expansions and advanced design variations can elevate your outdoor living spaces even further. Advanced creators can integrate miniature solar-powered water pumps into wide cage bases, creating multi-tiered trickling water fountains framed by climbing creeping fig and river stones. Another innovative avenue involves constructing miniature fairy garden landscapes within large Victorian-style cages, complete with tiny stone pathways, miniature wooden benches, and micro-flowering groundcovers like thyme and Irish moss. You can also explore seasonal color-shifting themes, transitioning a summer trailing petunia cage into an autumn ornamental pepper display, followed by an illuminated evergreen winter lantern. As your horticultural and crafting skills expand, combining diverse textures like copper pipe supports, stained glass accents, and rare epiphytic orchids will transform your garden cages into bespoke, heirloom-quality botanical installations that evolve beautifully with every passing season.